

This user guide provides detailed instructions on how to efficiently create a procedure using the DigiMEDSPA Portal.
Understanding Terminologies
- Procedure
A procedure is a professionally administered health or cosmetic treatment performed under medical supervision to improve wellness, skin health, or physical appearance.
Part 1 of 4
Create a Procedure Through EMR Board
-
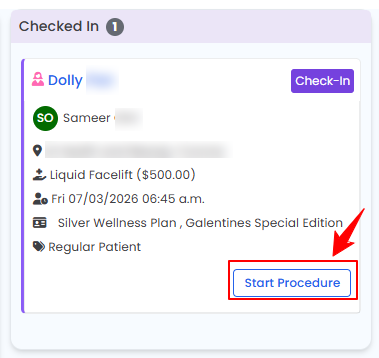
The user can create a procedure through the EMR Board. From the EMR Board select a booking that is in the ‘’Checked In’’ step then press the ‘’Start Procedure’’ button to move that booking to the ‘’In Procedure’’ phase.
-
Choose the Body Area from the dropdown menu and click “Start Procedure.”
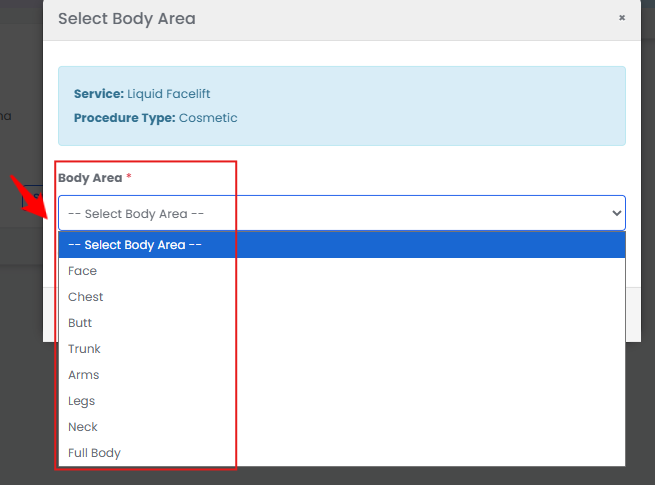 NoteFor services without a selected procedure type, you will be prompted to choose the procedure type at this step.
 -
You will be directed to the Procedure View Screen in the patient profile, where all procedure sections are displayed.
-
Procedure Images/ Videos
-
To mark images, first upload them in the Procedure Images/Videos section. Click “Upload Images” or “Upload After Images” to proceed.
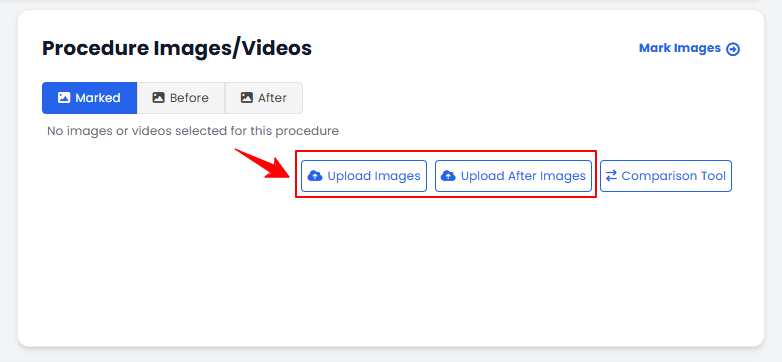 NoteTo view and compare before-and-after images of a procedure, click the “Comparison Tool” button. For step-by-step guidance on how to use this feature, refer to the article “Compare Before and After Images Using the Comparison Tool.”
 -
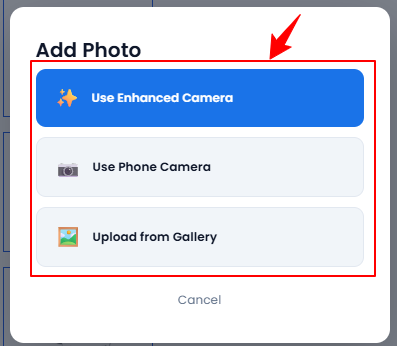
Click the “+” icon to add photos. A pop-up will appear, allowing you to choose how you want to upload the images. Select “Use Enhanced Camera,” “Use Phone Camera,” or “Upload from Gallery.”
-
Upload images from different angles, select the desired images, and click “Save.”NoteTo upload additional images, click the “+ Add Image” button at the bottom of the screen. A pop-up window will open where you can upload your image and enter a label. Once finished, click “Add Image” to save it.
-
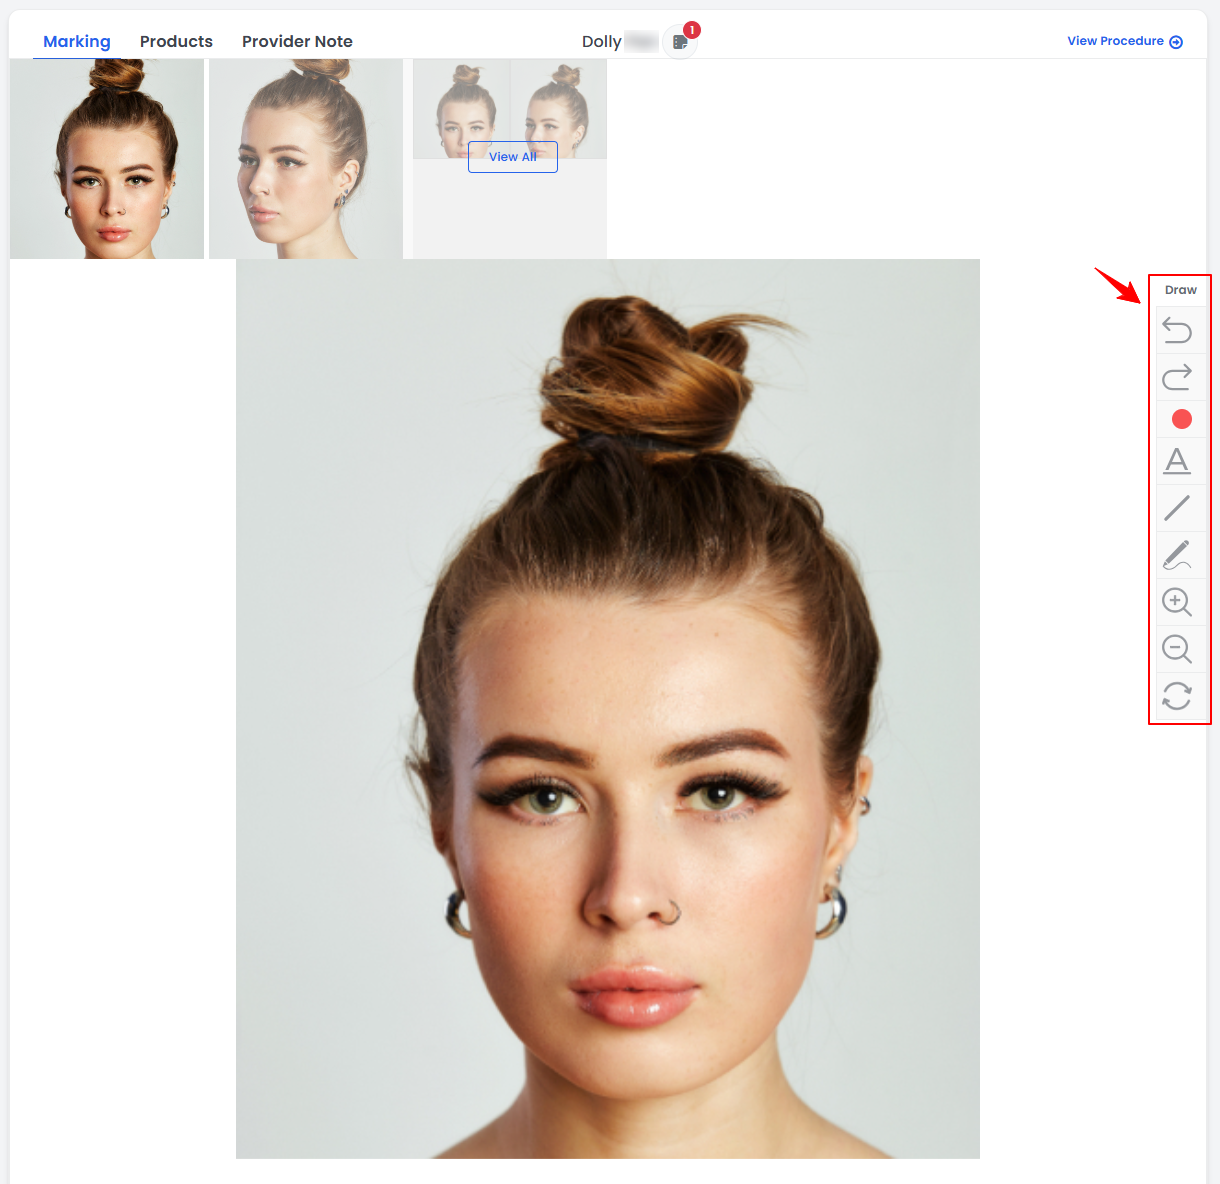
The “Marking Screen” will open, allowing the user to precisely chart drugs (products) and injection markings on the selected image for use during the procedure. Users can also utilize the drawing tools on the Marking Screen to annotate or highlight treatment areas.
-
The user can use the following drawing tools on the Marking Screen to enhance precision and clarity:
“Undo” reverts the last action performed on the Marking Screen, such as removing a drawing or marking.
“Redo” restores the last action that was undone, allowing you to reapply the previous change.
“Text”, denoted by “A” enables you to add text annotations directly on the Marking Screen, useful for labeling specific areas or providing additional notes.
“Draw” allows freehand drawing on the Marking Screen, letting users visually mark treatment areas or illustrate procedure details.
“Zoom In” magnifies the Marking Screen to provide a closer view, helping with precise markings.
“Zoom Out” reduces the zoom level to show a broader view of the Marking Screen, giving a clearer overview of the entire area being charted.
“Reset Text & Drawing” clears all text and drawing annotations on the chart, returning it to its original state.NoteFor detailed instructions on using the draw tool in the Marking Screen, refer to the article “Use the Draw Tool for Charting.”
-
-
Procedure Products
-
On the Procedure View Screen, add procedure products by clicking “Add Product” in the Procedure Products section.

-
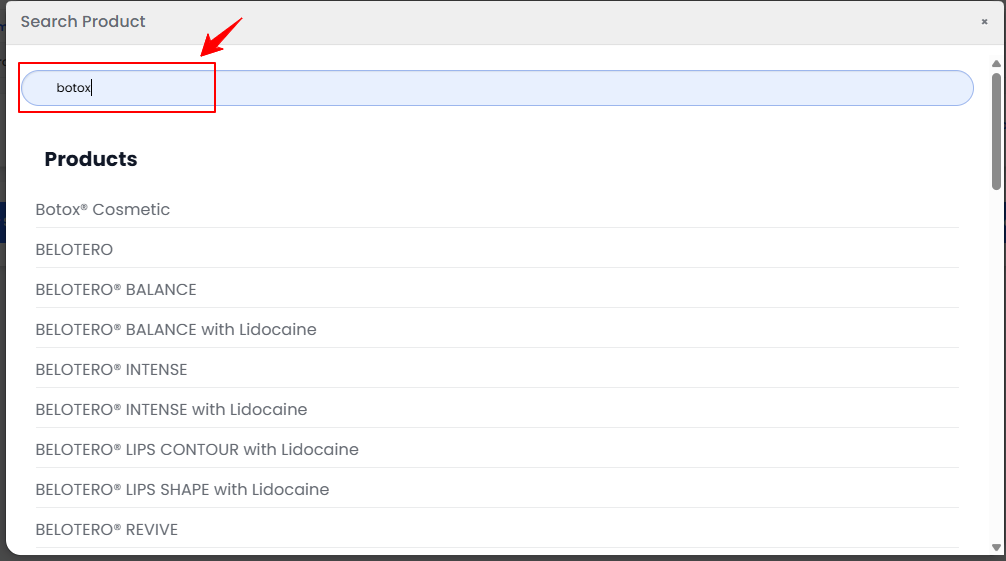
You will be taken to the Products tab. Click “Add Product,” then search for and select the desired product.
-
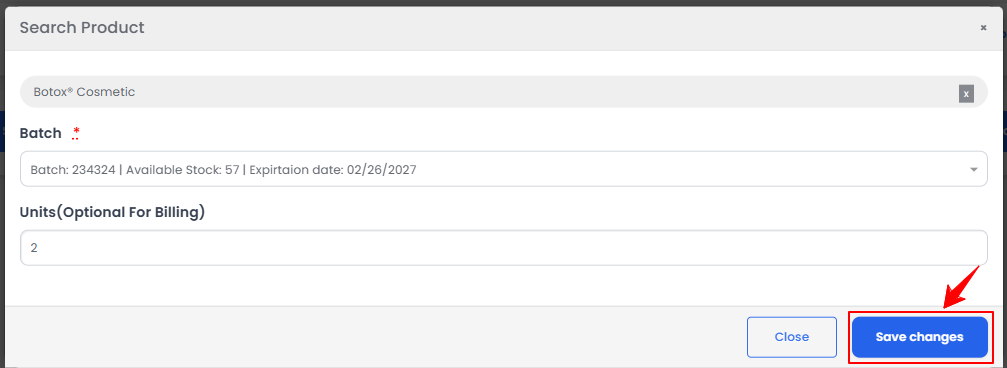
Select a batch from the dropdown, enter the units, and click “Save Changes.”
 NoteProducts can also be added the same way from the Marking Screen. The products added during charting will also be displayed in the Products tab.
-
-
Intake Forms
-
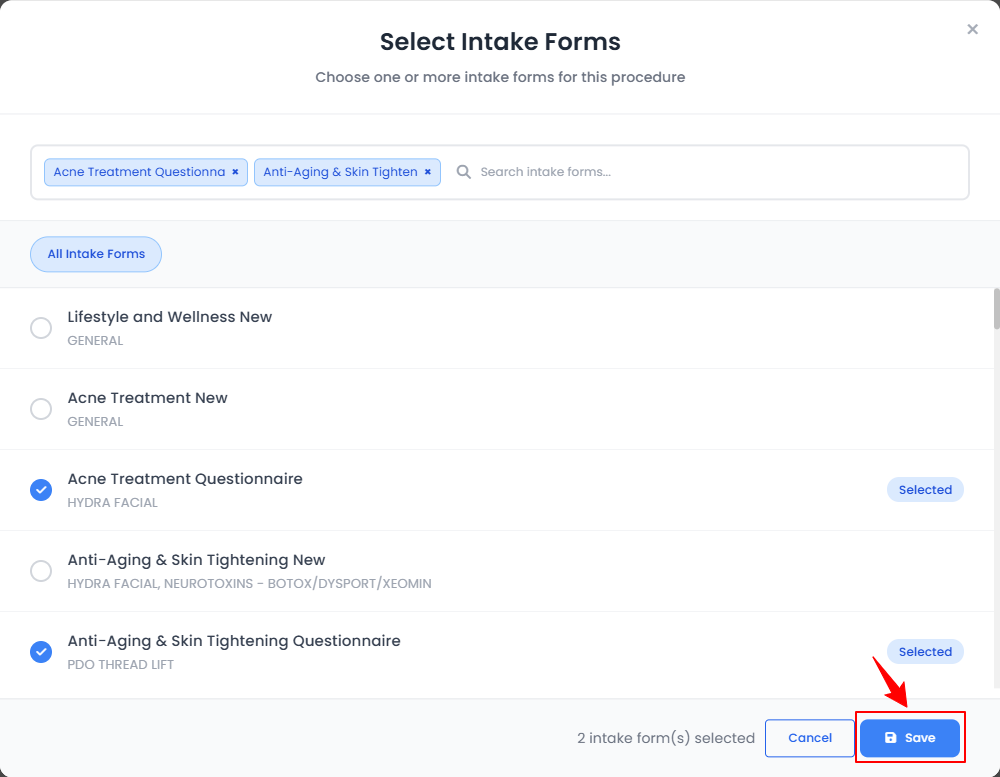
On the Procedure View Screen, add an intake form to the procedure by clicking “Add Intake Form” in the Intake Forms section.

-
Select the desired intake forms and click “Save.”
-
The intake form will be added. Click “Fill Intake Form” to complete it.NoteA “Intake Form” is a structured set of questions used to gather a patient’s medical history, skin concerns, and treatment preferences before a procedure. For full instructions on creating and managing questionnaires, refer to the article “Manage Intake Forms.”
-
-
Consents
-
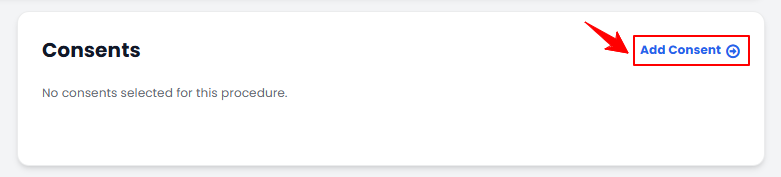
On the Procedure View Screen, add a consent form to the procedure by clicking “Add Consent” in the Consents section.
-
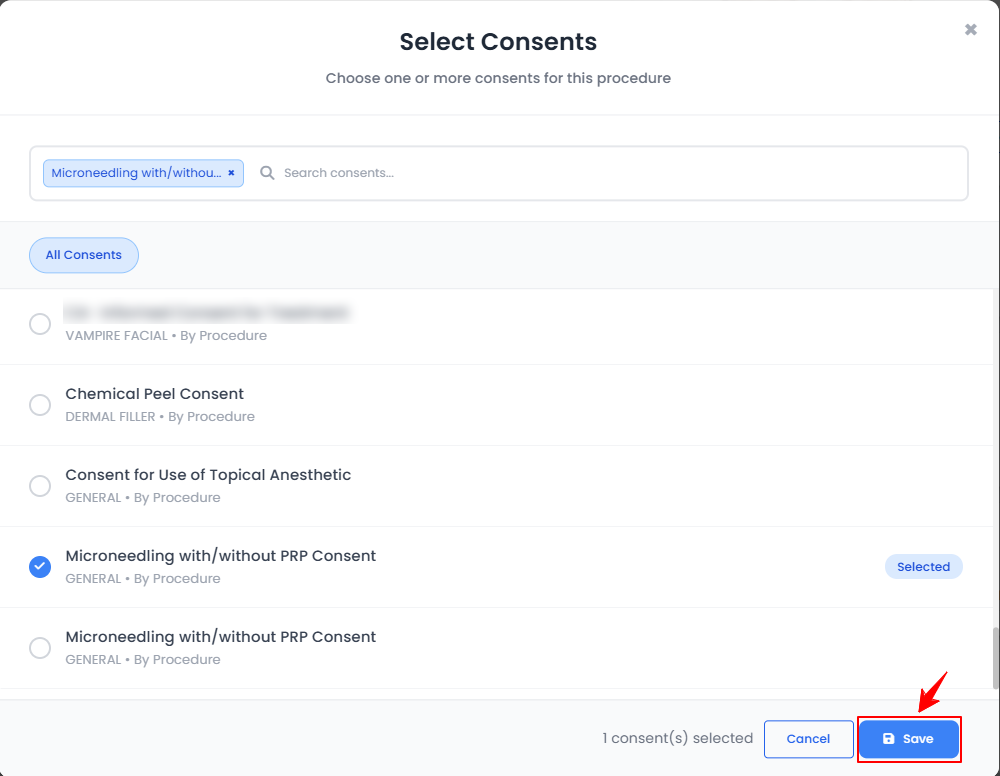
Select the desired consents and click “Save.”
-
The consent will be added. To sign, click “Sign Consent,” or choose “Sign All Consents” to sign multiple consents at once.Note“Consents” are formal documents signed by patients to acknowledge understanding and agreement to undergo a specific treatment or procedure. For full instructions on creating and managing consents, refer to the article “Manage Consent Forms.”
-
-
Provider Note
-
On the Procedure View Screen, add a provider note by clicking “Add Provider Note” in the Provider Note section.

-
Enter the required information in the Provider Note field and click “Save” to confirm.NoteProvider notes are written observations, comments, or details recorded during a procedure to document important patient treatment information. For complete guidance on adding a provider note during procedure charting, refer to the article “Add / Edit a Provider Note for a Procedure.”
-
To access “dot phrases,’’ type a dot (.) in notes. These pre-created phrases will appear in a dropdown menu, allowing you to quickly select and insert repetitive notes instead of typing them manually.NoteTo use Dot Phrases, you must first create and save them in the Dot Phrases List within Clinical Documentation in the portal. Once saved, simply type a dot (.) to insert them. For step-by-step guidance, refer to the “Manage Dot Phrases” tutorial.
-
-
e-Prescribing
-
The e-Prescribing section shows the prescription details of the drugs prescribed by the provider for this procedure.
-
-
Documents
-
To add a document to the procedure, click “Add Document” in the Documents section.

-
Enter the document details (name, description, type, optional appointment, expiration date), optionally pin it, attach a file if needed, then click “Create Document” to save it to the patient profile.Note“Documents” refer to medical and administrative records associated with a patient’s care. These may include medical history, consent forms, questionnaires, prescriptions, invoices, insurance details, membership agreements, and other essential files that support treatment, compliance, and record-keeping. For step-by-step instructions on creating a new document, refer to the article “Attach Documents or Files to a Patient's Profile.”
-
-
Lab Panels
-
To order a lab panel, click “Order Lab Panel.” To add a lab order, click “Add Lab Order.”

-
-
Patient Vitals
-
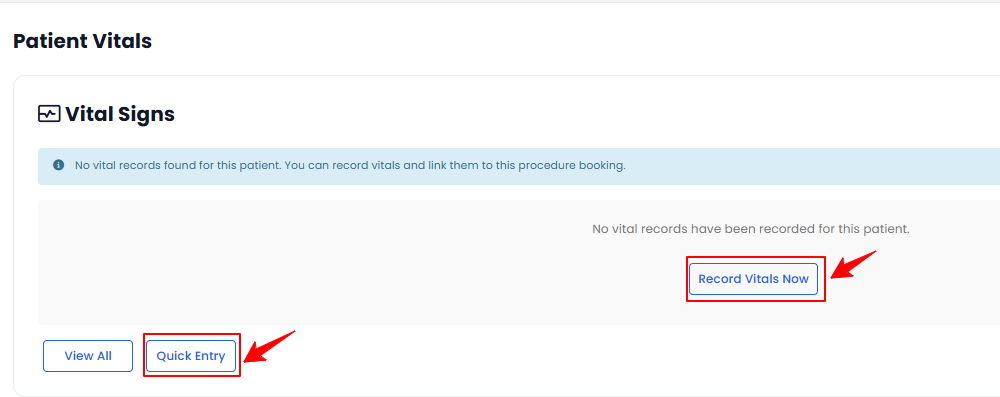
To add patient vitals, click “Record Vitals Now” to open the full patient vitals form. For a quicker entry, click “Quick Entry” to open a short pop-up form, fill in the vitals, and click “Save Vitals.”
 Note“Patient vitals” refer to essential measurements that indicate the body’s basic functions and overall health status. Common vitals include temperature, blood pressure, heart rate, respiratory rate, and other key indicators used to monitor a patient's physical condition over time. For step-by-step instructions on adding patient vitals, refer to the article “Add / View / Edit / Delete Patient Vitals.”
-
Part 2 of 4
Create a Procedure Through Patient List Screen
-
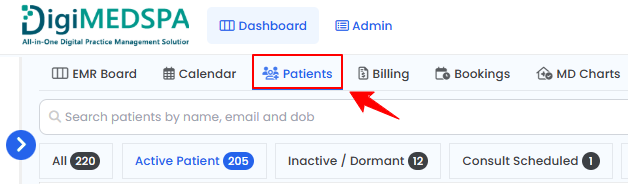
The user can create a procedure through the Patient List Screen. From the EMR Board Tabs, select “Patients.”
-
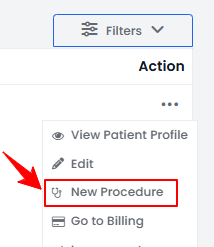
To create a procedure for a specific patient from the list, click the three dots under the action column and select "New Procedure."
-
The patient details will be automatically filled in. Complete the booking details by selecting an existing booking from the dropdown menu, or click “Create New Booking” to access the full booking form.
-
Complete the booking form by selecting the Location, Services, Provider, and an Available Slot.NoteFor detailed instructions on creating a booking, refer to the article “Book an Appointment Through New Booking.”
-
Enter a Procedure Name, select a Provider from the dropdown menu, then select the Procedure Type from the dropdown menu.
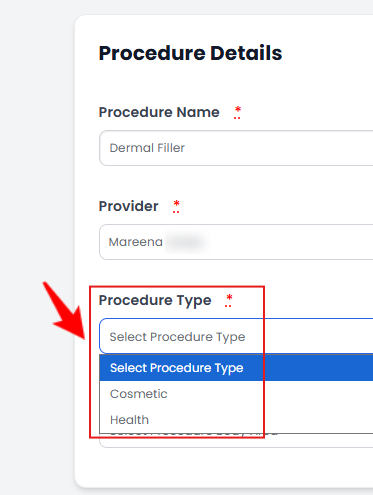 Note“Health Procedure” is a procedure performed to maintain or improve a patient’s health, treat medical conditions, or support overall wellness. “Cosmetic Procedure” is a procedure aimed at enhancing or improving a patient’s appearance for aesthetic purposes.
 -
Select the Body Area from the dropdown, then click “Save” to save the data, or “Save & Chart” to proceed to upload images and access the Marking Screen.
Part 3 of 4
Create a Procedure Through Bookings List Screen
-
The user can create a procedure through the Bookings List Screen. From the EMR Board Tabs, select “Bookings.”

-
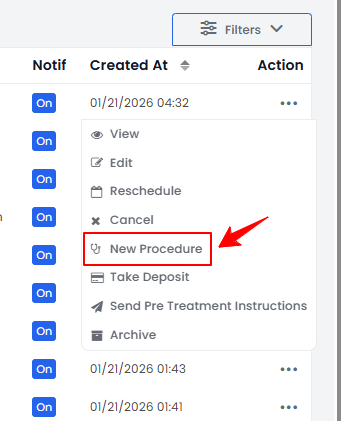
From the booking list, navigate to the desired booking. Click the three dots under Action and select “New Procedure.”
-
The patient and booking details will be automatically filled in. Complete the procedure details, including Procedure Name, Provider, Procedure Type, and Body Area. Click “Save” to save the information, or “Save & Chart” to proceed with uploading images and accessing the Marking Screen.
Part 4 of 4
Edit a Procedure
-
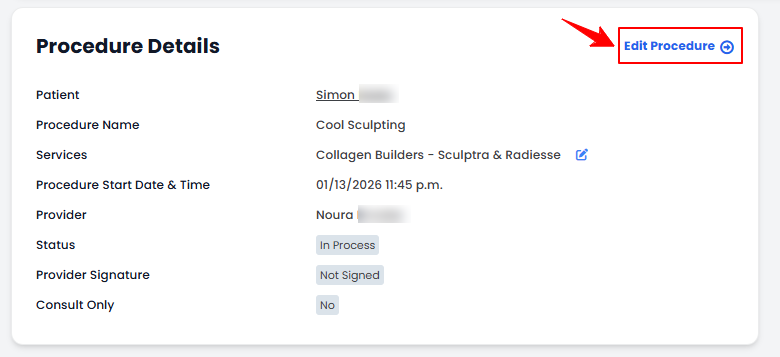
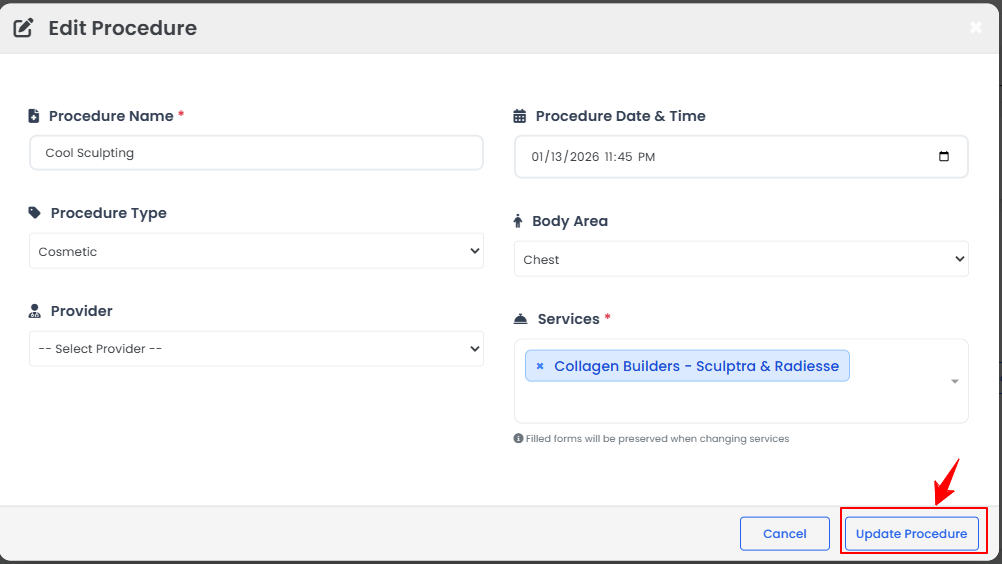
On the Procedure View screen, navigate to the Procedure Details section and click “Edit Procedure.”
-
Make the necessary changes, then click “Update Procedure” to save the updates.
 The procedure has been successfully edited!
You’re all set
That’s every step of “Create a New Procedure”. Up next: Add / Edit / Move Injection Markings.