

 DigiMEDSPA EMR
 DigiMEDSPA CONNECT ™
Naming a Procedure
This user guide provides detailed step-by-step instructions on how to properly name a procedure in the DigiMEDSPA Portal.
Understanding Terminologies
Naming a Procedure
Naming a procedure refers to assigning a clear and specific name to the treatment or service offered at a Med SPA (e.g. Botox Injections, Laser Skin Resurfacing, Chemical Peel). Naming is important because it helps both providers and patients to easily identify and understand the procedure. A well-defined name clarifies what the treatment entails, making it easier for the Med SPA to manage bookings, documentation, and patient communication.
Access this link: https://digimedspa.com/ap2/patients
Name a Procedure Through Patient List Screen
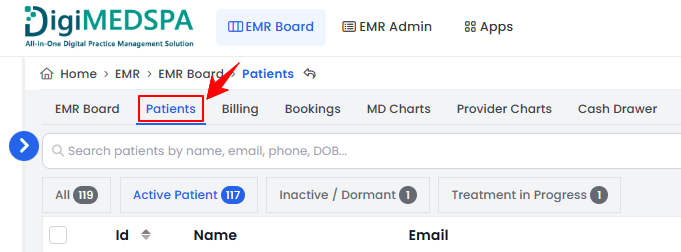
- The user can name a procedure through the Patient List Screen. From the EMR Board Tabs, select “Patients.”

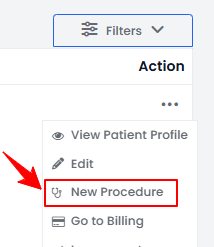
- To create a procedure for a specific patient from the list, click the three dots under the action column and select "New Procedure."
- The patient details will be automatically filled in. Complete the booking and procedure details. Enter a Procedure Name, select a Provider from the dropdown menu, then select the Procedure Type from the dropdown menu.
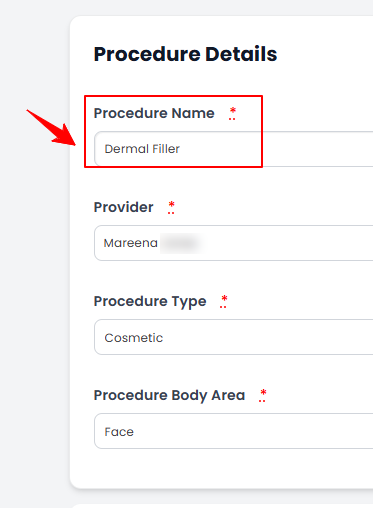
- Select the Body Area from the dropdown, then click “Save” to save the data, or “Save & Chart” to proceed to upload images and access the Marking Screen.
The procedure has been successfully named!
Name a Procedure Through Bookings List Screen
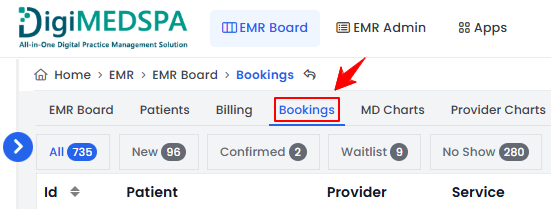
- The user can name a procedure through the Bookings List Screen. From the EMR Board Tabs, select “Bookings.”
- From the booking list, navigate to the desired booking. Click the three dots under Action and select “New Procedure.”
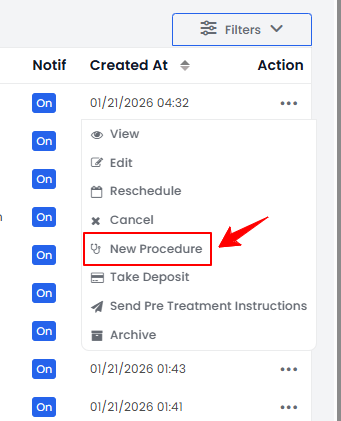
- The patient and booking details will be automatically filled in. Complete the procedure details, including Procedure Name, Provider, Procedure Type, and Body Area. Click “Save” to save the information, or “Save & Chart” to proceed with uploading images and accessing the Marking Screen.
The procedure has been successfully named!
Edit Procedure Name Through Procedure View Screen
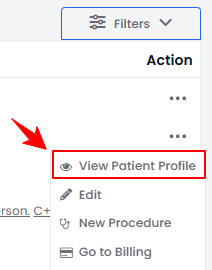
- The user can edit an existing procedure’s name through the Procedure View Screen. From the EMR Board Tabs, select “Patients.’’
- From the patient list, click on three dots under the action column and select "View Patient Profile" for the specific patient, or simply click anywhere on the patient’s data.
- On the Patient Information Screen, users can access a comprehensive summary of all patient details. To access the procedures, simply click on the ‘’Procedures’’ tab.

- Here, you will find all procedures for the patient. Click “Edit Procedure” under the Procedure Details section.

- Edit the Procedure Name, then click “Update Procedure” to save the updates.
The procedure has been successfully named!