

 DigiMEDSPA EMR
 DigiMEDSPA CONNECT ™
Attach a Booking to a Procedure
This user guide provides step-by-step instructions on how to attach a booking to a procedure for accurate scheduling, billing, and record-keeping within the DigiMEDSPA Portal.
Understanding Terminologies
Booking
A booking refers to the scheduled appointment made by a patient for a specific procedure or service. This can be done online, over the phone, or in-person, and it includes details such as the time, date, and type of service requested, allowing the Med SPA to allocate time and resources for the patient’s visit.
Procedure
A procedure in a Med SPA is any service provided to patients aimed at improving their aesthetic appearance or wellness. This can range from non-invasive procedures like facials and laser therapy to injectables, skin resurfacing, or body contouring, and is typically administered by licensed professionals.
Attach a Booking to a Procedure Through Patient List Screen
- The user can attach a booking to a procedure through Patient List Screen accessible from two entry points.
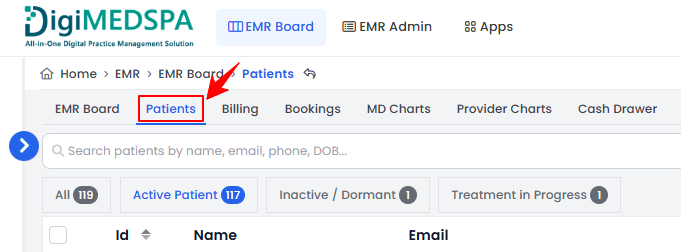
- From the EMR Board Tabs, select “Patients.”

- From the Left Navigation, click on the “EMR Board” dropdown menu and select “Patients.” Alternatively, you can type “Patients” into the search bar in the Left Navigation.
- From the EMR Board Tabs, select “Patients.”
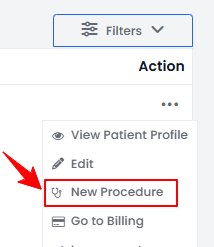
- To create a procedure for a specific patient from the list, click the three dots under the action column and select "New Procedure."
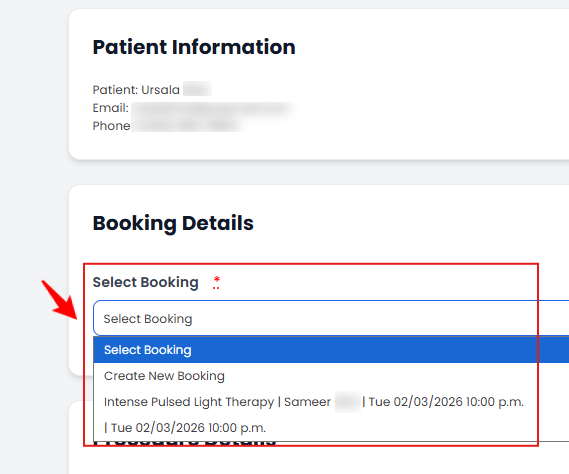
- The patient details will be automatically filled in. Complete the booking details by either creating a new booking or selecting an existing one from the dropdown menu. Any bookings already scheduled for that patient will appear in the dropdown, allowing the user to select one and attach it to the procedure.
- Complete the procedure details, and click “Save” to save the data, or “Save & Chart” to proceed to upload images and access the Marking Screen.
The booking has been successfully attached to the procedure!
Attach a Booking to a Procedure Through Booking List Screen
- The user can attach a booking to a procedure through Booking List Screen accessible from two entry points.
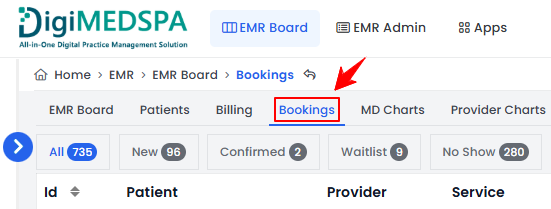
- From the EMR Board Tabs, select “Bookings.”
- From the Left Navigation, click on the “EMR Board” dropdown menu and select “Bookings.” Alternatively, you can type “Bookings” into the search bar in the Left Navigation.
- From the EMR Board Tabs, select “Bookings.”
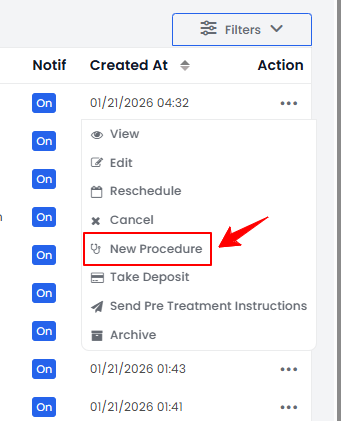
- From the booking list, navigate to the desired booking. Click the three dots under Action and select “New Procedure.”
- The patient and booking details will be automatically filled in. Complete the procedure details and click “Save” to save the information, or “Save & Chart” to proceed with uploading images and accessing the Marking Screen.
The booking has been successfully attached to the procedure!