

 DigiMEDSPA EMR
 DigiMEDSPA CONNECT ™
Manage Product Categories
This user guide offers step-by-step instructions on how to add, view, and edit product categories in the DigiMEDSPA Portal, ensuring accurate organization and management of products.
Understanding Terminologies
Product Category
Product category refers to a group of similar or related products organized under a specific classification. Product categories help organize items such as skincare products, injectables, equipment, and treatment tools. Categorizing products makes it easier to manage inventory, streamline the selection process, and ensure that patients and providers can quickly find the right products for procedures.
Access this link: https://digimedspa.com/ap2/product_categories
Add a Product Category
- The user can add a product category by accessing the Product Categories List Screen from two entry points.
- From the EMR Admin, click on “Product Categories” under “Products & Inventory.’’

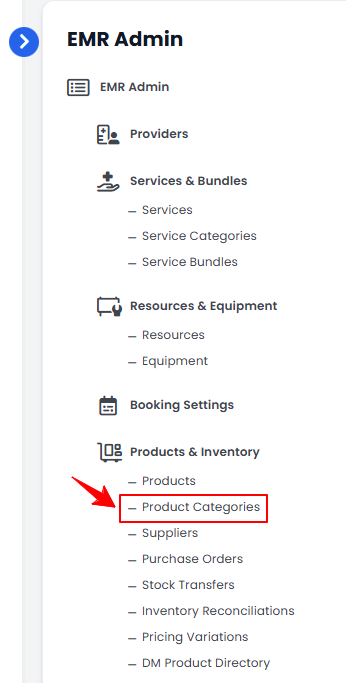
- From the Left Navigation, open the “EMR Admin” dropdown menu, select “Products & Inventory,’’ and then choose “Product Categories” from the subsequent dropdown menu. Alternatively, you can type “Product Categories” into the search bar in the Left Navigation.
- From the EMR Admin, click on “Product Categories” under “Products & Inventory.’’
- To add a new product category, click "New Product Category" in the top right corner of the screen.
- Provide a clear and appropriate Category Name for the product category to ensure it accurately reflects the products included. Select “Active” if the product category is available and visible throughout the portal for selection and use.
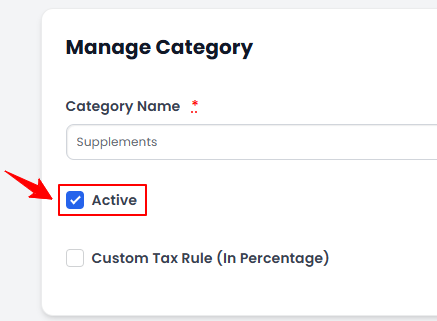 Note: If "Active" is not check marked, the product category will remain inactive and will not be visible or selectable anywhere in the portal until it is marked active.
 - Select “Custom Tax Rule (In Percentage)” if a custom tax is applied to the product category. Once selected, separate fields for each location will open. Enter the custom tax percentage for each location, as it may vary from location to location. Click “Create Product Category” to save your new category.Note: A “custom tax rule (in percentage)” for a product category is a specific tax rate applied to products within that category. This percentage-based tax can vary by location, ensuring compliance with local tax regulations.The Product Category has been successfully added!
View a Product Category
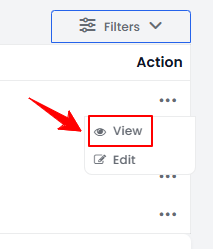
- To view a product category, click the three dots under the action column next to the specific product category and select '’View” or simply click anywhere on the product category’s data.
- The Product Category View Screen will open, displaying all the details of the product category.
Check Status of Product Categories
- To check the status of the product categories, go to the top scopes bar on the product categories listing and review the status indicators for the status updates.
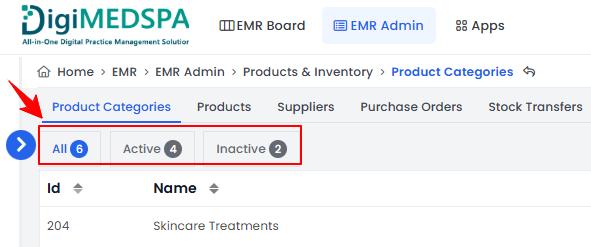
- Click on the “Active” scope to view the list of all product categories that are active.
- Click on the “Inactive” scope to view the list of all product categories that are inactive in the portal.Note: Inactive product categories will be unavailable for selection when creating a new product in the portal.
Edit a Product Category
- You can edit an existing product category from two entry points.
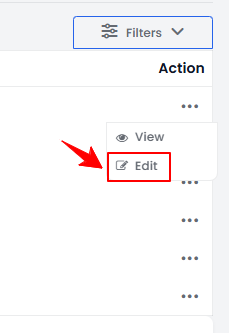
- From the product categories list, click on three dots under the action column and select "Edit" for the specific product category.
- On the View Product Category Screen, click on the ‘’Edit Product Category’’ button on the top right corner of the screen.
- From the product categories list, click on three dots under the action column and select "Edit" for the specific product category.
- Make the necessary changes and click "Update Product Category" to save the updates.
The product category has been successfully edited!
Attach a Product Category to a Product
- From the EMR Admin, click on “Products” under “Products & Inventory.’’
- Click the "New Product" button to add a product, or select an existing product from the list to edit.
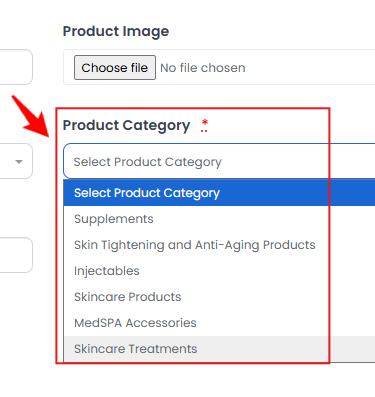
- In Step 1 of creating or editing a product, choose the appropriate Product Category from the dropdown menu after entering the product details.
 Note: For detailed instructions on creating and editing a product, refer to “Add / View / Edit Product” article.The product category has been successfully attached to the product!