Create a Cosmetic Procedure
DigiMEDSPA EMR Portal allows you to create two types of procedures: Cosmetic and Health. Creating accurate procedures ensures that patient records are properly documented and managed according to the specific needs of the treatment. This user guide provides detailed, step-by-step instructions on how to efficiently create a cosmetic procedure.
Understanding Terminologies
Cosmetic Procedures
They are typically focused on esthetic treatments, such as injectables (e.g., Botox, fillers) or skin rejuvenation therapies. These procedures often require photo documentation to track progress and results, as well as injection markings to ensure precise application. Accurate records for cosmetic treatments are essential for maintaining patient satisfaction, ensuring safety, and adhering to regulatory standards.
Health Procedures
These procedures, on the other hand, focus on medical or wellness-related treatments that do not require photo documentation or injection markings. These may include services such as health assessments, wellness treatments, or other non-aesthetic medical procedures.
Create a Cosmetic Procedure
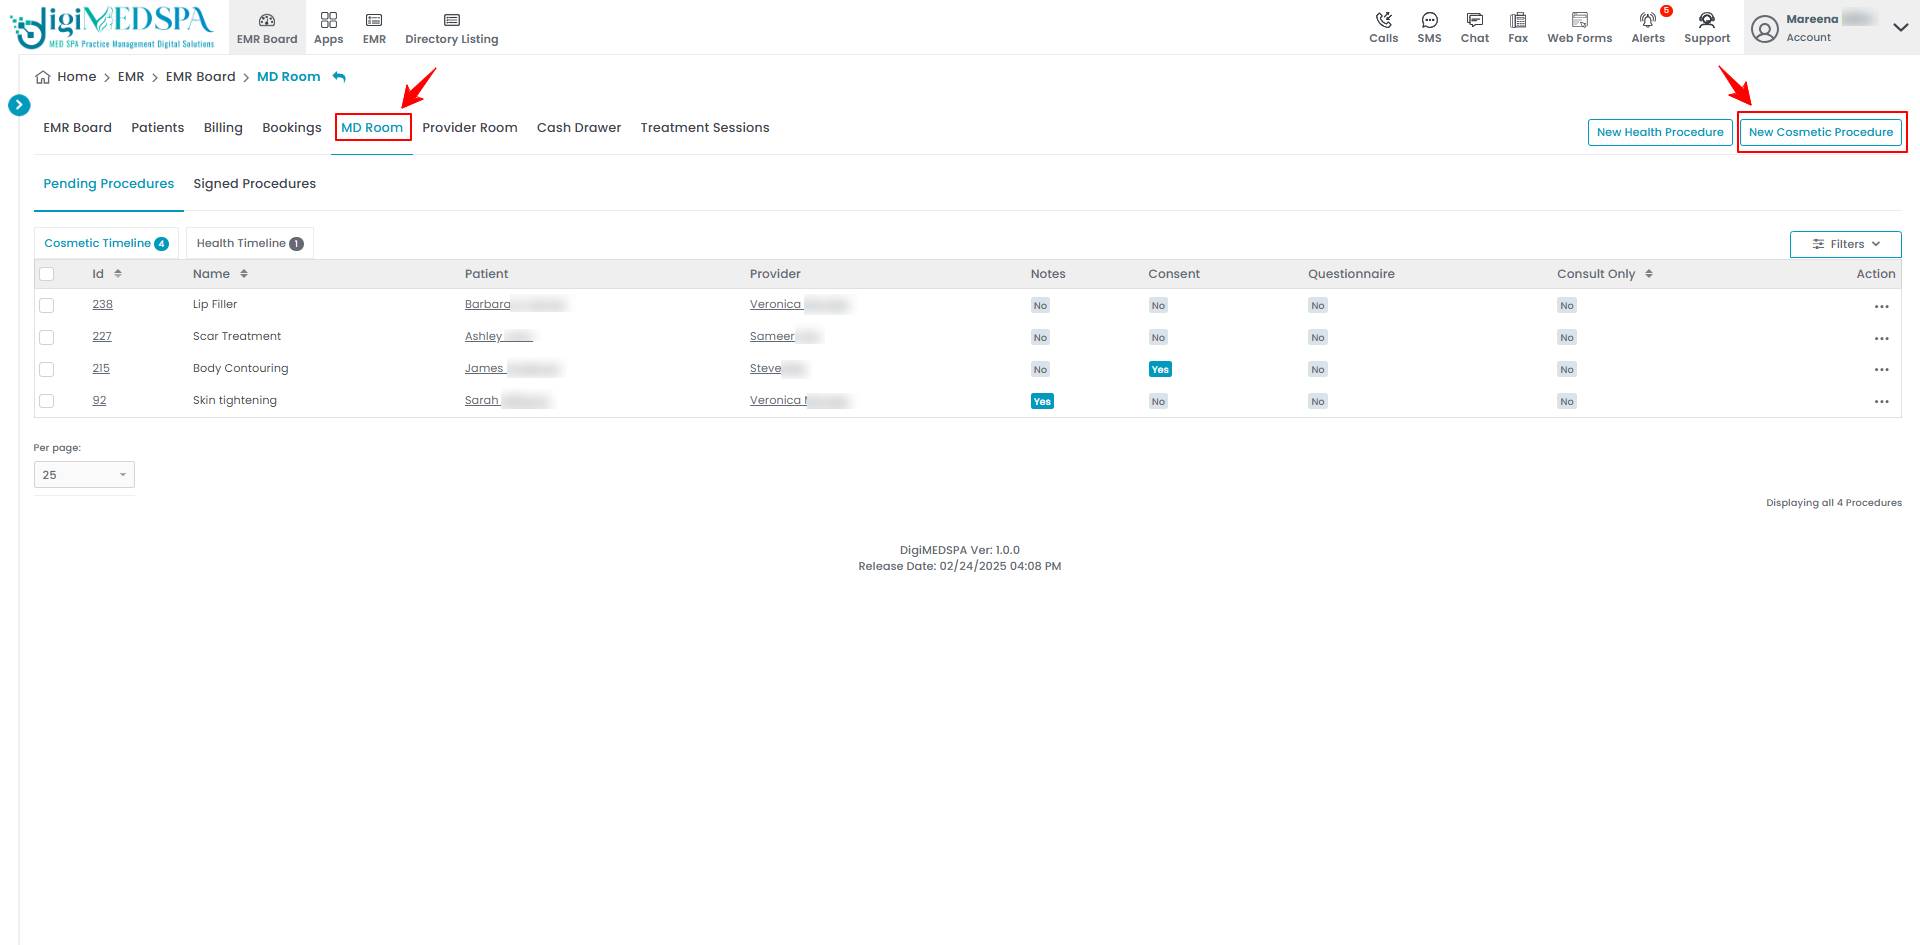
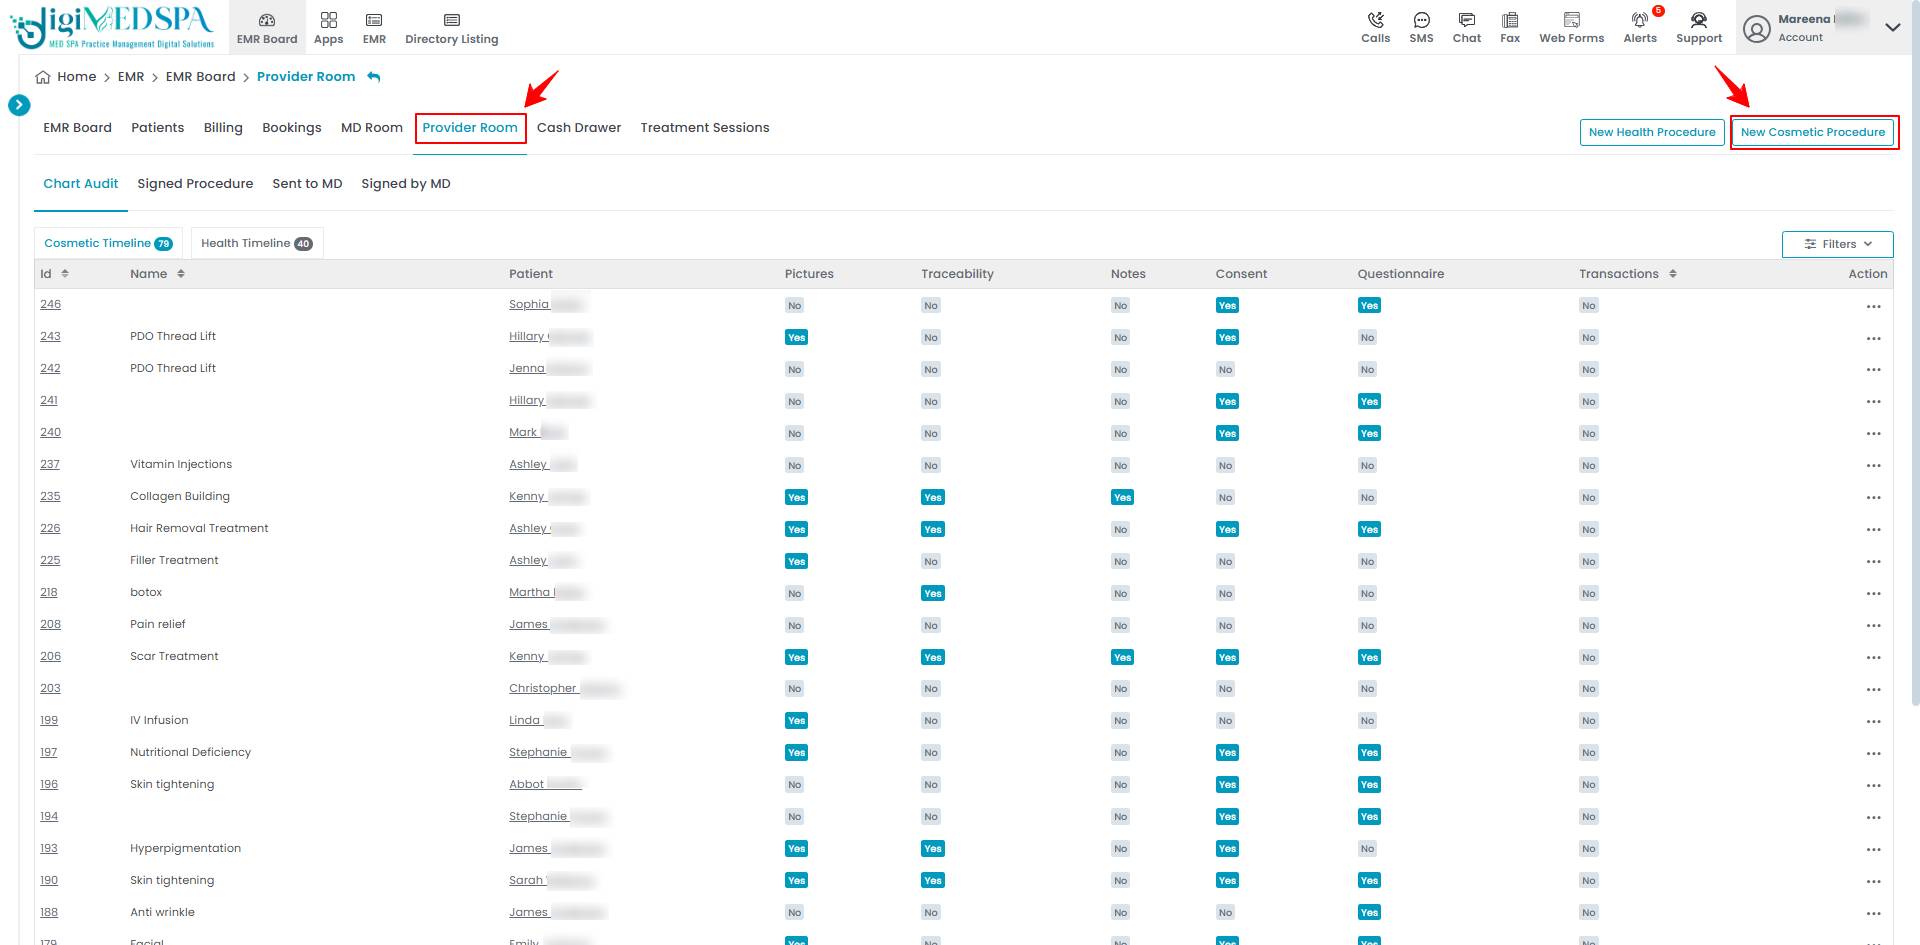
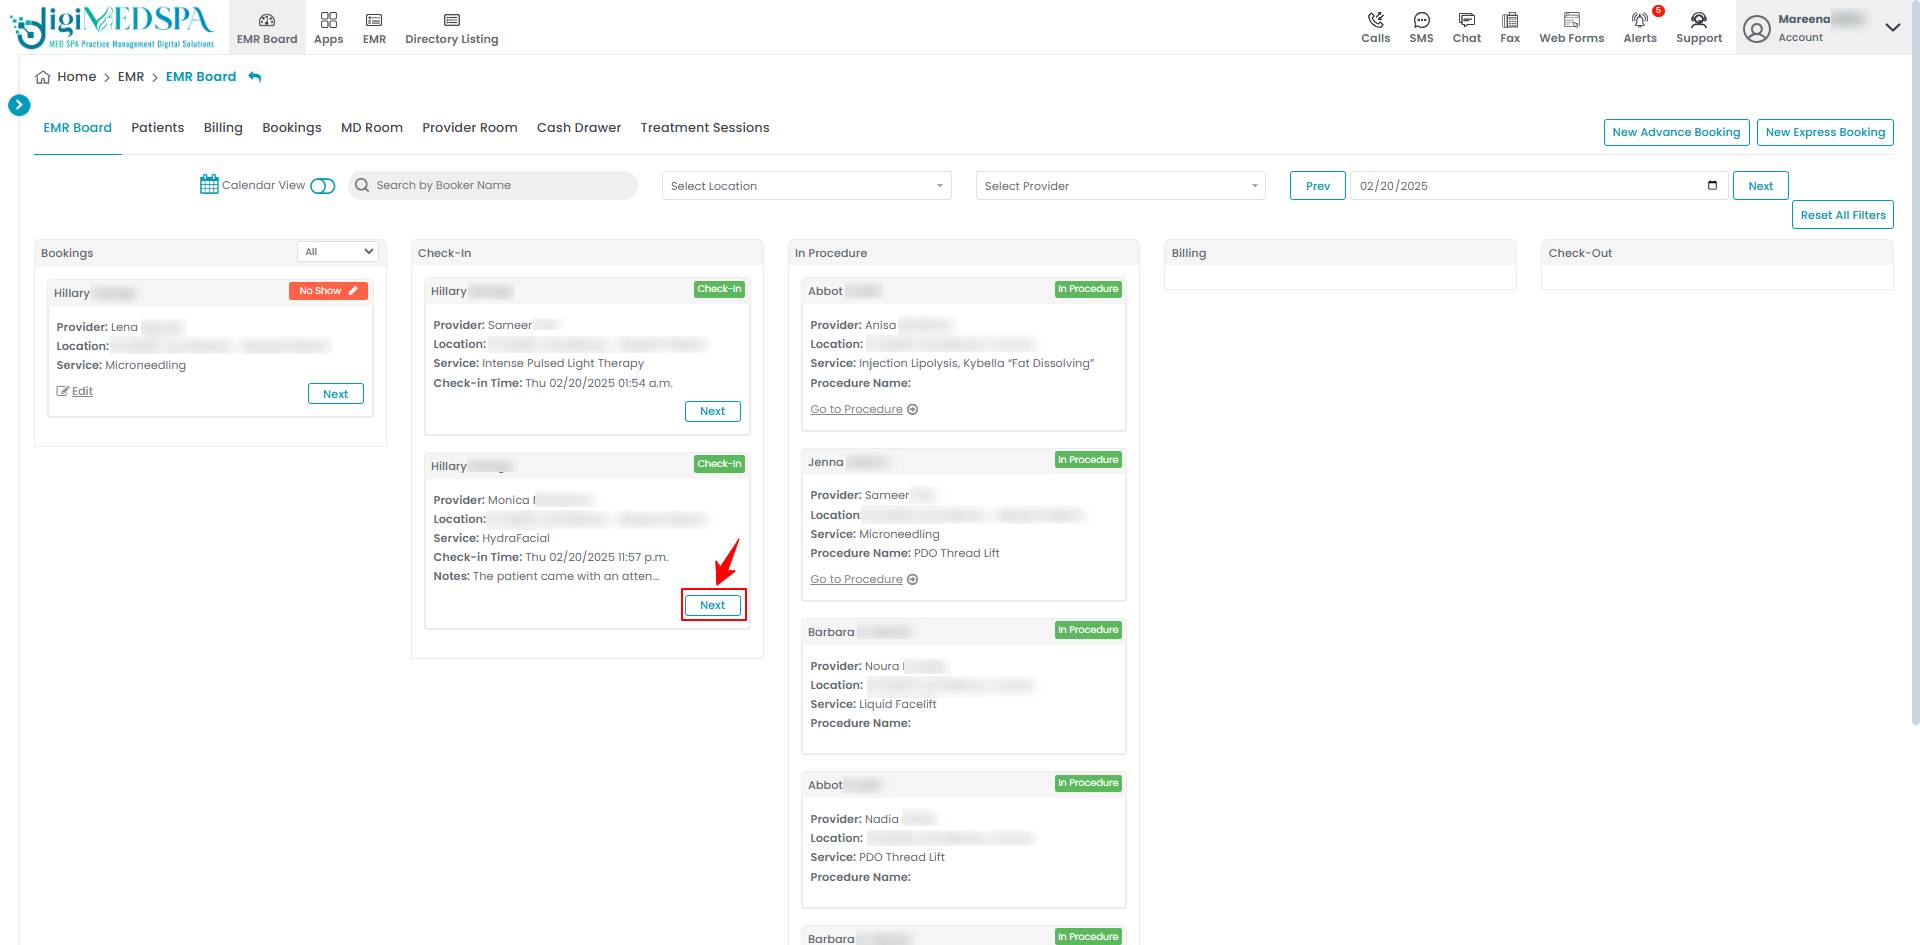
- You can create “Cosmetic Procedures” from 5 entry points:
- From the EMR Board tabs, click on the “MD Room” tab and select "New Cosmetic Procedure" to create one.

- From the EMR Board tabs, click on the “Provider Room” tab and select "New Cosmetic Procedure".

- From the EMR Board select an appointment or booking that is in the ‘’Check-in’’ step then press the ‘’Next’’ button to move that booking to the ‘’In Procedure’’ phase.

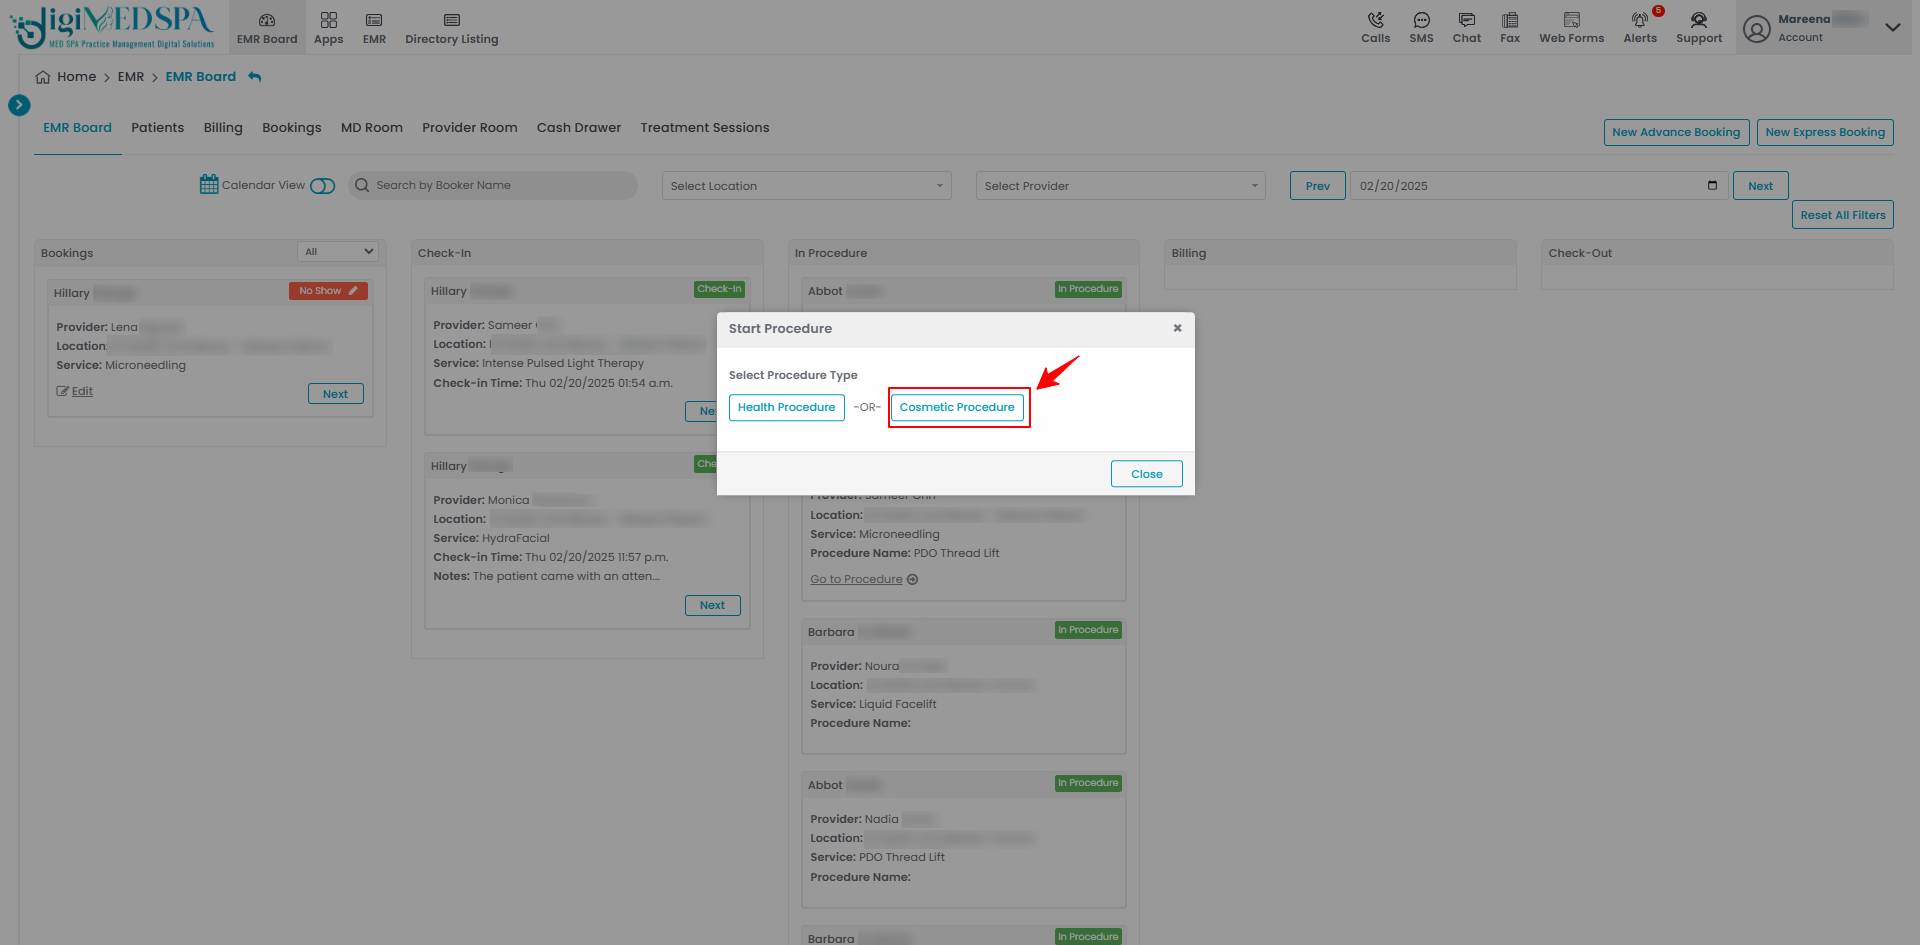
 When a booking is in progress, the user can choose to create either a health procedure or a cosmetic procedure based on the specific requirements. Selecting "Cosmetic Procedure" will take the user to the first step of creating a cosmetic procedure.

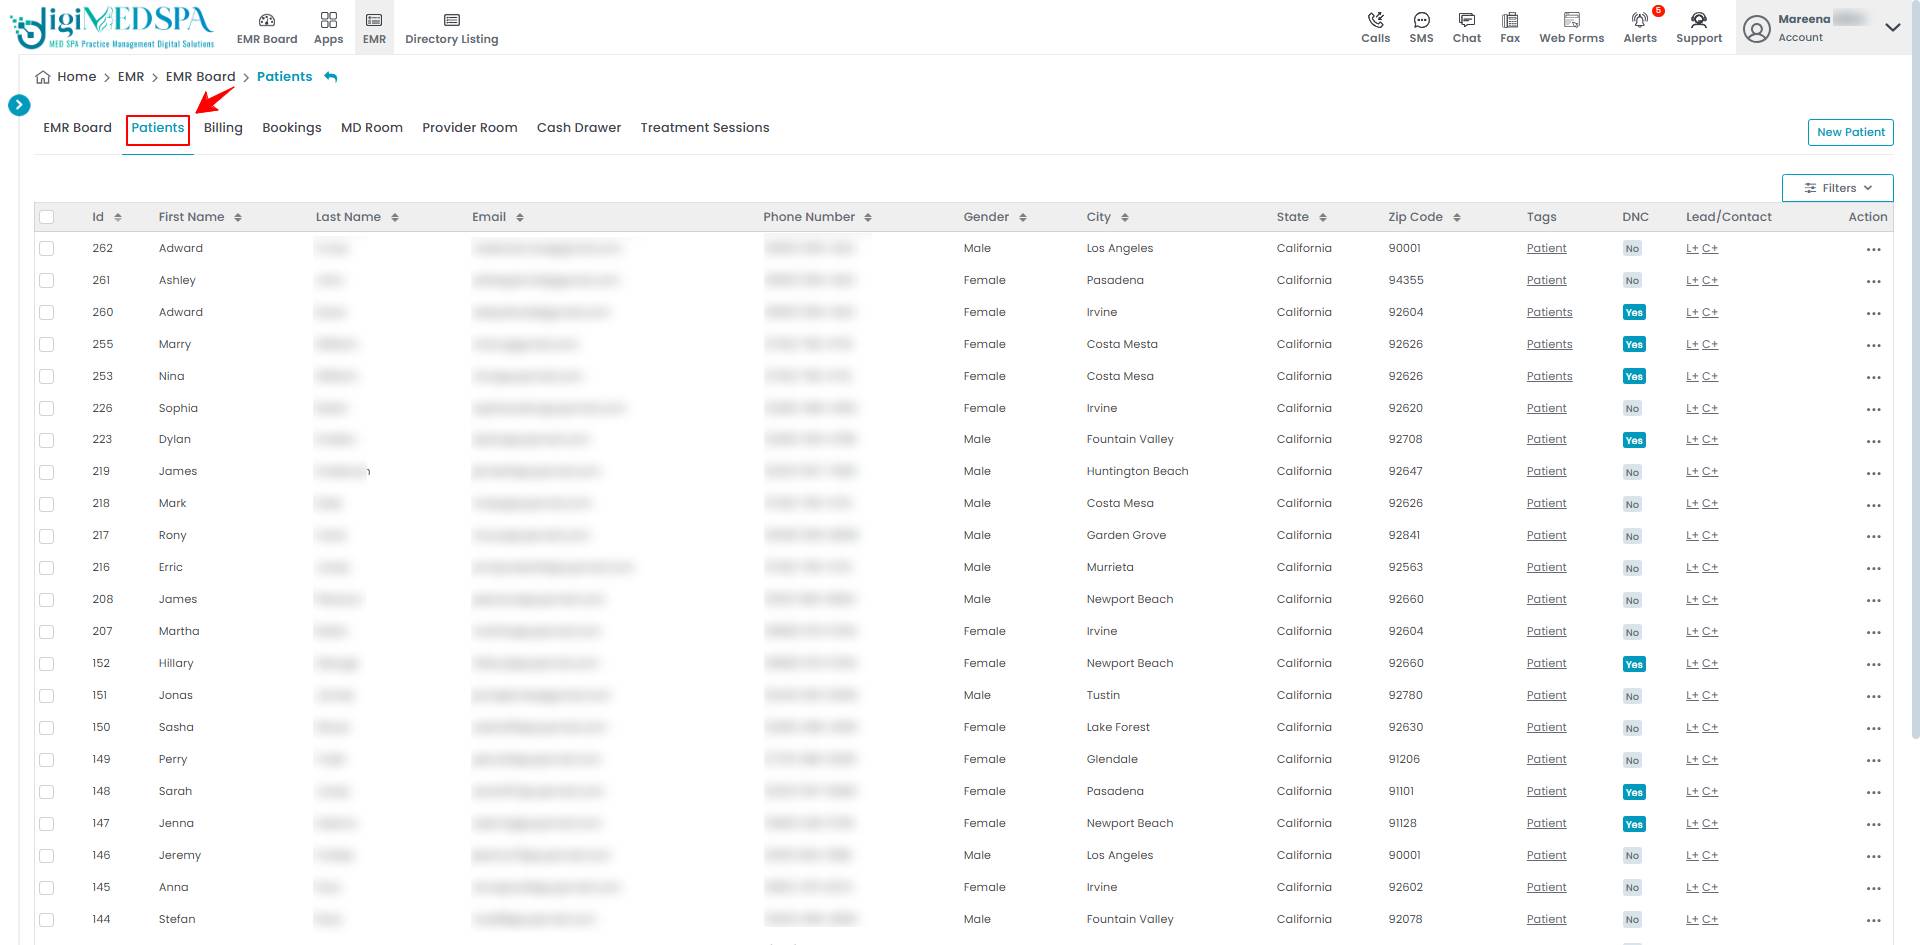
- From the EMR Board tabs, click on “Patients.”

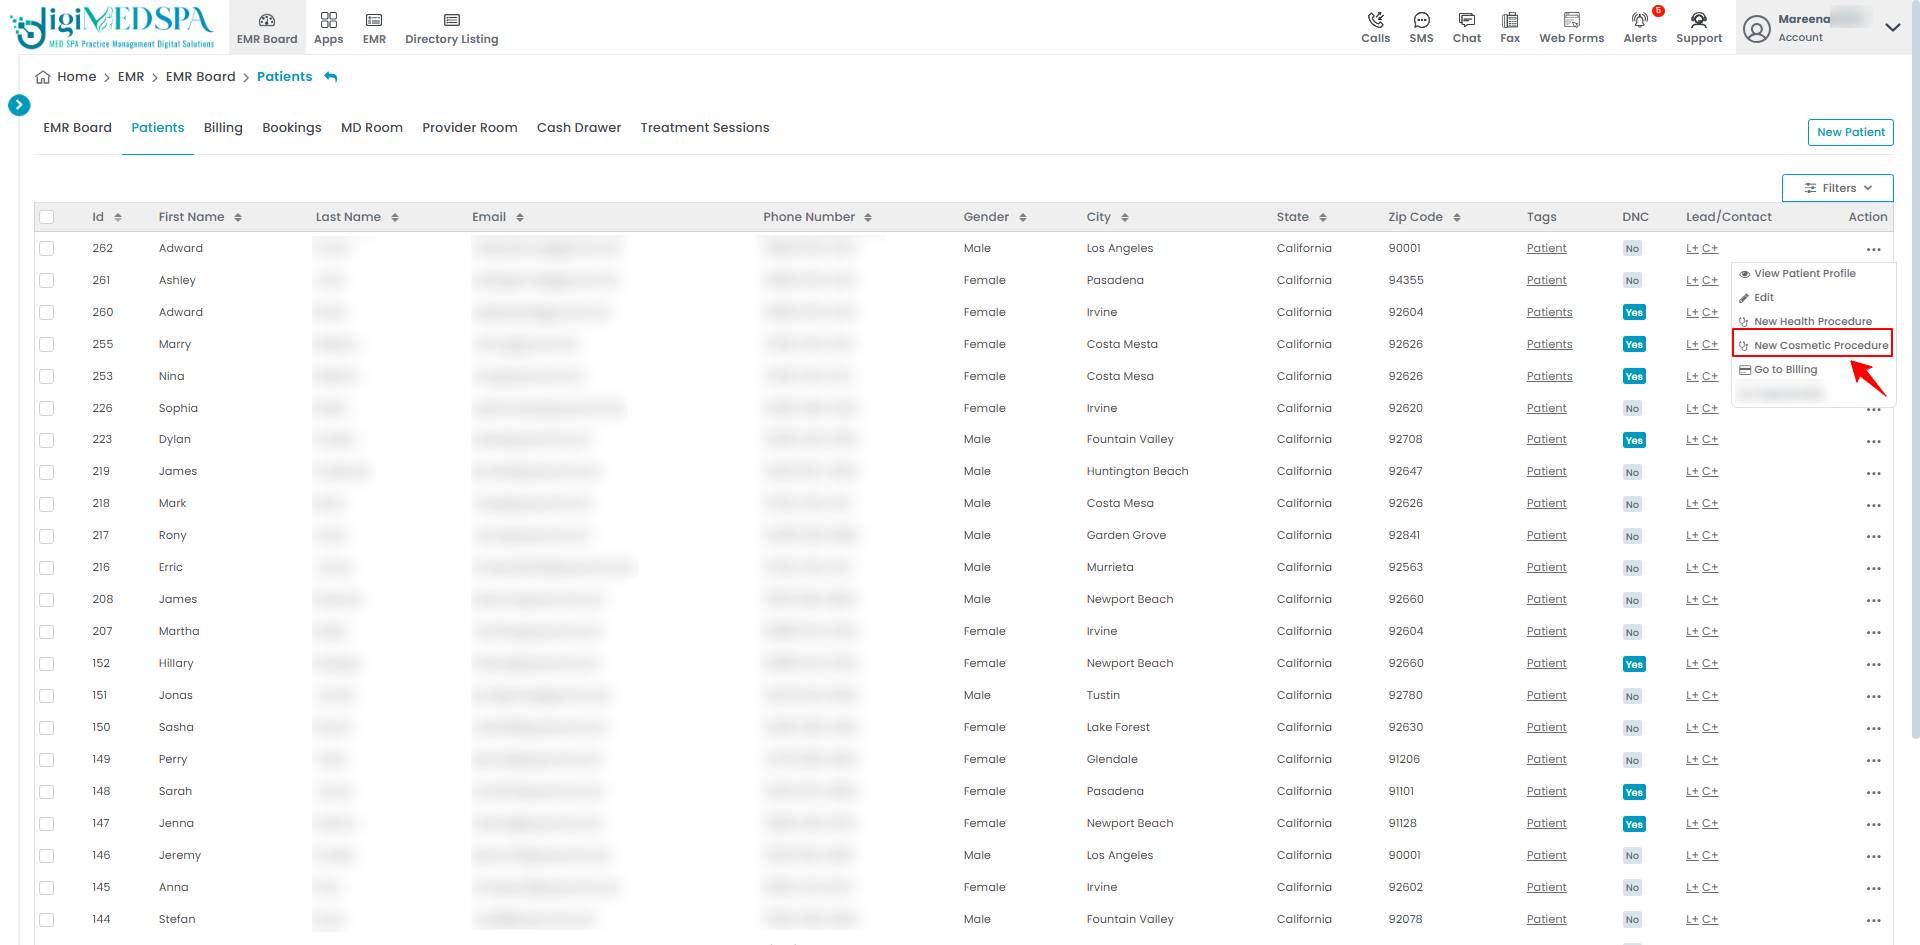
 From the patient list, click on three dots under the action column and select "New Cosmetic Procedure" for the specific patient.

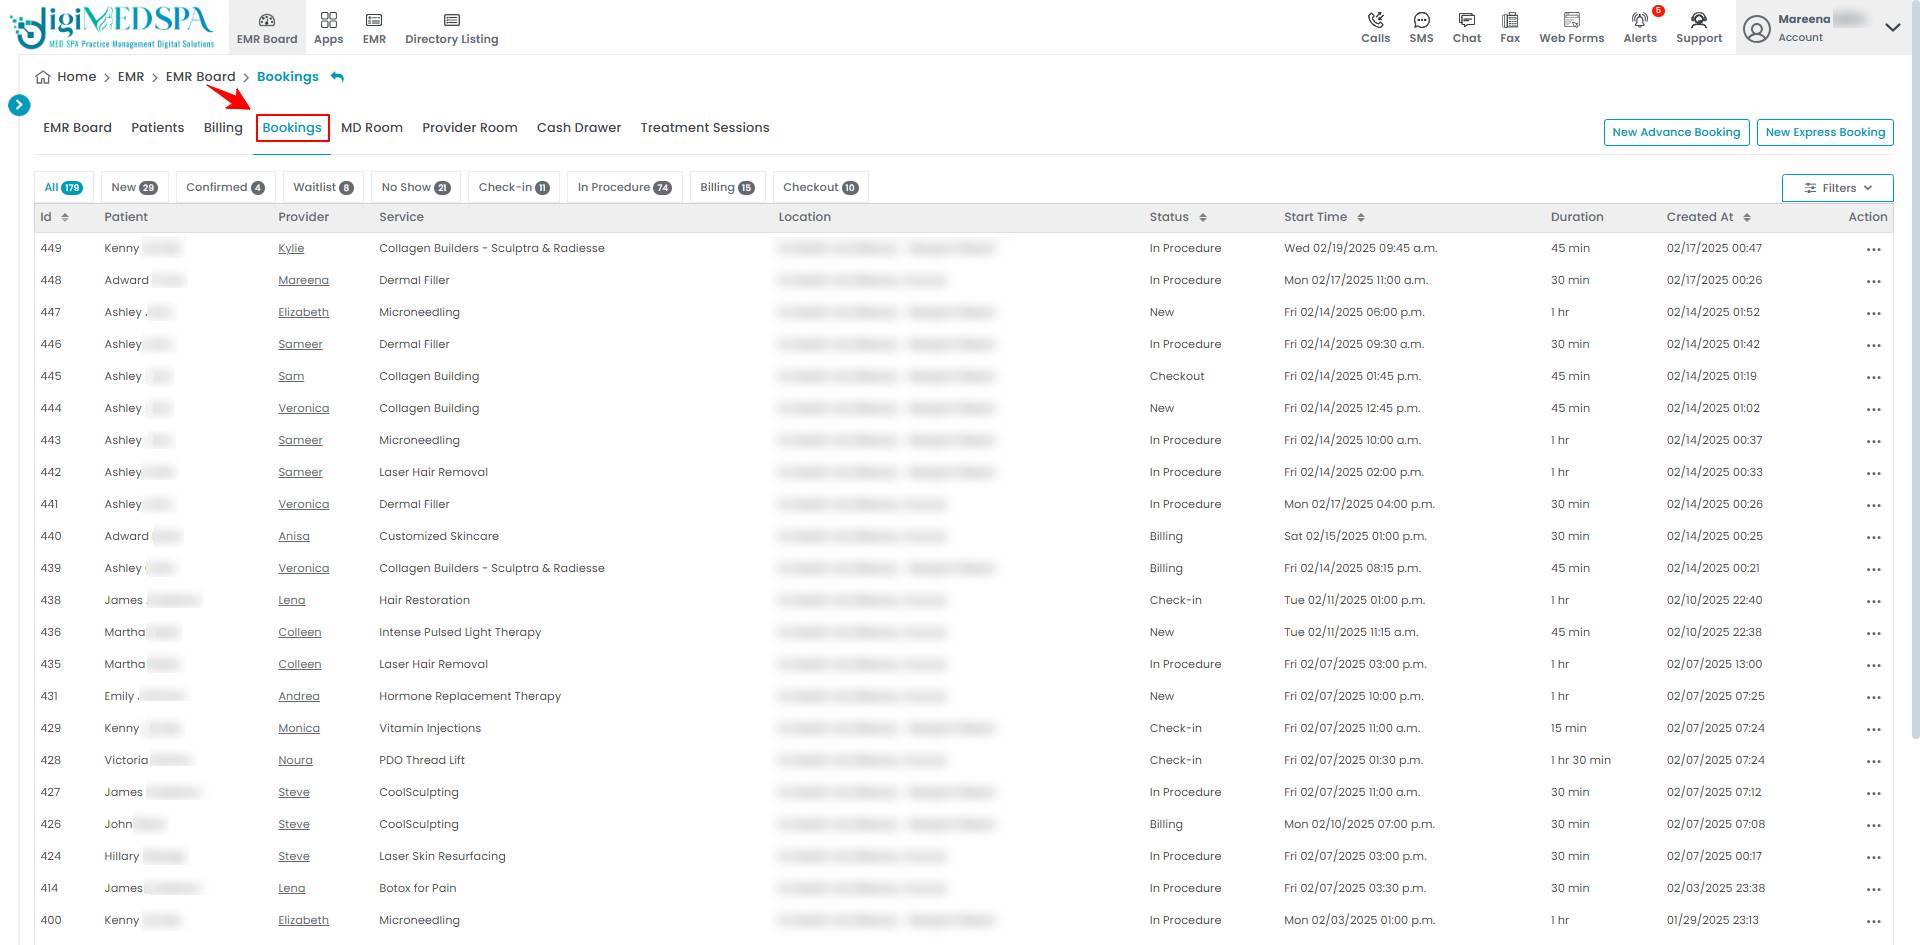
- From the EMR Board tabs, click on “Bookings.”

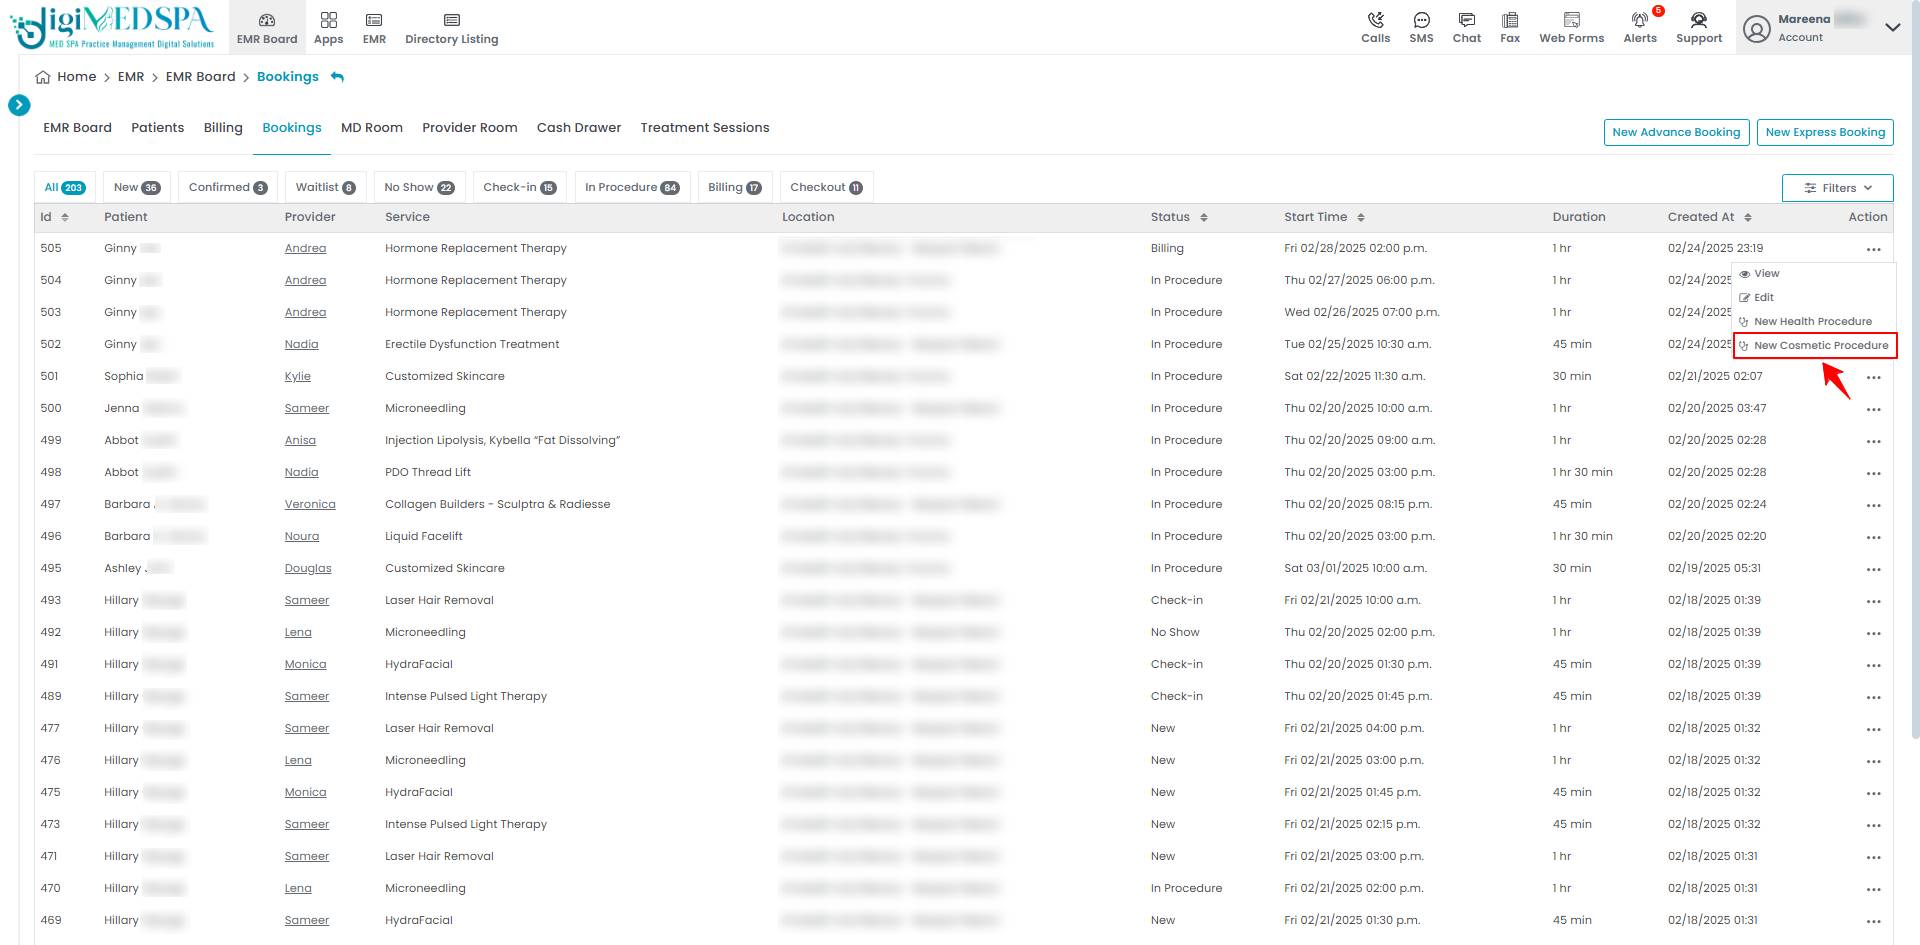
 From the list of all bookings, click on three dots under the action column and select "New Cosmetic Procedure" for the specific booking.

 Note: Clicking the "New Cosmetic Procedure" button from any entry point will take the user to step 1 of creating a cosmetic procedure. If patient information and booking details are already entered, the user will go directly to Step 3 of creating a cosmetic procedure.
- From the EMR Board tabs, click on the “MD Room” tab and select "New Cosmetic Procedure" to create one.
- Step 1: Patient Information
- In Step 1, enter the required patient information, including First and Last Name, Phone, Gender, Email Address, and Referee Code. Selecting a patient from the search bar will autofill information for an existing patient. Then press “Next”, after filling in all the required information.

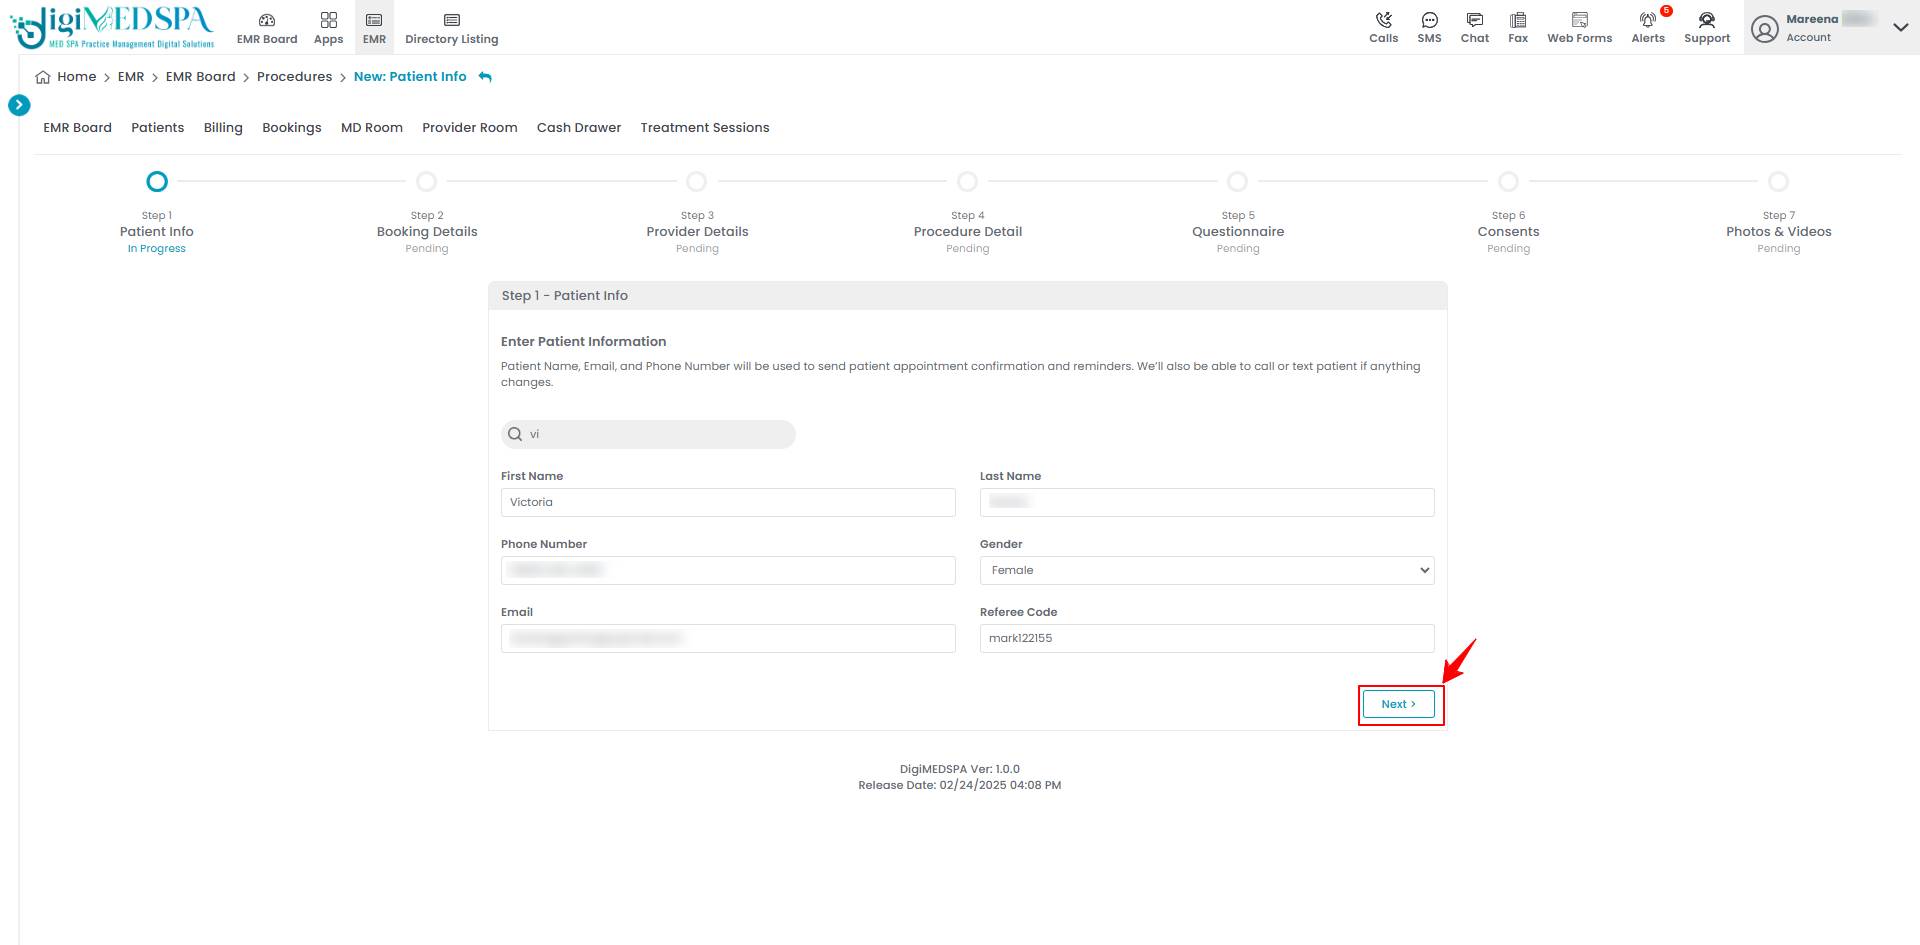 Note: A ‘Referee Code’ is a special code given to someone who refers patients to the Med SPA. It helps track referrals and reward partnerships. The referee code field will only be visible for patients who do not already have a referee code saved in their profile.For detailed instructions on Referee Code, refer to our ‘’Add Referee Code’’ user guide.
- In Step 1, enter the required patient information, including First and Last Name, Phone, Gender, Email Address, and Referee Code. Selecting a patient from the search bar will autofill information for an existing patient. Then press “Next”, after filling in all the required information.
- Step 2: Booking Details
- In Step 2, please enter booking details. Click on “Select Booking” to either select an existing booking to which you want to attach this procedure or create a new booking.

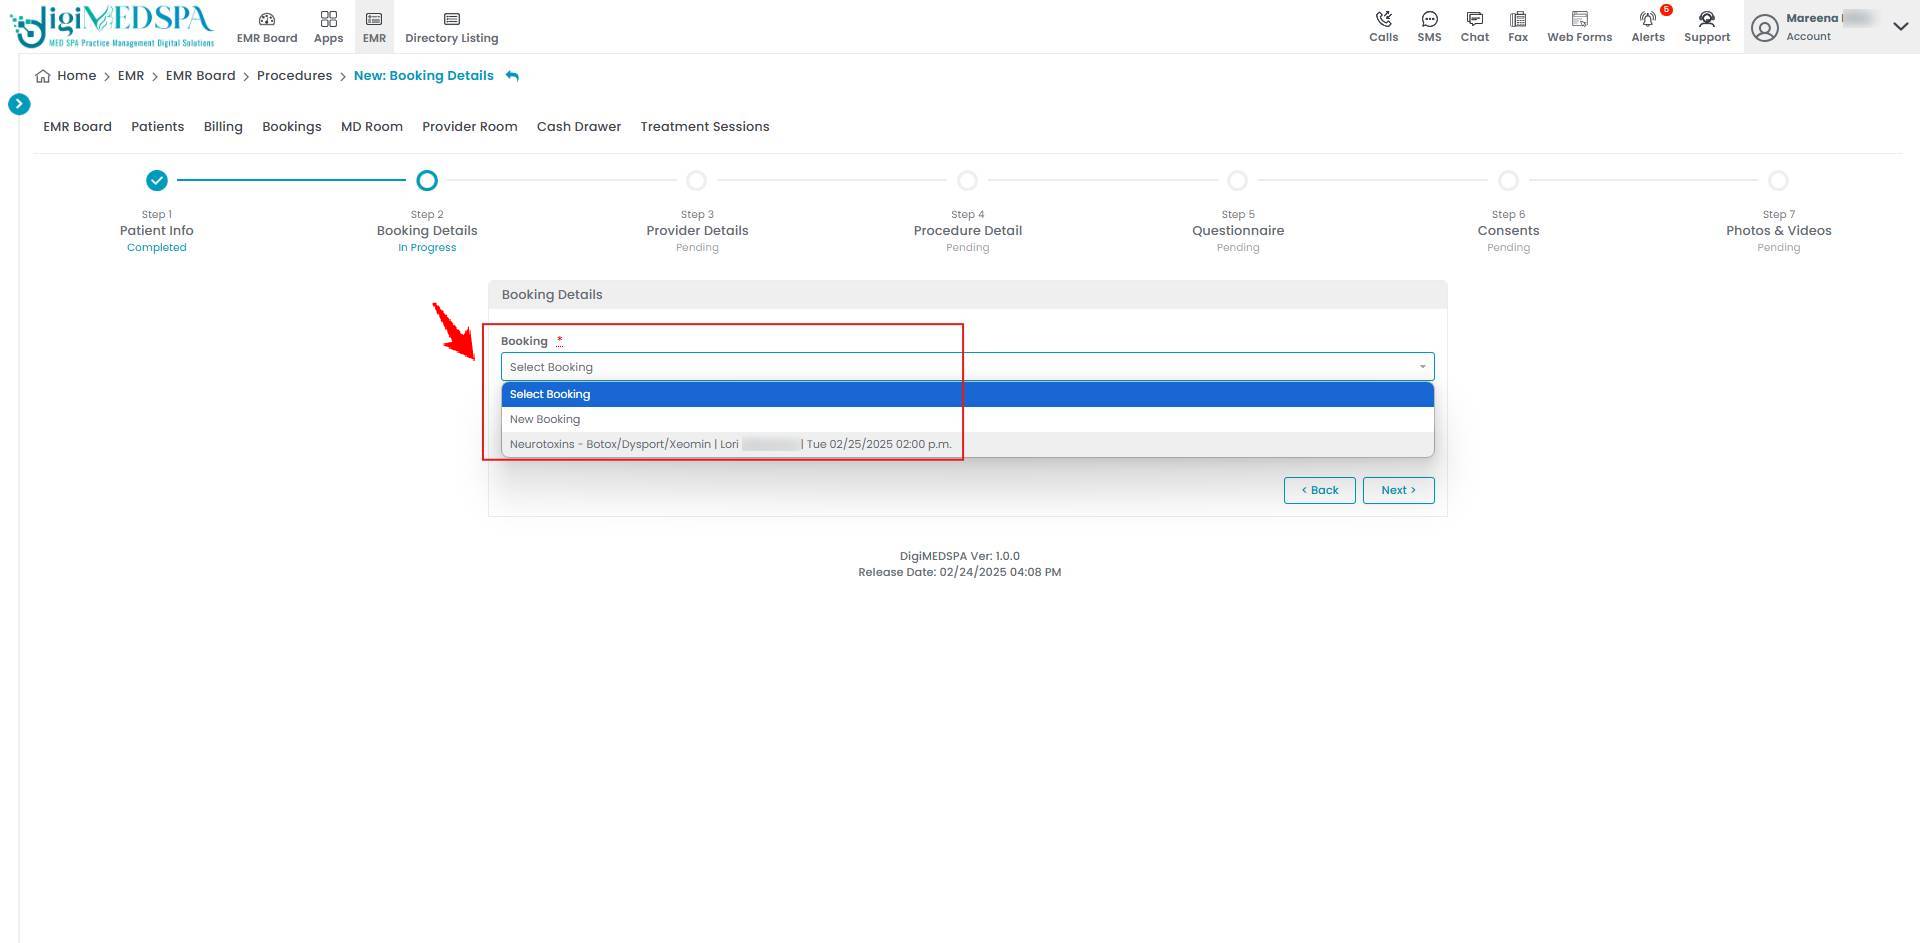
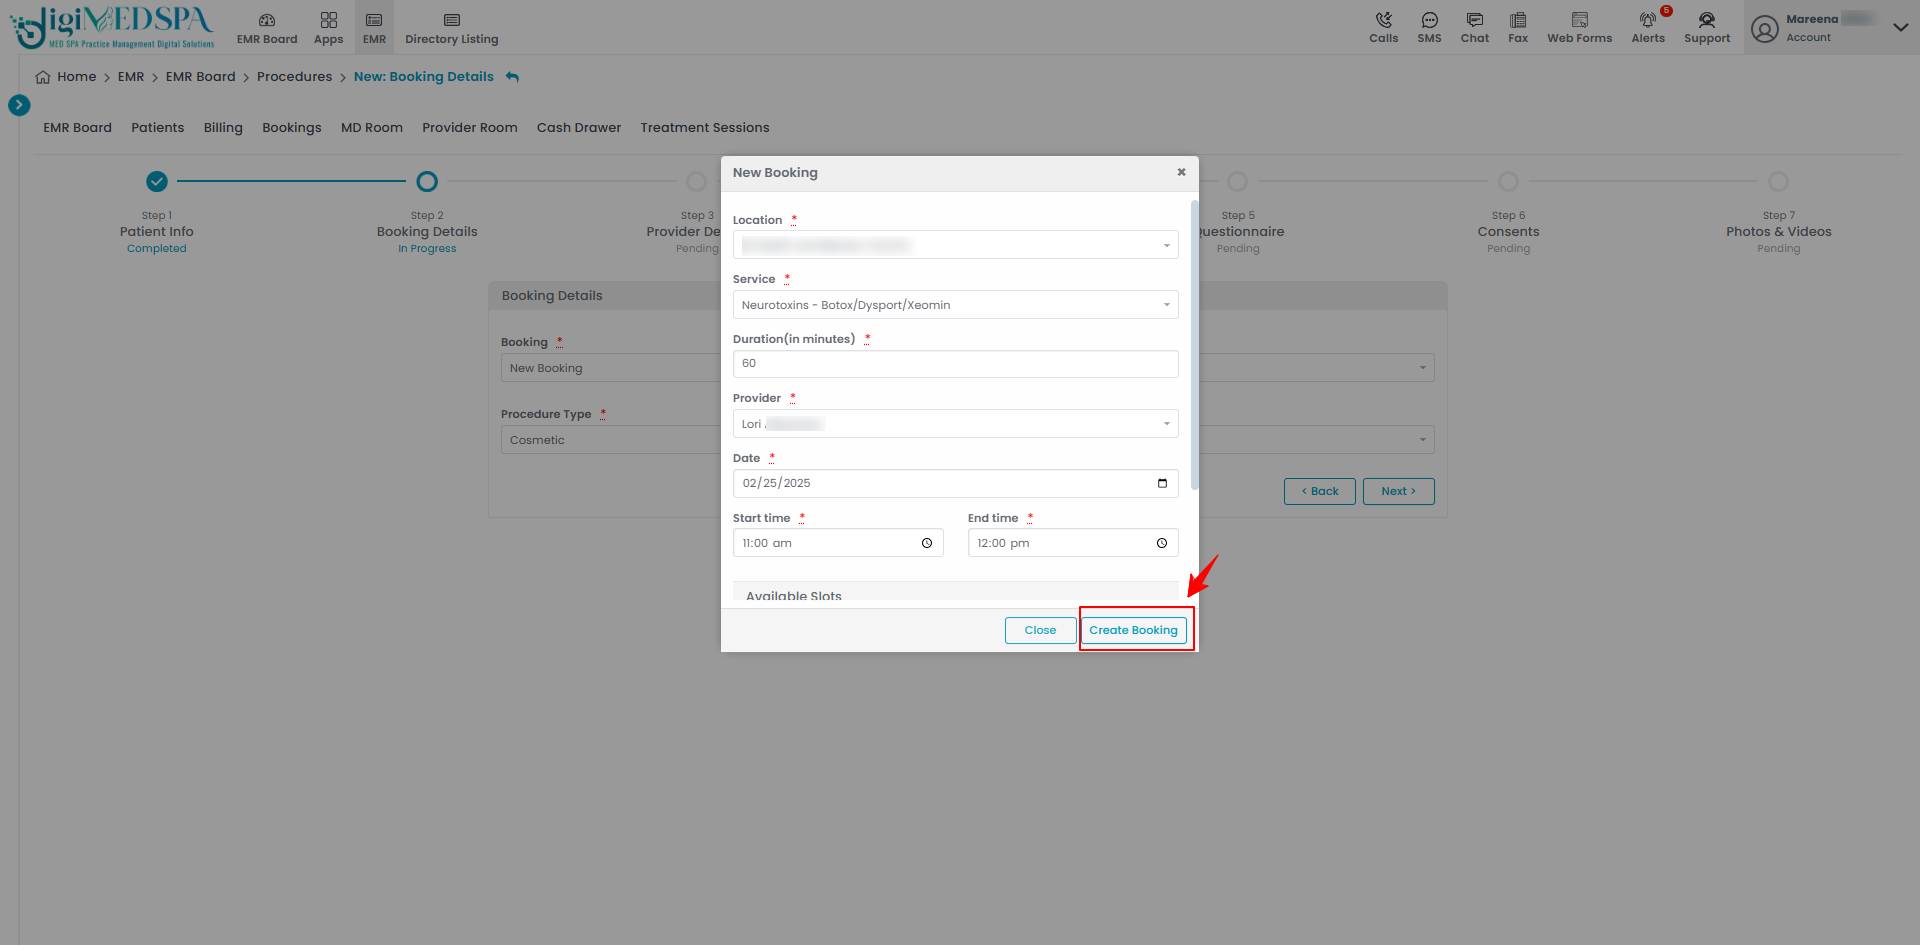
- If you select the new booking option, a booking form will appear. Please fill in the information, including Location, Service, Provider, Start Time, and End Time, then click on "Create Booking."

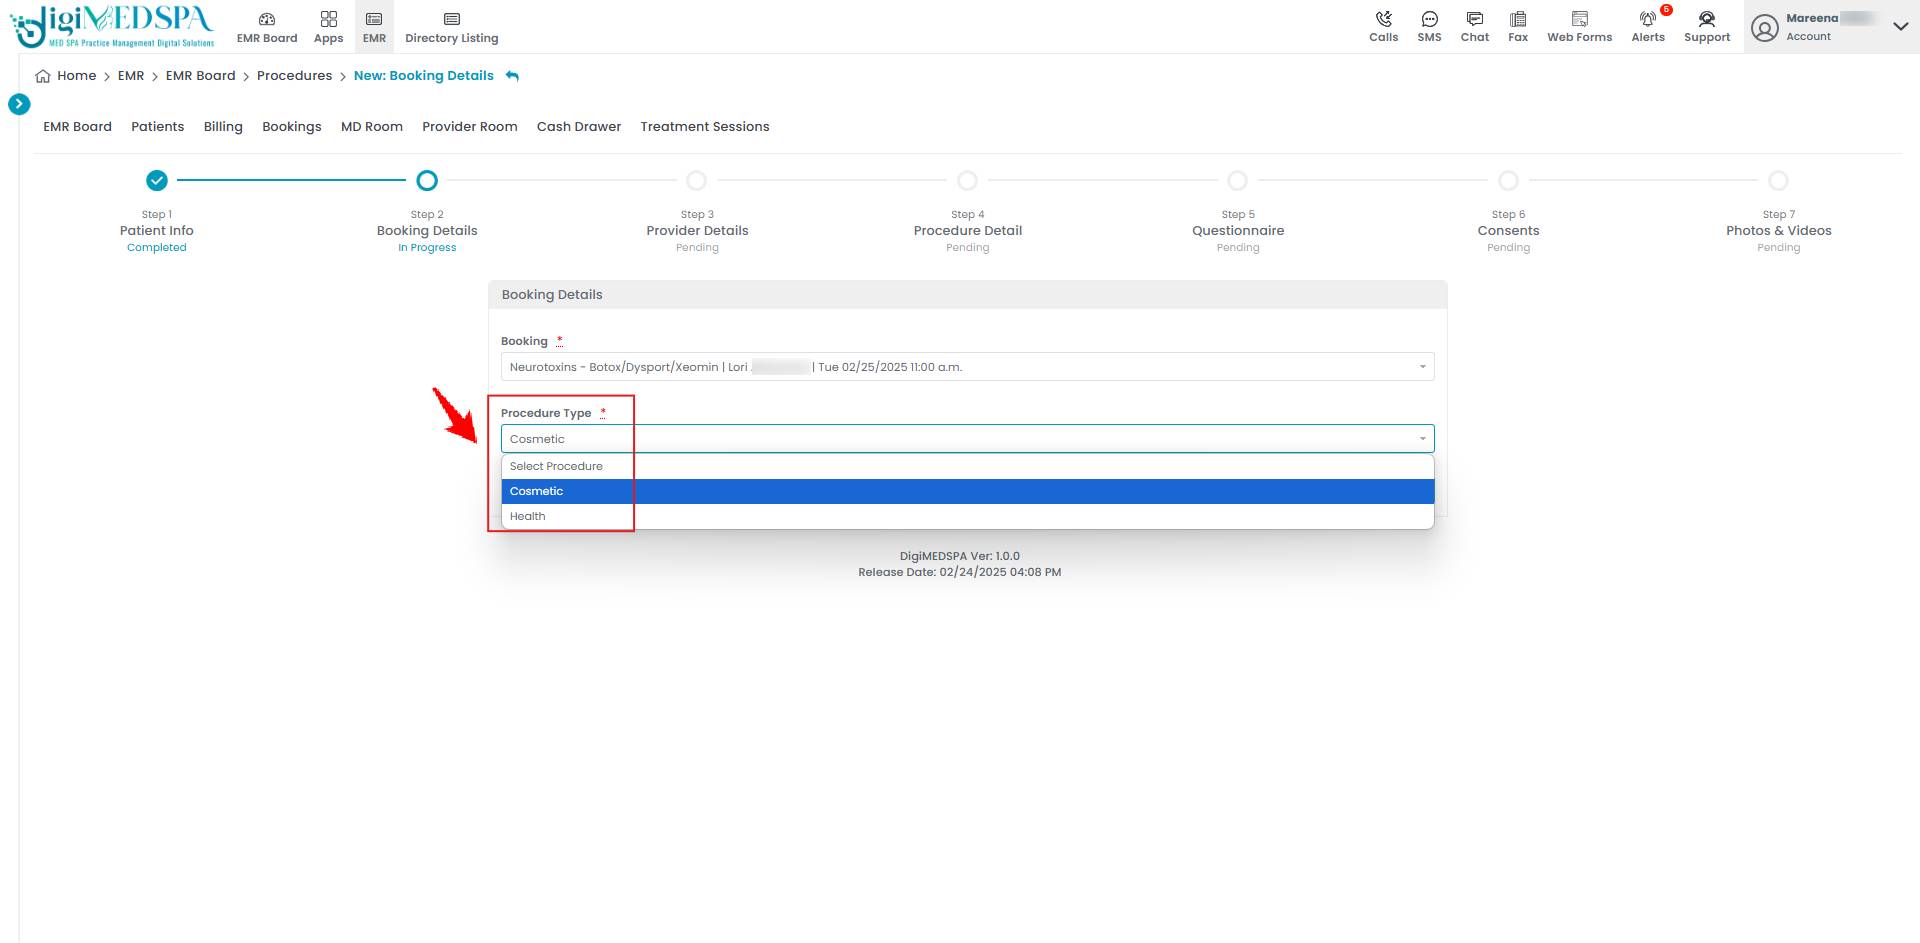
- Next, select the “Cosmetic” procedure type.

- After adding booking details and procedure type, click on “Next” to proceed.

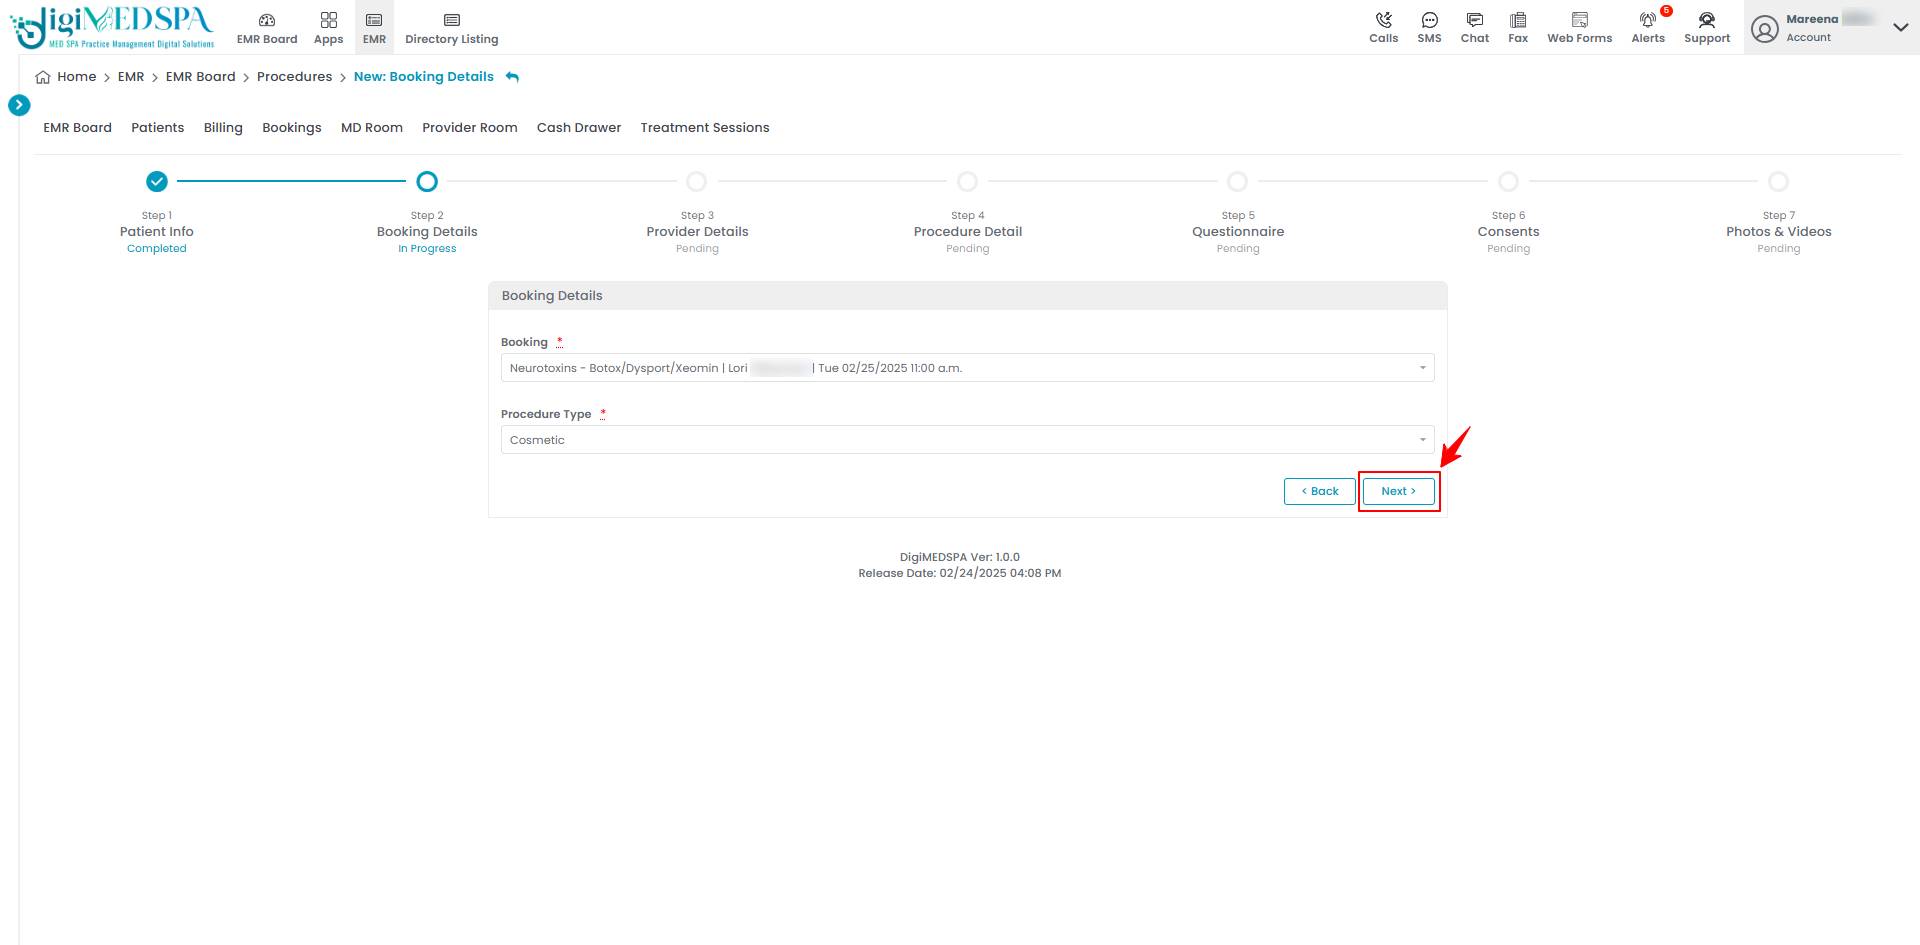
- In Step 2, please enter booking details. Click on “Select Booking” to either select an existing booking to which you want to attach this procedure or create a new booking.
- Step 3: Provider Details
- Choose the clinic “Location” from the dropdown menu, for your procedure.

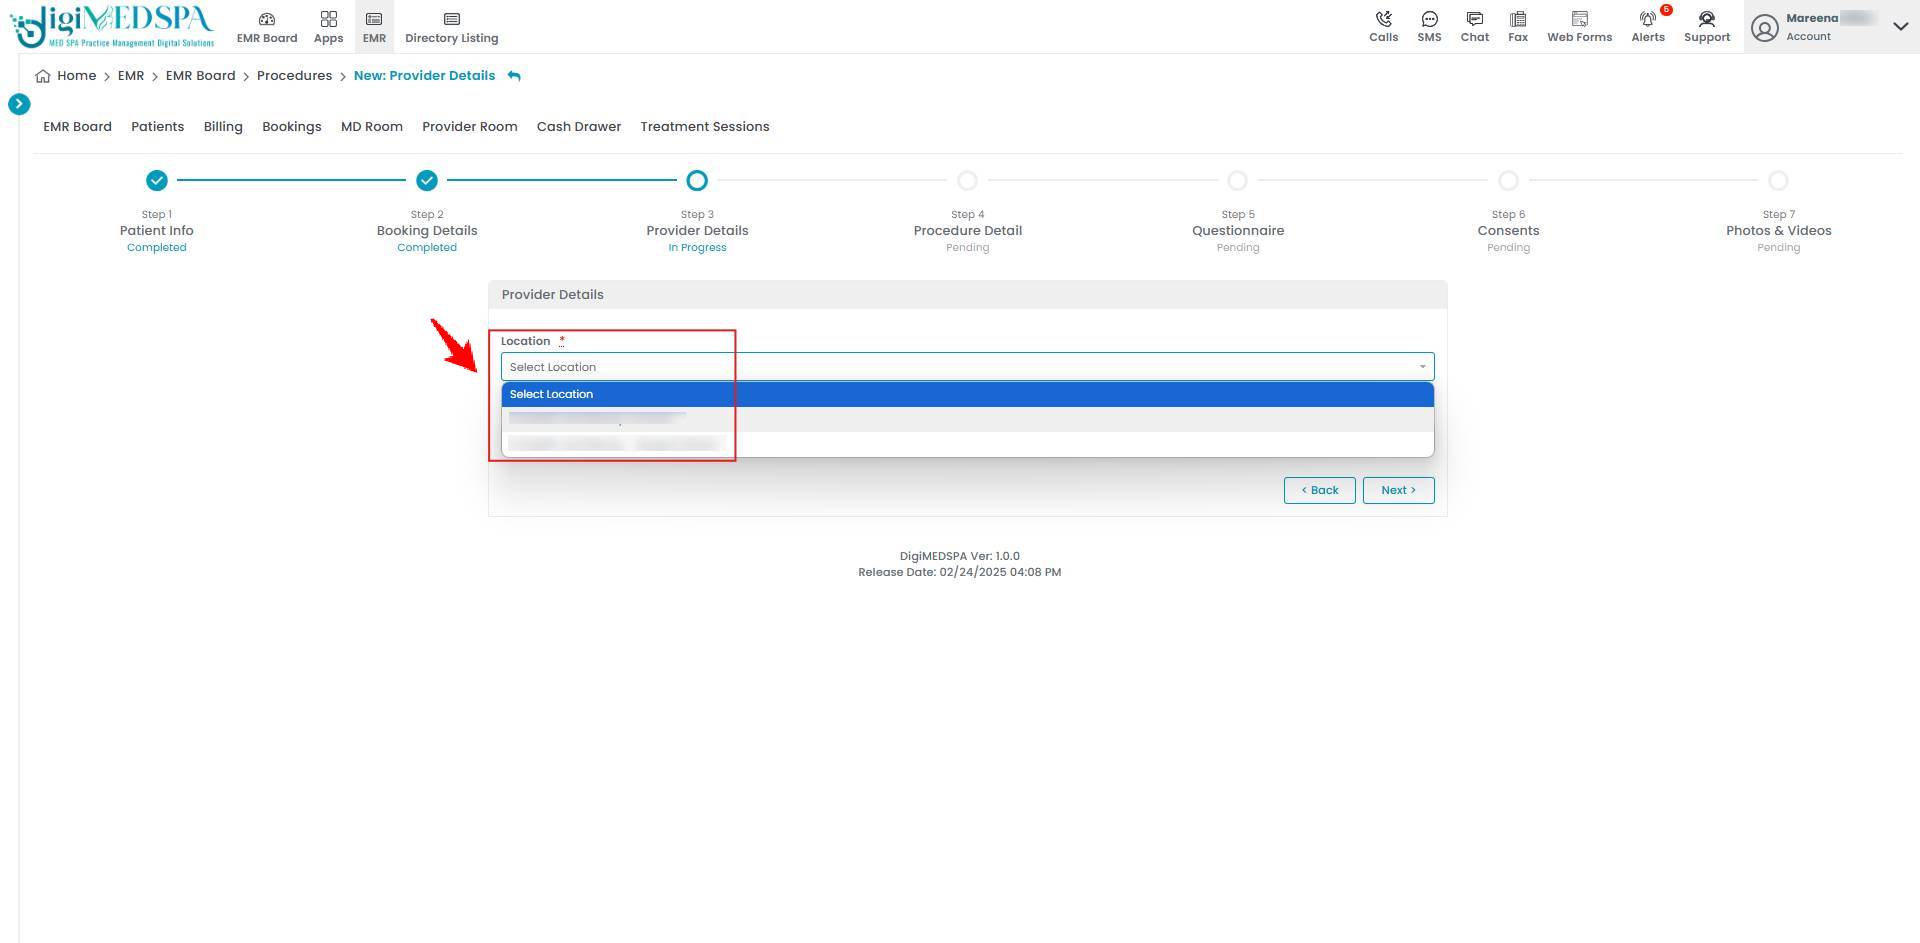
- Select the “Provider” for your procedure.

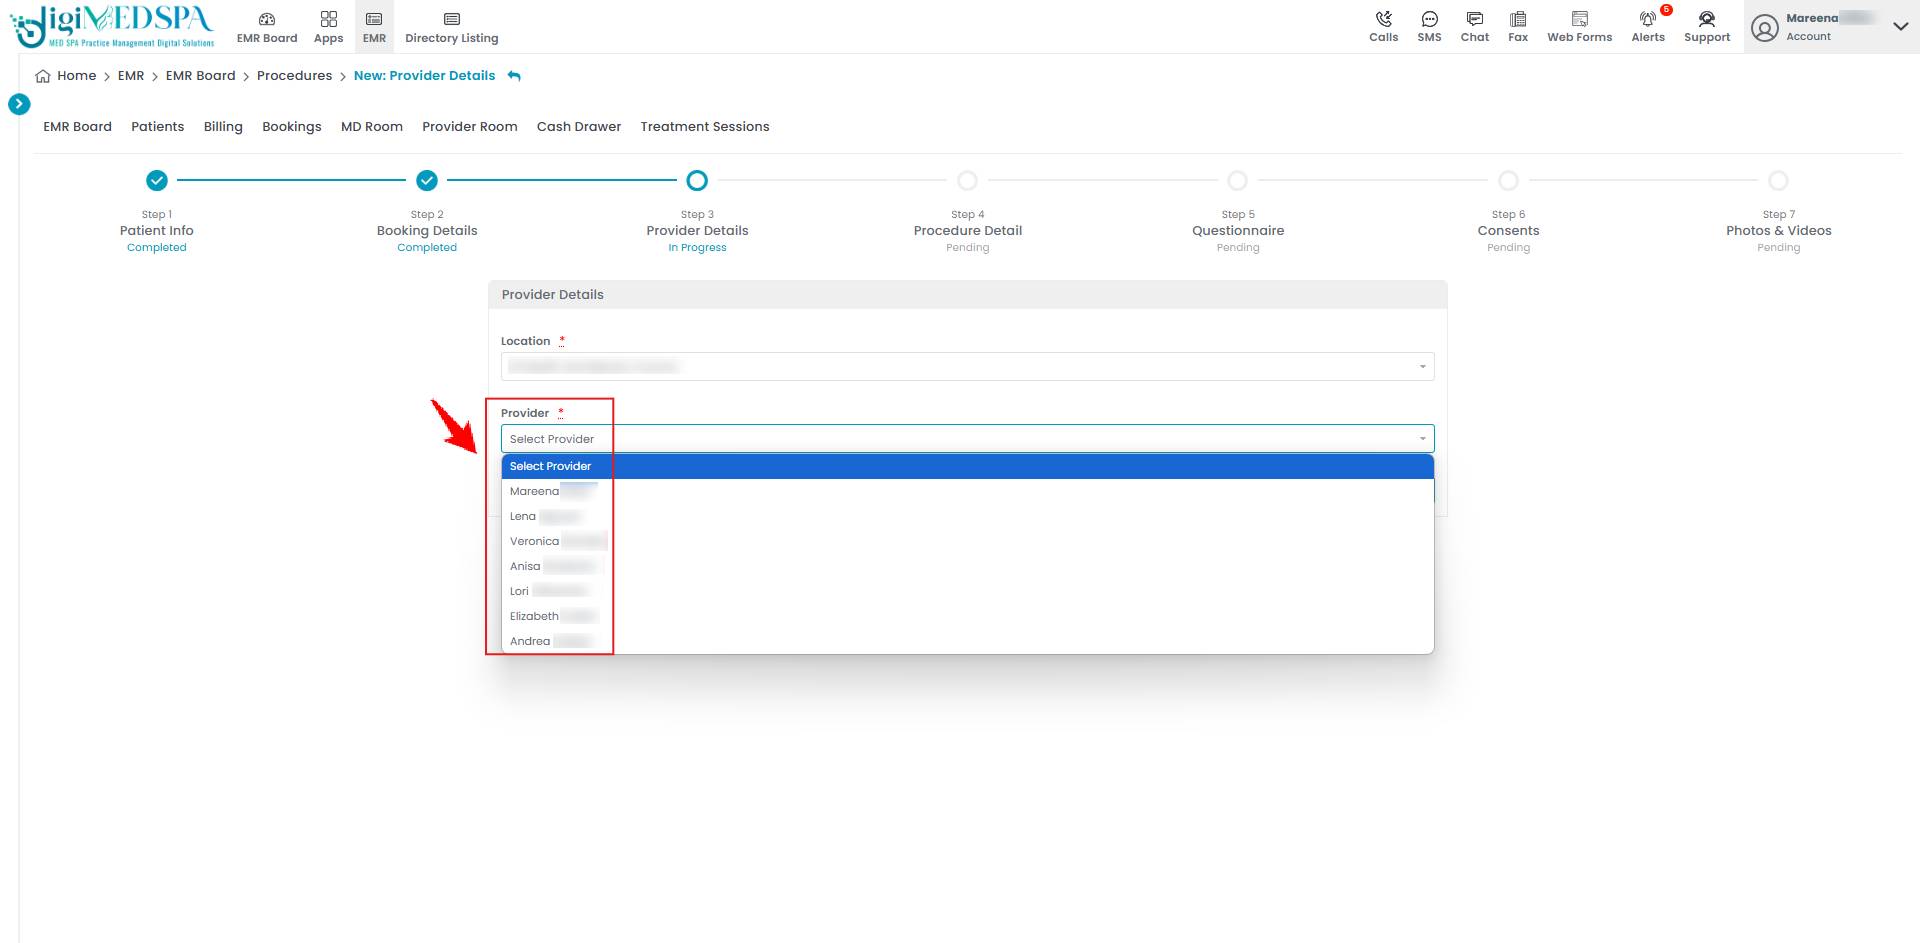 Note: The provider name you selected in Step 2 will appear pre-filled here. However, if needed, the user can change the provider at this stage by selecting a different one from the dropdown menu, which lists all available providers for the booking created in Step 2.
 - After adding the location and provider, click on “Next” to proceed.

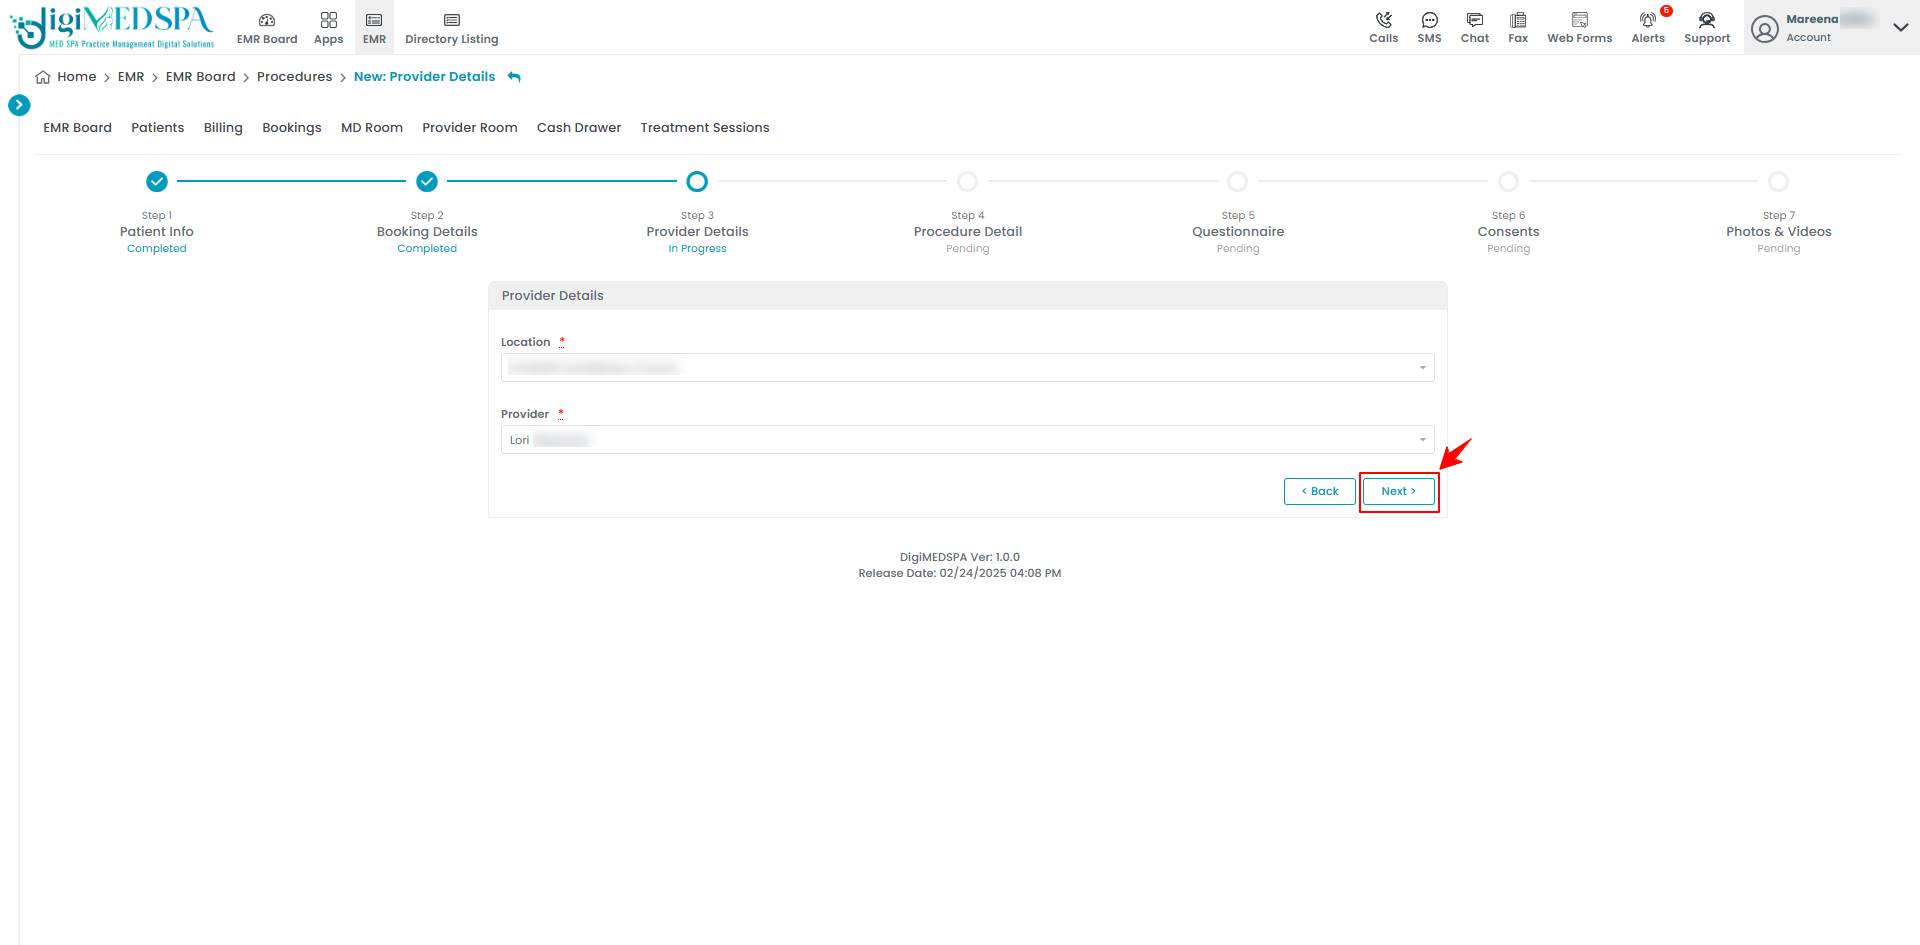
- Choose the clinic “Location” from the dropdown menu, for your procedure.
- Step 4: Cosmetic Procedure Type
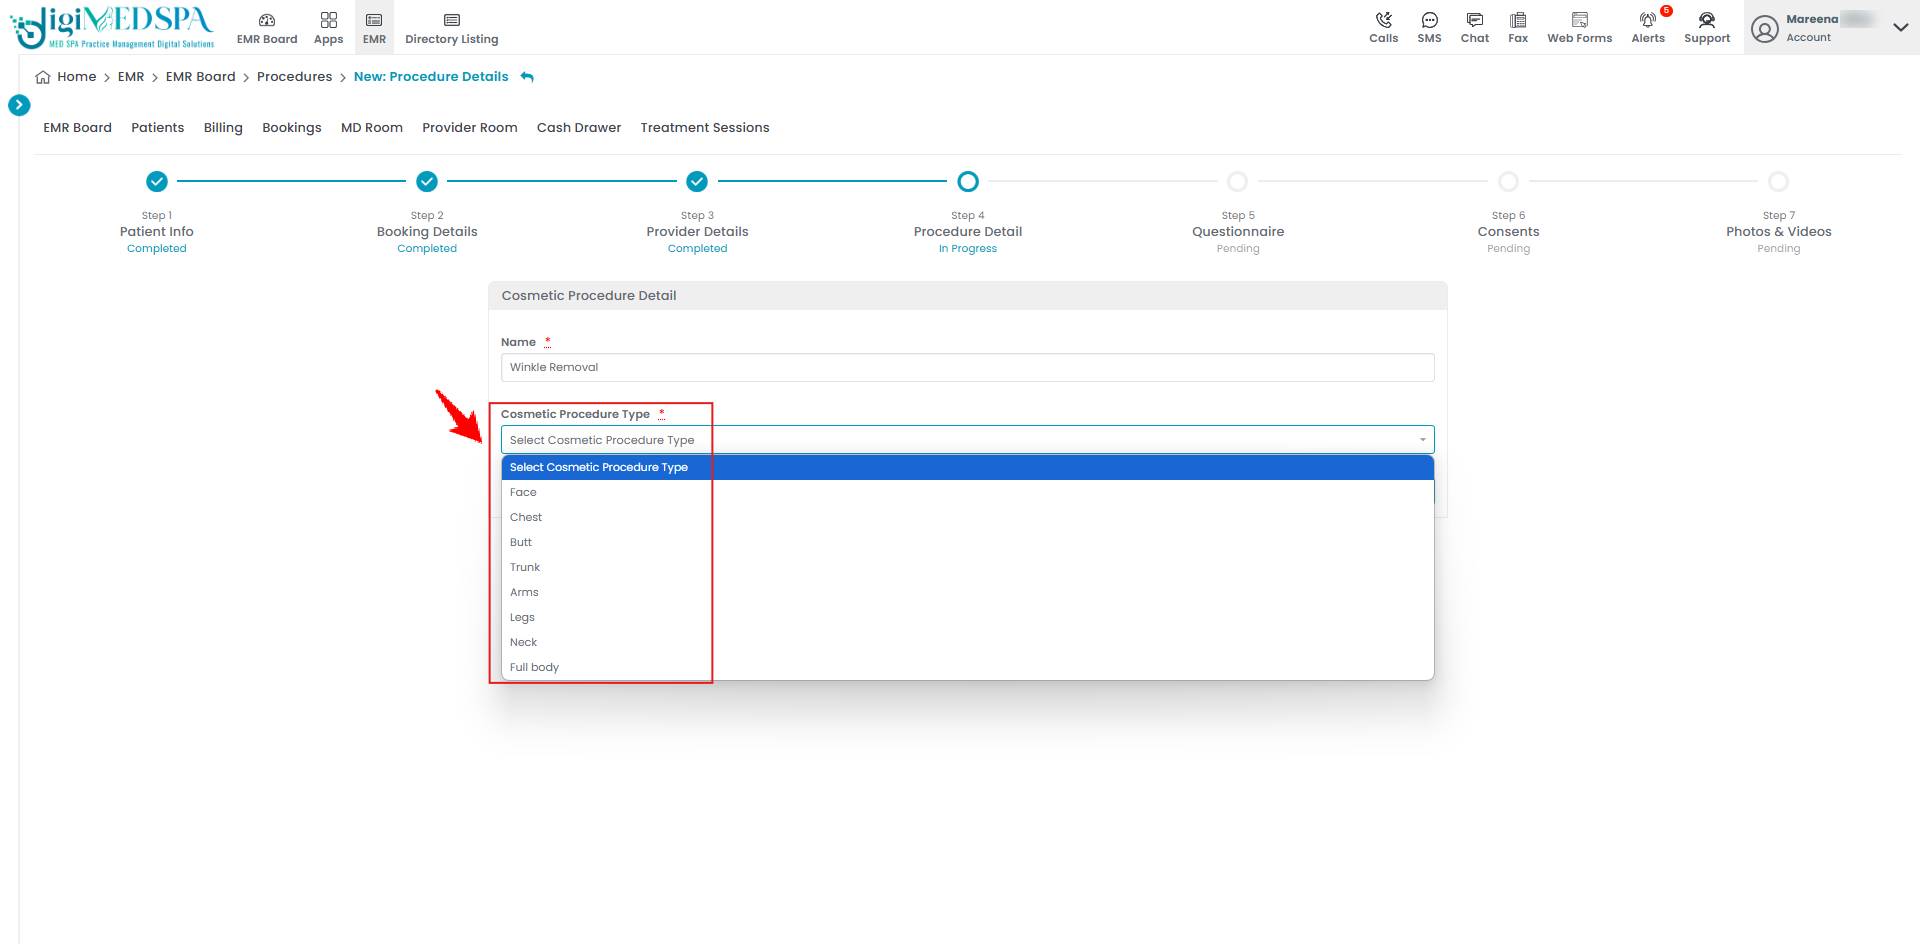
- In Step 4, enter a relevant “Name” for your procedure and select the “Cosmetic Procedure Type.” A dropdown menu for "Cosmetic Procedure Type" will appear with options such as Face, Chest, Butt, Trunk, Arms, Legs, Neck, and Full Body. Select the appropriate type based on the area where the cosmetic procedure will be performed.

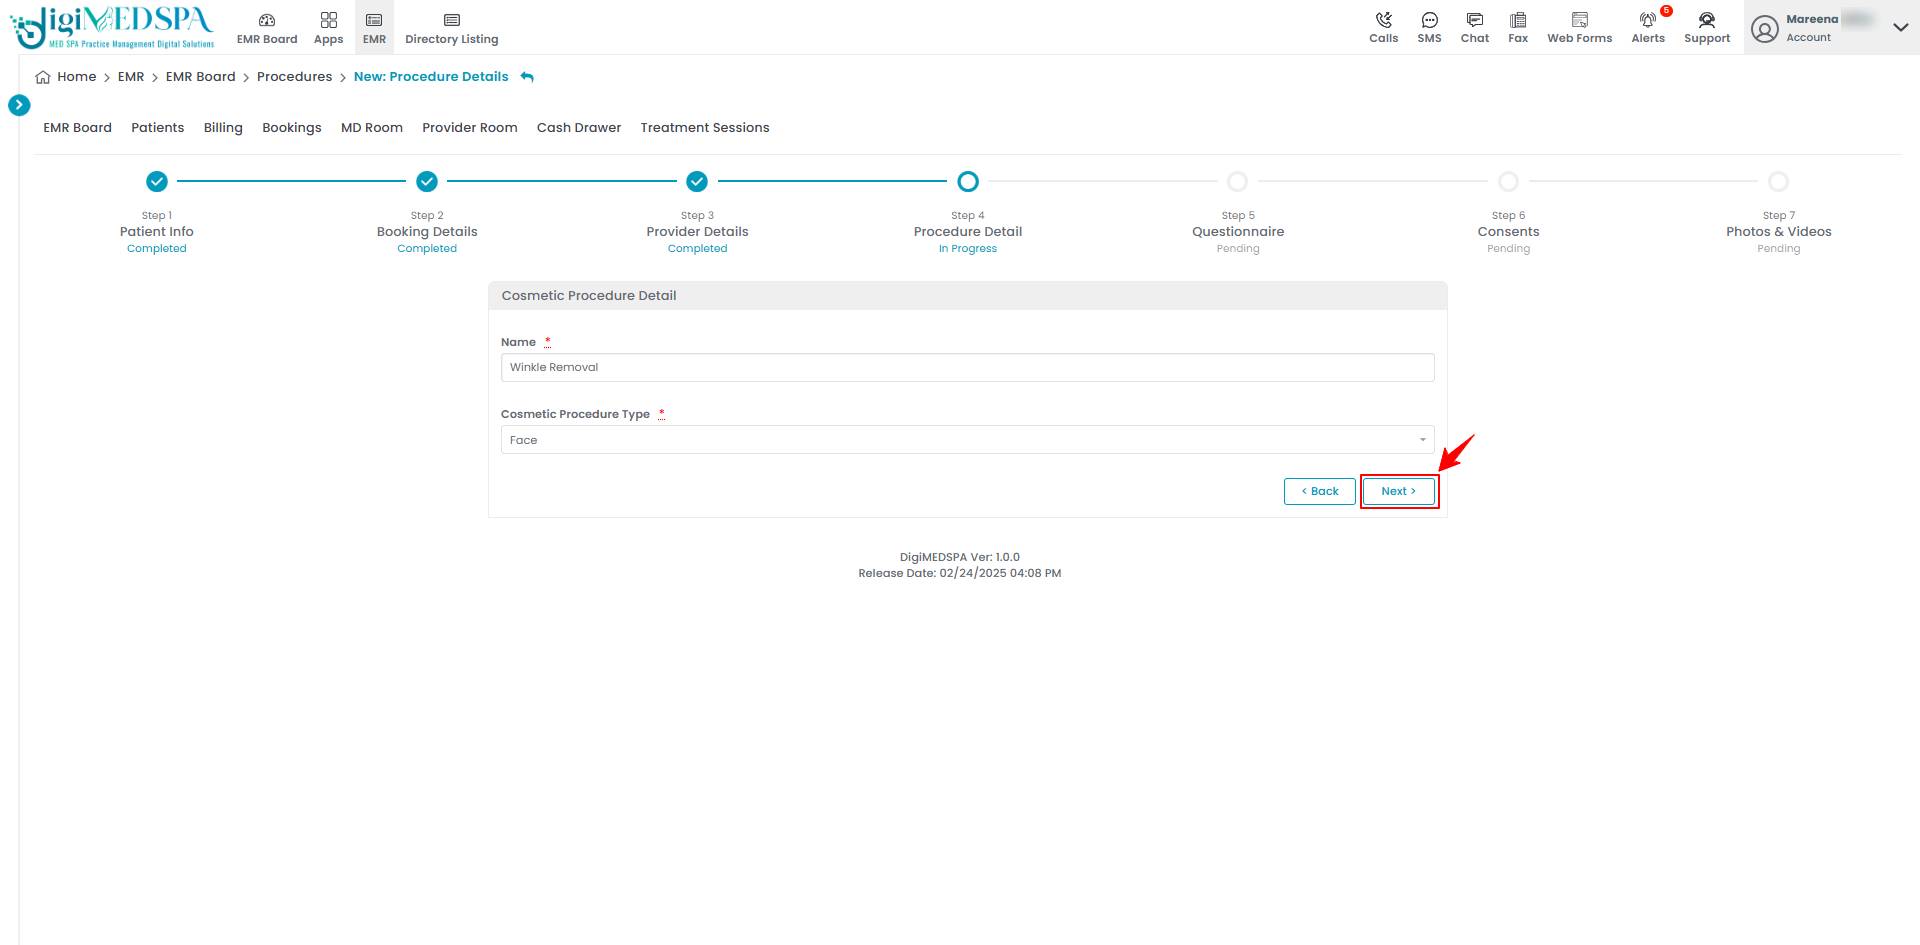
- Once you've entered the procedure name and selected the cosmetic procedure type, click "Next" to continue.

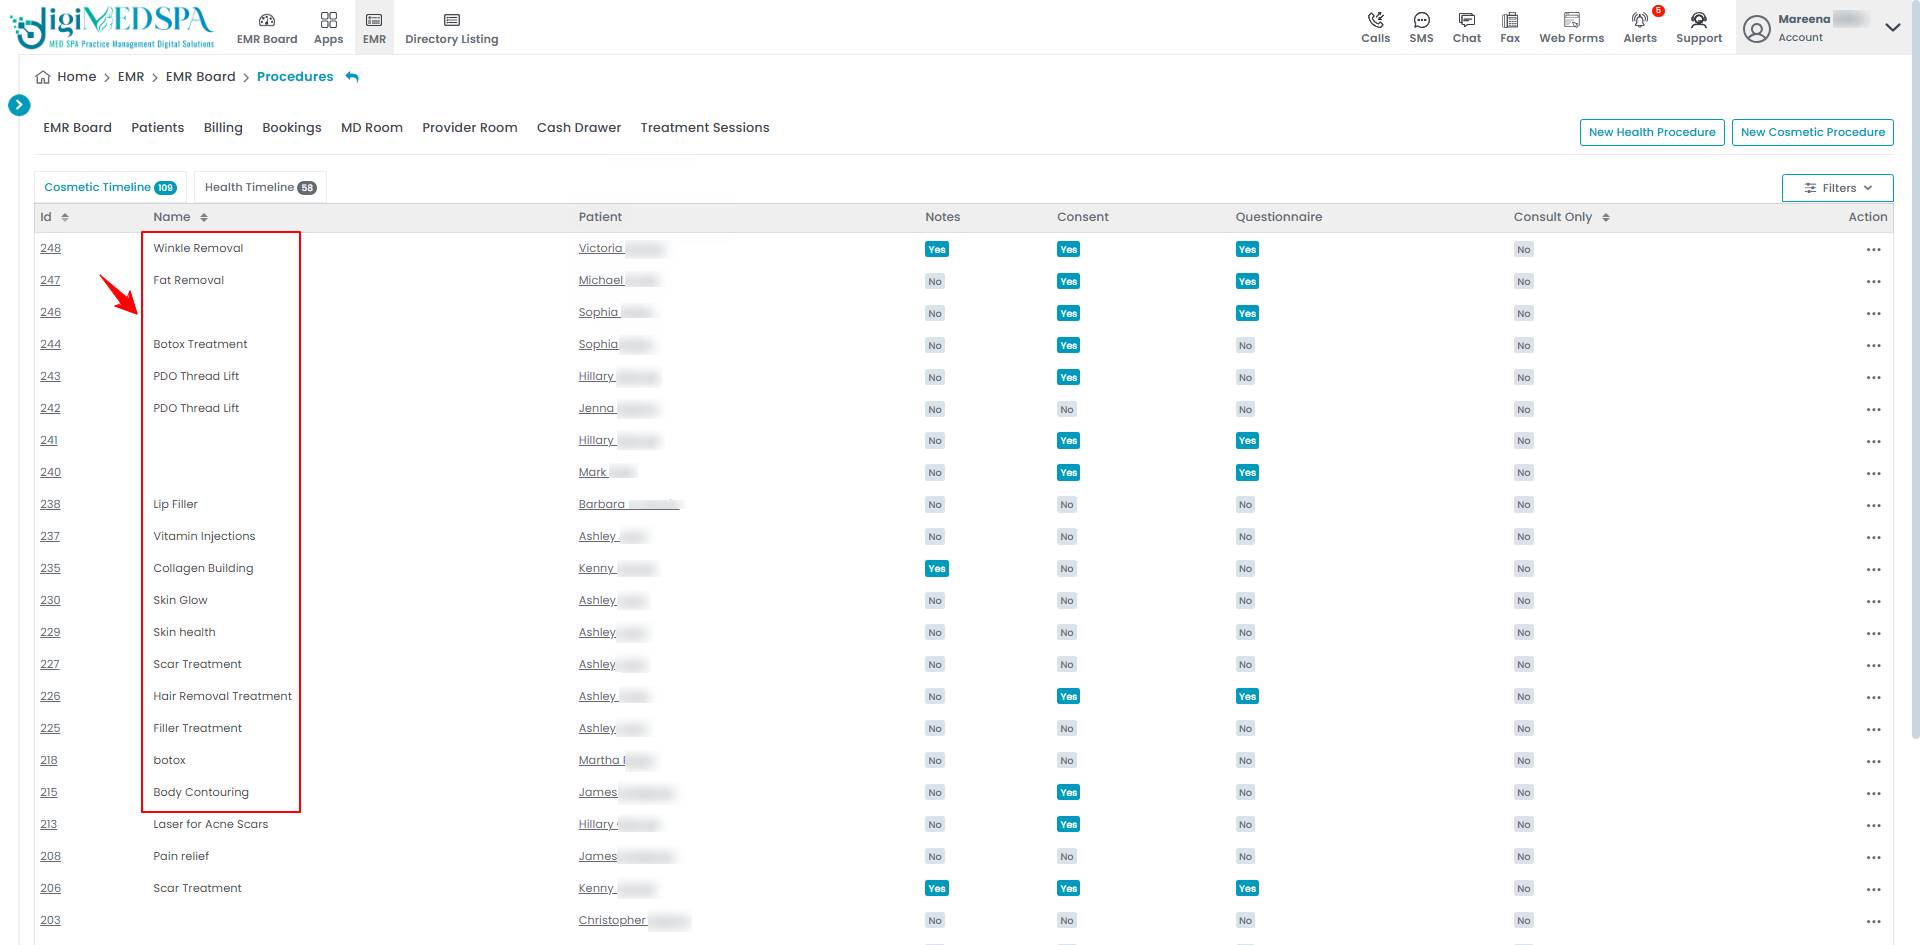
 Note: The "Procedure Information" column for incomplete procedures before Step 4 will appear empty in the "MD Room" and "Provider Room" procedure list because they haven't been named yet.
- In Step 4, enter a relevant “Name” for your procedure and select the “Cosmetic Procedure Type.” A dropdown menu for "Cosmetic Procedure Type" will appear with options such as Face, Chest, Butt, Trunk, Arms, Legs, Neck, and Full Body. Select the appropriate type based on the area where the cosmetic procedure will be performed.
- Step 5: Questionnaire
- Select the “Questionnaire” relevant to the procedure from the dropdown menu. You can choose as many questionnaires as needed. After selecting a questionnaire, click “Next.”

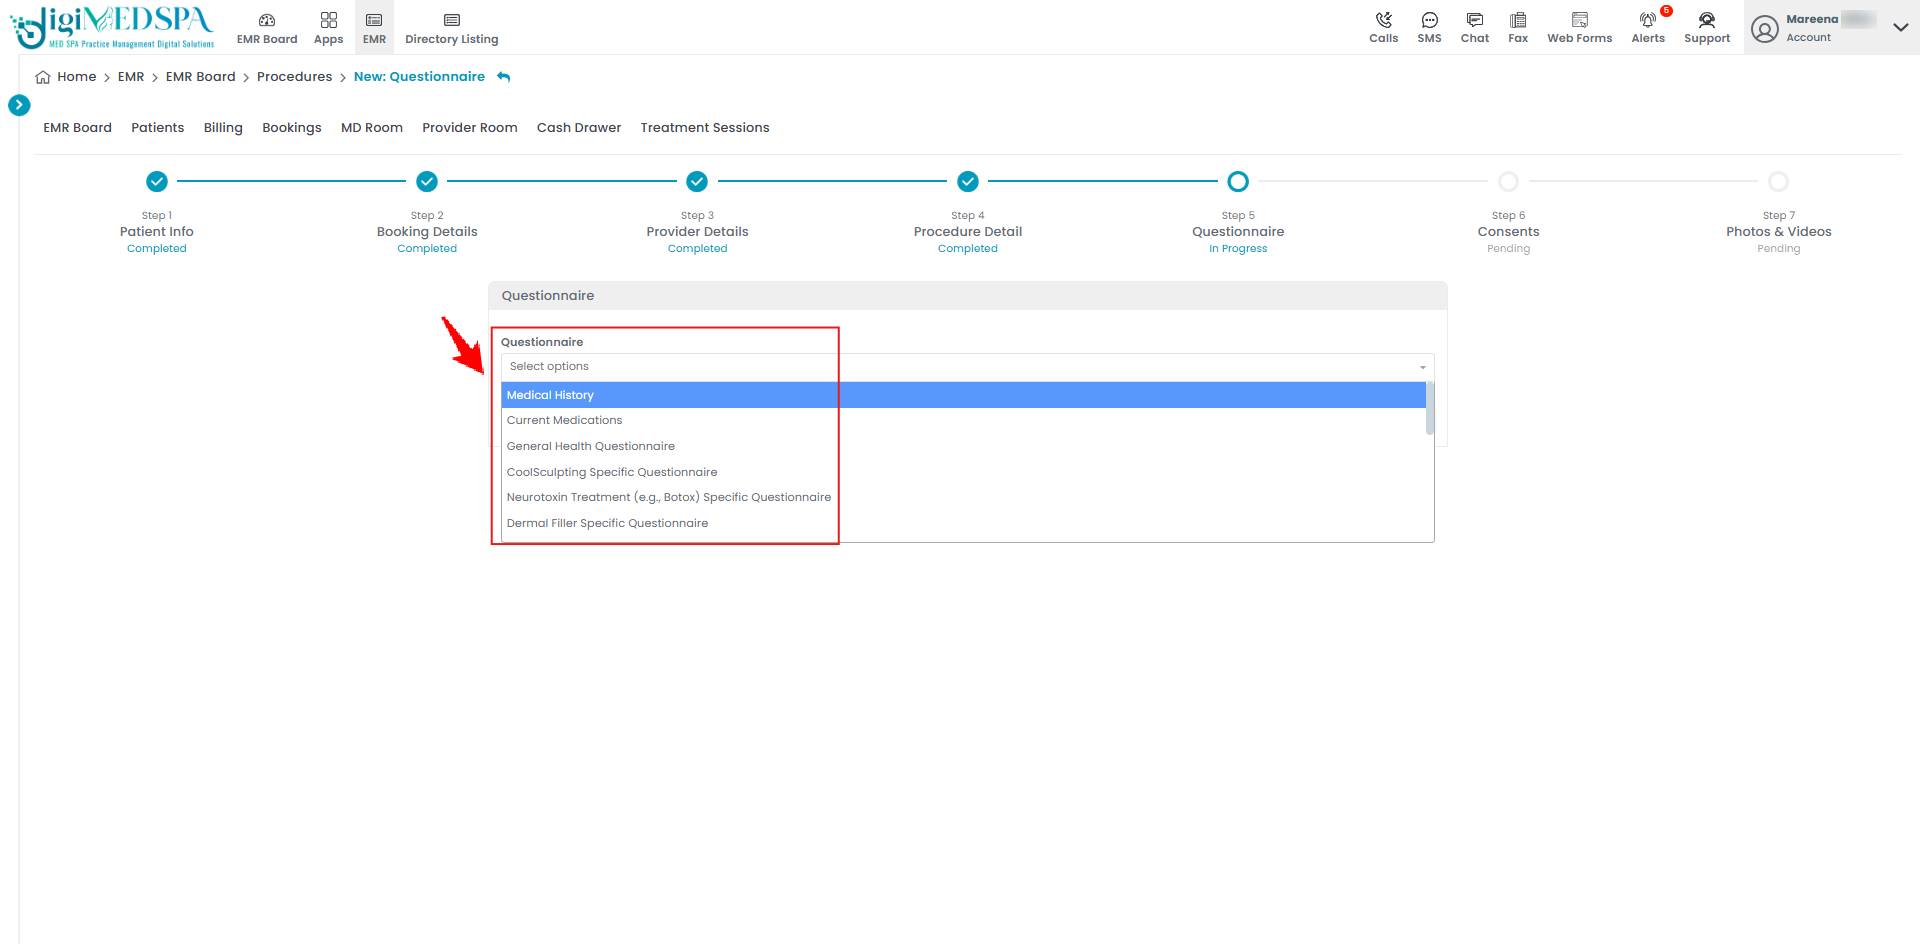 Note: This step is optional, so the user can also skip it by clicking “Next” without selecting the questionnaires.
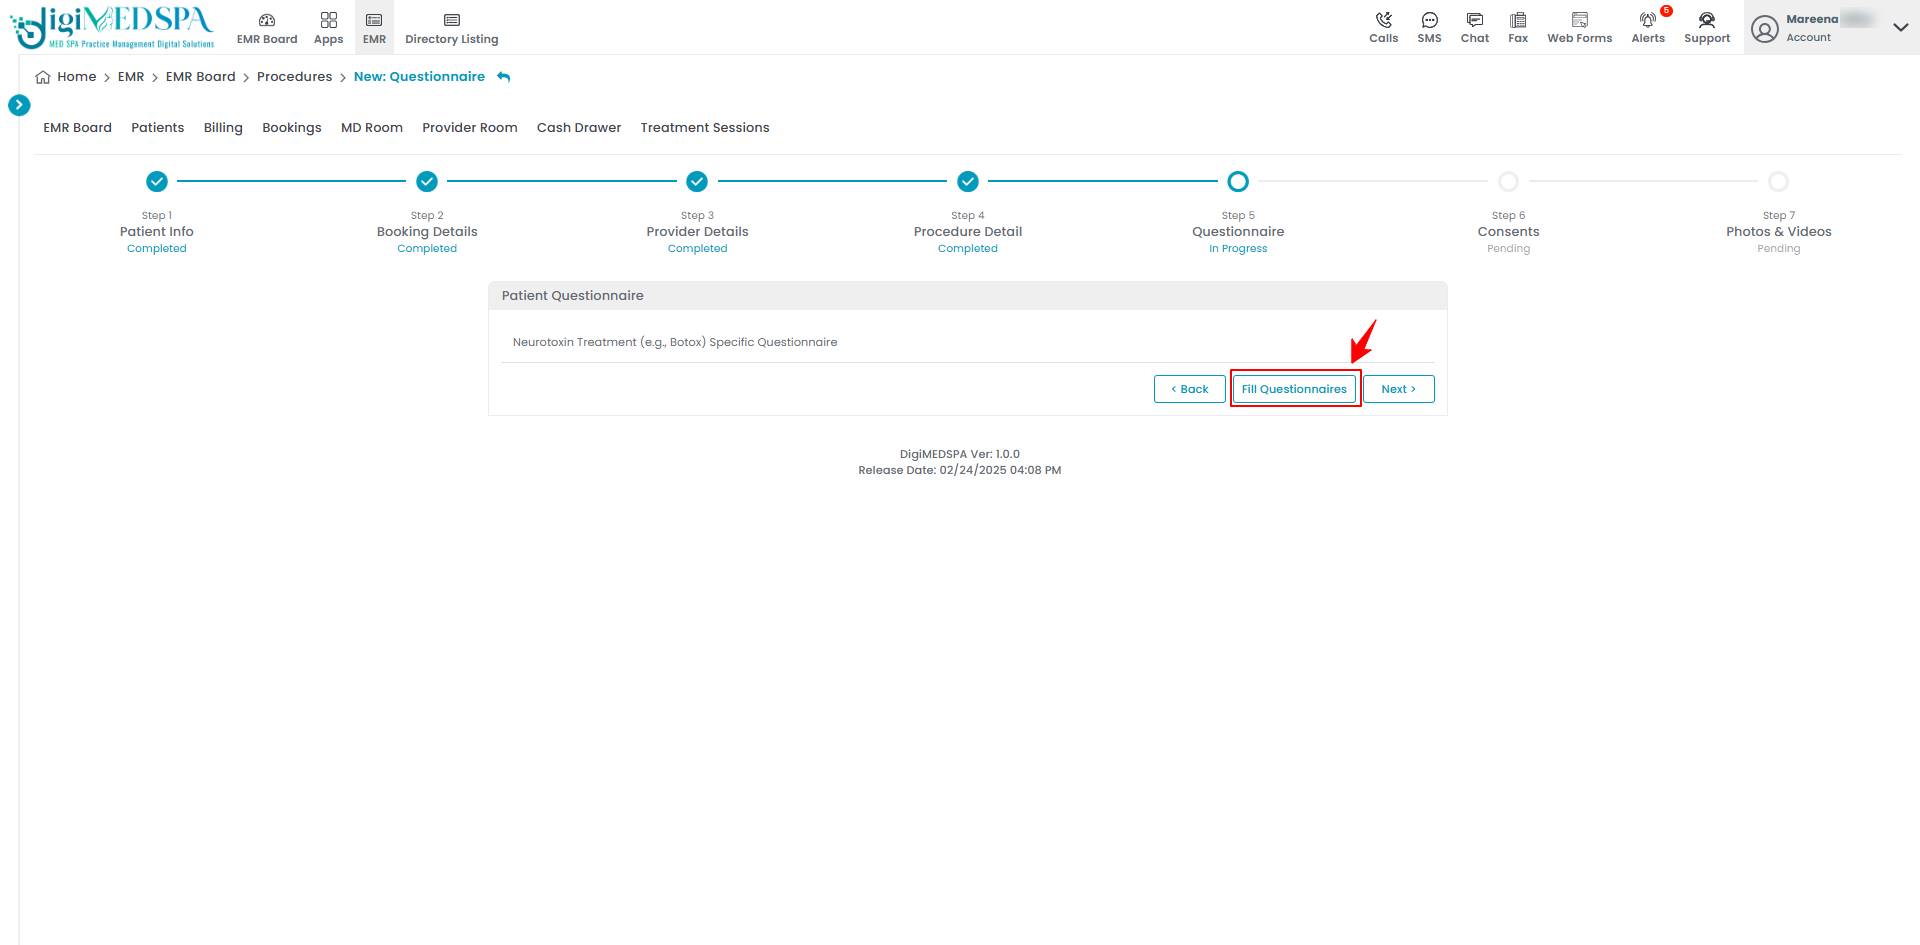
 - After the questionnaires are selected, the user can have the patient fill out the questionnaires by clicking on “Fill Questionnaires” if the patient has already checked in at the Med SPA facility to get the procedure done. Alternatively, the patient can log in to their patient portal and fill out the questionnaires before the procedure is performed.

- After the questionnaires are filled, click “Finish” to proceed.

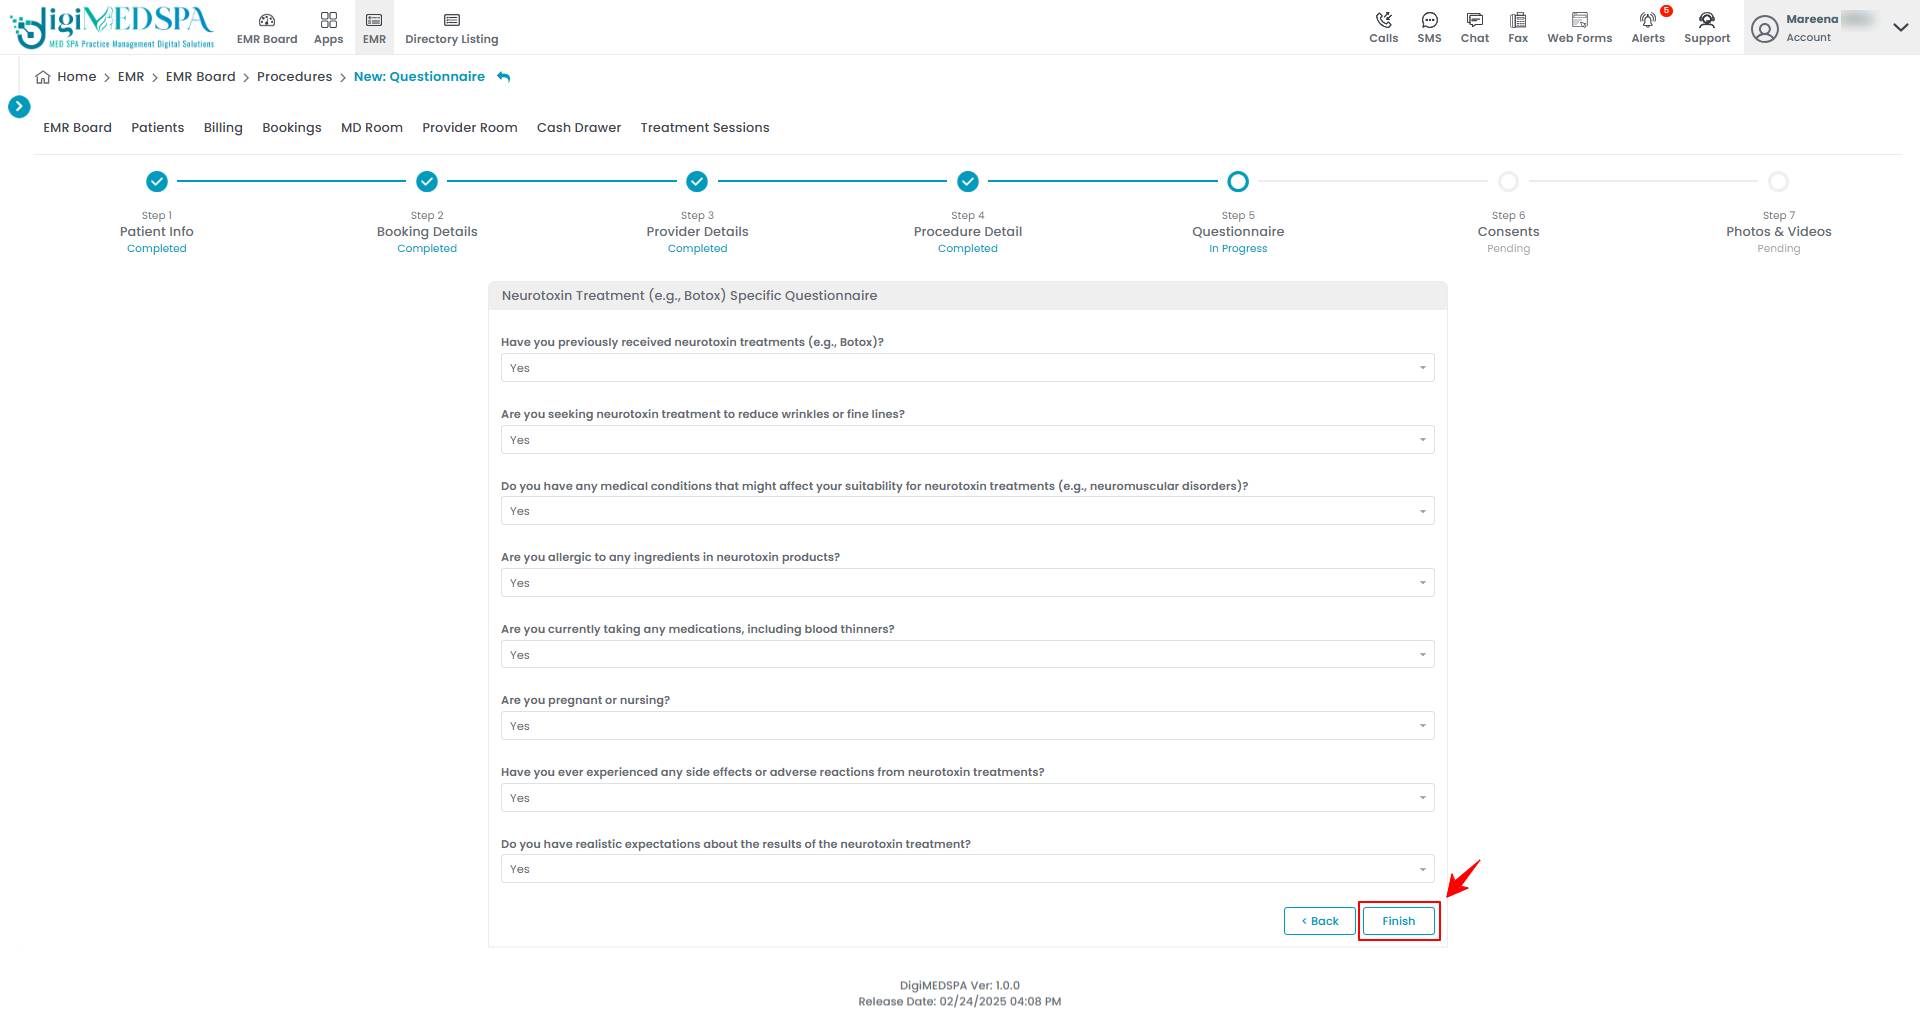 Note: It is mandatory to fill out the questionnaires before the procedure begins.
- Select the “Questionnaire” relevant to the procedure from the dropdown menu. You can choose as many questionnaires as needed. After selecting a questionnaire, click “Next.”
- Step 6: Consents
- Similar to Step 5, select the relevant consent forms from the dropdown menu. You can select as many as needed. After selecting a consent form, click “Next.”

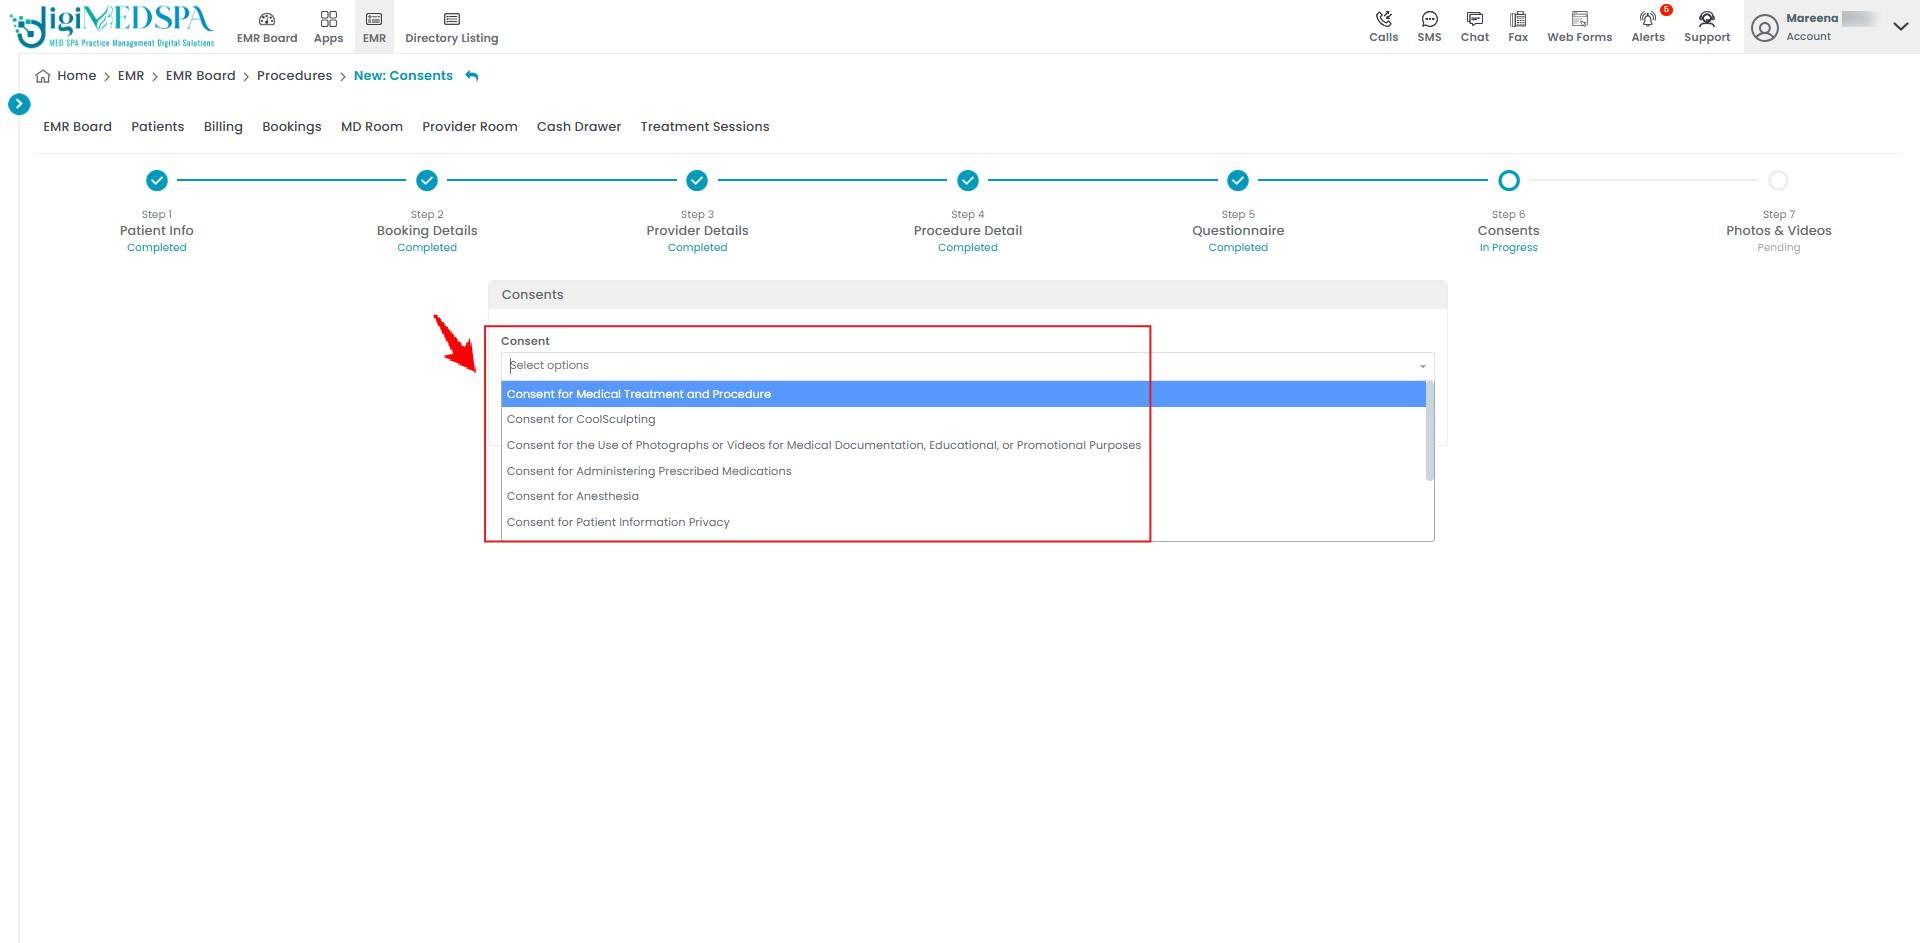 Note: This step is optional, so the user can skip it by clicking “Next” and have the patient sign the consent later before the procedure begins.
 - The user can have the patient sign the consent form by clicking on “Sign Consents,” and then "Click to Sign" button, if the patient has already checked in at the clinic. A blank screen will appear for the patient to provide their electronic signature. Once the signature is completed, click "Save". Alternatively, the patient can log in to their patient portal and sign the consent form independently.

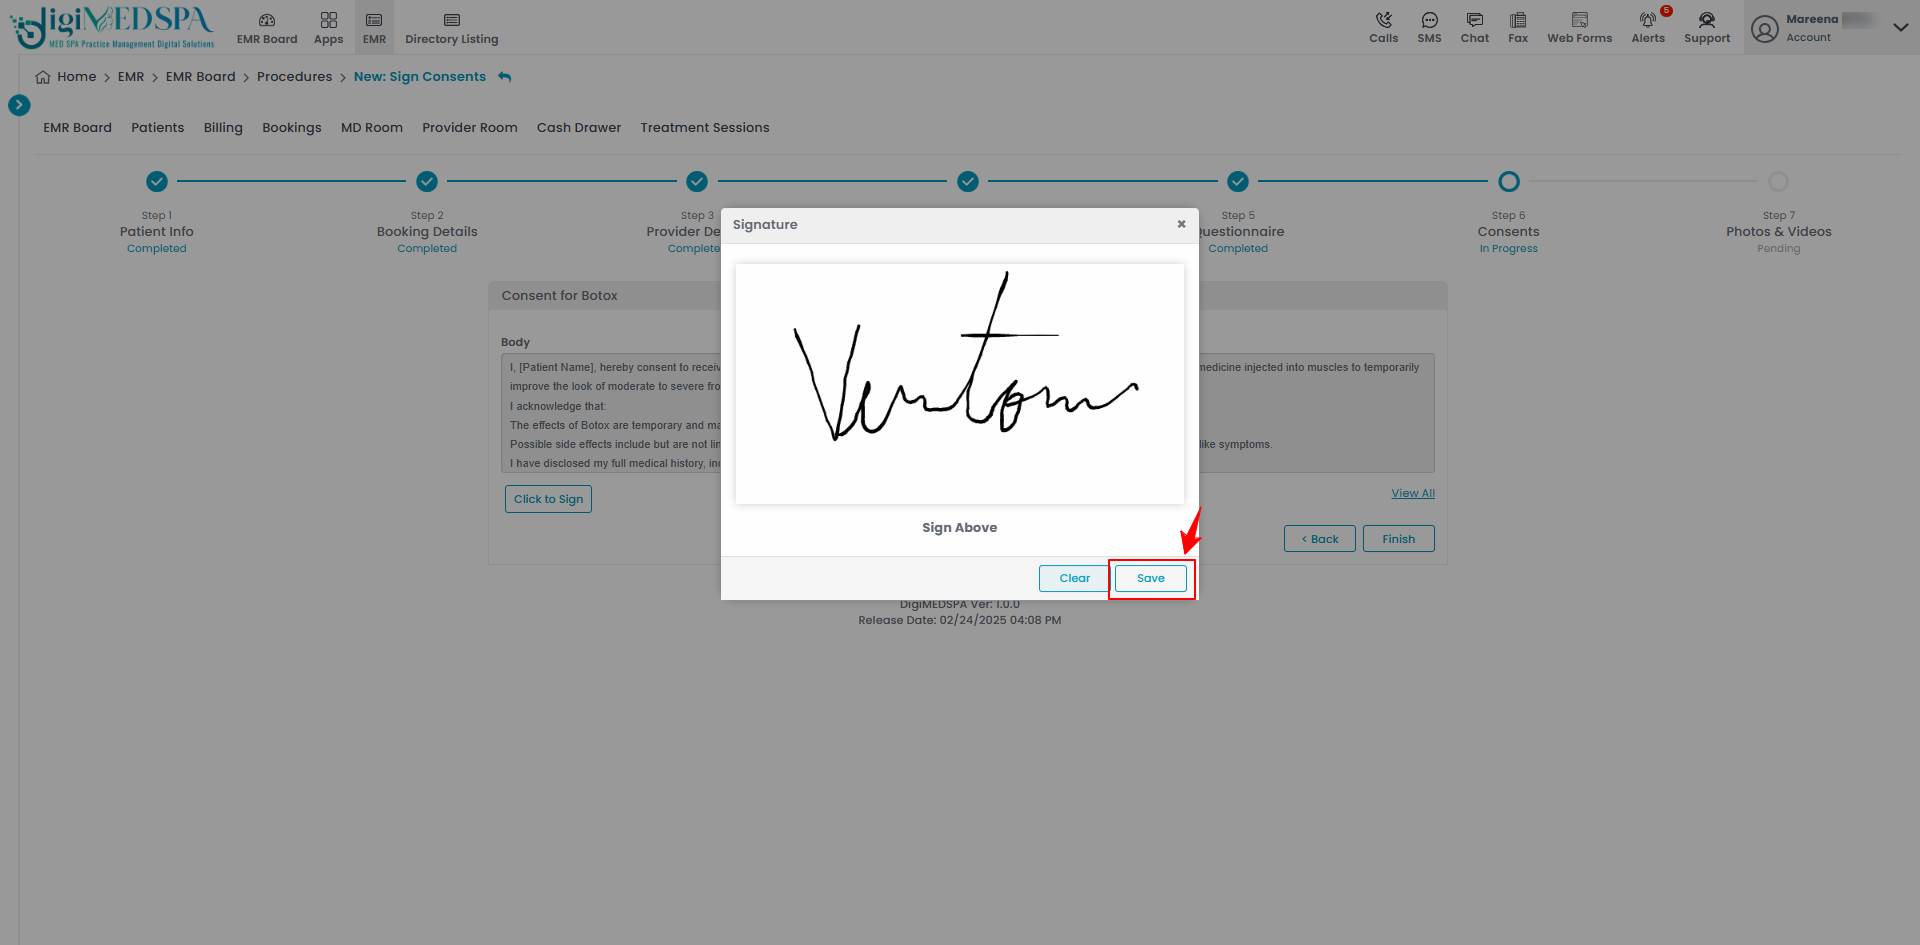
- The patient's electronic signature will appear below the consent form on the screen. Once confirmed, click "Finish" to proceed.

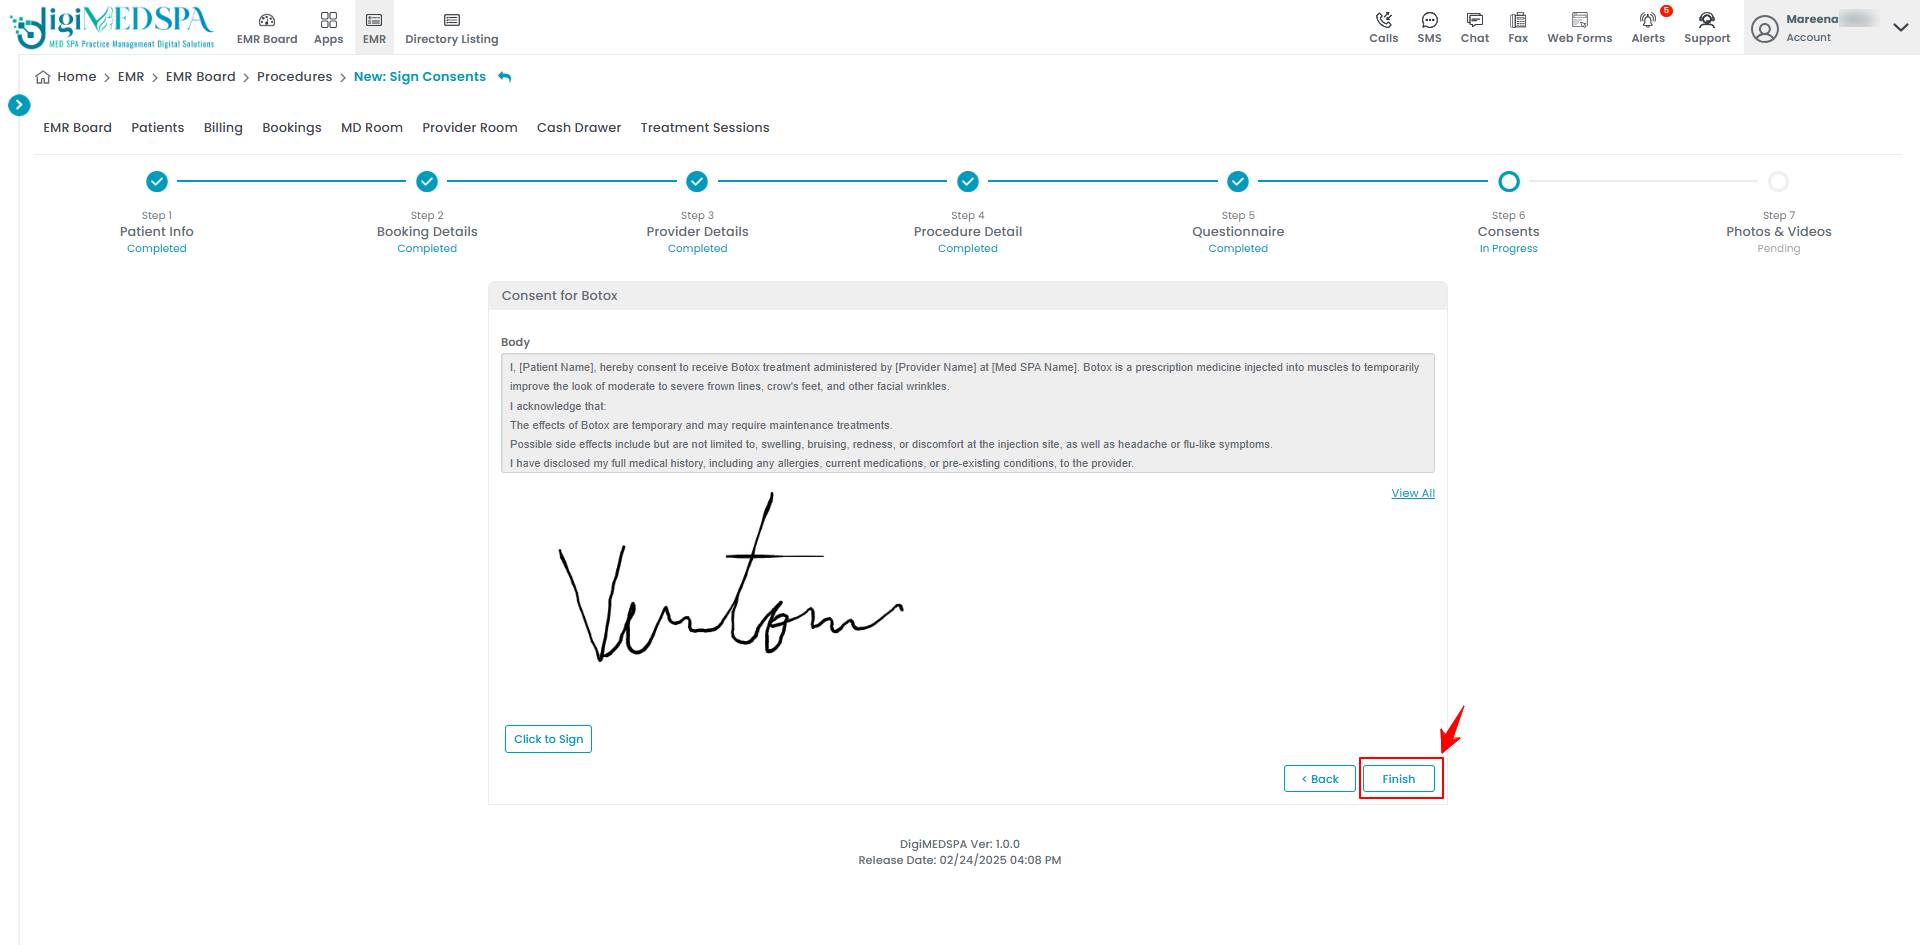 Note: Signing the consent forms before beginning the procedure is mandatory.
- Similar to Step 5, select the relevant consent forms from the dropdown menu. You can select as many as needed. After selecting a consent form, click “Next.”
- Step 7: Photos & Videos
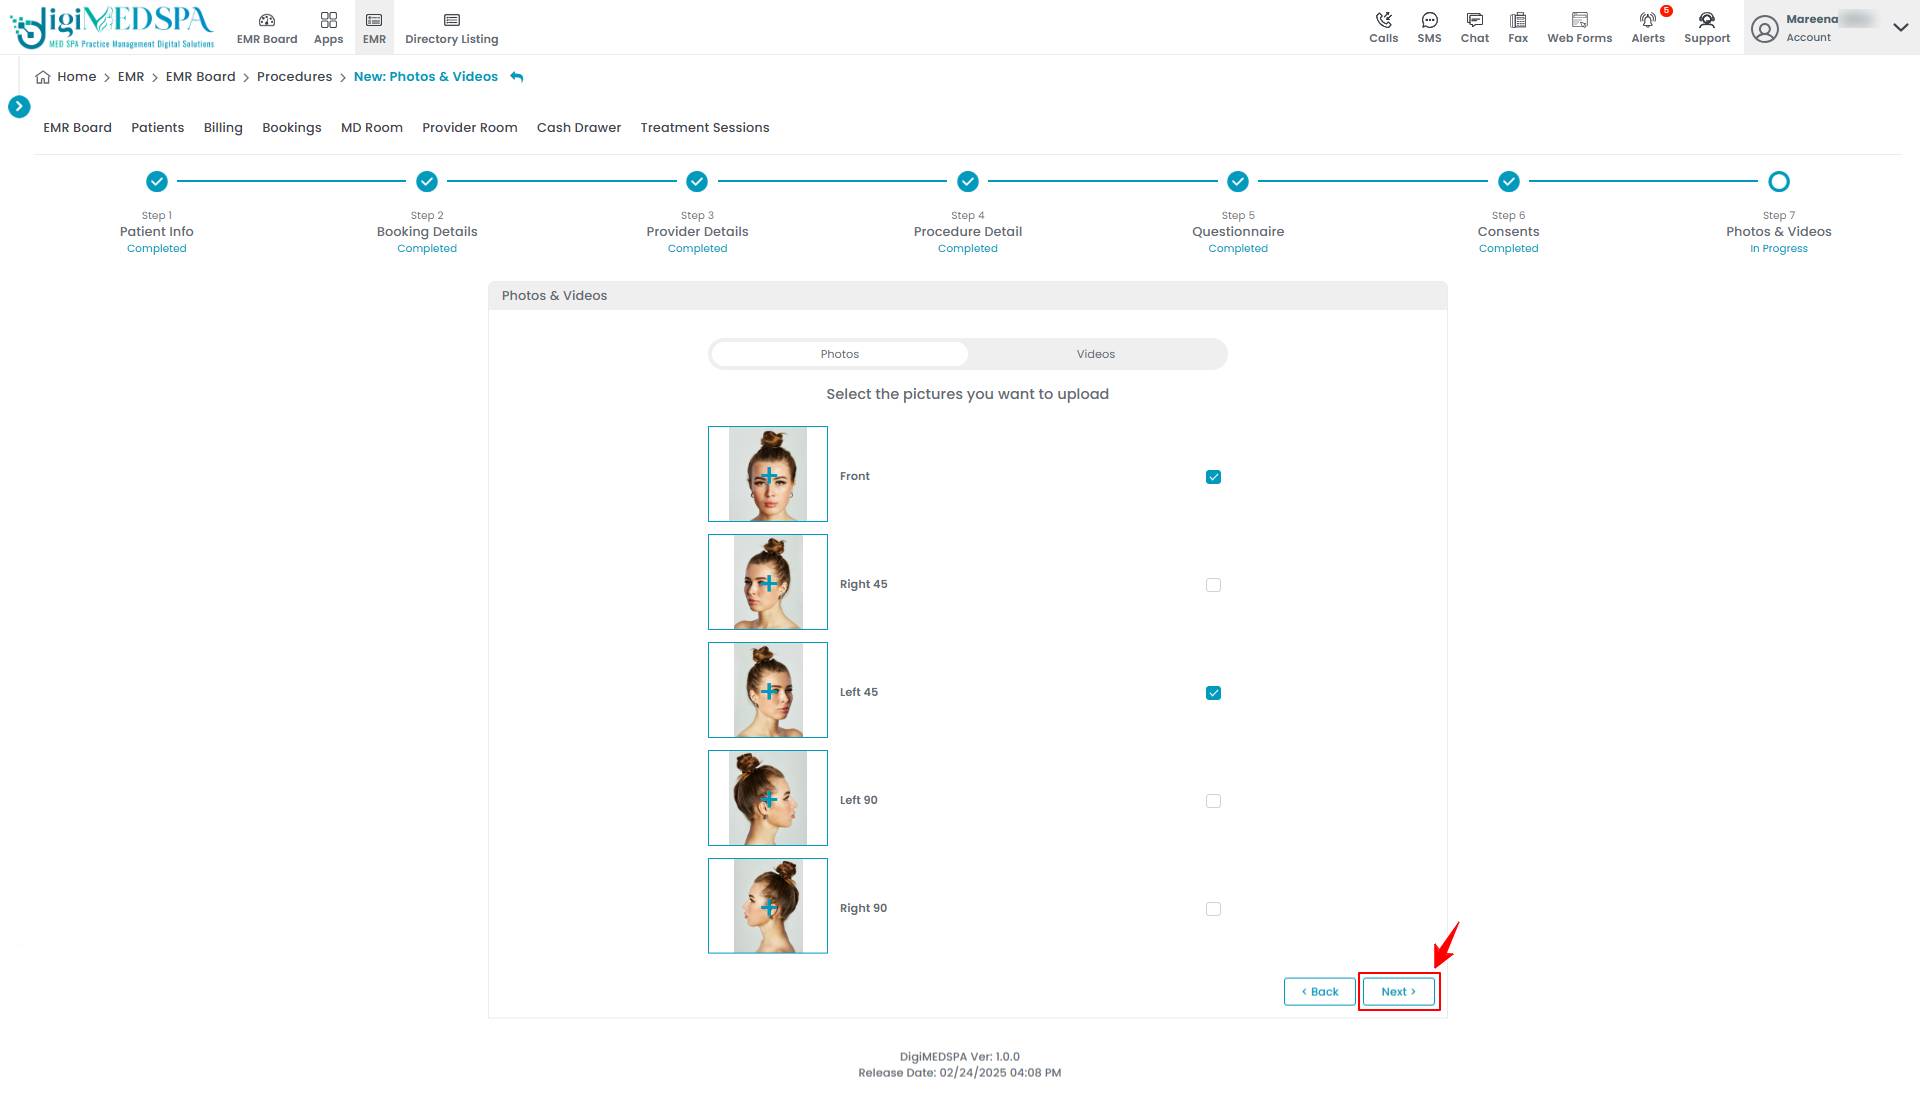
- In Step 7, upload photos for the procedure area selected in Step 4, ensuring coverage from the following angles: front, Right 45°, Left 45°, right 90°, and Left 90, for treatment charting and injection markings. Once the images are uploaded or selected, click "Next" to move to the charting screen.

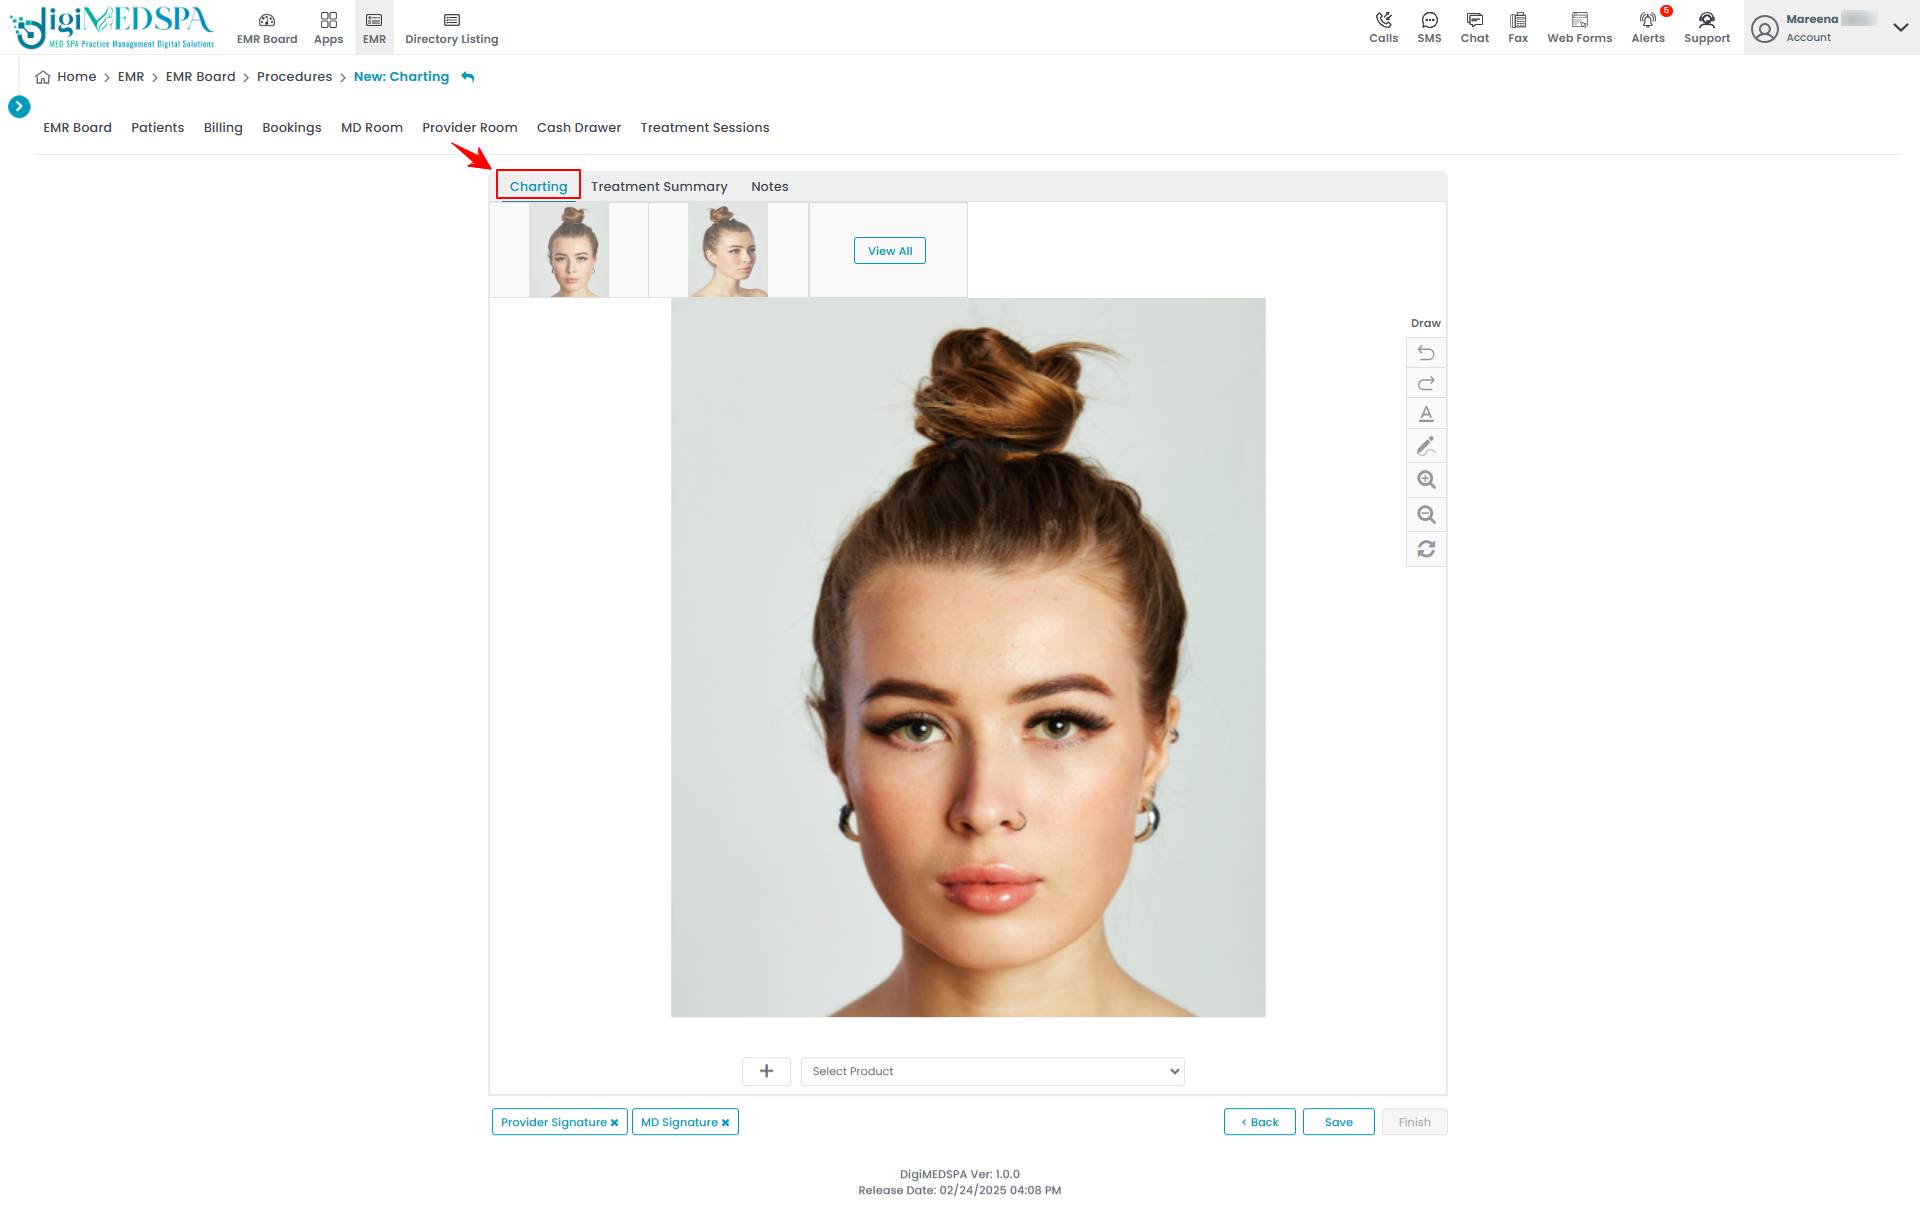
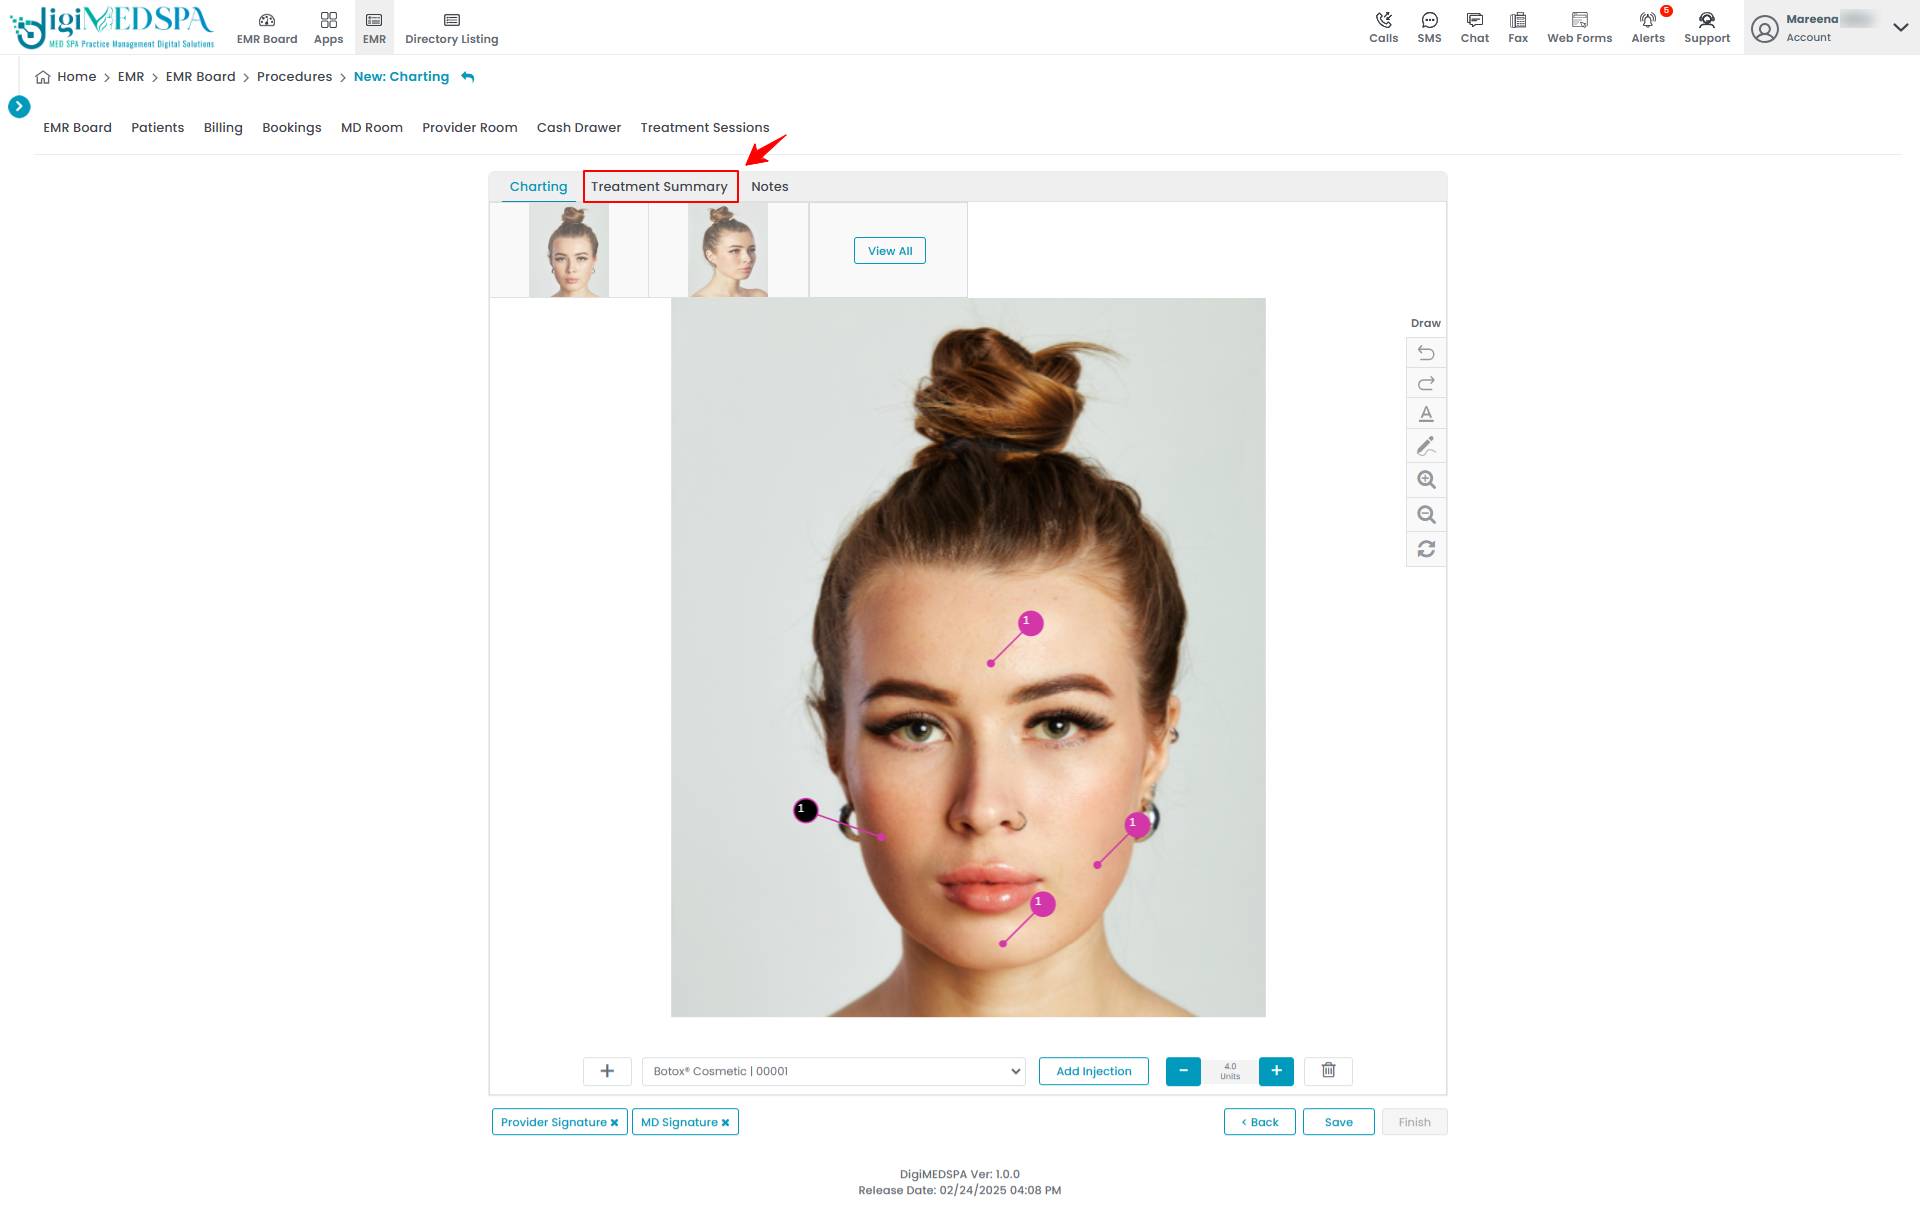
- The “Charting Screen” will open, allowing the user to precisely place drugs (products) and injection markings on the selected image for use during the procedure. Users can also utilize the drawing tools on the charting screen to annotate or highlight treatment areas.

- The user can use the following drawing tools on the charting screen to enhance precision and clarity:

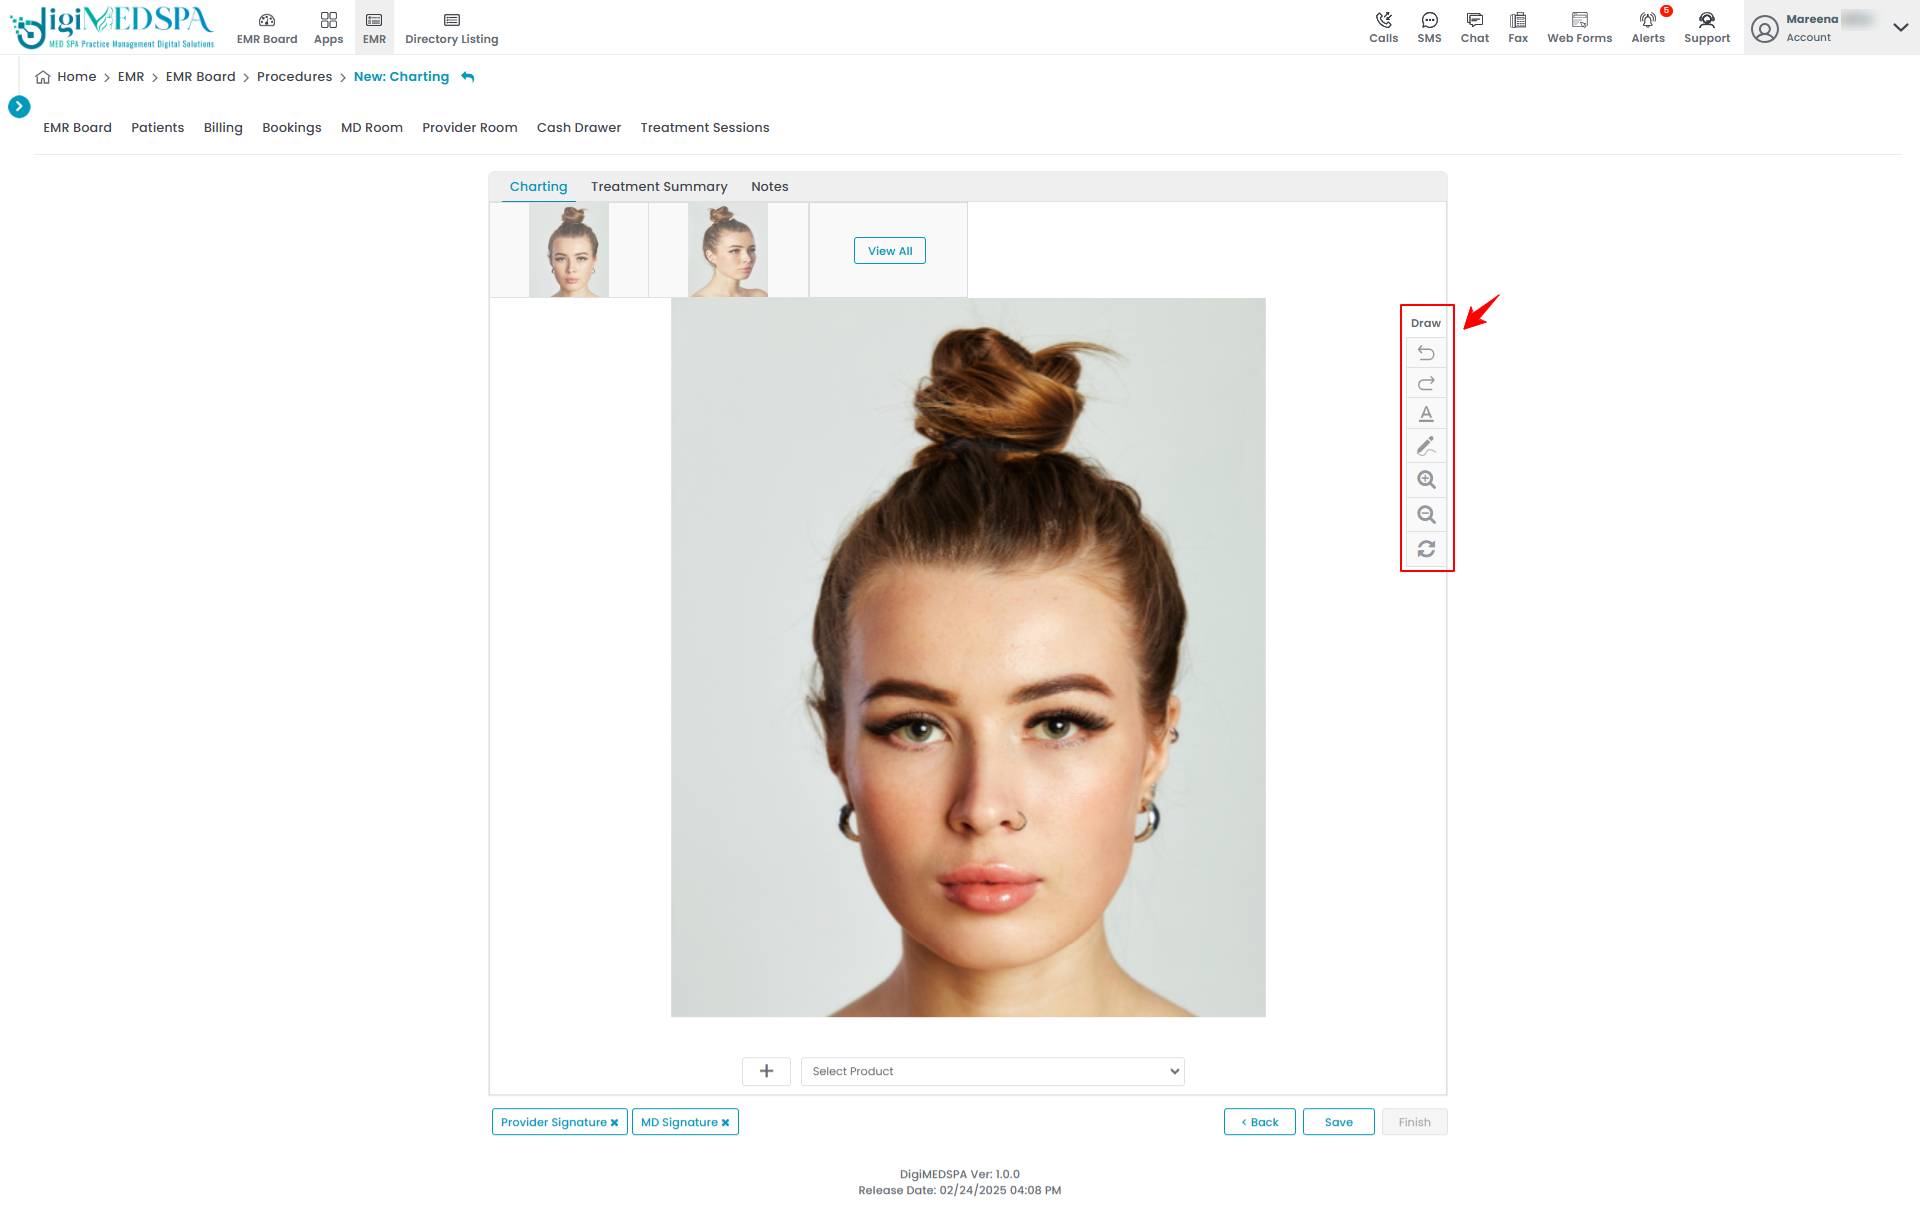 “Undo” reverts the last action performed on the charting screen, such as removing a drawing or marking.
“Redo” restores the last action that was undone, allowing you to reapply the previous change.
“Text”, denoted by “A” enables you to add text annotations directly on the charting screen, useful for labeling specific areas or providing additional notes.
“Draw” allows freehand drawing on the charting screen, letting users visually mark treatment areas or illustrate procedure details.
“Zoom In” magnifies the charting screen to provide a closer view, helping with precise markings.
“Zoom Out” reduces the zoom level to show a broader view of the charting screen, giving a clearer overview of the entire area being charted.
“Reset Text & Drawing” clears all text and drawing annotations on the chart, returning it to its original state. - To add products for injection markings on the charting screen, select “Add Product” from the dropdown menu to proceed.

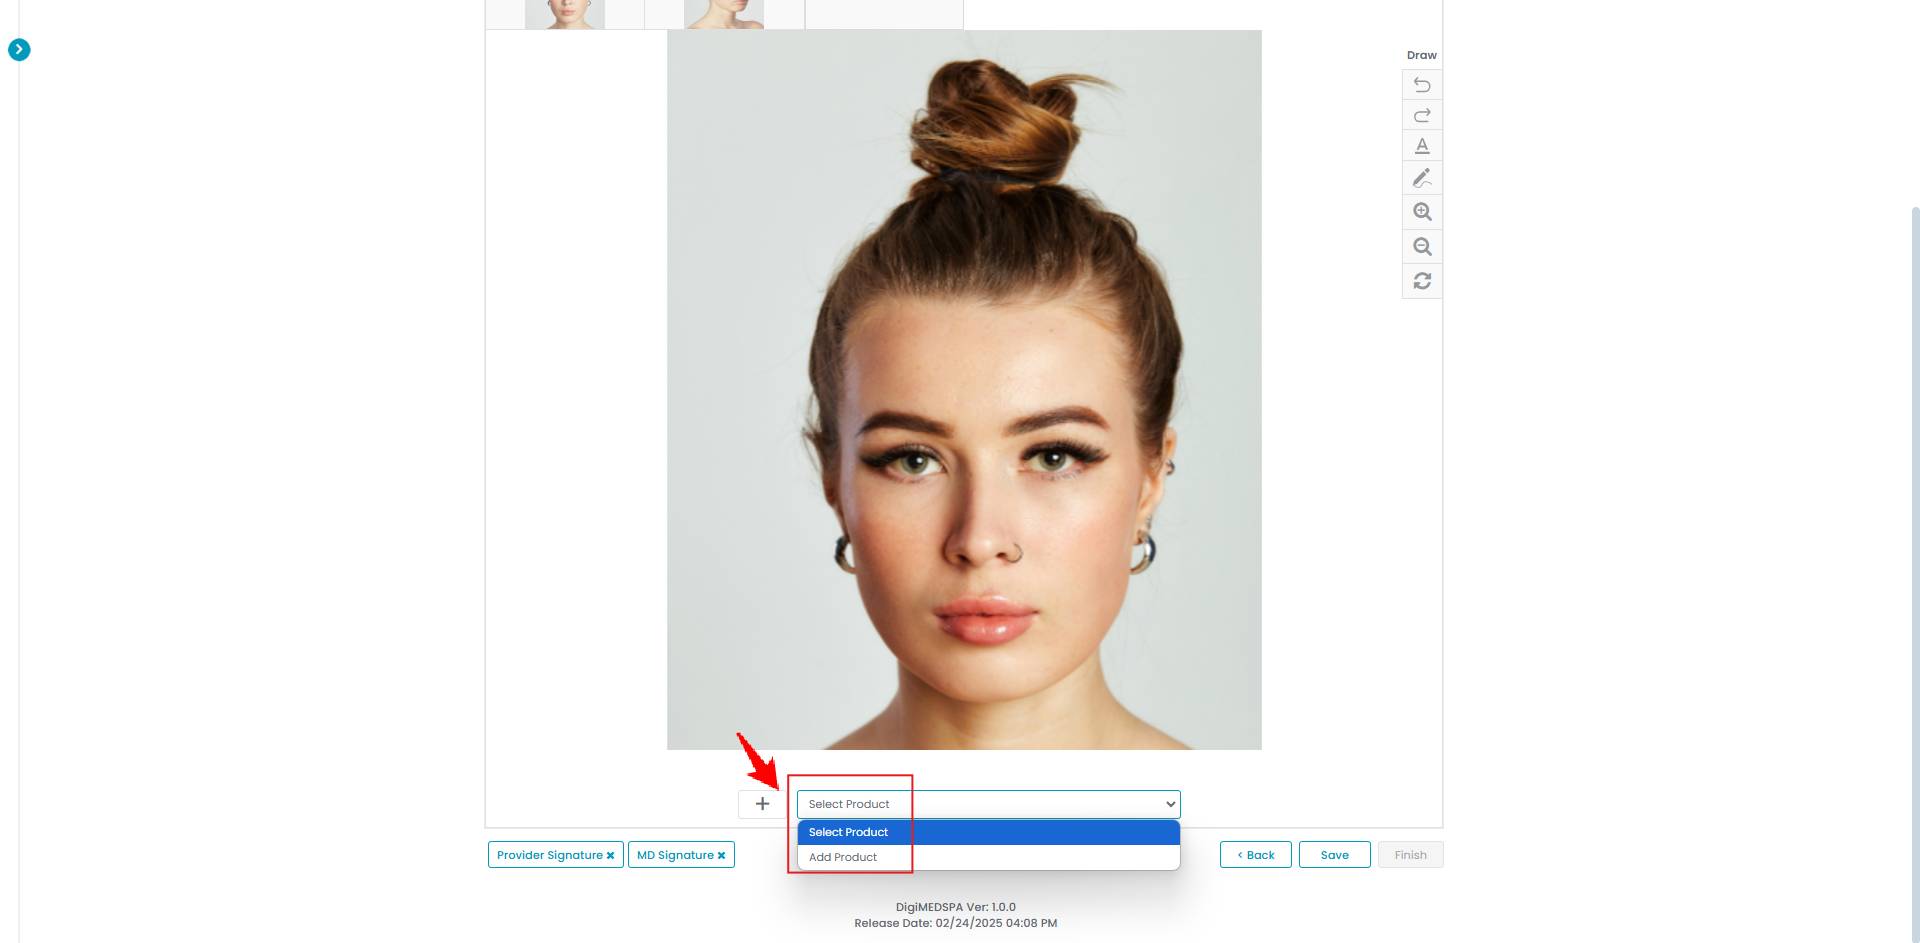 Note: You can also search for treatment products by clicking the "+" sign.
 - Select the treatment product from the dropdown menu for which you want to place the injection marking. The dropdown will display all available products.

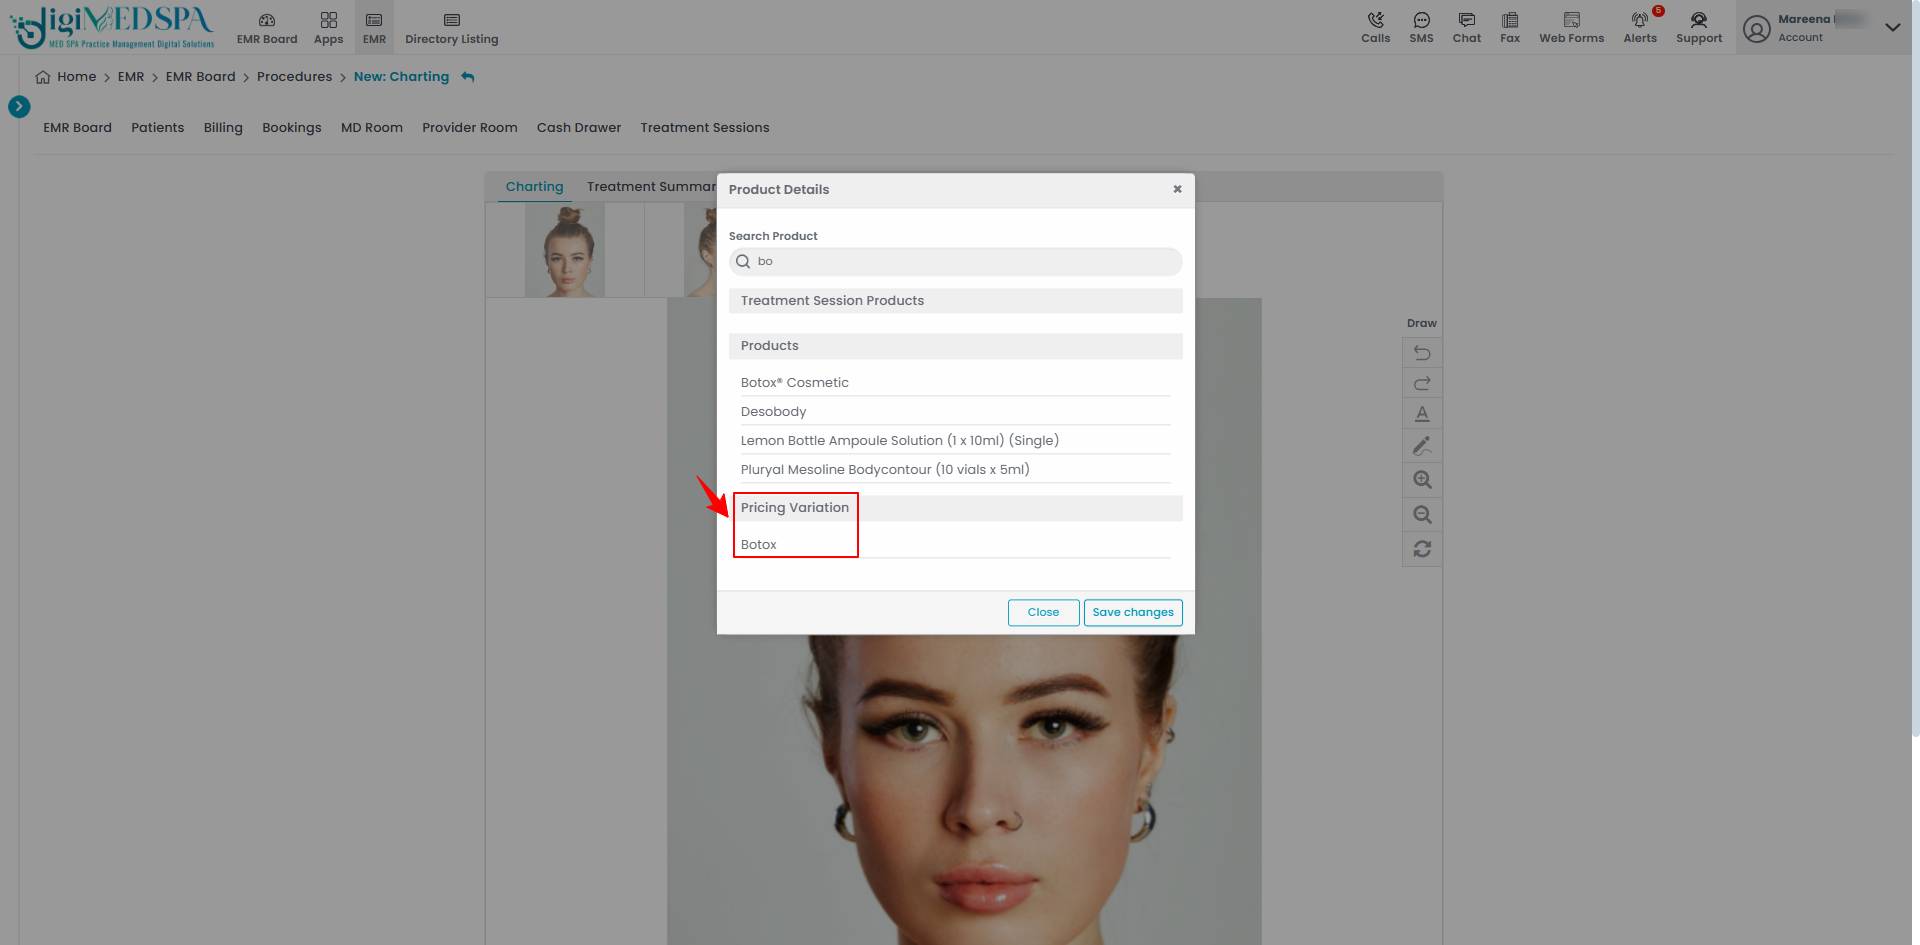
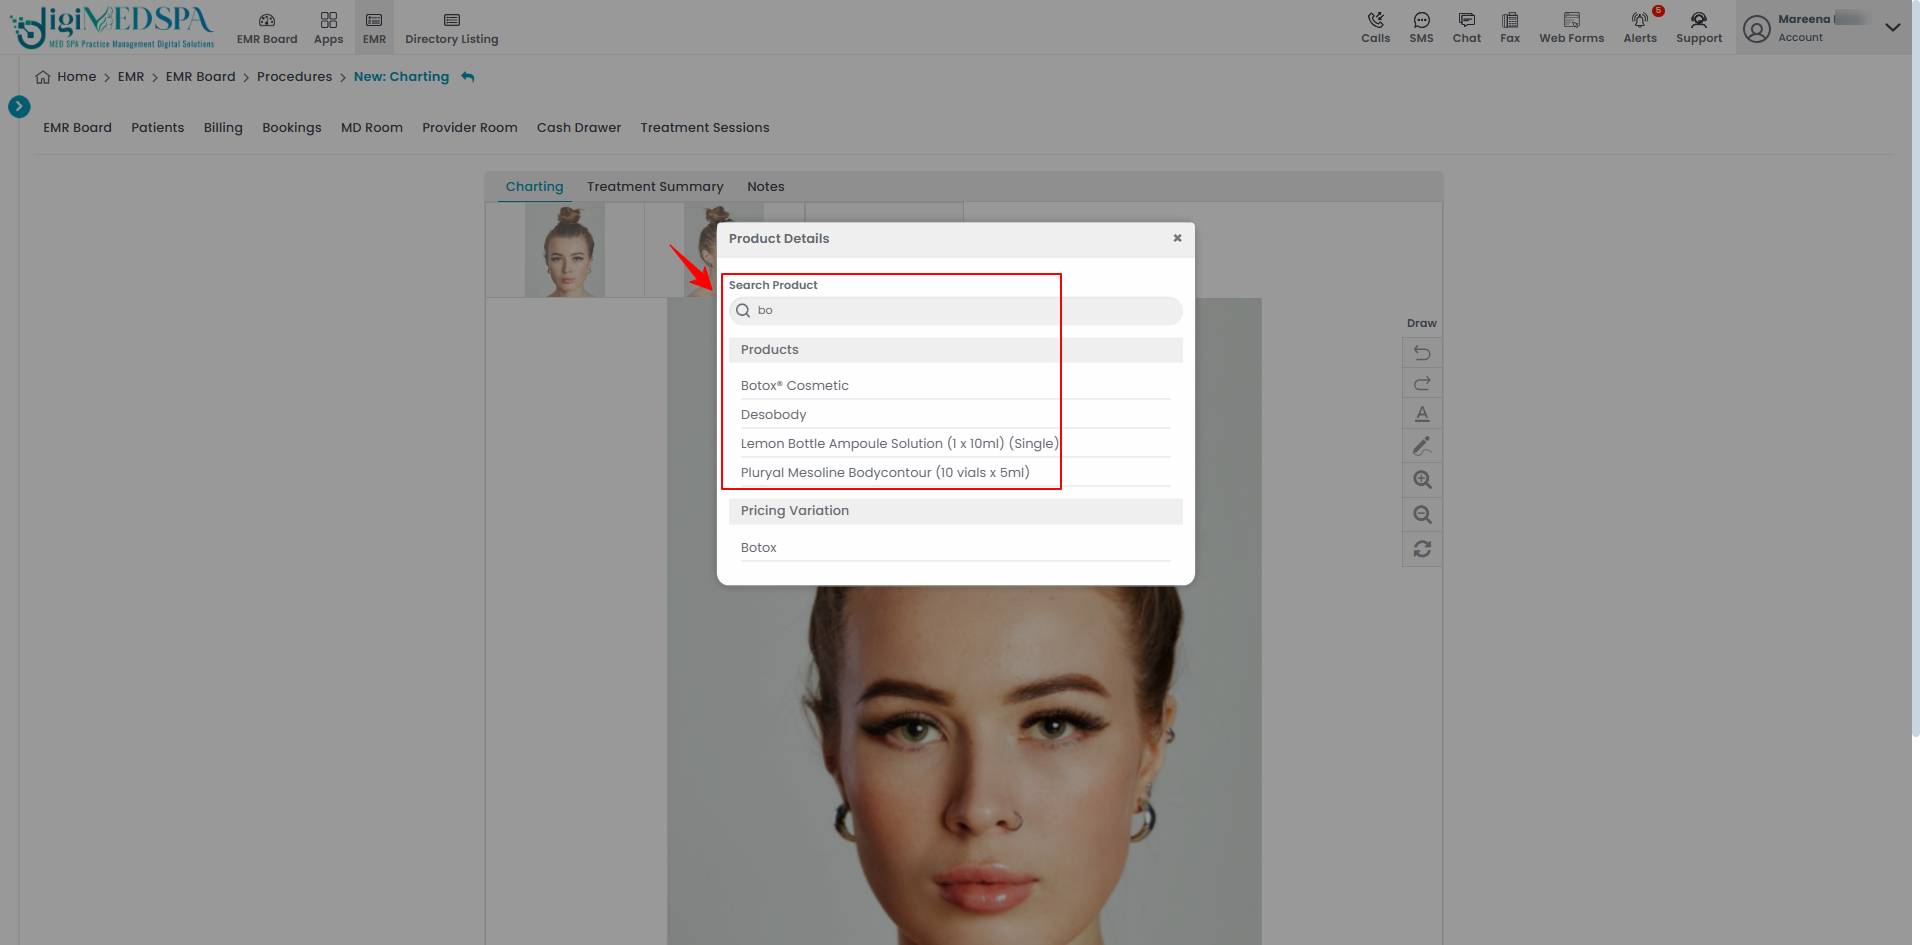 Note: The dropdown also displays the inventory variations created, enabling the user to select from those variations for injection markings.
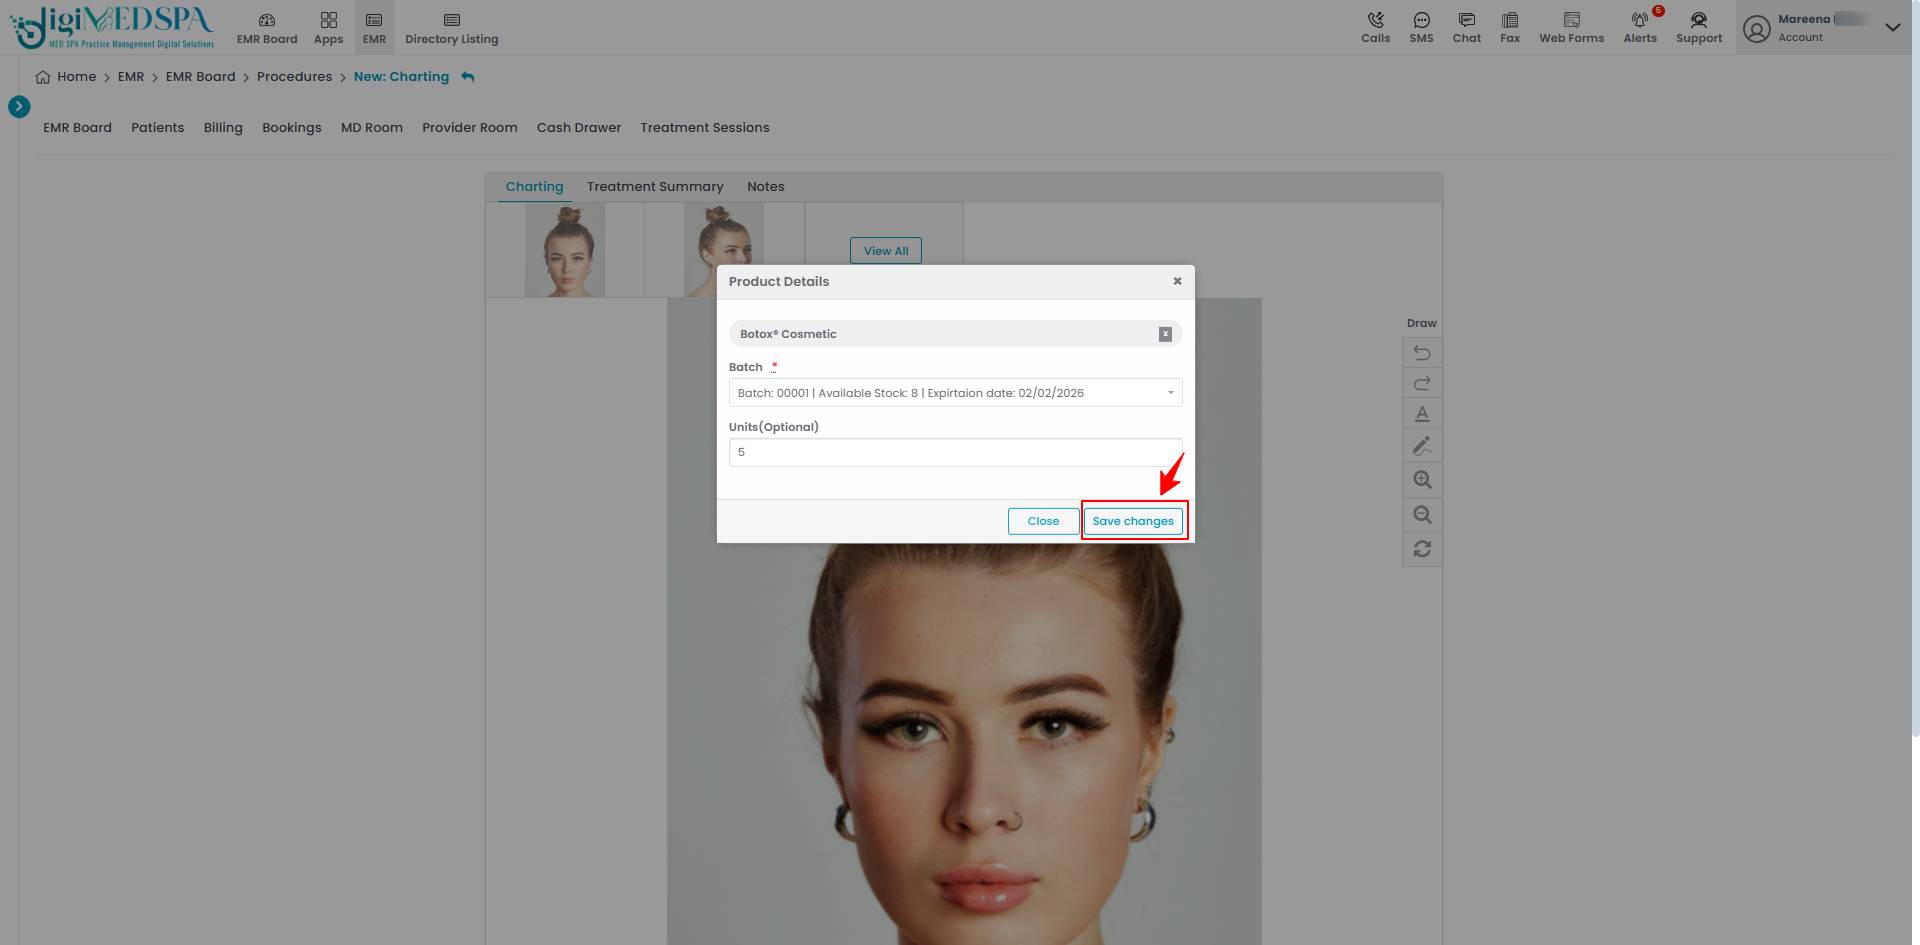
- After adding the product, select the Batch.

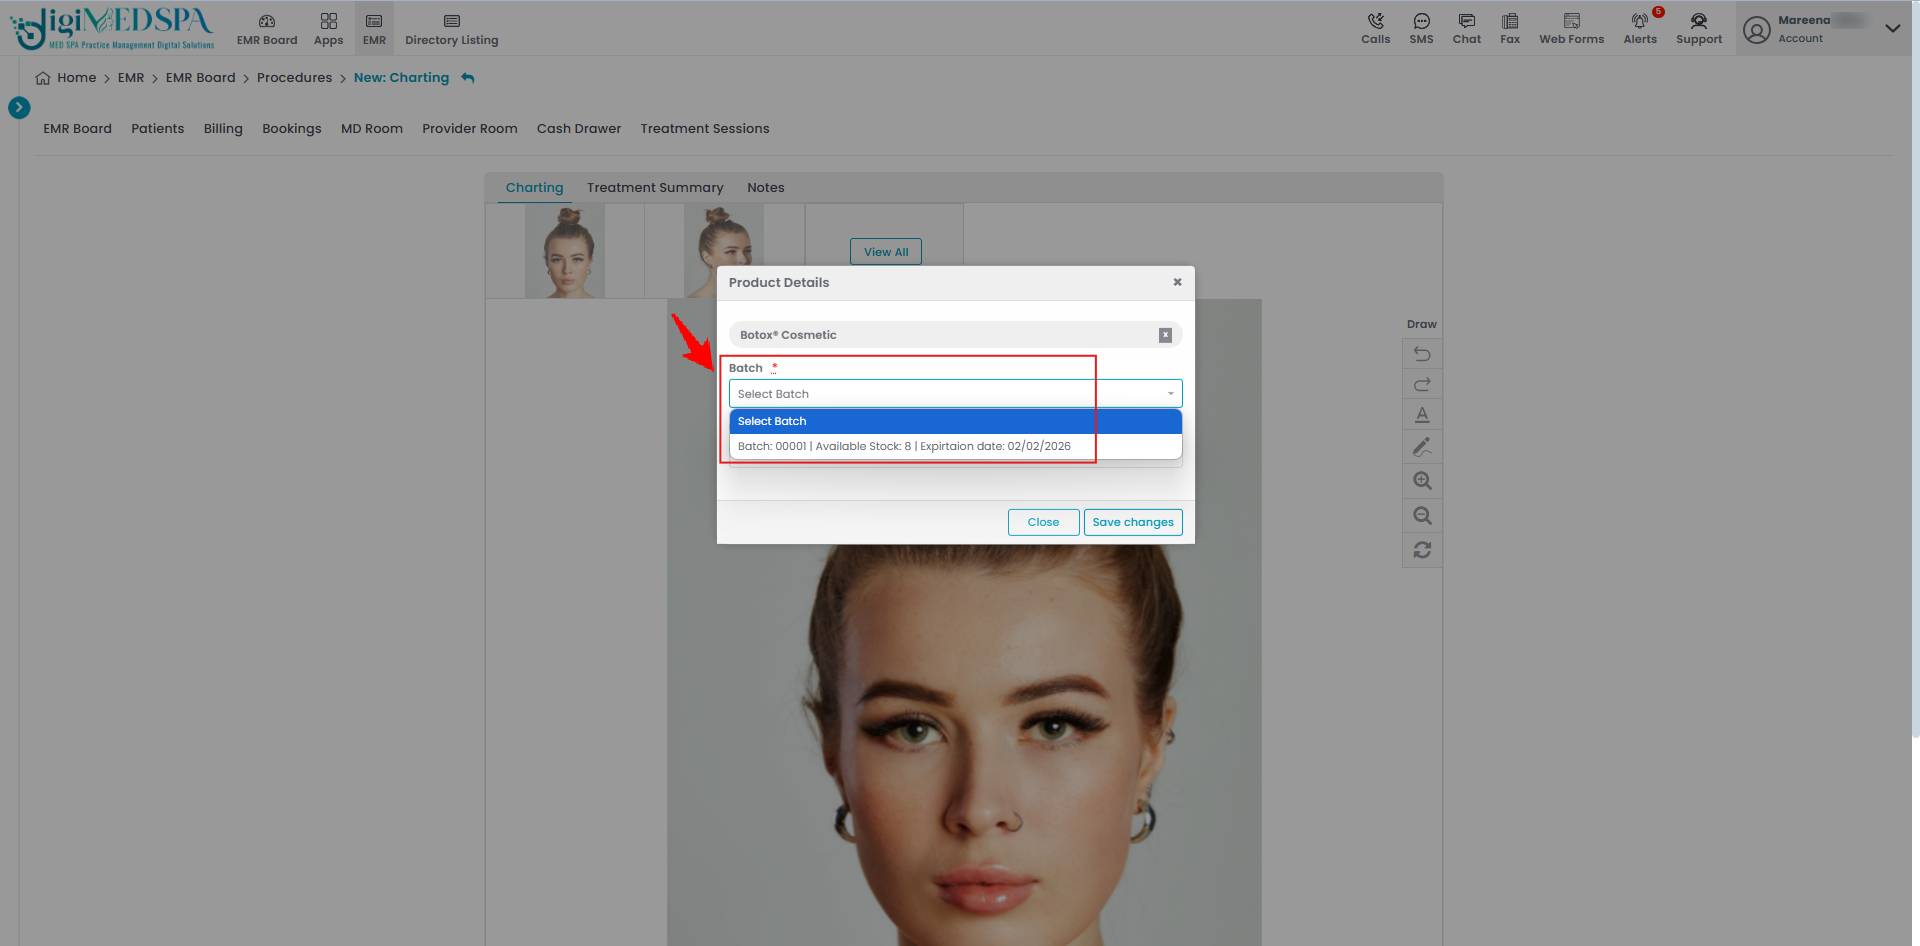
- Once the Batch is selected, enter the Units and click on ‘Save Changes’ to confirm.

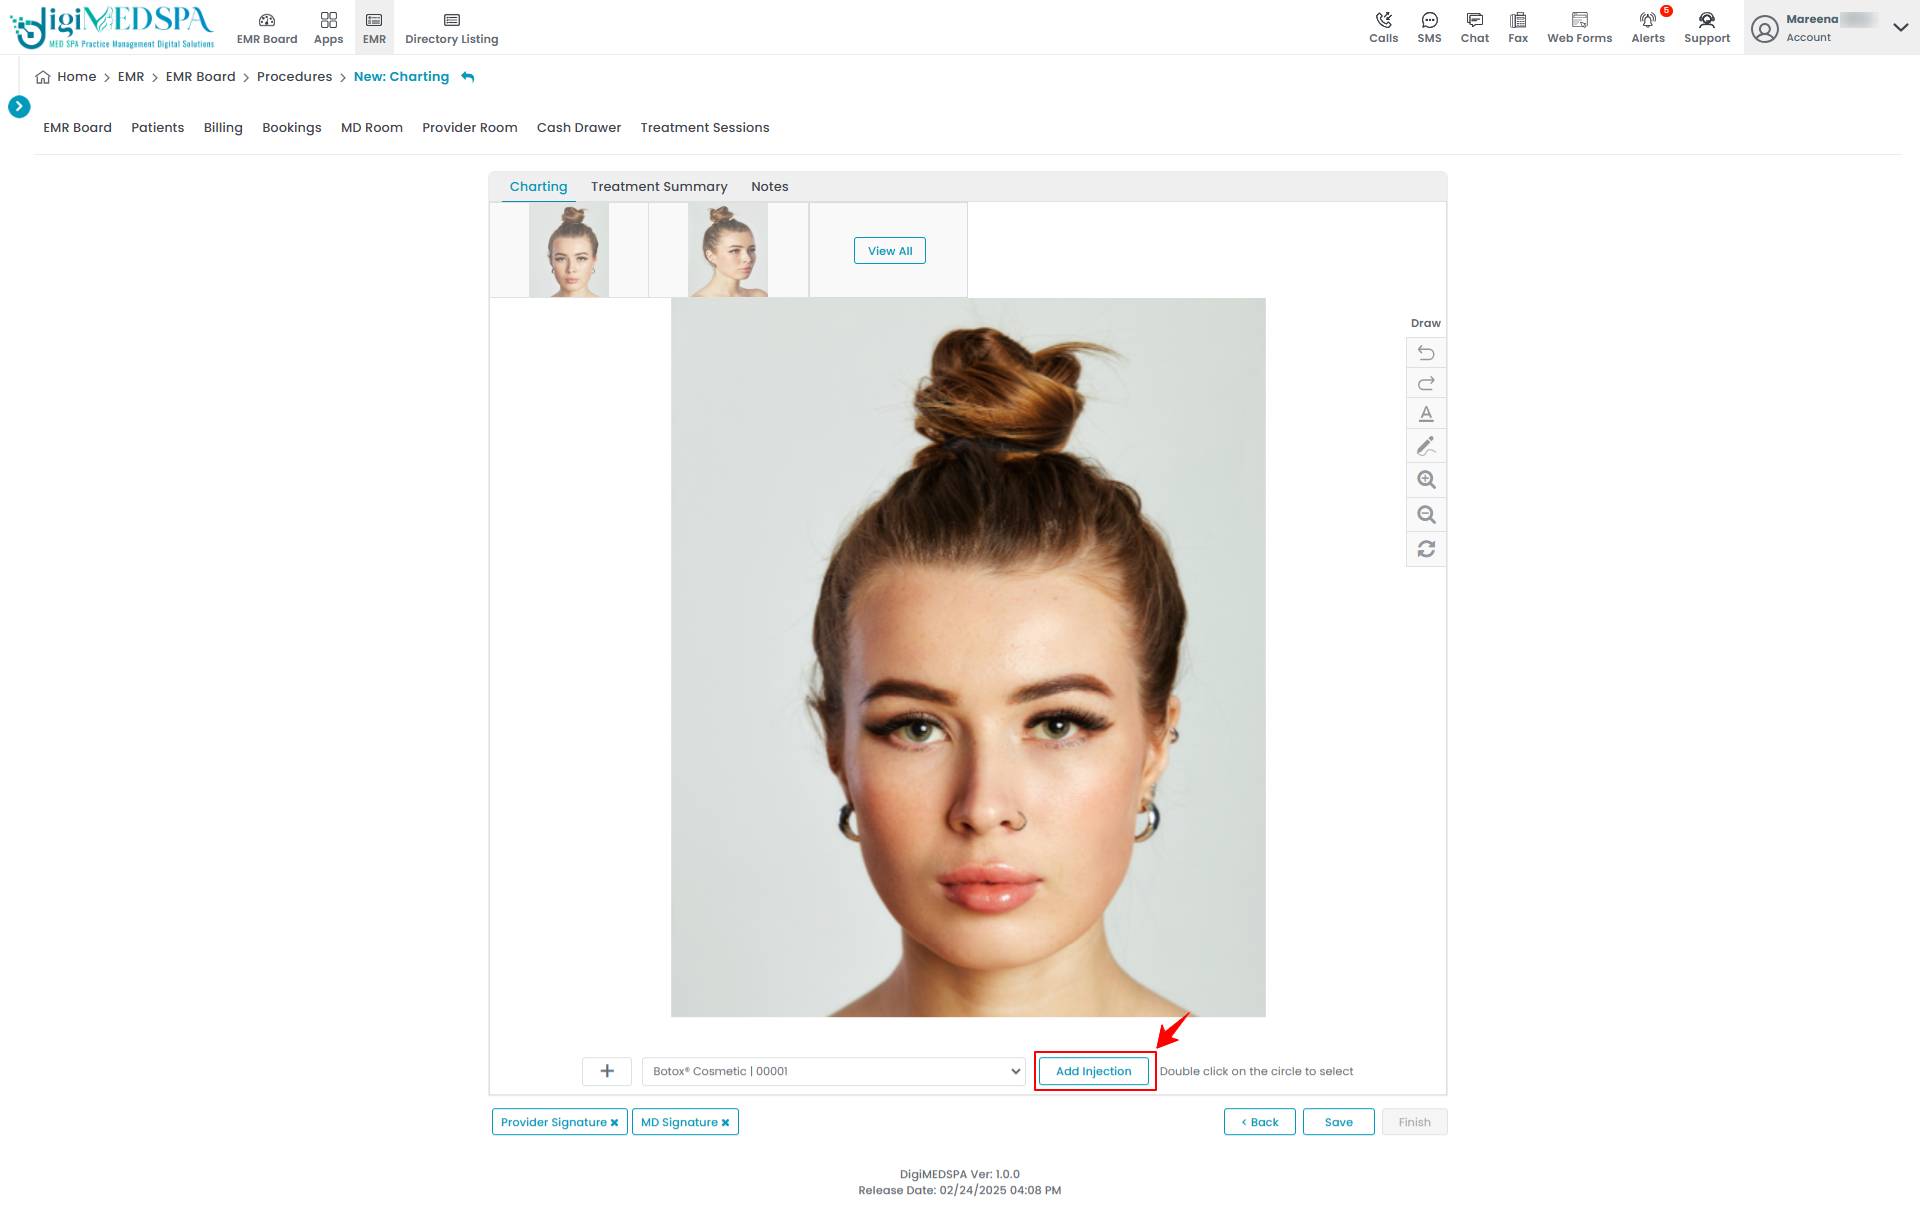
- Now, an option to add injections will appear. Click "Add Injection," then click on the area where you want to place the injection markings.

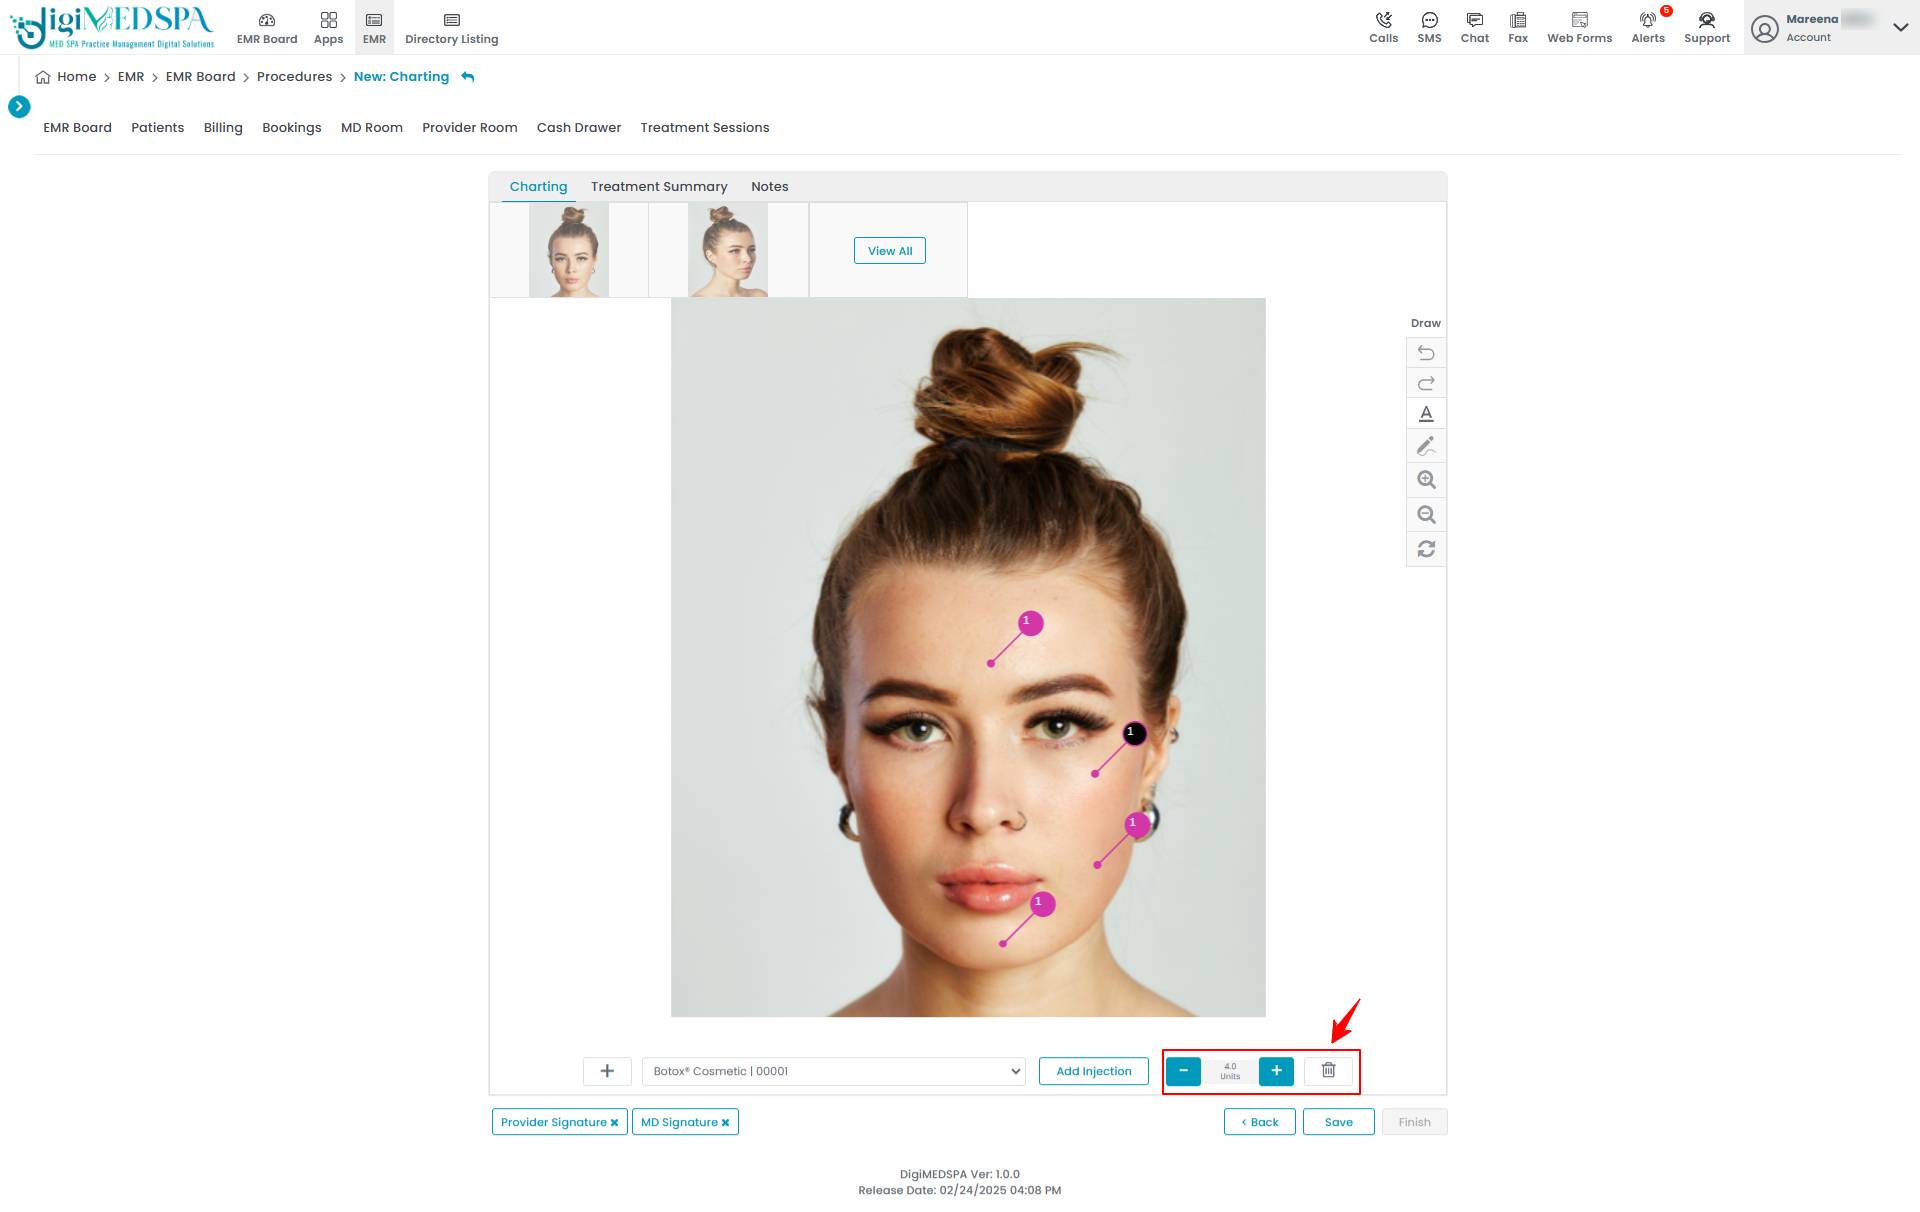
- After placing the injection markings, double-click on the circle to select the injection. Adjust the unit quantity as needed by clicking the "+" or "-" signs. Once finished, click “Save” to confirm your changes.

- To move a placed injection marking, long-press and drag the small circle to the desired location, then release to position it precisely. Click “Save” to confirm your changes.

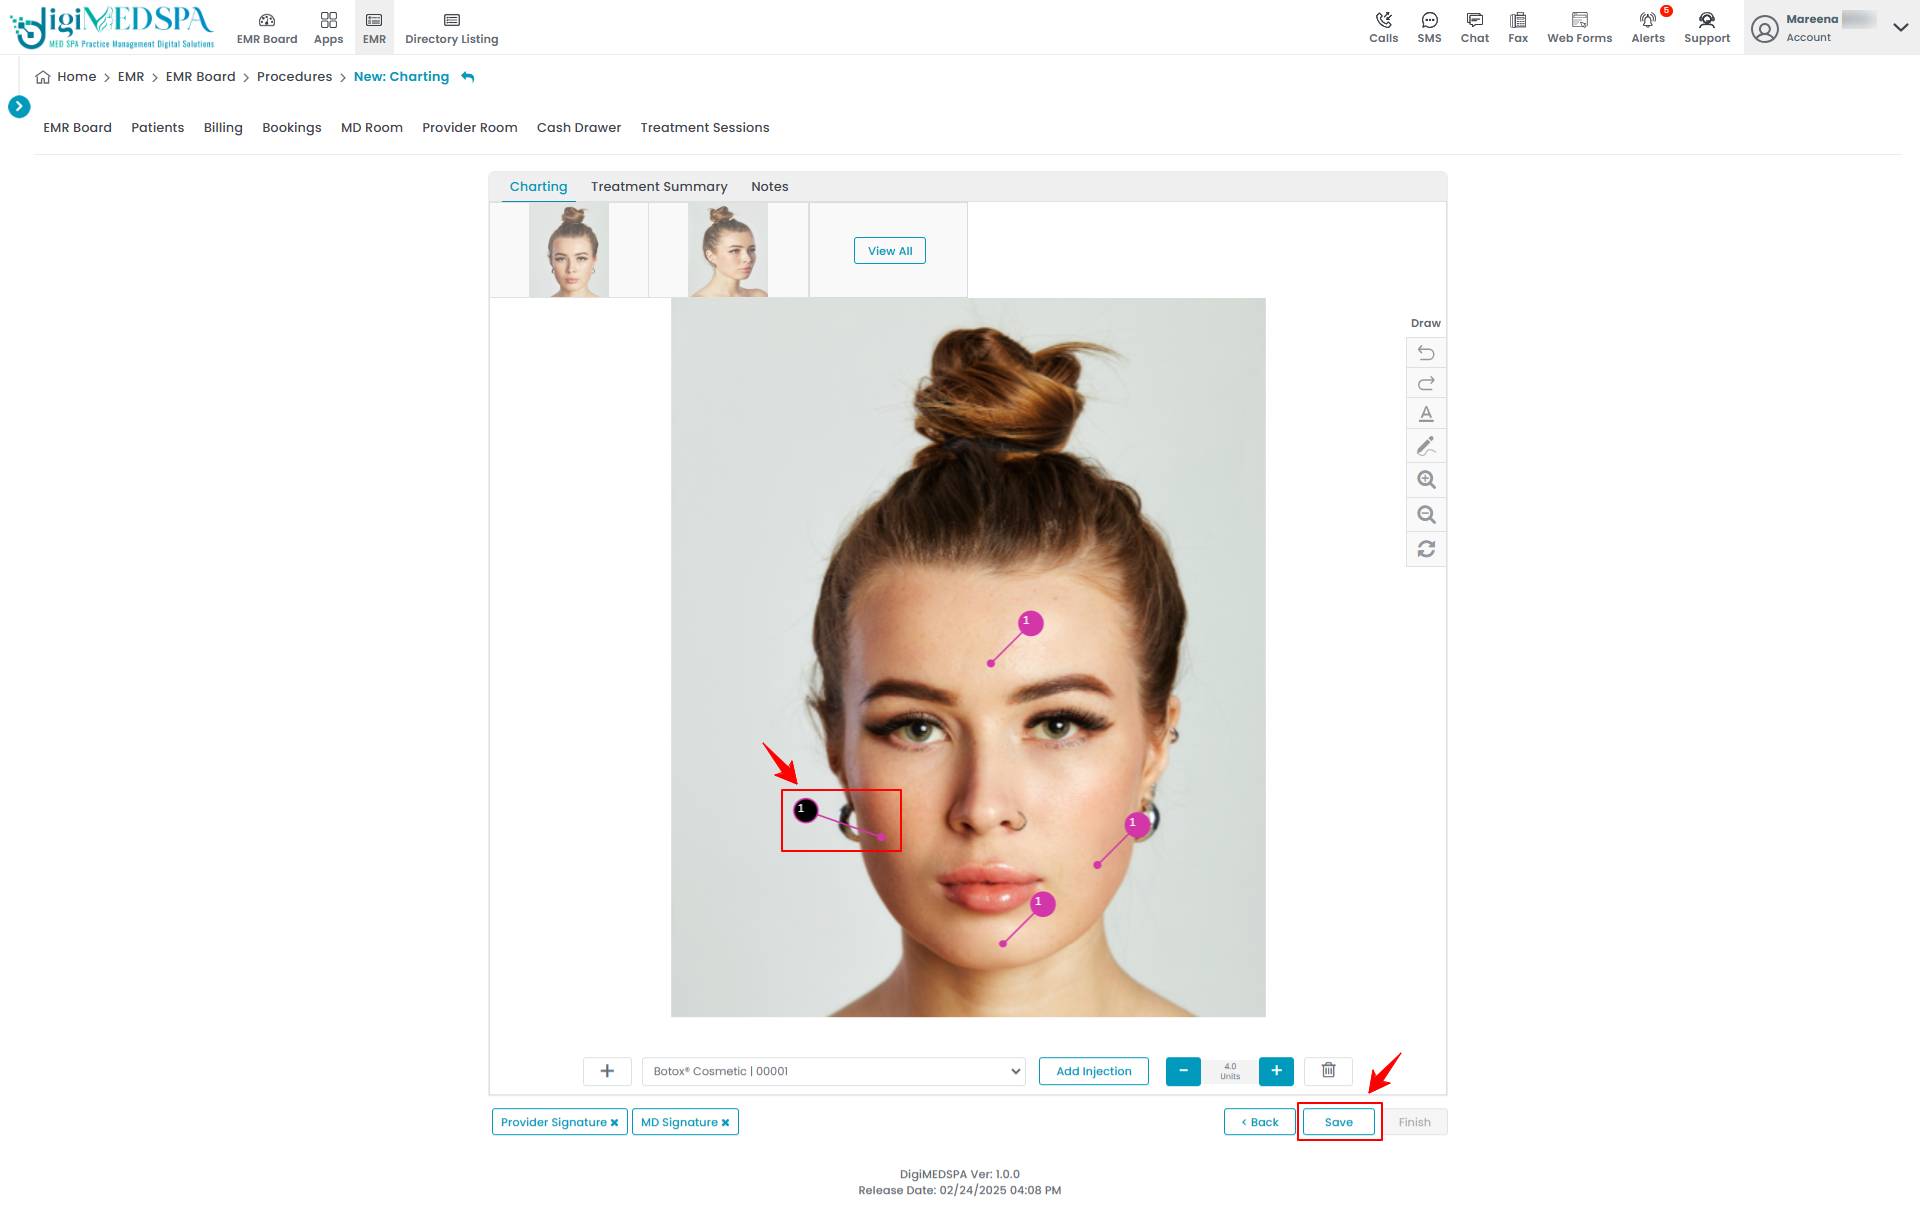 Note: You can select multiple treatment products and add as many injection markings as needed. Your cosmetic procedure has successfully been created!
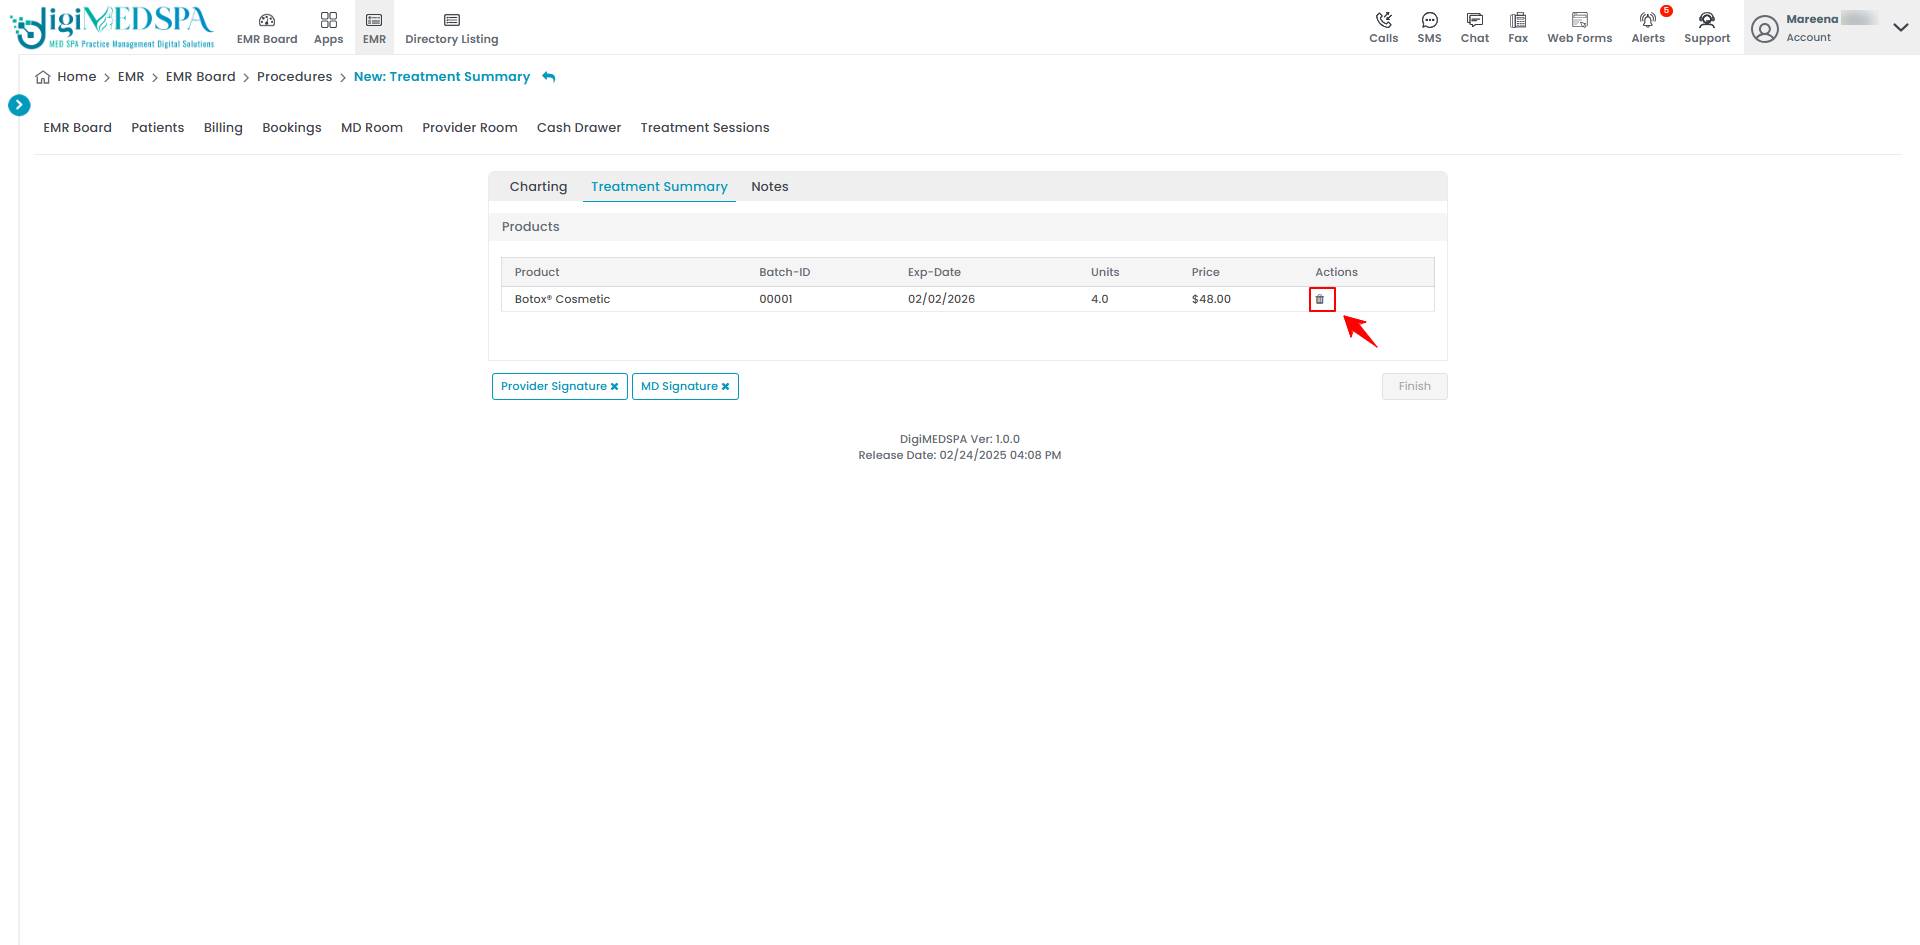
 - To view the traceability information for the procedure, click “Treatment Summary” at the top.

- The “Treatment Summary” displays details of all treatment products selected for the procedure, including Product Name, Batch ID, Expiry Date, Units Selected, and Price. Under “Action”, the “Delete option” allows you to remove all injections of that product from the charting screen.

- In Step 7, upload photos for the procedure area selected in Step 4, ensuring coverage from the following angles: front, Right 45°, Left 45°, right 90°, and Left 90, for treatment charting and injection markings. Once the images are uploaded or selected, click "Next" to move to the charting screen.
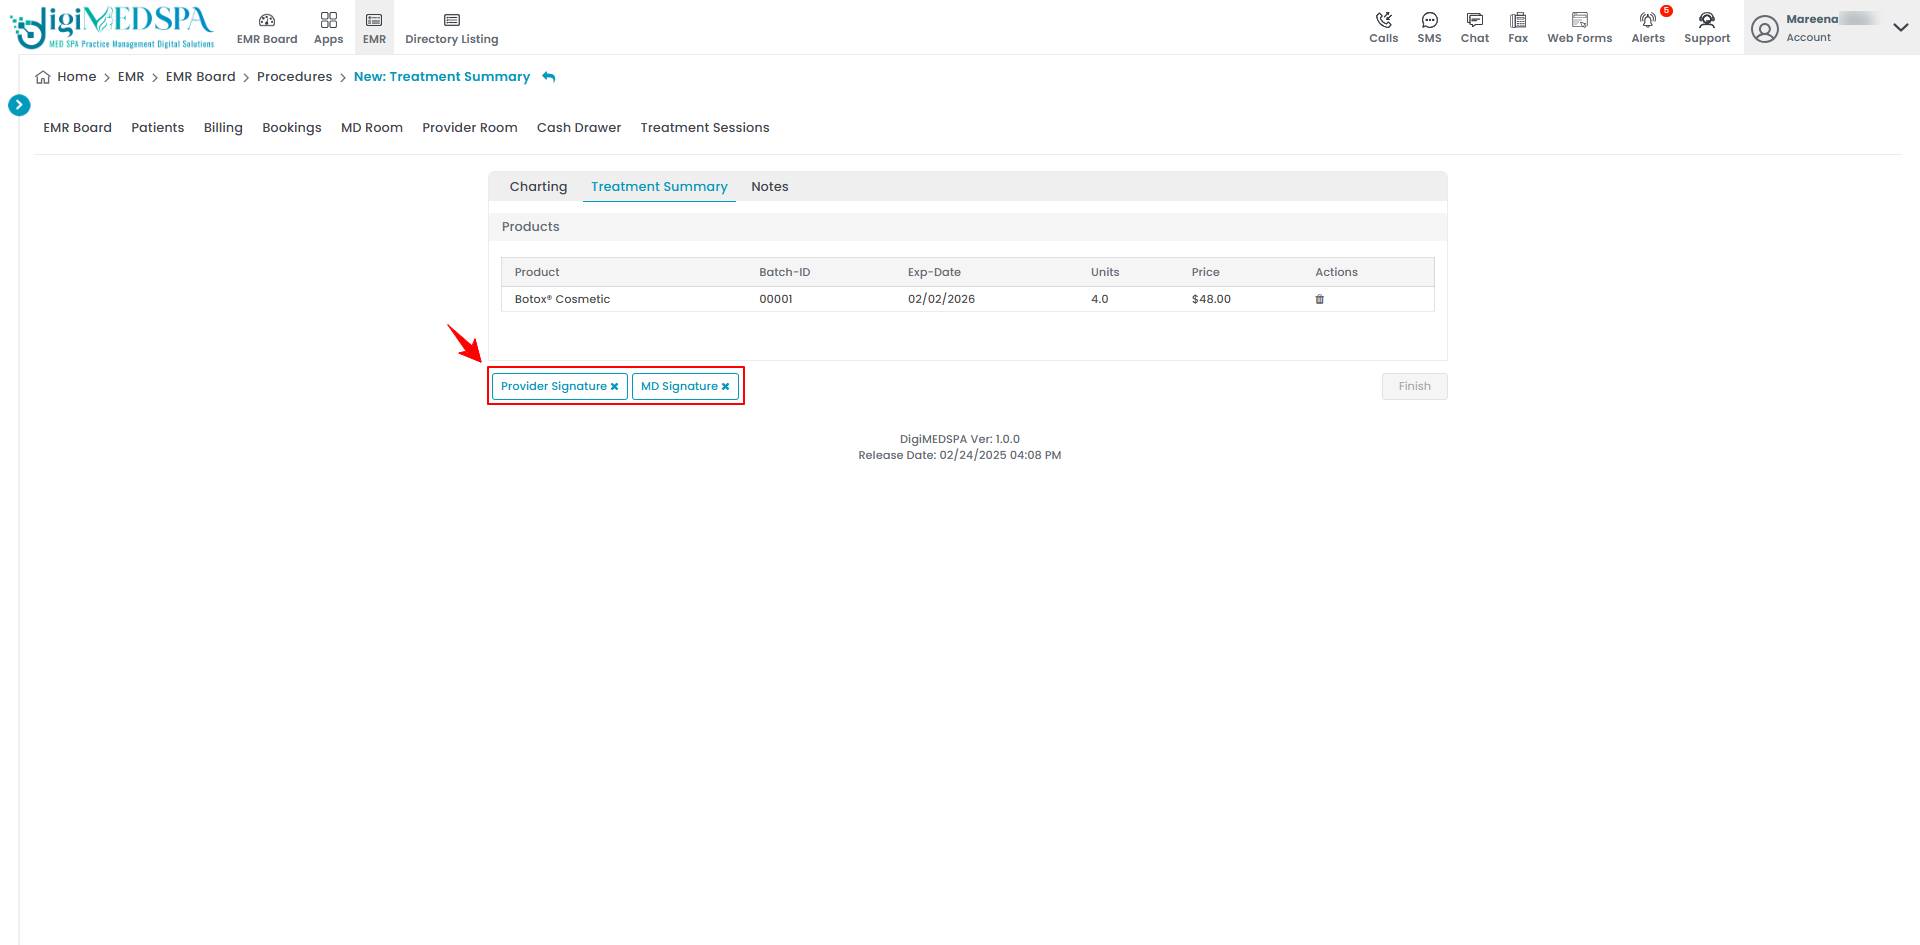
- The cross next to the Provider Signature and MD Signature indicates that the procedure has not yet been signed. Click the button to view your created procedure.

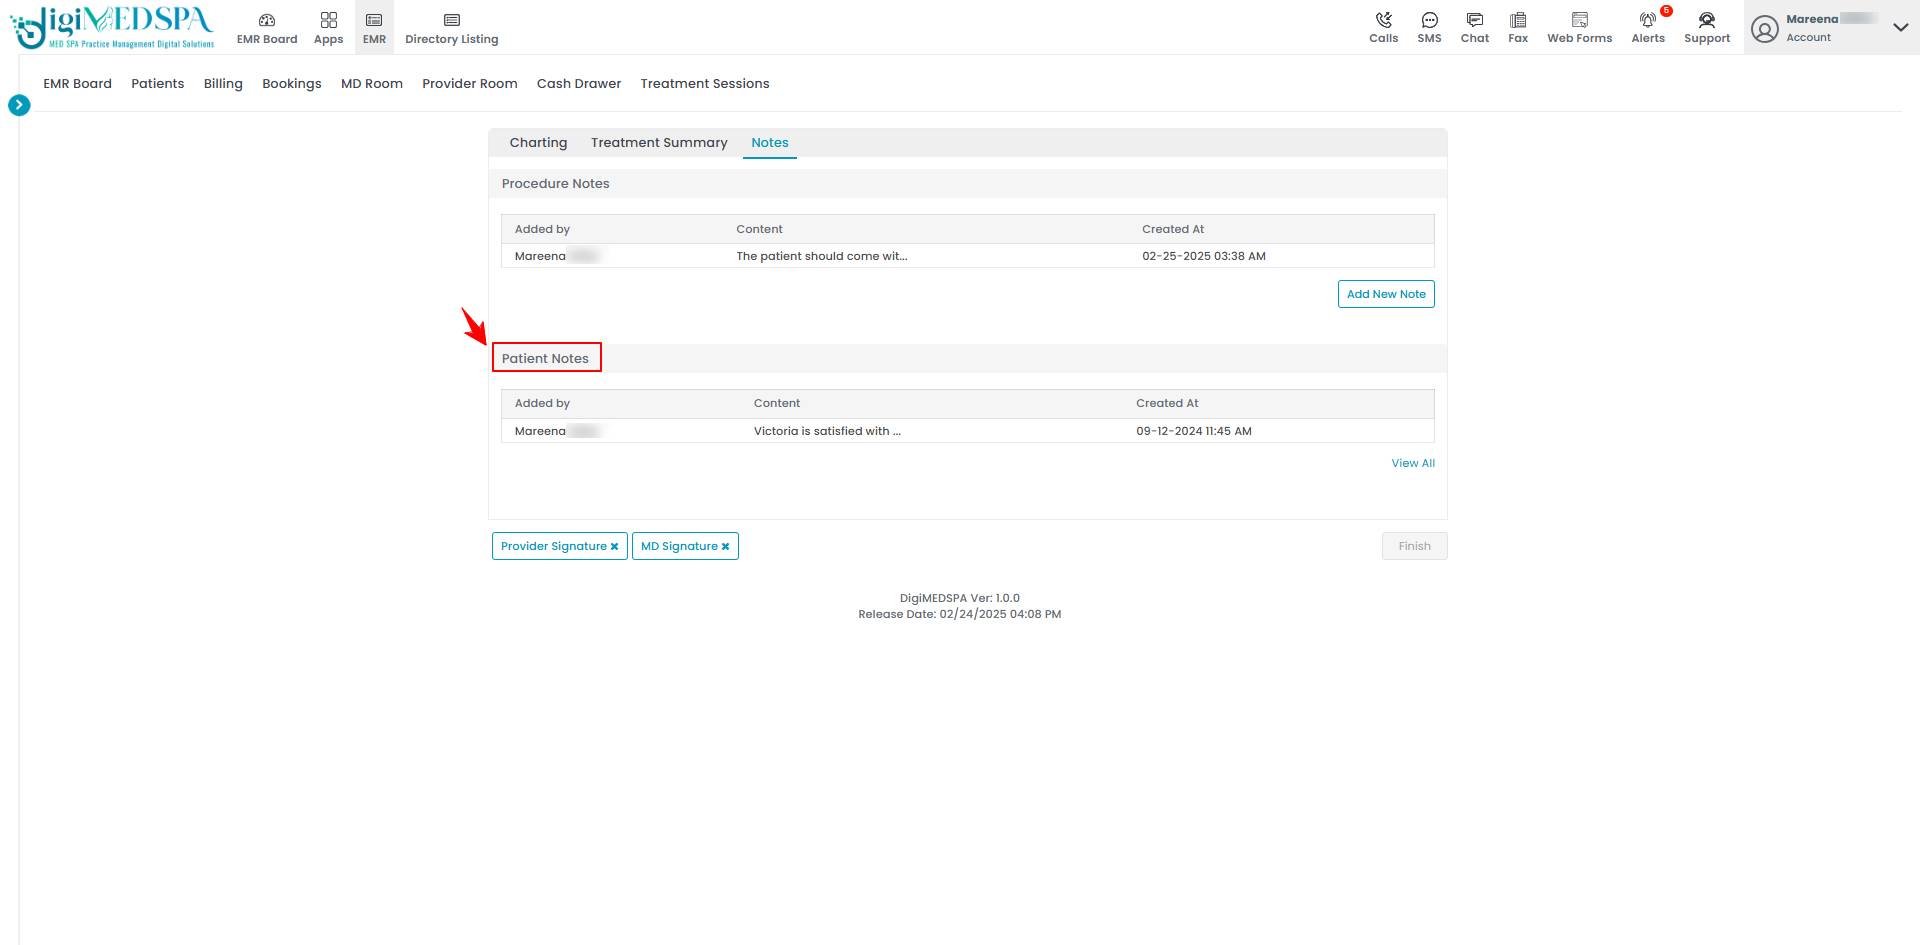
- Users can add notes to a cosmetic procedure through the “Notes” tab . Click “Add New Note” to proceed.

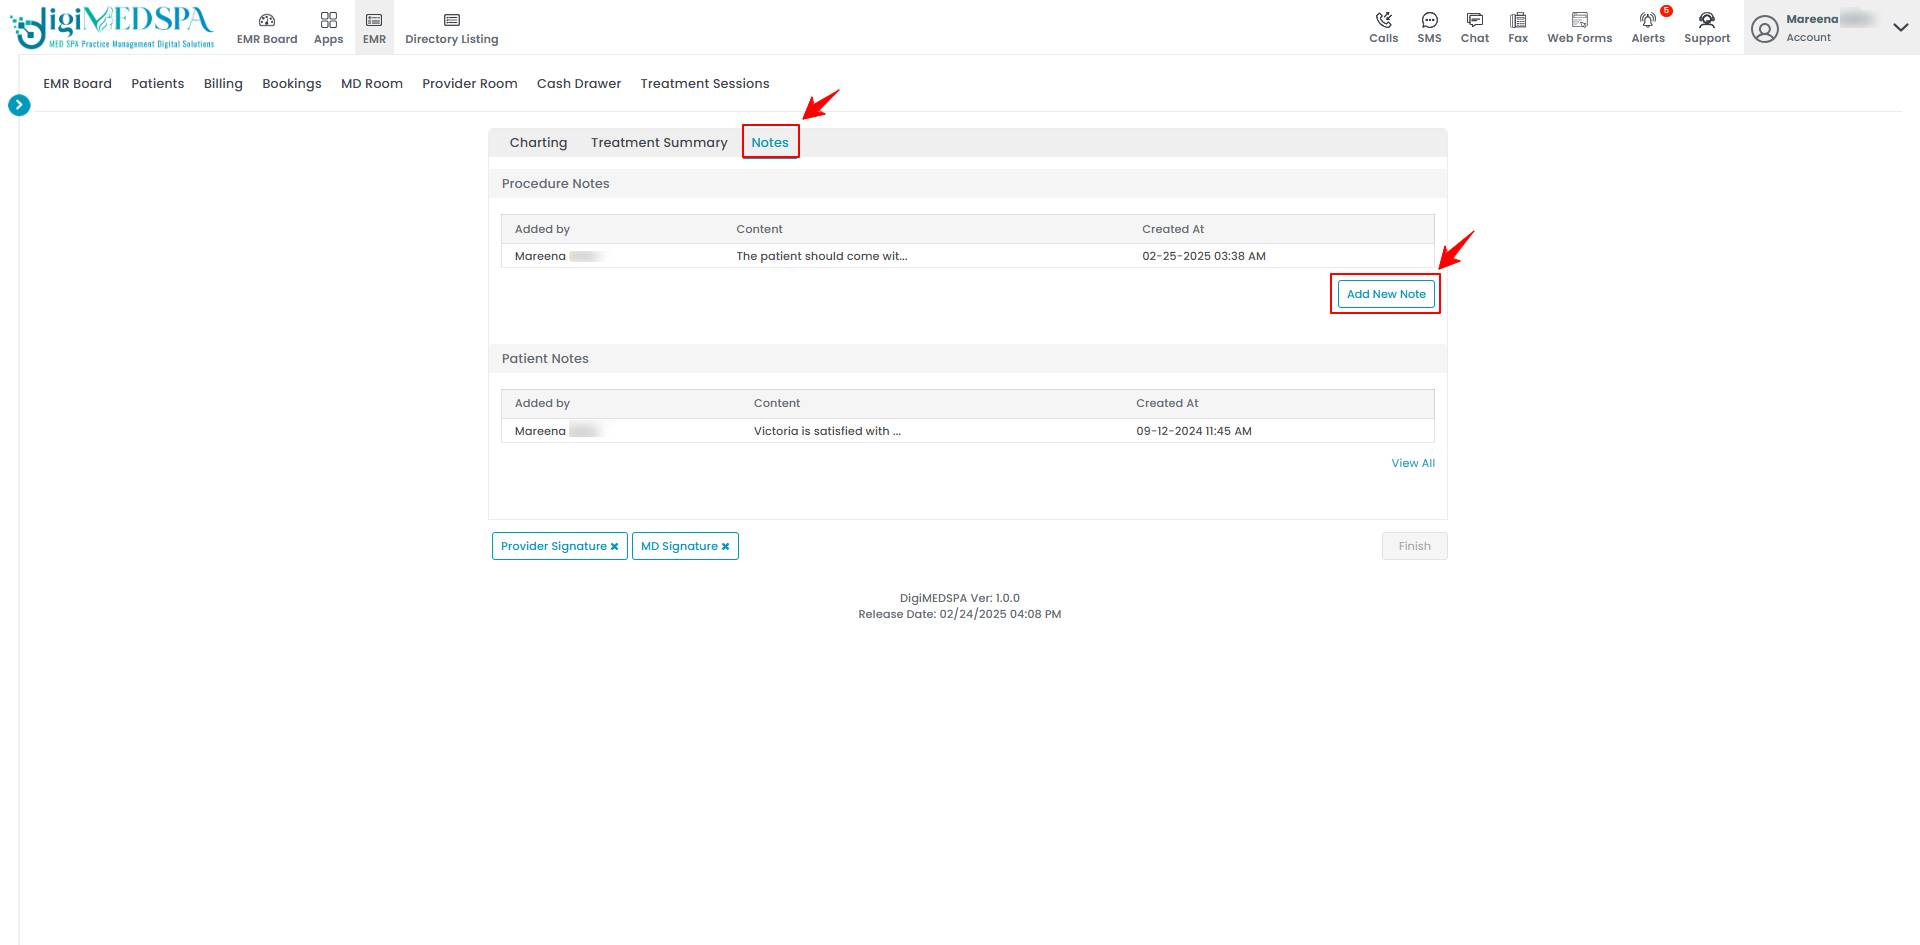 Note: The "Notes" tab also displays “Patient Notes” added through the patient's profile, ensuring the provider has access to all important patient information while charting products for the patient's cosmetic procedure. For more details, refer to our "Create and Manage Patient Notes" user guide.
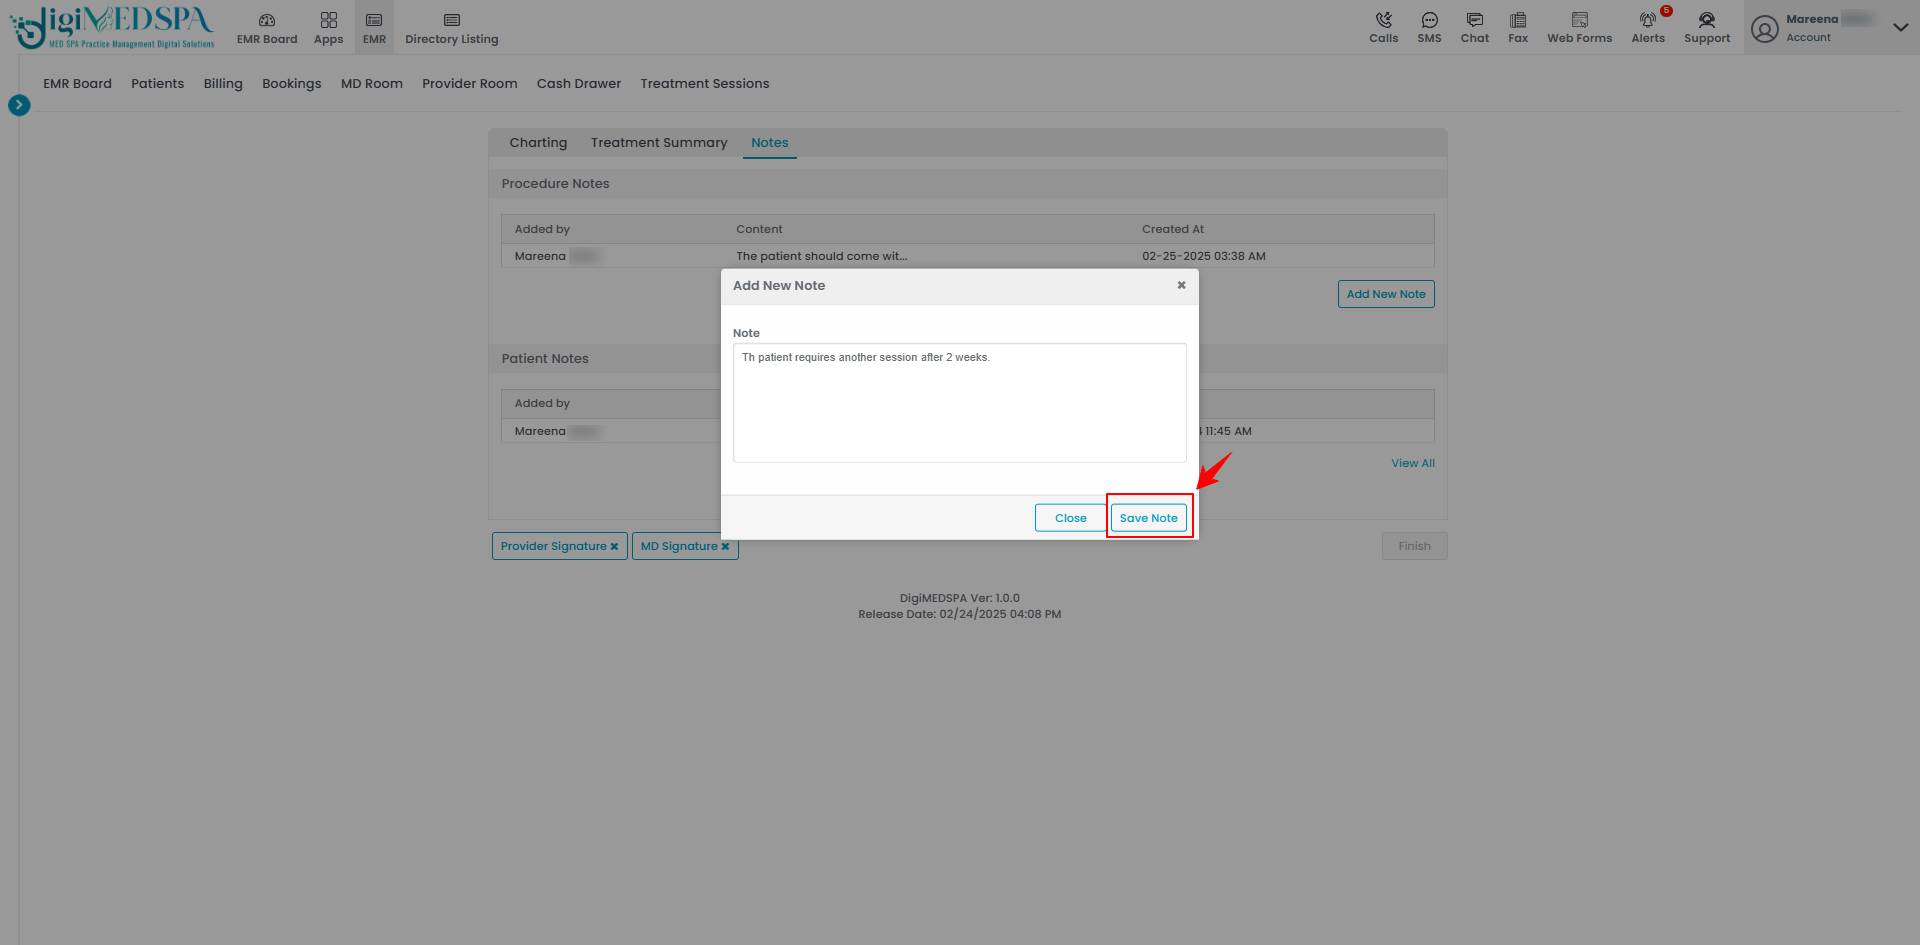
- Enter the note in the provided text field, then click “Save”

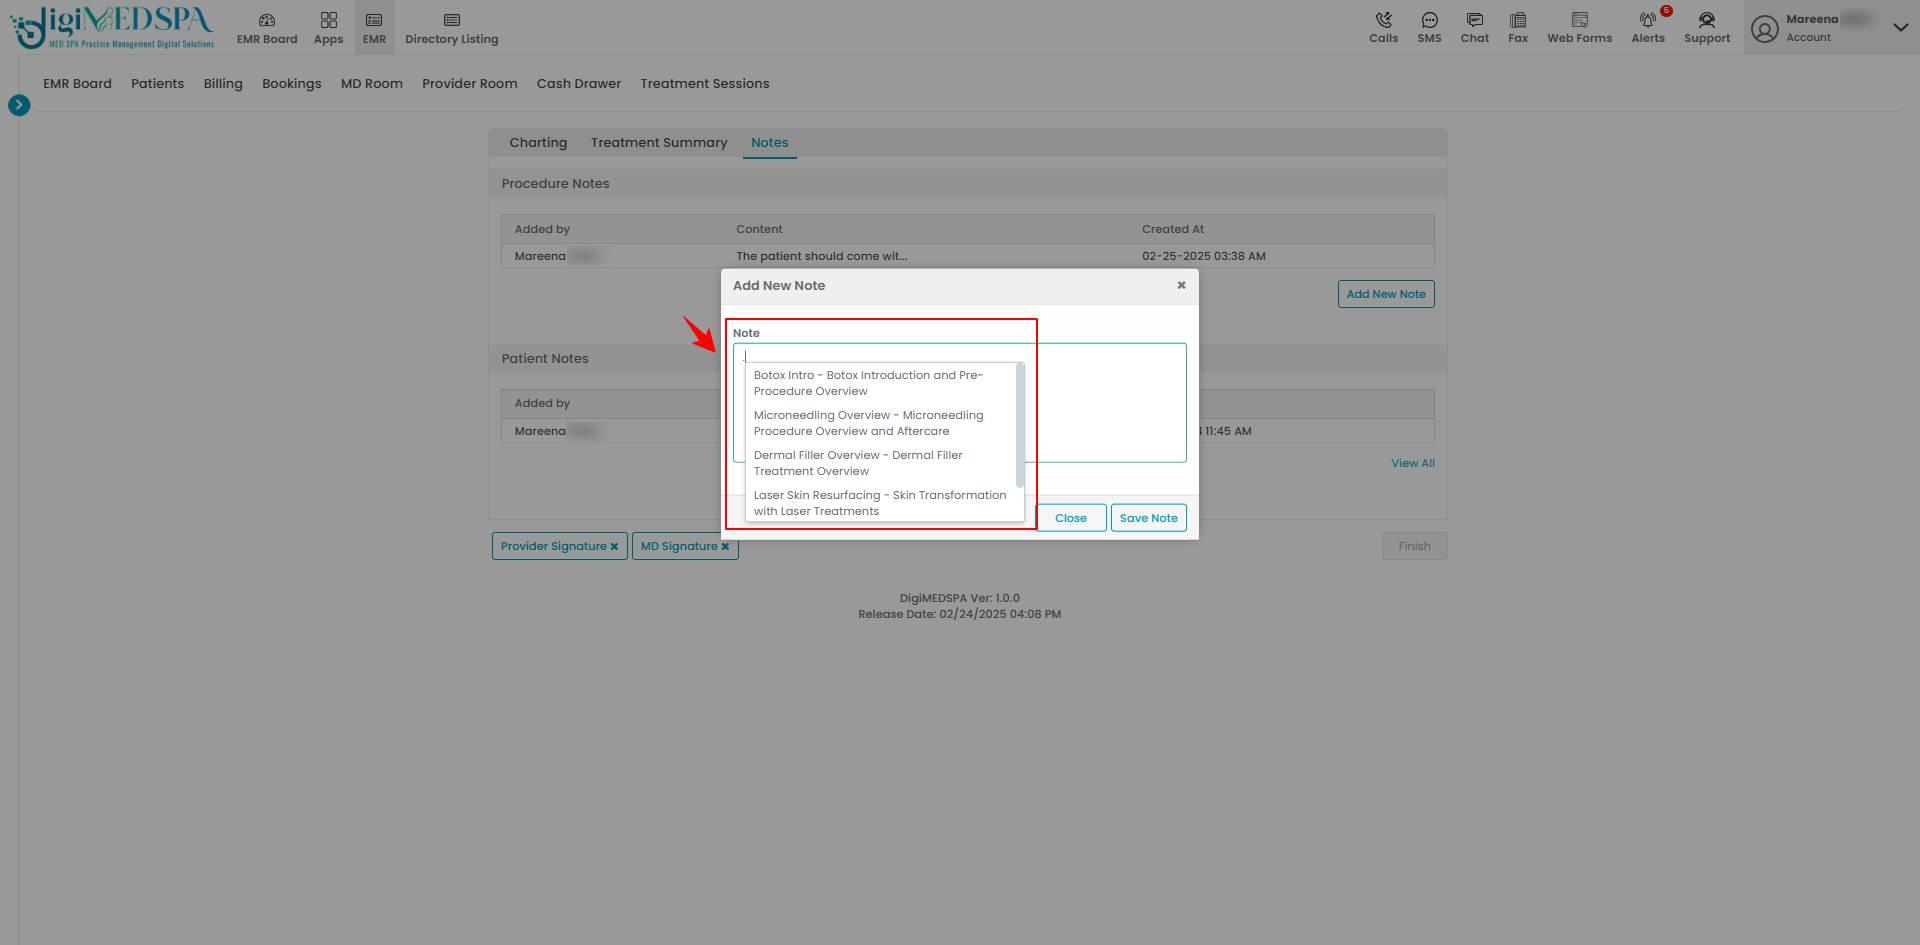
- To access “dot phrases”, type a dot (.) in notes. These pre-created phrases will appear in a dropdown menu, allowing you to quickly select and insert repetitive notes instead of typing them manually.

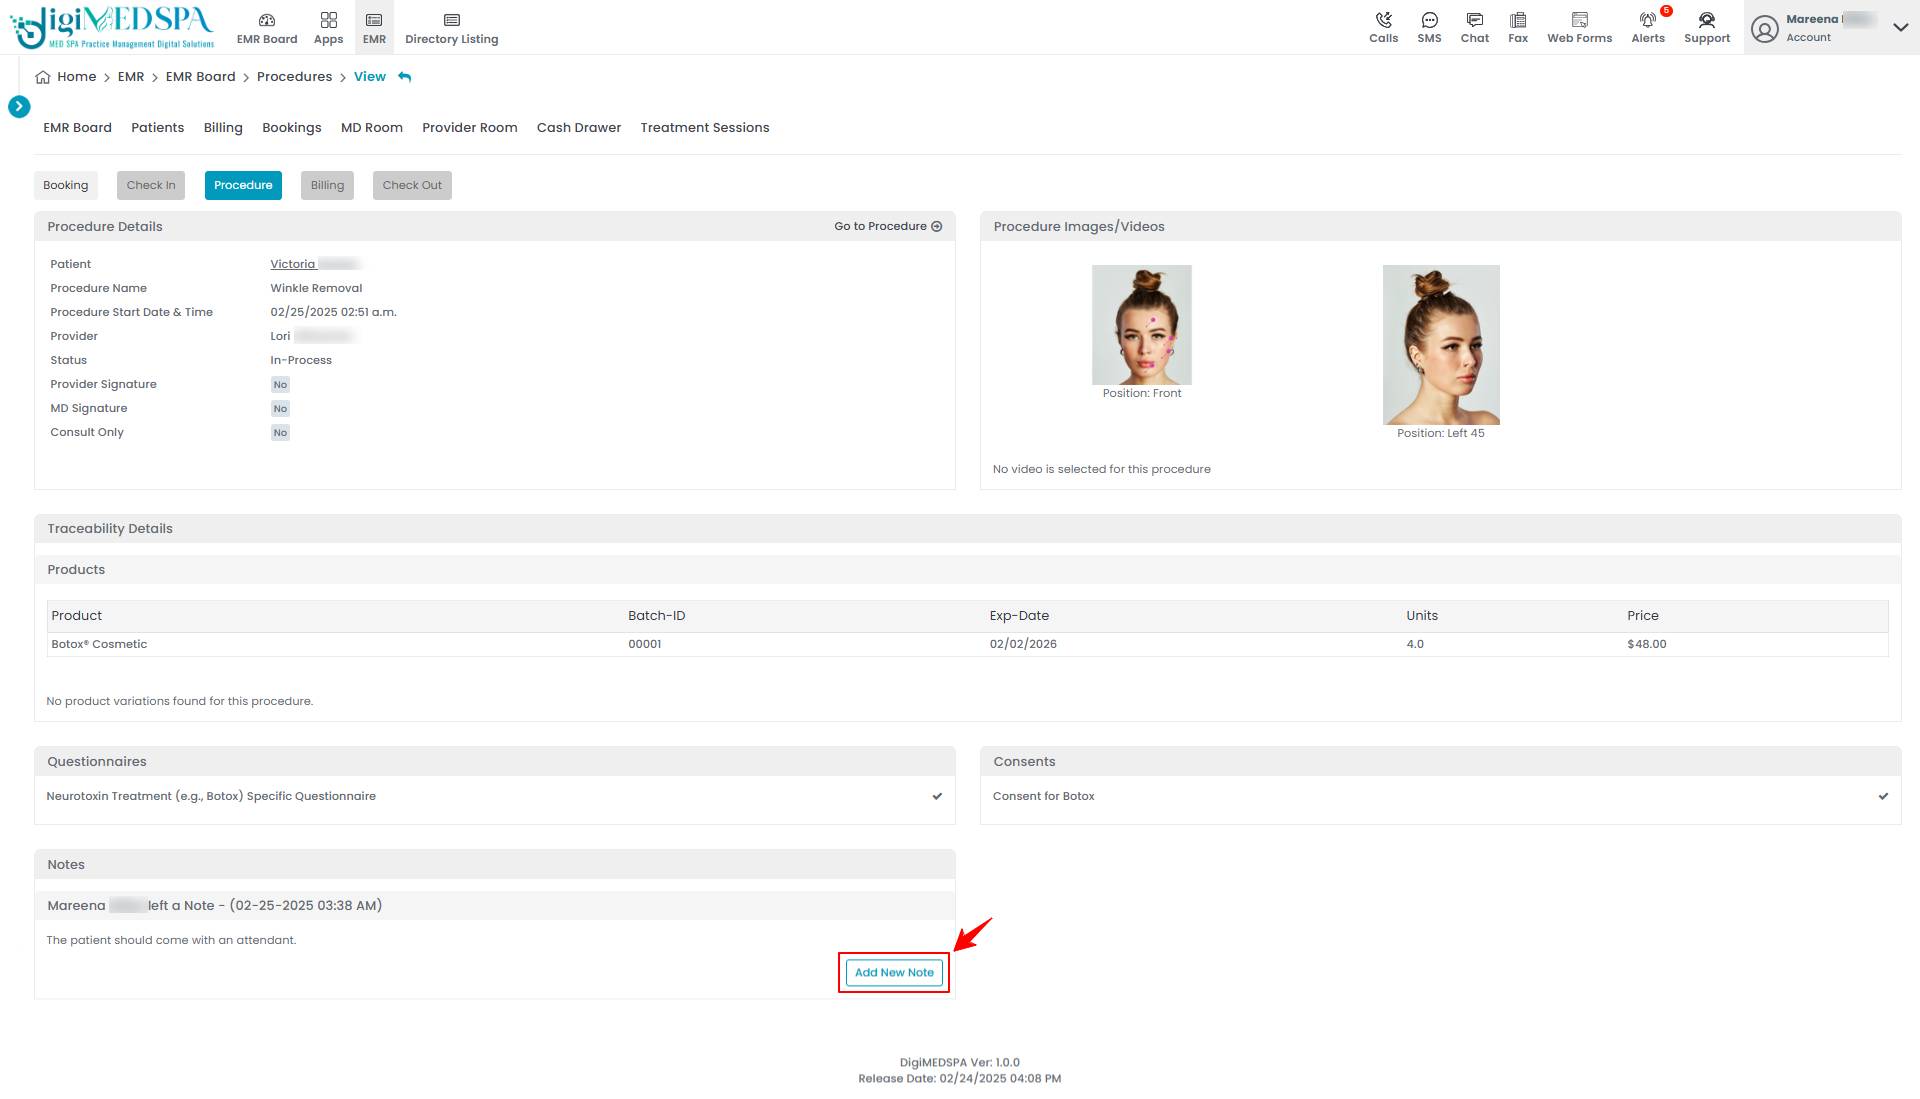
- Users can also add notes to a cosmetic procedure after it has been created. Click “Add New Notes” on the procedure's View Page, enter the note, and then click “Save Note” to save it.

 Note: If only a few steps are completed when creating a cosmetic procedure, it will be added to the procedure list as incomplete. The user can finish the remaining steps anytime.


