Add Purchase Orders
This user guide provides step-by-step instructions on how to add a purchase order and receive some or all of the ordered products within the DigiMEDSPA Portal.
Understanding Terminologies
Purchase Order
A purchase order is a formal document issued by a Med SPA to a supplier, detailing the products or equipment needed, such as skincare items, injectables, or treatment tools. It specifies quantities, prices, and delivery details, serving as an agreement between the Med SPA and the supplier. Efficient purchase order management ensures proper stock levels and it must be updated with received order details as products arrive.
Add a New Purchase Order
- The user can add a purchase order by accessing the Purchase Orders List Screen from two entry points.
- From the EMR Admin, click on “Purchase Orders” under “Products & Inventory.’’

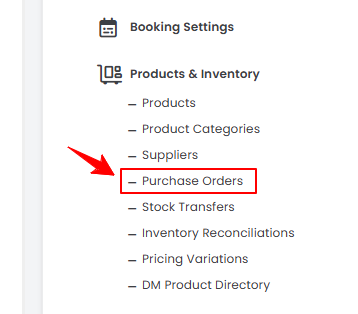
- From the Left Navigation, open the “EMR Admin” dropdown menu, select “Products & Inventory,” and then choose “Purchase Orders” from the subsequent dropdown menu. Alternatively, you can type “Purchase Orders” into the search bar in the Left Navigation.
- From the EMR Admin, click on “Purchase Orders” under “Products & Inventory.’’
- To add a new purchase order, hover over the “Actions” menu on the top right corner of the screen and select "New Purchase Order."
- Select the Supplier and Clinic Name from the dropdown menus. Enter any relevant Note, then click “Add Product” to include items in your purchase order.

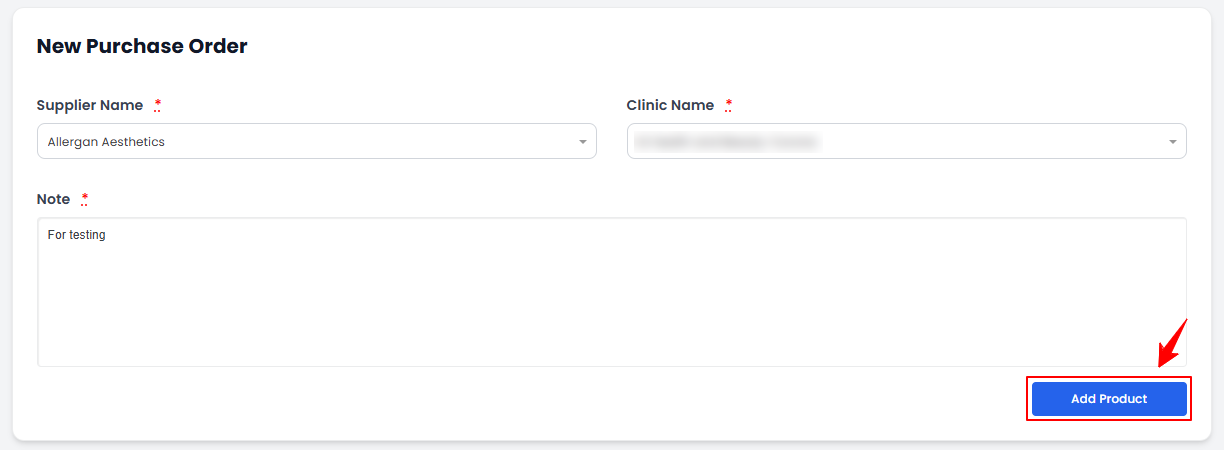 Note: To use dot phrases, type a dot to quickly insert your pre-saved text in the notes. Before that, you must create and save these repetitive phrases in the Dot Phrases List Screen accessible through Clinical Documentation. For detailed instructions, refer to the "Manage Dot Phrases" guide.
 - Search for the Product from the dropdown menu, then enter the Quantity, Price per Unit, and applicable Tax (if any). The Total field will automatically calculate the total price. You can add as many products to your purchase order as needed. Once finished, click “Create Purchase Order” to complete the process.

 Note: The order summary shows the total quantity, subtotal, and product details, making it easier for the user to review the purchase order before finalizing it, especially when dealing with a large number of products. This feature ensures accuracy and efficiency when placing the order.
The new purchase order has been added successfully!
Add a New Purchase Order for All Products
- To add a new purchase order for all products, hover over the “Actions” menu on the top right corner of the Purchase Orders List Screen and select "New Purchase Order For All Products."Note: “New Purchase Order For All Products” is ideal when ordering a large number of products as it provides all available products pre-listed. The user does not need to add each product manually; instead, they can simply remove any products not needed for the order.
- Enter the Supplier Name, Clinic Name, and Note. All the products activated in the portal will be autofilled here. For each product, enter the Quantity, Price per Unit, and Tax (if applicable).Note: The ‘’Total’’ field will automatically calculate the total price.
- Click "Remove" for the products you don't want to include in your purchase order. Once you have finished, click “Create Purchase Order” to place the order.
The purchase order for all products has been added!
Receive a Purchase Order
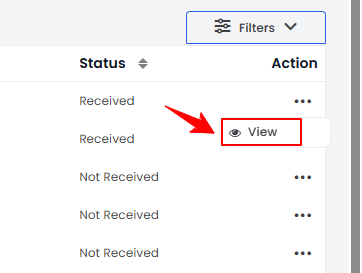
- From the purchase order list, click on three dots under the action column and select "View" for the specific purchase order or click anywhere on the purchase order’s data.

- The order details will open. Click “Receive” next to the product that has been received.
- Mark your order as Received, Damaged or Promotional, then fill in the Invoice Number. Check the Traceability box then enter the Batch Number, Expiration Date, and Quantity Received (out of the total product quantity ordered). Once completed, click “Submit.’’

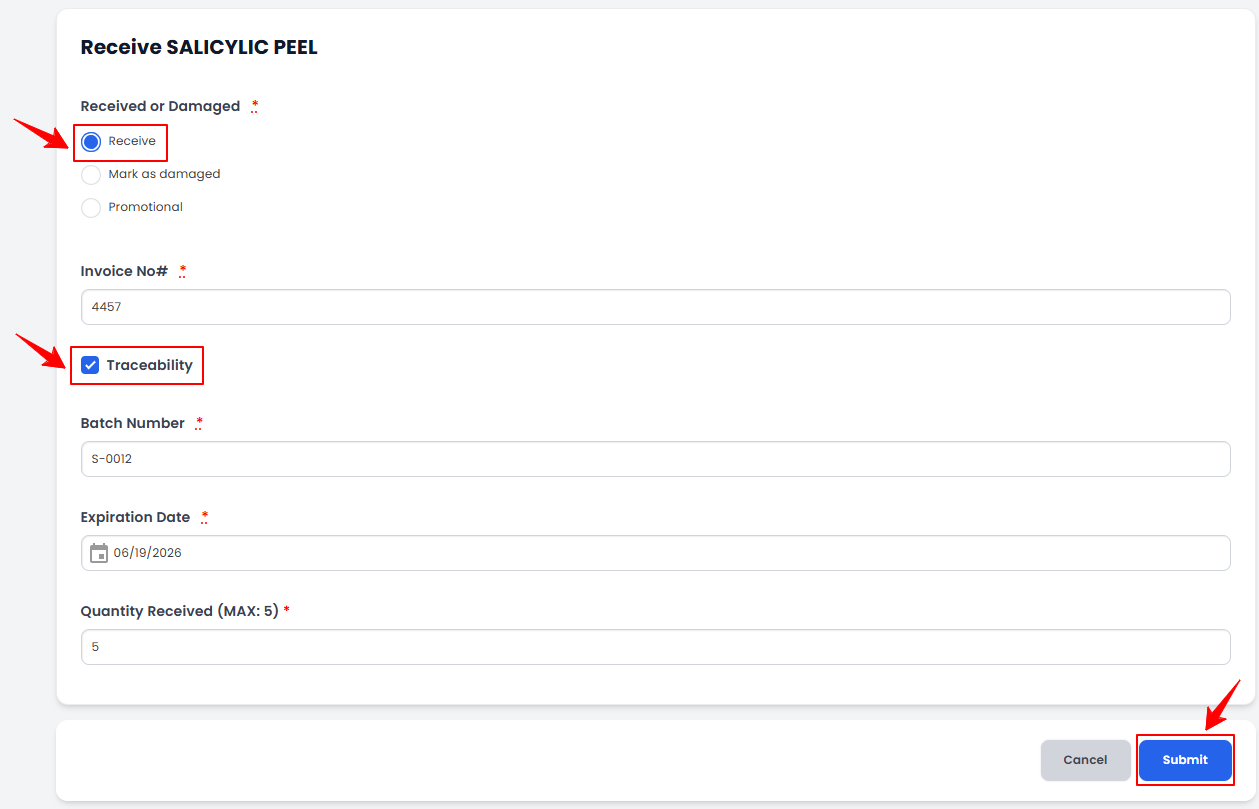 Note: Mark a product as “Damaged” for items received in poor or unusable condition. These damaged products will not be counted towards the received quantity and will instead be listed as “Pending” in the order details, indicating that they still need to be replaced. “Promotional” refers to products that are received as part of a marketing offer or free promotion from the supplier, rather than purchased through a standard order. ''Invoice Number'' is a unique identifier assigned to a purchase order invoice for tracking and payment purposes. ''Batch Number'' is a specific code assigned to a group of products manufactured or received together, helping track inventory and quality control. ''Traceability'' tracks a product's origin, movement, and history within the supply chain, ensuring compliance and quality assurance. ''Expiration Date'' is when a product, such as skincare or medical supplies, is no longer effective or safe.
 - The order details will display "Completed" status once the received details are entered and "Pending" status for any items that were partially received or damaged.
- If the entire order has been received, click "Receive All.’’
- Enter the Invoice Number, Batch ID, and Expiration Date. Click “Populate for All Products” to automatically apply these details to all items in the order. Check “Enable Traceability” if you want to track product usage by batch, expiration date, and supplier for inventory and compliance purposes. Once the details are entered, click “Receive All” to confirm that the entire purchase order has been fully completed.Note: This feature is helpful when a large number of products are ordered and received together, without any damage. It saves time by allowing the user to fill in details for all products at once, instead of entering them separately for each item.
The purchase order has been received successfully!
Check The Status of Purchase Order
- To check the status of the purchase order, go to the “Purchase Orders” tab and review the status indicators in the top scopes bar for the latest updates.

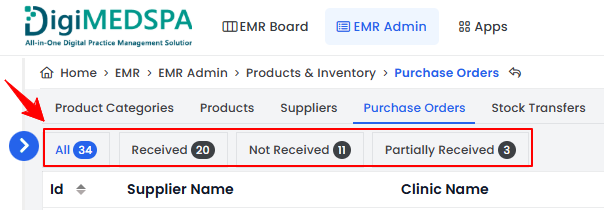
- Click on "Received" scope to view the list of all purchase orders that have been successfully delivered and received in full at the specified clinic location.
- Click “Not Received” scope to view the list of purchase orders where none of the items have been delivered or acknowledged as received.
- Click the “Partially Received” scope to view the list of purchase orders in which only some items have been delivered and received, while others are still pending.Note: The status of the purchase order can also be viewed in the ‘‘All’’ orders list. The ‘’Status’’ column shows whether a purchase order is Received, Not Received or Partially Received.


