

 DigiMEDSPA EMR
 DigiMEDSPA CONNECT ™
Add a Retail Item to Your Inventory
This user guide offers step-by-step instructions on how to add, view, edit, and activate / inactivate a retail item in the inventory using the DigiMEDSPA Portal.
Understanding Terminologies
Retail Item
Retail items are products available for purchase over the counter at a Med SPA, such as creams, sunblocks, serums, and other skincare or beauty products. These items are typically sold to patients for at-home use, complementing the procedures they receive at the Med SPA.
Inventory
Inventory refers to the system used to track and manage all products and materials within a Med SPA, including both retail items (like skincare products) and service items (such as treatment tools and supplies). The DigiMEDSPA Portal allows users to monitor stock levels, add new products, update quantities, set reorder alerts, and manage stock transfers between locations. Efficient inventory management ensures that the Med SPA has the necessary items available to meet patient needs and maintain smooth operations.
Add a Retail Item
- The user can add a retail item by accessing the Products List Screen from two entry points.
- From the EMR Admin, click on “Products” under “Products & Inventory.’’

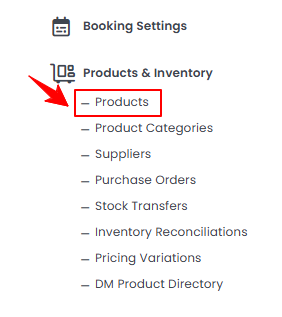
- From the Left Navigation, open the “EMR Admin” dropdown, select “Products & Inventory,’’ and then choose “Products” from the subsequent dropdown menu. Alternatively, you can type “Products” into the search bar in the Left Navigation.
- From the EMR Admin, click on “Products” under “Products & Inventory.’’
- To add a new retail item, click "New Product" in the top right corner of the screen.
- Step 1: Product
- In Step 1, select ‘’Retail’’ from the Inventory Type dropdown menu. Next, enter the required product details, including the Product Name, Product Category, and Cost to the Company.
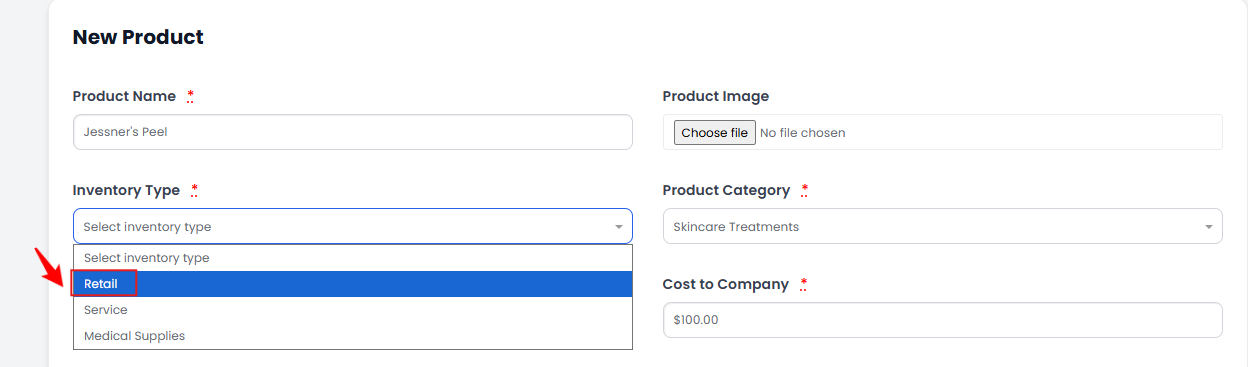 Note: “Cost to Company” is the amount the Med SPA pays to acquire the retail item from a supplier. “Inventory Type” defines the purpose or category of the product within the Med SPA’s inventory, such as Retail (products sold directly to patients) or Service (items used internally, like treatment supplies). “Product Category” is a classification that groups similar products together, such as Skincare, Injectables, or Laser Equipment.
 - The Product Image, Product SKU, Color, Description, Product Ratio, Product Keywords, and Bill for Whole Unit fields are optional. After entering all the required information, click “Create Product” to proceed.Note: “Product Image” is a visual representation of the retail item, such as a photo. “Product SKU (Stock Keeping Unit)” is a unique number assigned to the retail item for inventory tracking and management. The specific “color” of the retail item is used to distinguish variations. “Description” is a detailed explanation of the retail item, including its features, benefits, or uses, to provide additional context. “Product Ratio” is a measurement or proportion that indicates the retail item’s usage or mixing requirements. “Product Keywords” are search terms associated with the retail item to make it easier to locate in the inventory system. “Bill for Whole Unit” is an option to specify whether the retail item is billed as a whole unit rather than in parts or portions.
- In Step 1, select ‘’Retail’’ from the Inventory Type dropdown menu. Next, enter the required product details, including the Product Name, Product Category, and Cost to the Company.
- Step 2: Pricing
- In Step 2, enter the Product Price Per Unit and Member Price for Single Tier Membership, if applicable, for each location where the retail item is available. Product price per unit may vary by location, and member prices, if applicable, can also differ between locations. Click “Next” to proceed.
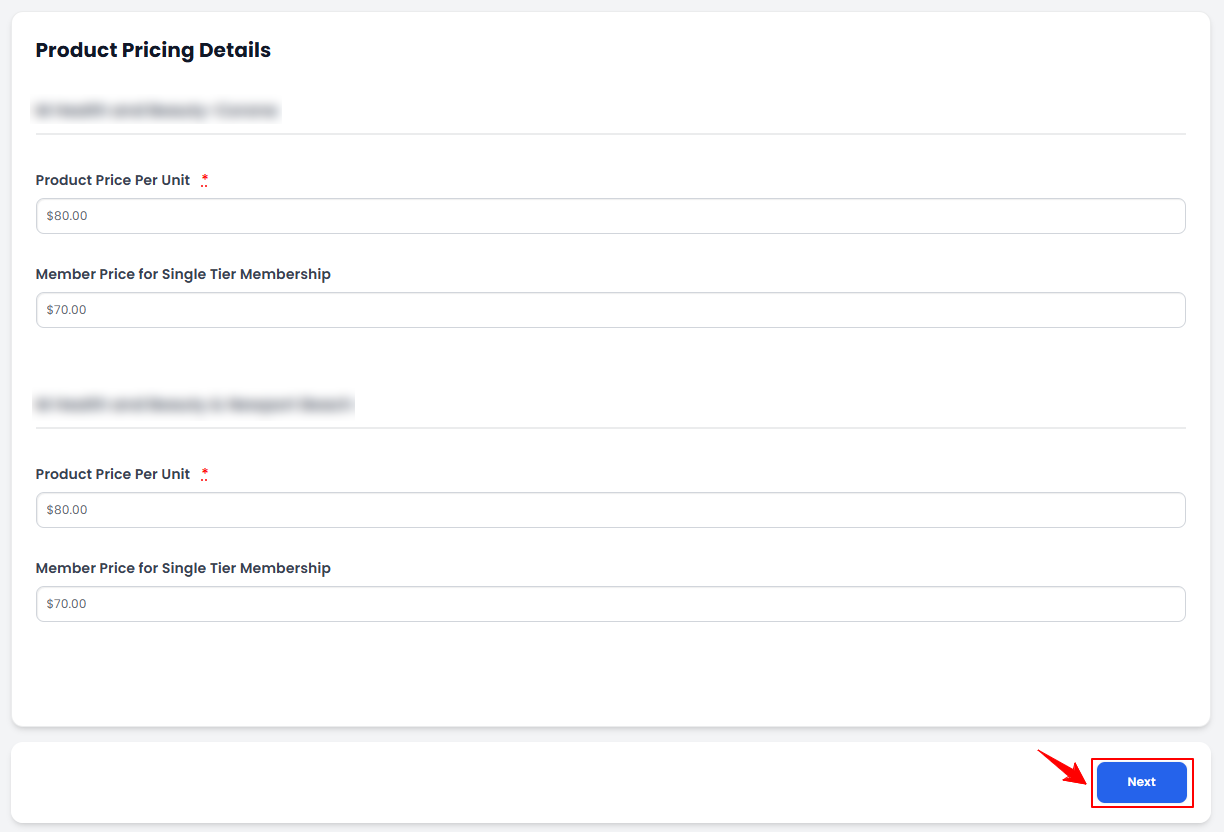 Note: ‘’Product Price Per Unit’’ is the cost of a single measurable unit of the retail item. ‘’Member Price for Single-Tier Membership’’ refers to a discounted or special rate offered to patients enrolled in a subscription program with a single level of benefits. This price is lower than the standard service rate, providing added value to members and encouraging loyalty through exclusive savings.
- In Step 2, enter the Product Price Per Unit and Member Price for Single Tier Membership, if applicable, for each location where the retail item is available. Product price per unit may vary by location, and member prices, if applicable, can also differ between locations. Click “Next” to proceed.
- Step 3: Traceability
- In Step 3, selecting the ‘’Stock and Inventory” option will enable additional fields to enter Stock per Clinic, Stock in Unit, and Stock Alert. Selecting the “Stocks Per Clinic” option enables individual fields for each location, allowing the user to enter separate “Stock in Units” and “Stock Alert” values for each site, as stock availability and alert values may vary by location. Click “Submit” to proceed.
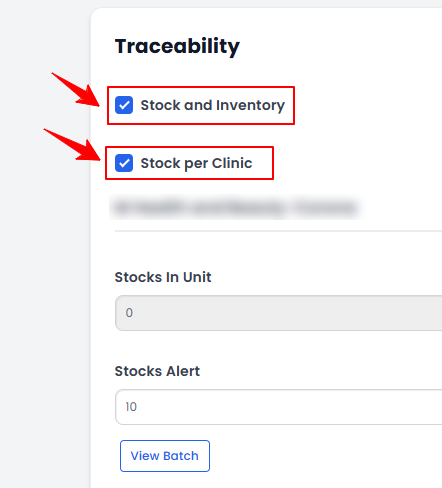 Note: The ‘’Stocks in Unit Value’’ is initially displayed as “0” because a purchase order must first be created and received for this specific retail item. Once the order is received, the stock will be updated. For detailed steps on creating and receiving a purchase order, refer to the ‘’Add Purchase Orders’’ user guide. “Stock in Units” refers to the total amount of a retail item available in inventory, measured by individual units, and tracks availability across all locations or specific clinics. “Stock Alert” is a notification that triggers when inventory falls below a certain level, prompting timely reordering to avoid stockouts.
Note: To view the batch or batches associated with this retail item, click on ‘’View Batch.’’
- In Step 3, selecting the ‘’Stock and Inventory” option will enable additional fields to enter Stock per Clinic, Stock in Unit, and Stock Alert. Selecting the “Stocks Per Clinic” option enables individual fields for each location, allowing the user to enter separate “Stock in Units” and “Stock Alert” values for each site, as stock availability and alert values may vary by location. Click “Submit” to proceed.
- Step 4: Tax Settings
- In Step 4, selecting the “Custom Tax Rule” option enables individual fields for each location to enter the applicable custom tax rule, if any. Once all information is entered, click “Save.”
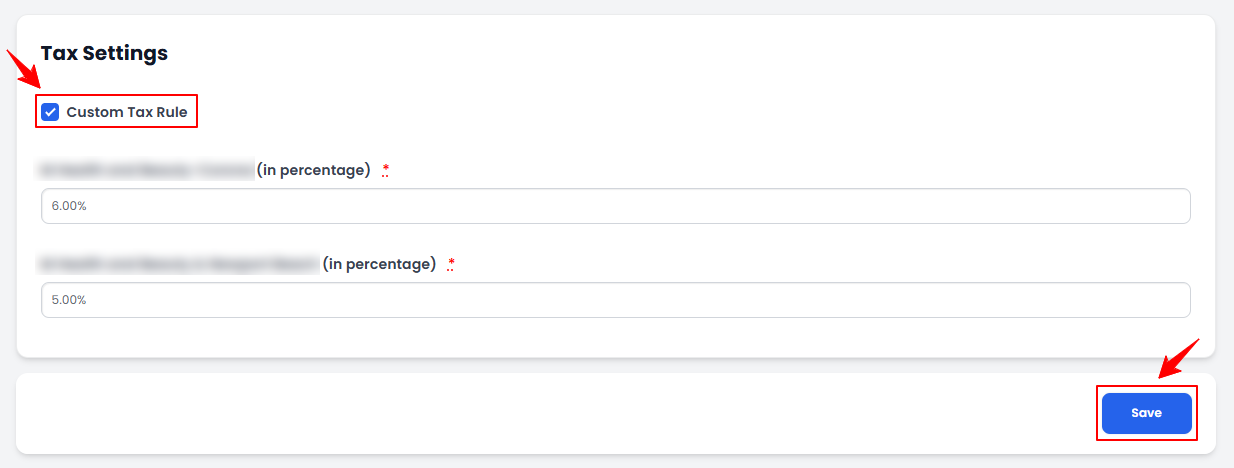 Note: “Custom Tax Rule” refers to a specific tax applied to retail items, considering factors like location, service type, or special promotions. This ensures accurate tax application in compliance with local tax laws while offering flexibility to manage varying tax rates for different retail items at different locations.
Retail products can be added to the bill directly from the billing screen during checkout. For instructions, refer to the “Add / View / Edit Product” article.
The retail item has been successfully added!
- In Step 4, selecting the “Custom Tax Rule” option enables individual fields for each location to enter the applicable custom tax rule, if any. Once all information is entered, click “Save.”
View a Retail Item
- To view a retail item’s information, click anywhere on the retail item’s data in the products listing, or click the three dots in the action column next to the specific retail item and select '’View.’’
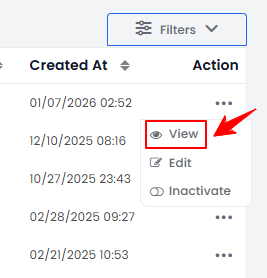
- The Product View Screen will open, displaying all the details of the retail item.
Edit a Retail Item
- There are two ways to edit an existing retail item.
- From the products list, click on three dots under the action column and select "Edit" for the specific retail item.
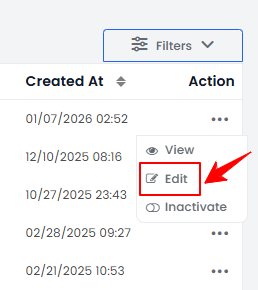
- On the Product View Screen, click on the ‘’Edit Product’’ button on the top right corner of the screen.
- From the products list, click on three dots under the action column and select "Edit" for the specific retail item.
- To edit a retail item, click "Update Product" in Step 1, then go through each step to make the necessary changes. Once done, click "Save" on the final step to apply your updates.
The retail item has been successfully edited!
Activate/ Inactivate a Retail Item
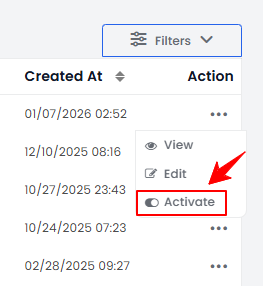
- From the products list, click on three dots under the action column and select "Inactivate" for the specific retail item.
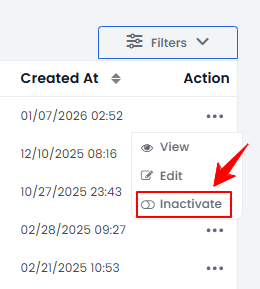 Note: Inactivating a retail item means the retail item is currently unavailable at all locations and will not appear for selection at any point in the portal until activated.
 - To activate a retail item, click on three dots under the action column and select “Activate” for the specific retail item, in the similar way.
 Note: Activating a retail item means the retail item is currently available at all locations and will appear for selection at any point in the portal until inactivated.
Check The Status of Retail Item
- To check the status of a retail item, go to the Products tab and review the status indicators in the top scopes bar for the current updates.

- Click on the “Active” scope to view the list of all products including retail items that have been activated in the portal.
- Click on the “Inactive” scope to view the list of all products including retail items that have been inactivated in the portal.Note: The status of the retail items can also be viewed in the ‘’All’’ list. The ‘‘Status’’ column shows whether a retail item is active or inactive currently.