

 DigiMEDSPA EMR
 DigiMEDSPA CONNECT ™
Prescribe and Start a Treatment Plan
This user guide provides step-by-step instructions on prescribing and starting a treatment plan.
Understanding Terminologies
Treatment Plan
A treatment plan is a structured document that outlines a personalized approach to a patient’s aesthetic and wellness goals. It includes the plan type, treatment goals, recommended treatments, session frequency, and product recommendations with pricing.
Prescribe a Treatment Plan
- The user can prescribe a treatment plan to a patient by accessing the Patients List Screen from two entry points.
- From the EMR Board Tabs, select “Patients.’’

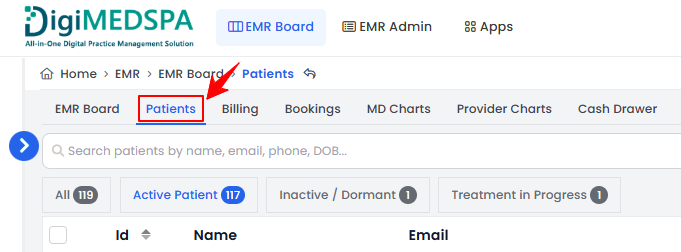
- From the Left Navigation, click on the “EMR Board” dropdown menu and select “Patients.” Alternatively, you can type “Patients” into the search bar in the Left Navigation.
- From the EMR Board Tabs, select “Patients.’’
- Click anywhere on the patient's data in the patient listing, or click the three dots under the action column next to the specific patient and select “View Patient Profile.”
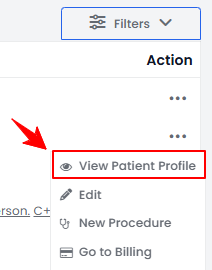
- On the Patient Information Screen, users can access a comprehensive summary of all patient details. To view treatment plans, simply click on the “Treatment Plans” tab.
 Note: For detailed instructions on creating and applying a treatment plan to a patient profile, refer to the user guide ''Manage Treatment Plan Template and Apply it to the Patient's Profile.''
 - A list of treatment plans created for the patient will be displayed. Click the three dots under the action column, and select “Prescribe to Patient.”
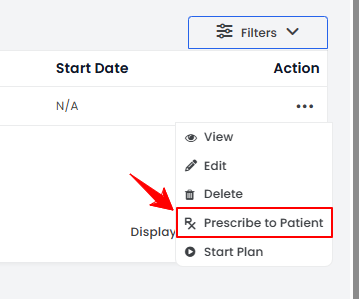
The treatment plan has been successfully prescribed to the patient, and a notification will be sent.
Start the Plan
- From the treatment plans list, click the three dots under the action column, and select “Start Plan.”
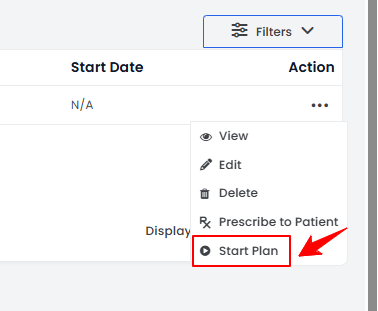
- You will see the payment options. Choose “Pay as You Go” and click “Confirm & Start Plan” to continue.
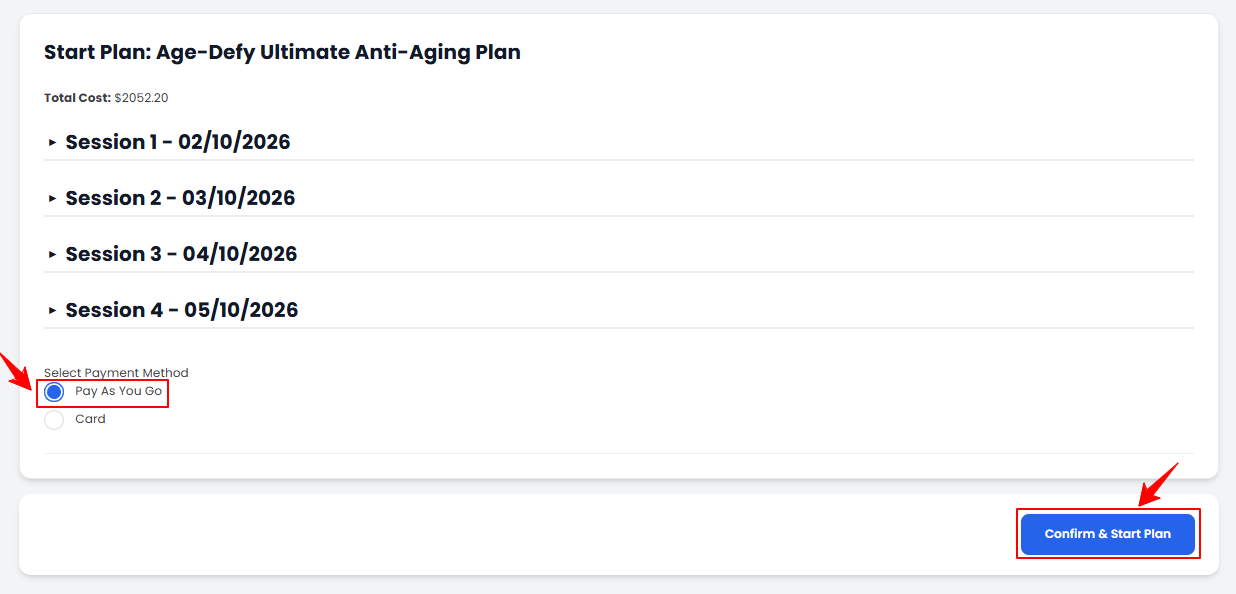
Note: “Pay as You Go” is a flexible payment option in which you pay for each service or treatment as you receive it rather than the full amount upfront. Each session will be charged 24 hours before it begins.
The treatment plan has been successfully started!
Start the Plan Through Email
- Once the treatment plan is prescribed, the patient will receive an email with session details. Click on the link in the email to start the plan.
Note: After clicking the link, you will see the payment options and then you can follow the same steps as mentioned above to start the plan.
Create a Booking for the Treatment Plan
- Once the plan has started, you must schedule sessions. Click “+Create Booking” to book a session.
 Note: A separate booking must be created for each session.
 - Fill out the booking form with all required details, then click “Create Booking” to confirm.Note: For step-by-step instructions on creating a new booking, refer to the “Book an Appointment Through New Booking” user guide.
- Select a payment method and click “Pay Now” or choose to pay later by clicking “Skip Payment.”
- The booking has been successfully created, and the details will be displayed. Click “Go to EMR Board” to proceed with creating a procedure.
Managing Treatment Plan Products in Patient Charting
- The booking will be displayed with a “New” status. Click “Next” to move it to “Check-In.”
- Click the ‘’Start Procedure’’ button to move the booking to the ‘’In Procedure’’ phase.
- Choose the Body Area from the dropdown menu and click “Start Procedure.”
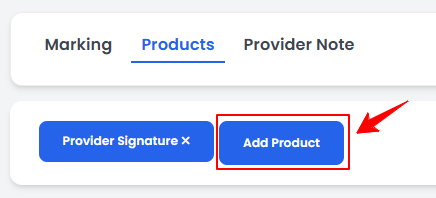
- On the Procedure View Screen, add procedure products by clicking “Add Product” in the Procedure Products section.

- From the Products tab, click “Add Product” to add products to the procedure.
 Note: For complete instructions on creating a procedure, refer to “Create a New Procedure” user guide.
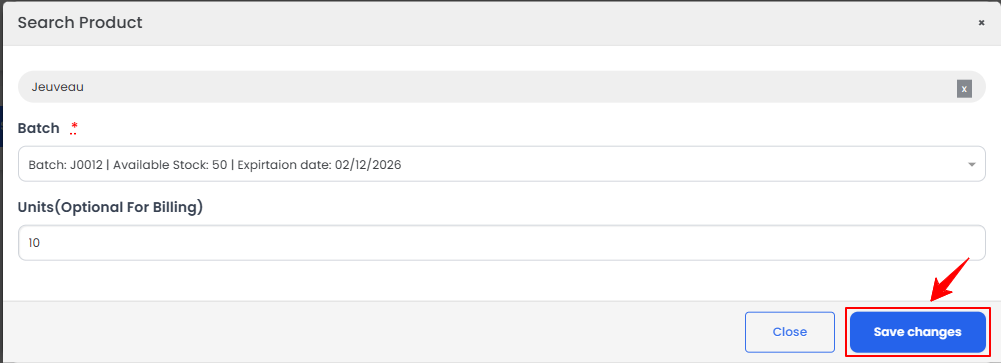
 - Search for the desired product in the dropdown menu to place the injection marking. The treatment session products will appear at the top, while the dropdown will list all available products.

Note: Treatment session products are the specific items chosen and added when setting up the treatment plan. - After adding the product, select the Batch. Once the Batch is selected, enter the Units and click on “Save Changes” to confirm.
Note: Treatment session products can also be added from the Marking Screen, where you can place injection markings and chart the product. For detailed steps, refer to the article “Add / Edit / Move Injection Markings.” - The product details will be displayed, including product name, batch ID, expiry date, units selected, charted units, and price. Use the delete option to remove a product from the chart. Once reviewed, click “Bill Now” to process payment.
Note: The treatment session products can be sent to billing even if they are not charted. For a step-by-step guide on billing, refer to our “Go to Patient’s Billing” user guide.