

 DigiMEDSPA EMR
 DigiMEDSPA CONNECT ™
Manage Tasks
This user guide provides step-by-step instructions to add, view, edit, and delete tasks, enabling users to manage tasks efficiently within the DigiMEDSPA Portal.
Understanding Terminologies
Tasks
Tasks are individual action items or activities that need to be completed within a system. They help users organize work, track progress, assign responsibilities, and ensure timely completion of daily or project-related activities.
Access this link: https://digimedspa.com/ap2/products
Add Task
- The user can create a new task by accessing “Tasks” from the Top Menu Navigation on the EMR Board.


- To create a new task, click the “New Task” button in the top right corner of the screen.
- Enter the task title, choose the assignee from the “Assign To” dropdown menu, set a due date to ensure the task is completed on schedule, and enter a description for the task.
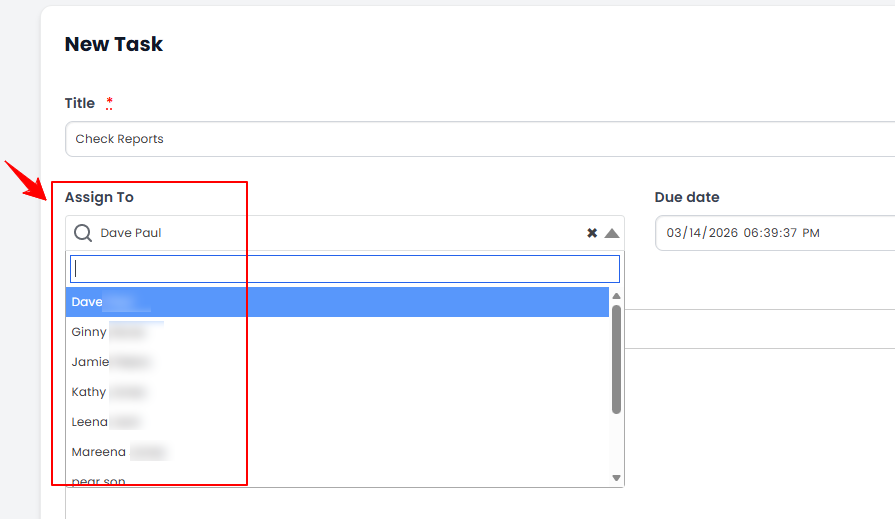 Note: “Assignee” is the person responsible for completing a specific task. Each task can be assigned to only one user, who is accountable for ensuring it is completed within the designated timeline.
 - Choose the task type from the dropdown menu, and link the task to a patient by selecting their name from the “Link to Patient” dropdown menu.
 Note: “Task Type” defines the purpose or category of a task, helping to organize and prioritize work. Common types include “General” for routine tasks, “Follow-Up” for checking on patient progress, and “Appointment Reminder” to notify staff or patients about upcoming appointments. “Link to Patient” refers to connecting or associating a task with a specific patient in the system. It ensures that all relevant information is tied to the correct patient for easy tracking, reference, and management.
 - Choose the task’s current status from the dropdown menu.
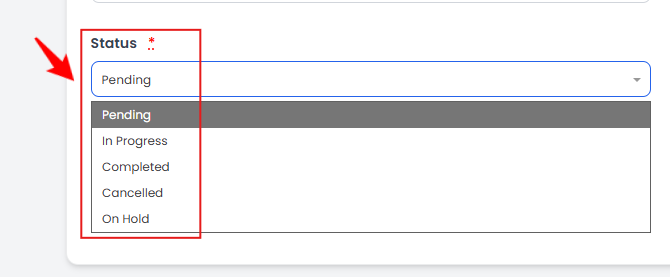 Note: Status indicates the current stage or progress of a task. Common statuses include Pending (task not yet started), In Progress (task is being worked on), Completed (task finished), Cancelled (task will not be completed), and On Hold (task temporarily paused).
 - Choose the task’s priority level from the dropdown menu.
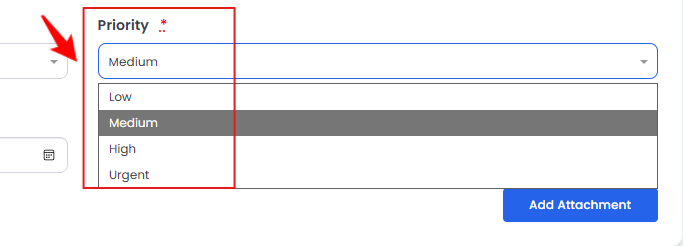 Note: Priority represents the importance or urgency of a task, guiding how quickly it should be addressed. It can be low, medium, high, or urgent, with urgent tasks needing immediate attention and low-priority tasks being less time-sensitive.
 - Set a reminder date for the task, and select “Private Task” to make it visible only to the task’s creator and assignee.
 Note: “Reminder date” is the specific date set to notify or alert the user about a task, ensuring it is completed on time. “Private task” is a task that is visible only to the creator and the assigned user, keeping its details restricted from other users in the system.
 - To attach a file or document, click “Add Attachment” and upload it from your computer. Once all task details are complete, click “Create Task” to save it.
The new task has been created successfully!
View Task
- From the Tasks List Screen, select ”View” for a specific task or simply click anywhere on the task’s data.

- The Task View Screen will open displaying the details of the task.
- To reopen a task, click the “Reopen Task” button.Note: “Reopen task” refers to the action of changing a previously completed, cancelled, or closed task back to an active status so it can be worked on or updated again.
- Type your comment in the “Comments” section and click “Add Comment” to post and save it.
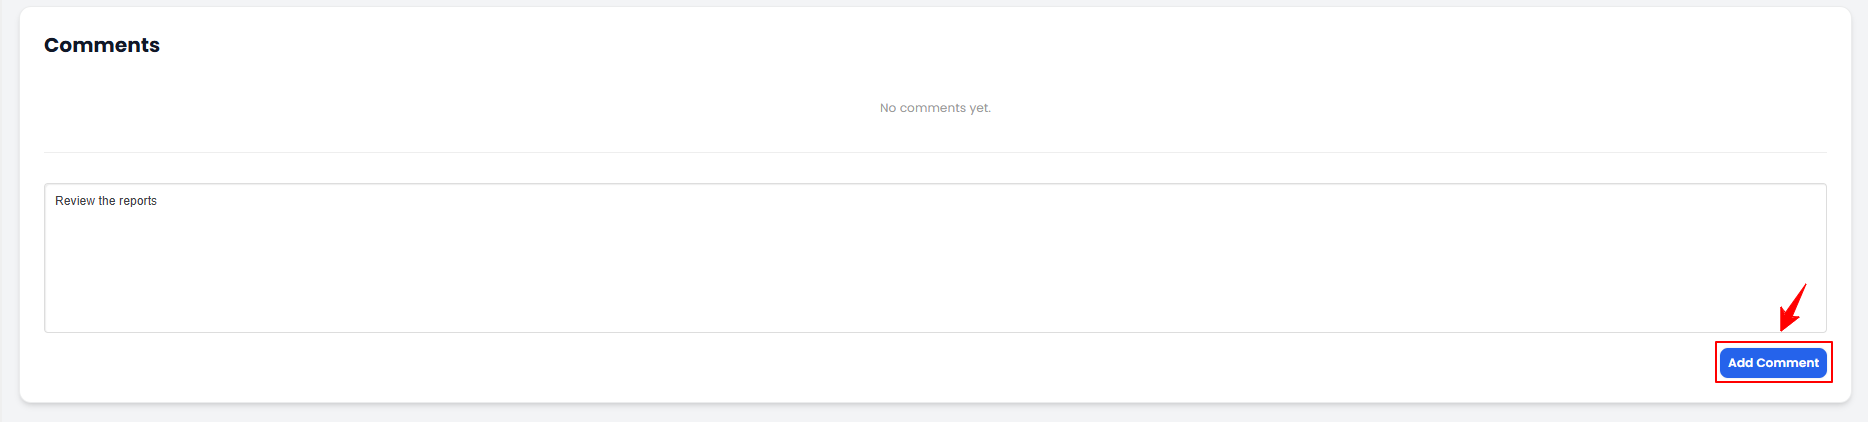 Note: All actions and updates related to a task are tracked and shown in the “Activity” section, providing a complete history of the task’s progress and interactions.
Edit Task
- There are two ways to edit an existing task.
- On the Tasks List Screen, click “Edit” next to the task you want to update.
- On the Task View Screen, hover over the Actions menu on the top right corner of the screen and click “Edit Task.”
- Make the necessary changes and click “Update Task.”
The new task has been edited successfully!
Delete Task
- There are two ways to delete an existing task.
- On the Tasks List Screen, click “Delete” next to the task you want to delete.
- On the Task View Screen, hover over the Actions menu on the top right corner of the screen and click “Delete Task.”
- A confirmation pop-up will appear, click “OK” to permanently delete the task.
The new task has been deleted successfully!
Check the Status of the Task
- On the Tasks List Screen, use the top scopes bar to filter and view tasks by specific statuses, such as Pending, Completed, and Deleted.
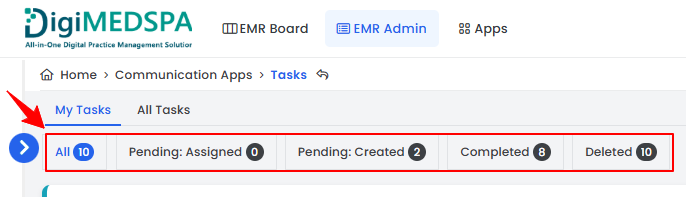
- To mark a task as complete, click “Complete” next to it.
View Tasks Through the Patient Profile
- The user can view the tasks linked to the patient through the patient profile by accessing the Patients List Screen from two entry points:
- From the EMR Board Tabs, select “Patients.”
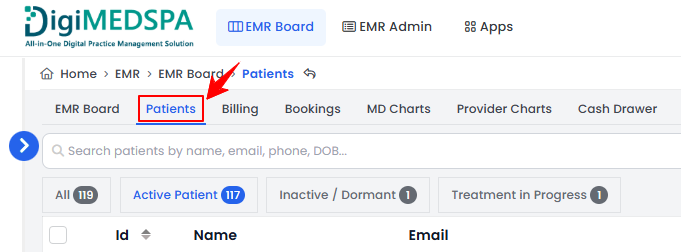
- From the Left Navigation, click on the “EMR Board” dropdown and select “Patients.” Alternatively, you can type “Patients” into the search bar in the Left Navigation.
- From the EMR Board Tabs, select “Patients.”
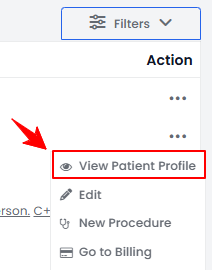
- Click anywhere on the patient's data in the patient listing, or click the three dots under the action column next to the specific patient and select “View Patient Profile.”
- On the Patient Information Screen, the user will find a detailed overview of the patient’s information. To view the tasks, simply click on the “Tasks” tab.
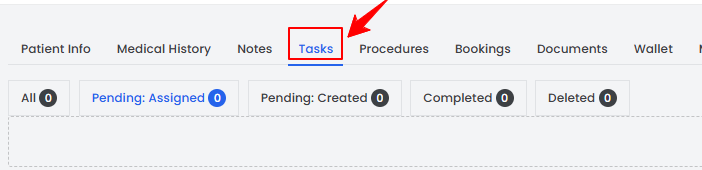
- Here you can view all tasks linked to this patient. To create a new task, click the “New Task” button in the top right corner of the screen.Note: The new task form will open. Follow the same steps as above to create the task, with the patient field automatically filled in this case.
Create a Task for a Document
- The user can create a task for a document while creating a document through the patient profile accessible via two entry points.
- From the EMR Board Tabs, select “Patients.”
- From the Left Navigation, click on the “EMR Board” dropdown and select “Patients.” Alternatively, you can type “Patients” into the search bar in the Left Navigation.
- On the Patient Information Screen, the user will find a detailed overview of the patient’s information. To view the documents, click the ‘’Documents’’ tab.

- To attach a new document to the patient profile, click the “New Document” button in the top right corner of the screen.
- Alternatively, on the Patient Information Screen, click on the "New Document" button under the Quick Actions on the left side of the screen.
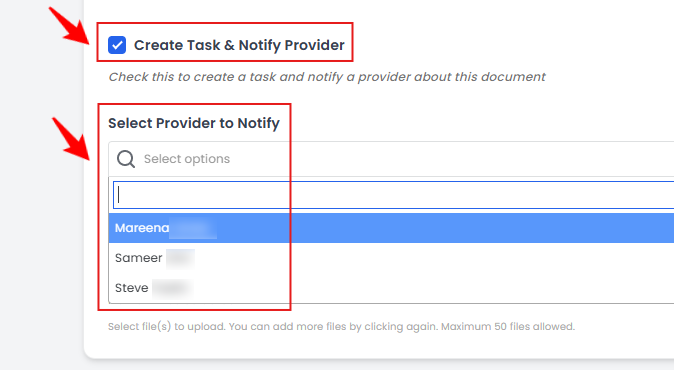
- Complete all the required information. To create a task for this document, enable the “Create Task & Notify Provider” option, then select the appropriate provider from the dropdown to notify them about this document.
 Note: The assigned task will appear in the provider’s “Pending Assigned Tasks” list.
 - After entering all the required information, click ‘’Create Document’’ to save it in the patient profile.
A task has been successfully created for this document!