DigiMEDSPA EMR
 DigiMEDSPA CONNECT ™
Manage Bank Drop in the Cash Drawer
This user guide provides step-by-step instructions for managing bank drop transactions within the cash drawer system.
Understanding Terminologies
Bank Drop
A bank drop transaction is the process of recording and submitting money (such as cash or checks) from a cash drawer or business account to a bank for deposit. It tracks the details of the deposited funds, including the amounts, denominations, and associated checks, ensuring accurate financial records and reconciliation with the bank.
Cash Drawer
A cash drawer is a secure compartment within the point-of-sale (POS) system used to store cash, coins, checks, and receipts from transactions. It helps track cash in and cash out movements for services, retail product sales, and refunds, ensuring accurate financial management and security.
Create Bank Drop Transaction
- The user can access the cash drawer from two entry points:
- From the EMR Board Tabs, select ‘’Cash Drawer.’’

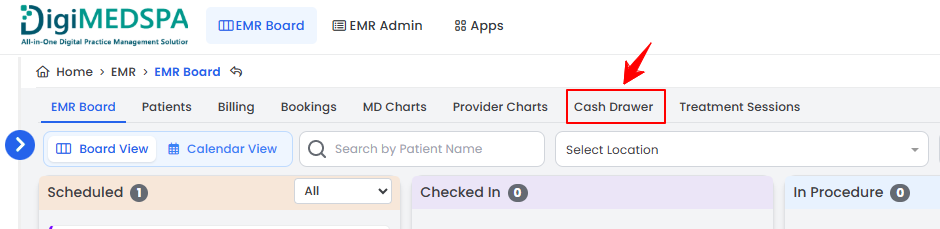
- From the Left Navigation, click on the “EMR Board” dropdown and select “Cash Drawer.’’ Alternatively, you can type “Cash Drawer” into the search bar in the Left Navigation.
- From the EMR Board Tabs, select ‘’Cash Drawer.’’
- Select the Med SPA location from the dropdown menu for which you want to view the cash drawer history and click “Proceed.”
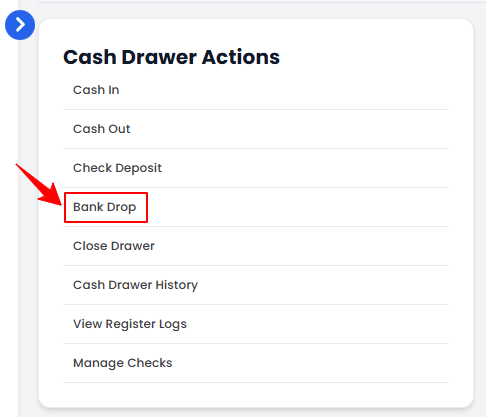
- The cash drawer for the selected Med SPA location will open, displaying Cash Drawer Actions on the left and Today’s Cash Transactions along with Undeposited Checks in Drawer at the bottom. It also shows the Opened At timestamp and the current totals for Cash In, Cash Out, Bank Drop, Check Deposits, and the Current Balance for that location.Note: “Cash Drawer Actions” are the available functions within the system that allow users to manage the cash drawer, including cash in, cash out, reconciliations, and transaction tracking. These actions help maintain accurate cash flow records for a Med SPA location. “Today's Cash Transactions” refers to a log of all cash movements within the cash drawer for the current business day. “Undeposited Checks in Drawer” are checks that have been received but not yet deposited into the bank. “Opened At” refers to when the cash drawer was opened for the business day, helping track when financial activity began. “Cash In” refers to adding money to the cash drawer, including payment for services, product sales, or manual cash deposits. “Cash Out” refers to money removed from the cash drawer, including refunds, petty cash expenses, or withdrawals. A “Bank Drop” transfers excess cash from the drawer to a secure bank deposit to minimize on-hand cash risks. “Check Deposits” are checks that have already been deposited into the bank. The “Current Balance” is the total amount of money available in the cash drawer after accounting for all cash in, cash out, and bank drop transactions.
- To create a bank drop transaction, click on “Bank Drop” under Cash Drawer Actions on the left side of the screen.
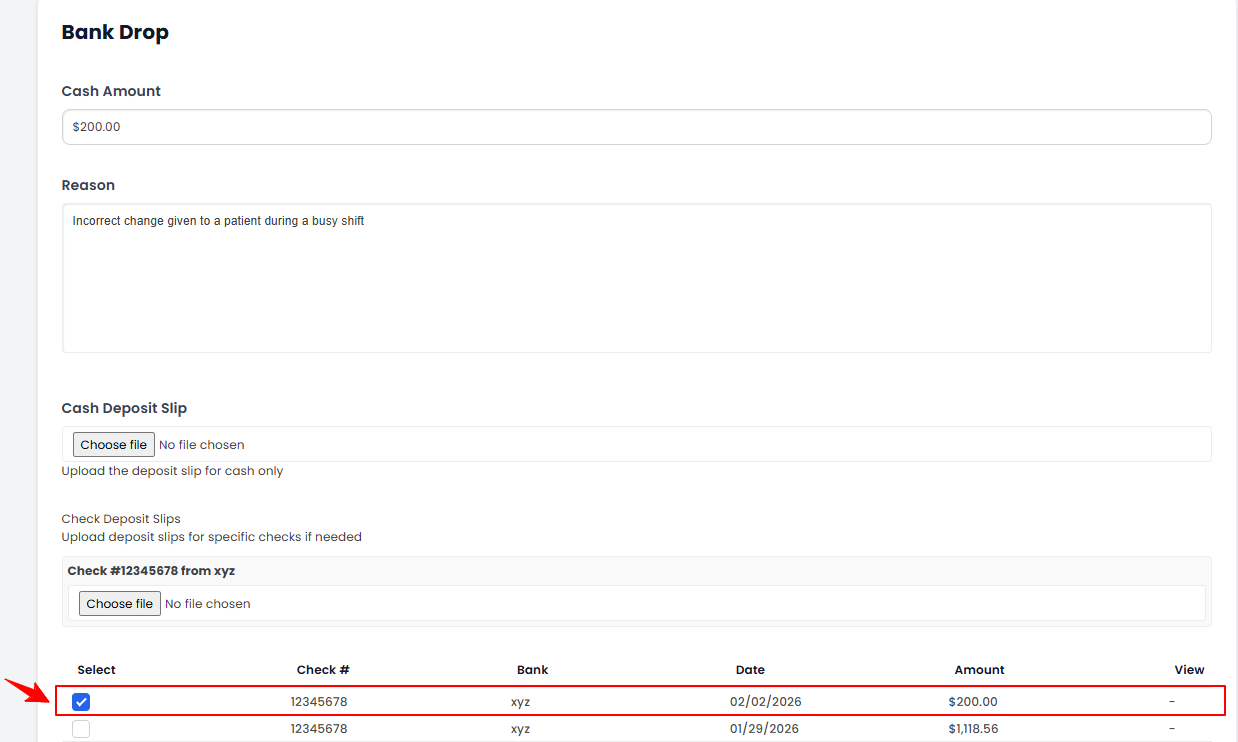
- Enter the Cash Amount and Reason for the bank drop. Upload the Cash Deposit Slip, or select a check from the list below to create a bank drop transaction. Once done, click “Record Bank Drop.”
The bank drop transaction has been recorded successfully!
Create Bank Drop While Managing Checks
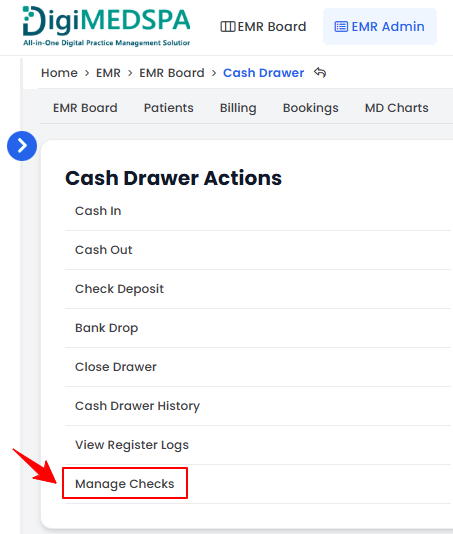
- The user can also create a bank drop transaction through the “Manage Checks”section in the cash drawer. To manage the checks, click on “Manage Checks” under Cash Drawer Actions on the left side of the screen.
- A list of checks will be displayed, showing the check number, bank name, account holder, check date, amount, deposit status, deposit location, date received, location, and received by.Note: “Check Number” is a unique identifier printed on the check, used to track and reference the specific check being deposited. “Bank Name” is the name of the bank that issued the check. “Account Holder Name” is the name of the individual or business that owns the bank account from which the check is issued. “Check Date” is the date written on the check, indicating when it was issued. “Check Image” is a digital copy or scanned image of the check, often required for record-keeping and verification. Amount – The monetary value written on the check. “Deposit Status” indicates whether the check has been deposited or is still pending. “Deposit Location” is the bank or account where the check was deposited. “Date Received” is the date when the check was received. “Location” is the physical or virtual location where the check was received. “Received By” represents the name of the person who received the check.
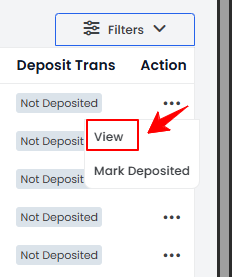
- To view the check details, click the three dots under the Action column and select “View” for the specific check for which you want to create the bank drop.
- The Check Details will be displayed along with the Bank Drop Information. Click “Create Bank Drop” to create a bank drop for the check.

- Enter the cash amount and the reason for the bank drop. Upload the cash deposit slip, and the check you previously selected for the bank drop will be automatically linked to this transaction. Once done, click “Record Bank Drop.”
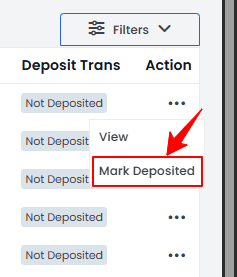
- On the Checks List Screen, click the three dots under the Action column and select “Mark Deposited” to go to the Bank Drop Screen. Then, follow the same steps as above to complete the bank drop transaction.