

Understanding Terminologies
- EMR Board
The EMR Board is a centralized dashboard in the DigiMEDSPA Portal that offers direct access to key Med SPA operations such as provider schedules, appointment statuses, and upcoming bookings. It also allows users to track and update patient statuses—such as New, Confirmed, Checked In, Waitlist, No-show, or Cancelled.
Part 1 of 4
View Bookings Through the EMR Board
-
Upon logging into the DigiMEDSPA Portal, the user is directed to the EMR Board, which is the default landing screen displaying all bookings scheduled for the current date.
-
Use various filters available to quickly and easily locate specific bookings in the EMR Board.
-
Click the “Edit” icon next to the date filter and select the desired date to view bookings for that day.
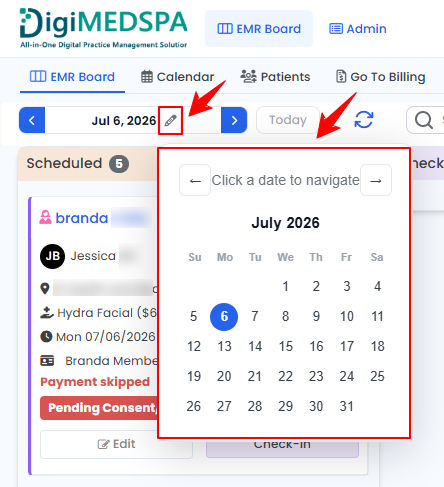 NoteYou can use the arrow buttons (the “<” and “>” icons) in the date filter to navigate to previous or upcoming dates.
 -
Select a Location from the dropdown menu to view bookings specific to that location.
-
Select a Provider from the dropdown menu to view bookings specific to that provider.
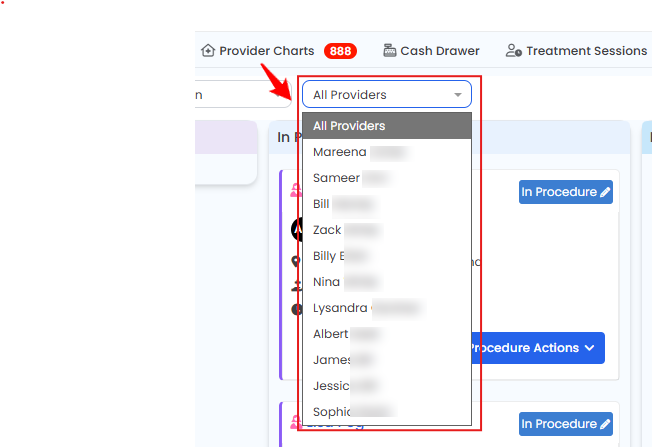 NoteTo choose a provider, you must first select the location.
 -
Enter the Patient's Name in the search bar to filter and view appointments specific to that patient.NoteTo refresh the EMR Board screen, click the “Refresh” icon to remove any applied filters.
-
Part 2 of 4
Update the Booking Statuses Through the EMR Board
-
Click “Check-in” on the scheduled booking for the patient who has arrived to update their status to Checked In.
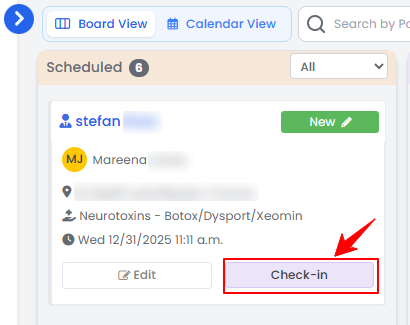 Note“Scheduled” indicates a confirmed appointment set for a specific date, time, service, and provider. “Checked In” indicates that the patient has arrived at the Med SPA and has checked in for their appointment.
 -
Click the “Edit” button to update a booking.NoteFor detailed instruction on how to edit a booking, refer to “Edit a Booking” user guide.
-
Once you click “Check-in” and review the check-in details, the booking will appear in the “Checked In” section. Click the “Start Procedure” button to move it to the In Procedure step.
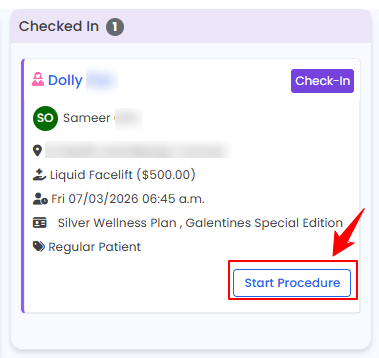 NoteBookings with pending payments will appear in the “Scheduled” section with a “Payment Skipped” label, while bookings with pending consent or questionnaires will appear with a “Pending Consent/Questionnaire” label. “In Procedure” marks the stage where the patient is undergoing their scheduled treatment or consultation. For detailed instructions on creating a procedure, refer to the user guide “How to Create a Procedure?”
 -
For virtual services, click “Join TeleHEALTH” to start the session. After the session ends, click “Check Out” to complete the appointment.NoteVirtual services allow patients to connect with Med SPA professionals through online meetings for consultations, treatment planning, follow-ups, and skincare advice from home.
-
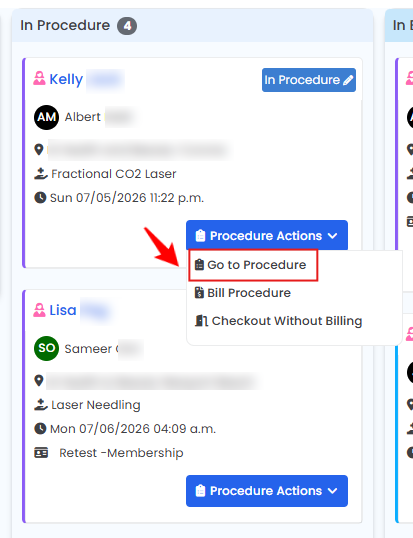
For bookings in the “In Procedure” step, click the “Go to Procedure” button to continue creating the procedure from where you left off.
-
To bill a procedure for bookings in the "In Procedure" phase, hover over "Procedure Actions" and select "Bill Procedure."
-
To checkout without billing, hover over “Procedure Actions” and select “Checkout without Billing” from the dropdown menu.
-
To cancel a booking, hover over “In Procedure” and select “Cancelled.”
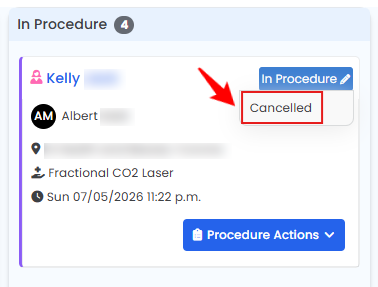 NoteThe booking will move back to the “Scheduled” section with a cancelled status, but you can still click “Go to Procedure” to complete it if needed.
 -
Once the procedure is complete, the booking will be sent to billing and appear under the “In Billing” step.Note“In Billing” denotes the phase where payment is being processed for the services provided during the appointment.
-
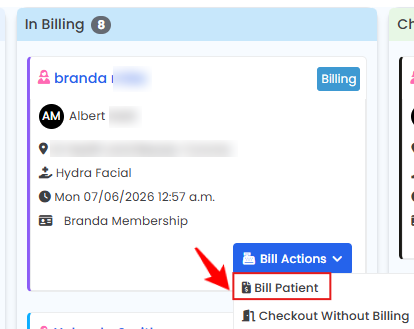
To bill the patient, hover over the “Bill Actions” and select “Bill Patient” from the dropdown menu.
-
To checkout without billing, hover over “Bill Actions” and select “Checkout without Billing” from the dropdown menu.
-
The booking will be updated and moved to the “Checked Out” stage.Note“Checked Out” is the final status indicating that the appointment has been completed, and the patient has successfully completed their visit.
Part 3 of 4
Update Patient Statuses Through the EMR Board
-
Hover over the patient status next to the patient's name to reveal a dropdown menu. From the menu, select the appropriate status for the patient.
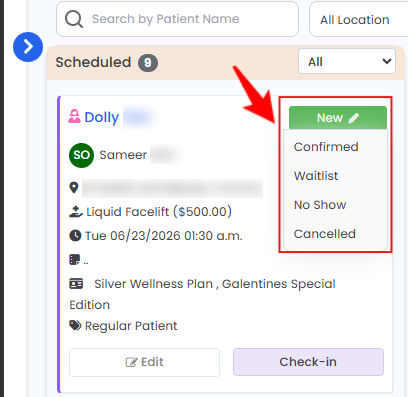 Note"Confirmed" means that the patient has acknowledged and verified their scheduled appointment. This status indicates that the appointment is set to proceed as planned, with no further confirmation needed. “Waitlist” represents a patient who is on a waiting list for an appointment. This status is often used when the desired time slot is unavailable, and the patient is waiting for an opening. “No Show” denotes that the patient did not arrive for their scheduled appointment without prior cancellation or rescheduling. “Cancelled” indicates that the appointment has been canceled by the patient before the scheduled time.
Part 4 of 4
Check Provider’s Schedules and Availability Through EMR Board
-
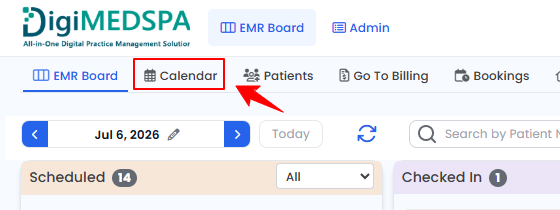
From the EMR Board Tabs, click “Calendar” to switch to a calendar format.
-
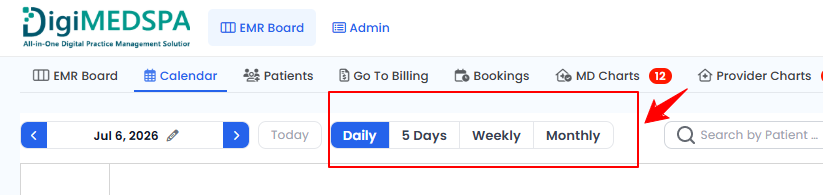
Click “Daily,” “5 Days,” “Weekly,” or “Monthly” to switch between the corresponding calendar views to display bookings for the selected time period.
-
All providers listed in the portal will be displayed. Hover over their name and their booking percentage (the portion of their schedule occupied by confirmed appointments for the day) will be displayed. You can also view their appointments in a calendar format, with the duration of each appointment clearly shown.
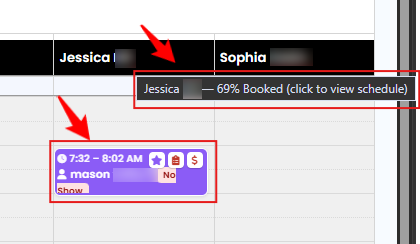 NoteTo view the details of an appointment, including the patient name, location, and service, deposit, and paperwork hover over the appointment's duration on the calendar. Bookings can also be rescheduled by clicking and dragging the booking to the desired time slot. For detailed instructions, refer to “Reschedule a Booking” article.
 -
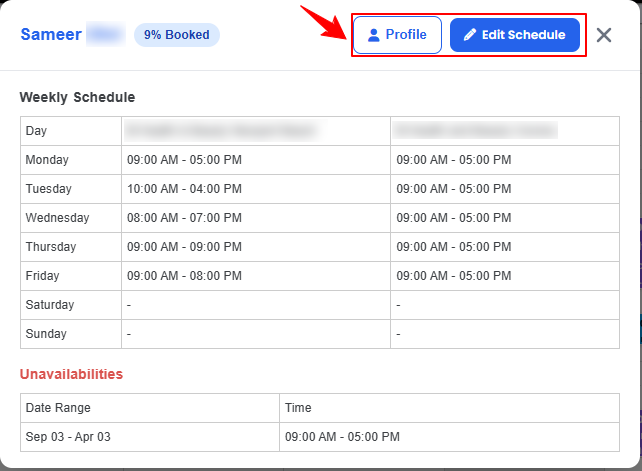
To view a provider’s weekly schedule, click the provider’s name. The provider’s weekly schedule and unavailabilities will be displayed, along with their booking percentage. From here you can click “Profile” to view the provider’s details or “Edit Schedule” to update the provider’s schedule.
 NoteFor detailed instructions on updating a provider’s schedule, refer to the “Manage Provider Schedule” article.
 -
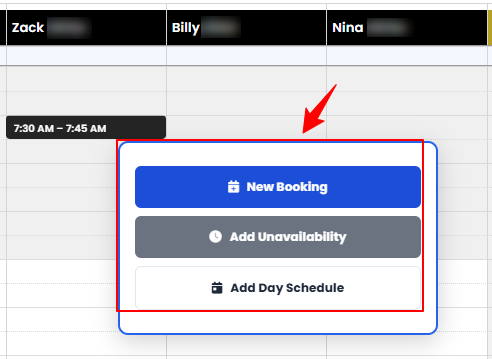
Click any available time slot on the provider’s calendar to create a new booking, mark the provider as unavailable, or add a day schedule.
You’re all set
That’s every step of “How to Navigate Through EMR Board”. Up next: Use the Calendar View on the EMR Board to View Provider Schedules and Availability.