

 DigiMEDSPA EMR
 DigiMEDSPA CONNECT ™
How to Manage Users
This user guide provides detailed instructions on adding, editing, and viewing users within the DigiMEDSPA Portal.
Understanding Terminologies
Users
Users can access a system, platform, or software, each with unique login credentials and assigned permissions.
User Types in DigiMEDSPA EMR Portal
In the DigiMEDSPA EMR portal, each individual accessing the system is categorized as a user. Users may have varying roles, each with distinct responsibilities and permissions:
-
Provider: A user type responsible for performing services. Providers include nurses, aestheticians, etc., who directly interact with patients and manage patient procedures. A provider requires an MD's signature on their patients' charts in order to complete the procedure.
-
MD (Medical Director):A licensed medical professional with oversight responsibilities. MDs perform procedures and sign off charts for providers. Every MD can be a provider, but not every provider is an MD.
-
Support User: User who handles administrative or operational tasks but does not provide direct medical treatments. Support users include receptionists, administrative staff, billing personnel, and other team members responsible for managing appointments, patient records, and clinical operations. Support users when given access to e-Prescribing, who can also prescribe drugs to patients with the provider's final approval.
-
Employee: Anyone who works at the Med SPA and receives wages, regardless of their specific role or responsibilities, is considered an employee. All employees accessing the EMR portal are defined as users.
Add New User
- A new user can be added by accessing the “Users & Roles” from two entry points.
- From the Top Right Profile dropdown menu, select “Users & Roles.”

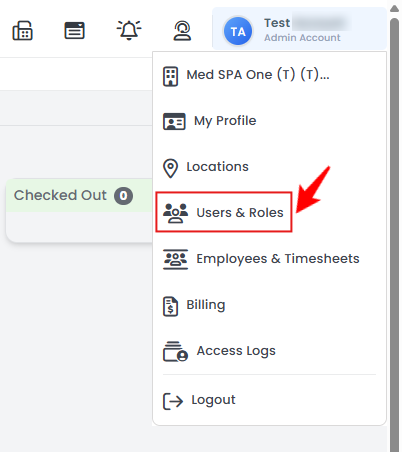
- From the Left Navigation, click on the “My Account” dropdown menu and select “Users & Roles.” Alternatively, you can type “Users & Roles” into the search bar in the Left Navigation.
- From the Top Right Profile dropdown menu, select “Users & Roles.”
- Clicking '’Users & Roles'’ opens the Users List Screen. To create a new user, click the ‘’New User’’ button in the top right corner.
- Enter the required information, including First and Last Name, County, Address, Zip, State, City, Phone Number, and Email. Select the Role from the dropdown menu. You can select multiple roles for the user.
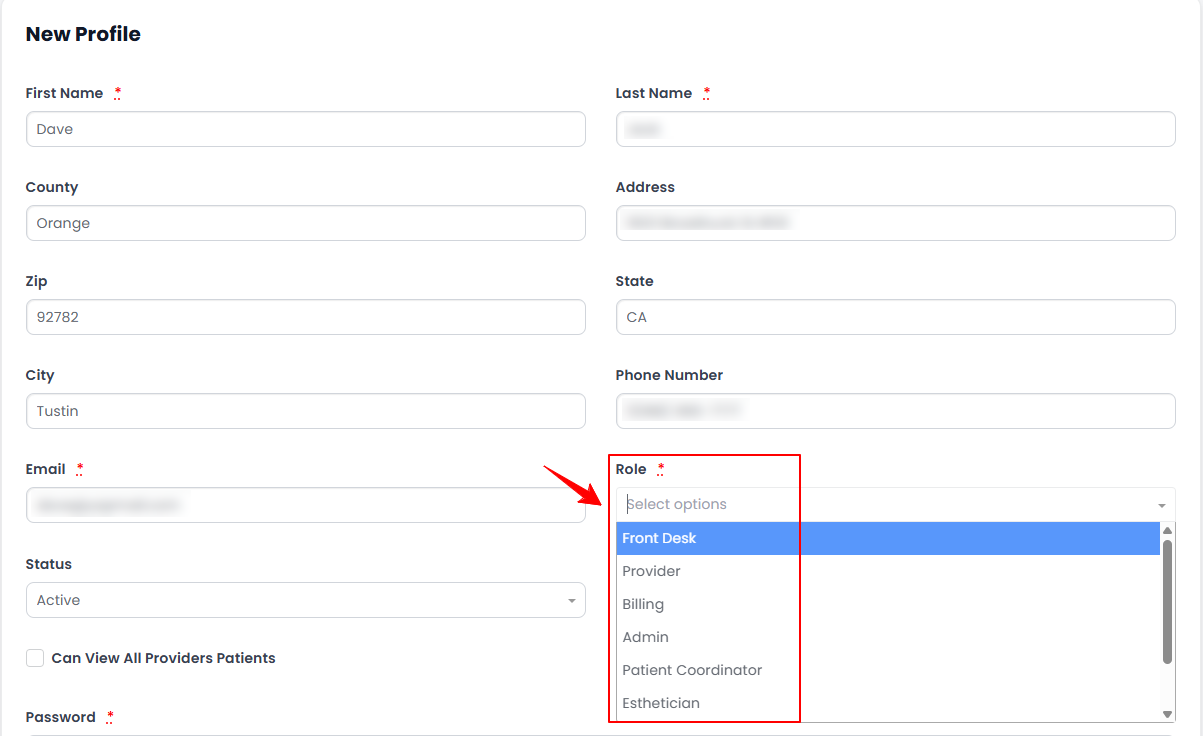 Note: “Roles” are predefined sets of permissions that determine a user's access level and allowed actions within the system, ensuring controlled and efficient management.
 - Select a Status for the user from the dropdown menu.
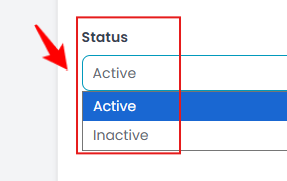 Note: “Active” refers to a user who has access to the system and can perform their assigned duties. “Inactive” refers to a user whose access is disabled, preventing them from logging in or performing any tasks.
 - Select a Location from the dropdown menu. You can select one or multiple locations.
- Choose whether the user can view All Providers' Patients or only Specific Providers' Patients. If you select Specific Providers' Patients, choose those specific providers from the dropdown menu.
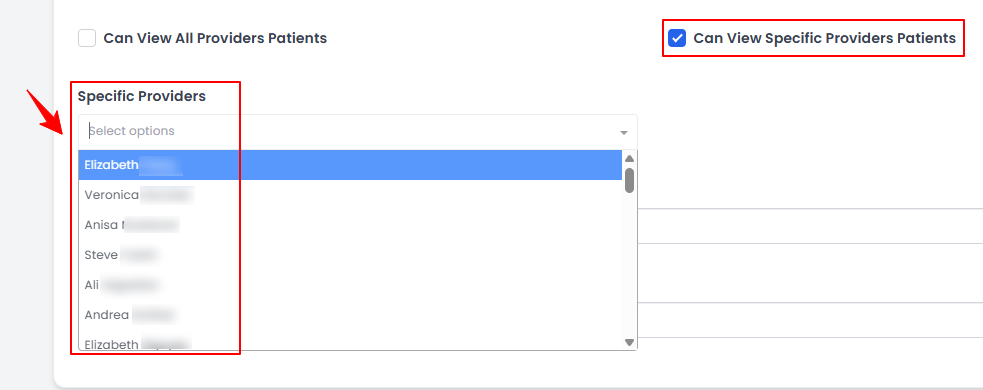 Note: Selecting “View All Providers' Patients” allows the user to see all patient records in the system. Selecting “Specific Providers' Patients” allows the user only to see records of patients linked to specific providers.
 - Enter the Password and Password Confirmation, then click "Save" to add the user.Note: The “Password” is required to create secure login credentials for the user. It allows them to access the DigiMEDSPA Portal with a unique username (email) and password, ensuring the security of sensitive information and enabling personalized access to the system based on their role and permissions.
A new user has been added successfully!
View User
- To view a specific user from the list, click the three dots under the action column and select "View," or simply click anywhere on the user’s data.
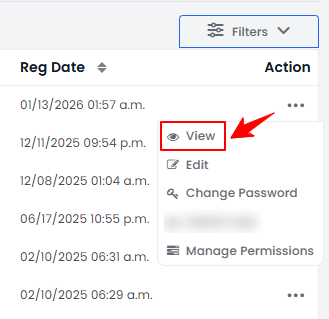
- The User View Screen will open, displaying all the details of the user.
Edit User
- There are two ways to edit an existing user.
- From the users list, click on three dots under the action column and select "Edit" for the specific user.
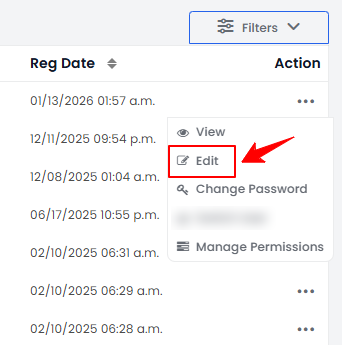
- On the User View Screen, hover over the Actions menu in the top right corner of the screen and click on ‘’Edit User.”
- From the users list, click on three dots under the action column and select "Edit" for the specific user.
- Make the necessary changes and click “Save” to save your updates.
The user has been edited successfully!
Change User Password
- There are two ways to change the password for a user.
- From the users list, click on three dots under the action column and select "Change Password" for the specific user.
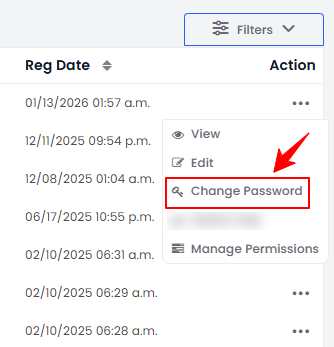
- On the User View Screen, hover over the Actions menu in the top right corner of the screen and click on ‘’Change Password.’’
- From the users list, click on three dots under the action column and select "Change Password" for the specific user.
- Enter the new password, confirm it, and click “Save” to update the password.
The password has been successfully updated!
Manage User Permissions
- There are two ways to manage permissions for a user.
- From the users list, click on three dots under the action column and select "Manage Permissions" for the specific user.
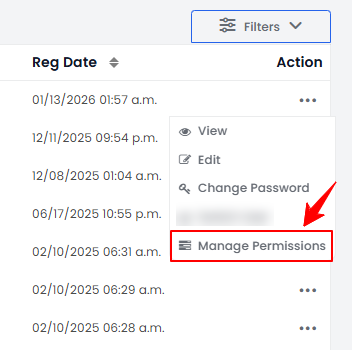
- On the User View Screen, hover over the Actions menu in the top right corner of the screen and click on ‘’Manage Permissions.’’
- From the users list, click on three dots under the action column and select "Manage Permissions" for the specific user.
- Select the desired permissions from the list, then click “Save” to apply them.
Check the Status of Users
- To check the status of a user, go to the Users List Screen and review the status indicators in the top scopes bar for the current updates.
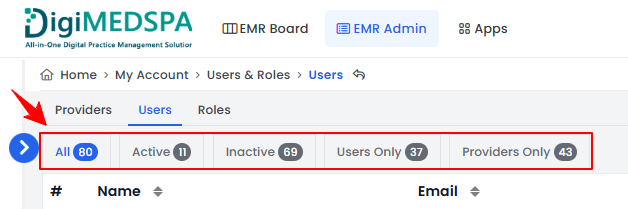
- Click on the “Active” scope to view the list of all active users in the portal.
- Click on the “Inactive” scope to view the list of all inactive users in the portal.
- Click on the “Users Only” scope to view the list of all users in the portal. The “All” list also allows you to view both the type and status of each user. The “Status” column indicates whether a user is currently active or inactive, while the “Type” column specifies whether the account belongs to a user or a provider.