

 DigiMEDSPA EMR
 DigiMEDSPA CONNECT ™
How to Manage a Patient Wallet?
This user guide explains how to manage billing and payments through a patient’s profile in the DigiMEDSPA portal. In this section, you will learn how to review the patient wallet, apply promotions and credits, manage and redeem credits, and process payments to ensure accurate and efficient billing.
Understanding Terminologies
Patient Wallet
The patient wallet is a digital account within the EMR system that stores a patient’s available dollar credits, allowing them to use the balance for payments, rewards, or discounts on services and products.
Access this link: https://digimedspa.com/ap2/products
How to Access a Patient’s Wallet
- A patient's wallet can be accessed through the Patients List Screen, accessible via two entry points.
- From the EMR Board Tabs, select “Patients.’’

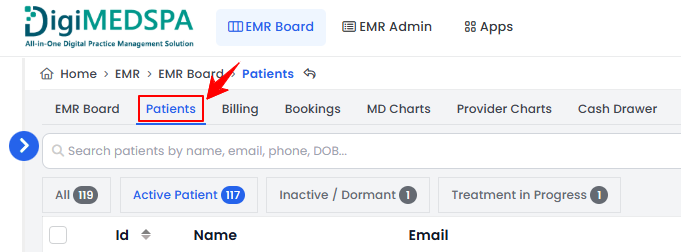
- From the Left Navigation, click on the “EMR Board” dropdown menu and select “Patients.” Alternatively, you can type “Patients” into the search bar in the Left Navigation.
- From the EMR Board Tabs, select “Patients.’’
- From the patient list, click on three dots under the action column and select "View Patient Profile" for the specific patient.
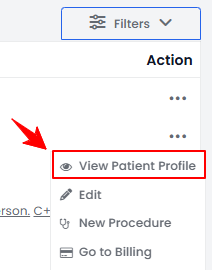
- Users can view detailed patient information on the patient profile. Click on the “Wallet” tab.
- Here, you can view everything assigned to the patient— “Credits” show available dollar credits, while “Wallet Items” display applied promotions, prepaid services, gift cards, products, and membership-related items.
How to Add Money to a Patient’s Wallet?
- To add dollar credit to the patient’s wallet, click the “Add” button next to Dollar Credit.
 Note: Dollar credit is a monetary value added to a patient’s account as part of a rewards or payment system, which can be used for future services or product purchases.
 - Enter the Amount and Reason, then click “Submit” to complete the process.
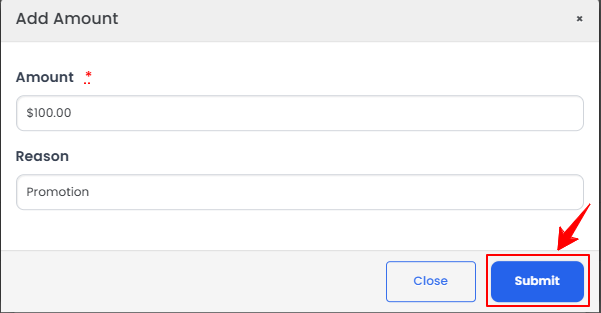 Note: ''Amount'' is the monetary value of the dollar credit added or deducted in a transaction. ''Reason'' is the justification or purpose for the transaction, such as a promotional reward, refund, or manual adjustment.
How to Remove Dollar Credit from a Patient’s Wallet?
- To remove dollar credit from the wallet, click the ‘’Remove’’ button next to the dollar credit option.

- Enter the Amount to Remove and Reason, then click “Submit” to complete the process.
How to View Credit Ledgers?
- Click the “View Credit Ledgers” button below the credit section to view the list of credit ledger entries for the selected patient.Note: “Credit Ledgers” are a record of all dollar credit transactions for a patient, including amounts added or deducted, the reason for the transaction, and the date. Credit ledgers track the patient’s available credit balance over time.
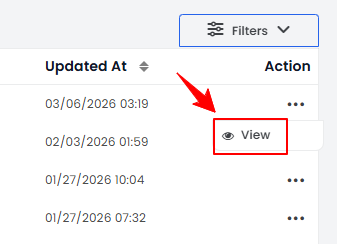
- To view a credit ledger’s details, click anywhere on the credit ledger’s data in the listing, or click the three dots in the action column next to the specific credit ledger and select '’View.’’
- The Credit Ledger Details Screen will open, displaying all the details of the credit ledger, including Patient and User Name, Reward Type, Ledger Type, Amount, Previous Balance, and Reason.Note: “Reward Type” is the category of the reward, such as dollar credits, discounts, or promotional points. “Ledger Type” is the classification of the transaction, such as credit (added rewards) or debit (redeemed rewards). The “Amount” is the numerical value of the reward transaction, indicating how much was credited or debited. The “Previous Balance” is the reward balance before the current transaction was applied. “Reason” is the justification or description for the reward transaction, such as a promotional bonus, referral reward, or redemption.
How to Add Items to a Patient’s Wallet?
- To add items to a patient’s wallet, click the “+Add Item” Item button at the end of the Wallet Items section.

- Next, select the Item Type from the dropdown menu—Products, Services, or Promotions.
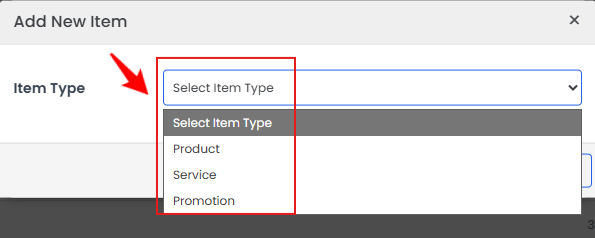 Note: Products are physical items or retail products purchased by the patient, such as skincare or wellness products. Services are prepaid or scheduled treatments, procedures, or sessions that the patient can redeem at the Med SPA . Promotions are discounts, offers, or special deals applied to the patient’s account that can be redeemed for services or products.
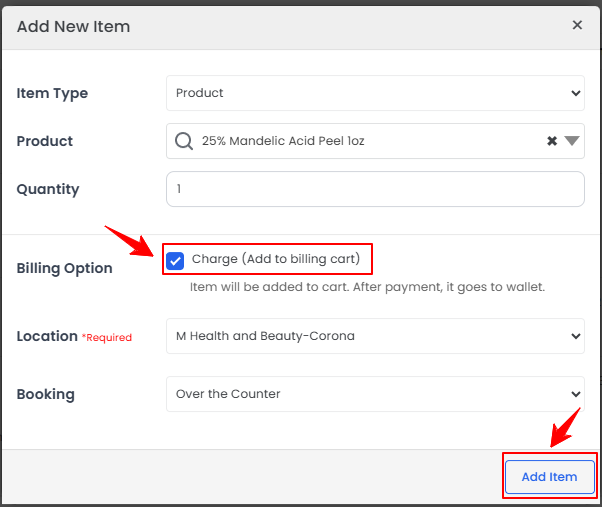
- If you select Product, choose it from the search bar. Check “Charge (Add to Billing Cart)” if the item should be billed; otherwise, it will be added to the wallet as a free item. If charging, select the location and booking to attach it for billing. Click “Add Item” to complete the process.
 Note: If the “Charge” option is not selected, simply enter your notes in the Notes field and click “Add Item” to save.
 - If you select Service, choose it from the search bar and enter the quantity. Check “Charge (Add to Billing Cart)” if the service should be billed; otherwise, it will be added to the wallet as a free item. If charging, select the location and booking to attach it for billing. Click “Add” Item to complete the process.
- If you select Promotion, choose it from the search bar. Check “Charge (Add to Billing Cart)” if the promotion should be billed; otherwise, it will be added to the wallet as a free item. If charging, select the location and booking to attach it for billing. Click “Add” Item to complete the process.
- If you select Product, choose it from the search bar. Check “Charge (Add to Billing Cart)” if the item should be billed; otherwise, it will be added to the wallet as a free item. If charging, select the location and booking to attach it for billing. Click “Add Item” to complete the process.
- To view the applicable dates for wallet items, click “Show Dates” for the items listed below the Wallet Items section.
How to View Wallet Ledgers?
- Click the View Wallet Ledgers button in the Wallet Items section to view the list of wallet ledger entries for the selected patient.Note: “Wallet Ledgers” are a record of all wallet item transactions, including products, services, and promotions added, redeemed, or charged. Wallet ledgers show the status, usage, and history of all items in the patient’s wallet.
- The Wallet Ledgers list will display all ledger entries for the selected patient, including details such as Name, Quantity, Amount, Line Item Type, and Created At (date and time of the transaction).