

 DigiMEDSPA EMR
 DigiMEDSPA CONNECT ™
How to Collect Deposit for a Booking
This user guide provides step-by-step instructions for collecting a deposit for a booking—both when creating a booking and afterwards if a deposit was missed. In the DigiMEDSPA Portal, the term "booking" refers to an appointment.
Understanding Terminologies
Booking
A booking refers to reserving a time slot for aesthetic and wellness procedures such as facials, chemical peels, injectables, or laser therapies. It typically involves selecting a service, choosing a time slot, and confirming appointment details.
Deposit
A deposit is a partial payment collected in advance to confirm and secure a patient’s booking. It serves as a commitment from the patient and is later adjusted in the total bill during checkout. Deposits help minimize last-minute cancellations and ensure smoother payment processing.
Collect Deposit While Creating a New Booking
- To create a new booking, go to the EMR Board and click “New Booking” located in the top-right corner of the screen.

 Note: There are more navigation points available to create a new booking. For detailed instructions, refer to the “Book an Appointment through New Booking” user guide.
 - The New Booking form will open, complete the patient details and booking details sections. Below the booking details, select “Take Deposit / Capture Card” if you wish to collect an advance deposit, then click “Create Booking.” If the “Take Deposit / Capture Card” option is selected, you’ll be directed to the Upfront Deposit Payment Screen, which displays the required deposit amount.
 Note: When multiple services are selected, the deposit shown will be the total of all service deposits. “Capture card” means finalizing a previously authorized card payment and officially charging the card.
 - On the Upfront Deposit Payment Screen, you can either edit the deposit amount or pay the pre-set deposit. Choose the payment method (Existing Card, New Card, Cash or Other), fill in the required details and click “Pay Now” to collect the deposit.
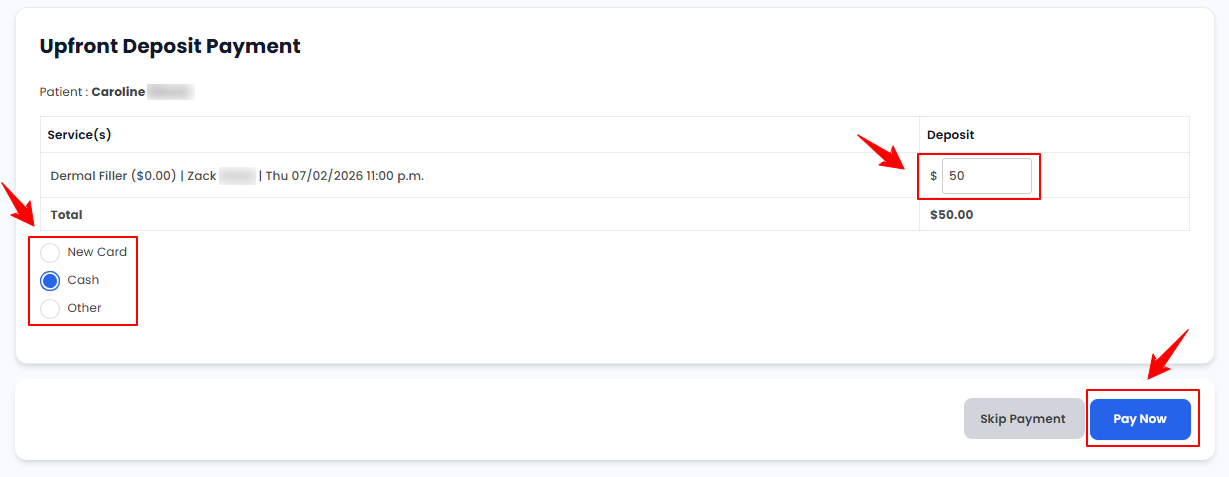 Note: When you select card payment, click the Capture Only option to complete the payment using funds that were already authorized on the card. No new authorization will be requested from the cardholder.
Collect Deposit After Creating a Booking
- You can also collect a deposit for a booking after it has been created, through the Bookings List Screen. From the EMR Board Tabs, select “Bookings.”

- On the Bookings List Screen, click on three dots under the action column and select "Take Deposit" for the specific booking.
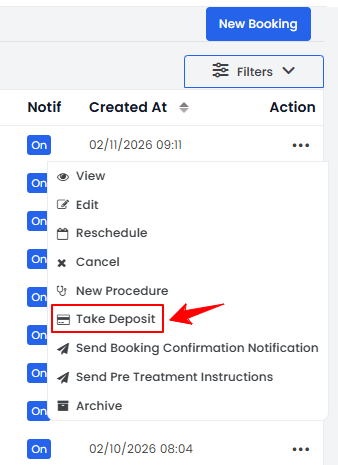 Note: This button is provided in case you forgot to collect a deposit while creating the booking, allowing you to do so later with ease. “Take Deposit” button will only be visible for bookings that have not yet been conducted, and are yet to be performed.
 - You will be directed to the Upfront Deposit Payment Screen, which displays the required deposit amount.. Choose the payment method (Existing Card, New Card, Cash or Other), fill in the required details and click “Pay Now” to collect the deposit.Note: You can set the deposit amount for each service when adding a new service to the portal. This amount can be edited from the Upfront Deposit Payment Screen. For more information, refer to the “Managing Prepayments for a Service (Service Deposits)” user guide.
The deposit has been successfully collected for the booking created earlier!