

 DigiMEDSPA EMR
 DigiMEDSPA CONNECT ™
Create and Manage Patient Notes
The DigiMEDSPA Portal allows you to create and manage three types of patient notes: “Normal Notes,” “Sticky Notes” and “Sticky Permanent Notes.” This user guide provides instructions on how to create and manage patient notes effectively.
Understanding Terminologies
Normal Note
A normal note is a standard note added to a patient’s profile. It remains in the note list but does not pop up automatically. Normal notes are ideal for documenting general information, such as treatment history or notes that may not require immediate attention during every booking.
Sticky Note
A sticky note is a pop-up note that automatically appears when a patient’s profile is opened. It is used for important, time-sensitive information or reminders, such as allergies, special preferences, or urgent instructions that need to be seen by the provider before booking an appointment or performing a procedure for that patient. Once acknowledged, it will not appear again automatically.
Sticky Permanent Note
A sticky permanent note is a non-dismissible alert that always appears whenever the patient’s profile is opened. Unlike a regular sticky note, it cannot be acknowledged or hidden, ensuring the information remains continuously visible to the user. This type of note is intended for vital, ongoing information that must be seen every time the profile is accessed, regardless of user acknowledgment.
Create a Patient Note
- The user can create a patient note through the Patients List Screen, accessible via two entry points.
- From the EMR Board Tabs, select “Patients”.


- From the Left Navigation, click on the “EMR Board” dropdown and select “Patients.” Alternatively, you can type “Patients” into the search bar in the Left Navigation.
- From the EMR Board Tabs, select “Patients”.
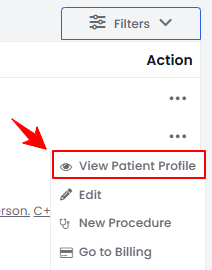
- Click anywhere on the patient's data in the patient listing, or click the three dots under the action column next to the specific patient and select “View Patient Profile.”
- On the Patient Information Screen, users can view a detailed overview of the patient's information. To view the patient notes, click on the "Patient Notes" tab.

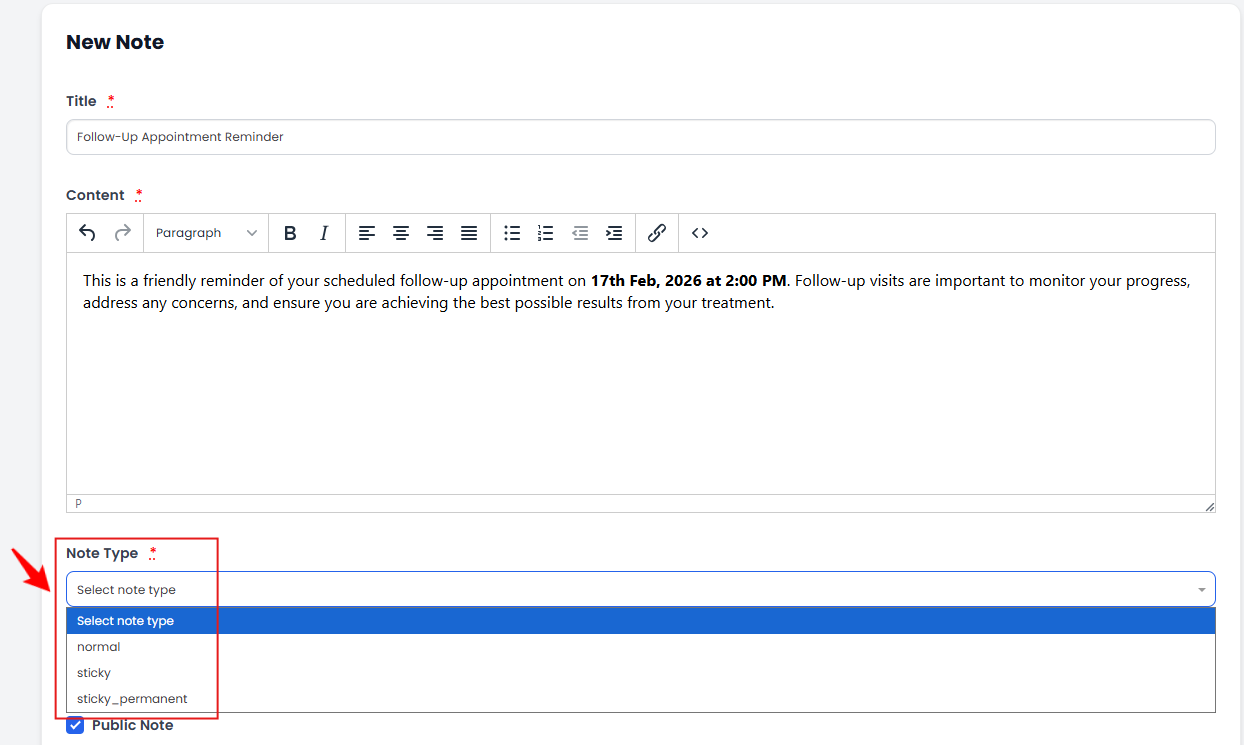
- To create a new patient note, click on ‘’New Note’’ in the top right corner of the screen.
- Enter the required details, including Title and Content and then, select the Note Type from the dropdown menu.
- To access “dot phrases”, type a dot (.) in the content field. These pre-created phrases will appear in a dropdown menu, allowing you to quickly select and insert repetitive notes instead of typing them manually.Note: To use Dot Phrases, users must first create and save these repetitive phrases in the Dot Phrases List Screen. Once saved, you can easily insert them by typing a dot wherever needed. Dot Phrases can be created and managed within Clinical Documentation in the portal. For step-by-step instructions, refer to the “Add / View / Edit Dot Phrases” tutorial.
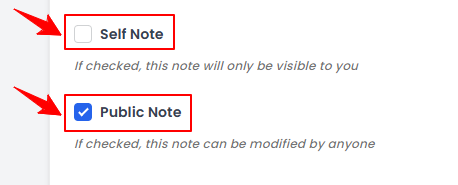
- Check “Self Note” if you want the note to be visible only to you, or select “Public Note” to allow others to view and edit it.
- Click “Add Attachments” to upload and attach files to the note. After filling in all the required information, click “Create Note” to save.
The patient note has been successfully created!
Acknowledge Sticky Note
- Each time the patient's profile is viewed, the sticky note will pop up on the screen until it is acknowledged. Clicking "Acknowledge" confirms that the note has been seen by the provider, and it will no longer pop up each time the patient's profile is opened.
 Note: Once acknowledged, the sticky note will remain saved in the patient’s notes, with “Acknowledged” displayed at the bottom of the note.
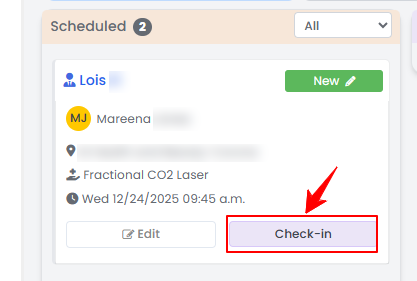
 - On the EMR Board, click “Check-in” for scheduled bookings. The patient note will automatically pop up, allowing you to acknowledge it directly from there.
 Note: Only Sticky and Sticky Permanent notes appear after check-in. Normal notes can be viewed only through the patient profile.
View a Patient Note
- Click on the note to view a specific patient note from the list on the patient profile.
- The Note View Screen will open, displaying all the details of the patient note.
Edit a Patient Note
- From the note list, click on "Edit" for the specific note you want to edit.

- Make the necessary changes and click “Update Note” to save your updates.
The patient note has been successfully edited!
Delete a Patient Note
- From the note list, click on "Delete" for the specific note you want to delete.

- A confirmation pop-up will appear. Click “OK” to confirm and delete the note.
The note has been successfully deleted!
Convert to Normal / Sticky / Sticky Permanent Note
- From the note list, click on '’Make Normal'’ for a sticky note, either before or after acknowledging it. Once converted, the note will no longer pop up automatically when the patient's profile is opened. Instead, it will remain in the patient's note list as a normal note, accessible when needed.
 Note: Normal notes can be converted to sticky or sticky permanent notes in a similar way by selecting "Make Sticky" or “Make Sticky Permanent.” Sticky permanent notes will pop up every time the Patient Profile is opened.