

 DigiMEDSPA EMR
 DigiMEDSPA CONNECT ™
Create and Manage Email Campaigns
This guide provides clear, step-by-step instructions for creating and managing email campaigns to increase audience engagement.
Understanding Terminologies
Email Campaign
An email campaign is a targeted marketing initiative that involves sending promotional emails to a specific audience to promote your services, procedures, and special offers. The aim is to engage current and potential patients by providing valuable information about aesthetic procedures, skin care tips, upcoming events, and exclusive promotions.
Access this link: https://digimedspa.com/ap2/products
Create Email Campaign
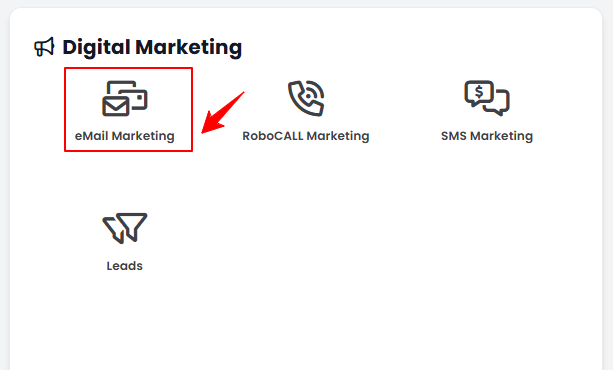
- The user can create an email campaign by accessing “eMail Marketing” in the Digital Marketing Panel through two entry points.
- Click “Apps” in the Top Menu Navigation to access the applications.


- Navigate to the Digital Marketing Panel and click on “eMail Marketing.”
- Navigate to the Digital Marketing Panel and click on “eMail Marketing.”
- From the Left Navigation, click on the “Digital Marketing” dropdown menu, and select “eMail Marketing.’’ Alternatively, you can type “eMail Marketing” into the search bar in the Left Navigation.
- Click “Apps” in the Top Menu Navigation to access the applications.
- To create a new campaign, click on the “New Campaign‘’ button in the top right corner of the screen.
- Step 1: Name
- In Step 1, create a suitable name for the email campaign then click the ‘’Next’’ button to proceed.
- Step 2: Event
- In Step 2, select an event from the dropdown menu or create a new event by clicking on ‘’+Add New Event.’’ Click the ‘’Next’’ button to proceed to the next step or click the ‘’Skip’’ button if you don't want to create an event.
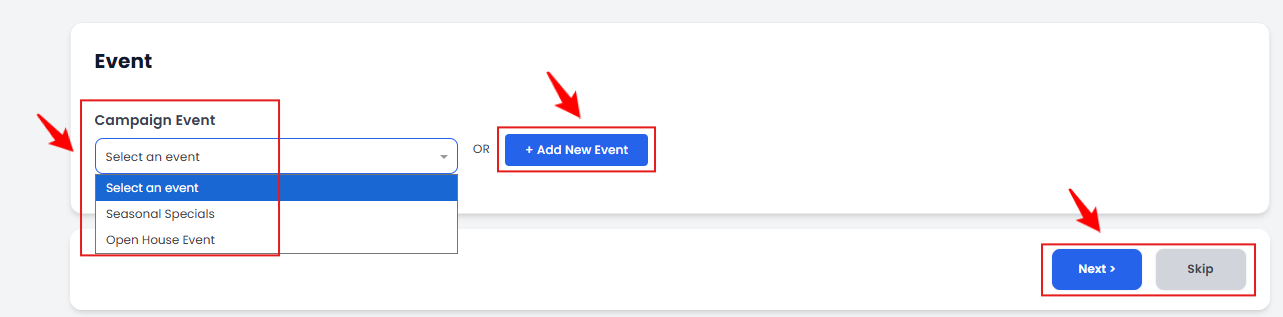 Note: “Event” is a special promotion or seasonal offering designed to attract patients with limited-time deals, exclusive treatments, or packages. Refer to the "Manage Email Campaign Event" user guide for instructions on creating a new event.
- In Step 2, select an event from the dropdown menu or create a new event by clicking on ‘’+Add New Event.’’ Click the ‘’Next’’ button to proceed to the next step or click the ‘’Skip’’ button if you don't want to create an event.
- Step 3: Message
- In Step 3, select a message for the campaign by clicking on the ‘’Search Message’’ dropdown menu or click the ‘’+New’’ button at the top right to create a new message for the campaign.
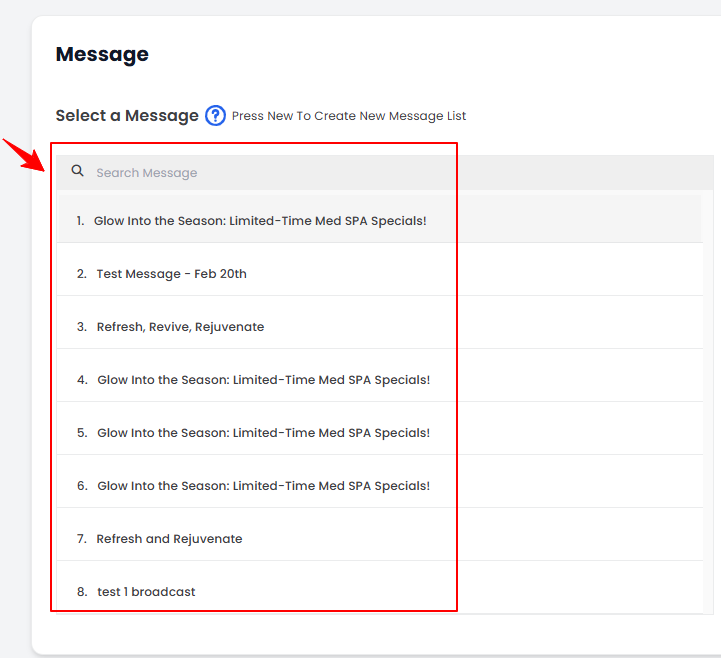 Note: For detailed instructions on creating a new message for the email campaign, refer to “Add / View / Edit Email Campaign Message” user guide.
 - A preview of the selected message will appear on the right. To send and verify the email content, enter the email address in the provided space and click the “Send & Verify” button.
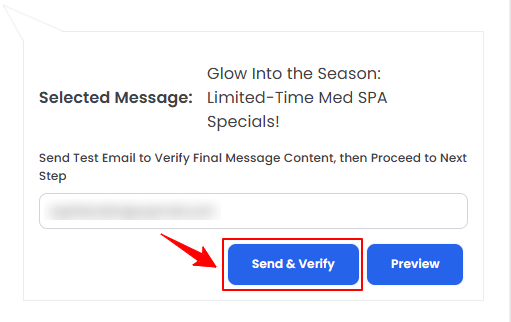 Note: The “Send and Verify” option for the test email is necessary to proceed to the next step. It ensures that your email is set up correctly and free of errors before sending it to your audience.
The email has been successfully sent for verification! - To review the email content, click on the ‘’Preview’’ button.
- The preview of the message displays the email content.
- Once you are done, click on the ‘’Next button to proceed.
- In Step 3, select a message for the campaign by clicking on the ‘’Search Message’’ dropdown menu or click the ‘’+New’’ button at the top right to create a new message for the campaign.
- Step 4: Audience
- In Step 4, select the audience from the dropdown menu to whom you want to send the email campaign or click on the ‘’+New’’ button in the top right corner to create a new audience. A preview of the selected audience will be displayed on the right. Once you are finished, click on the ‘’Next’’ button to proceed.
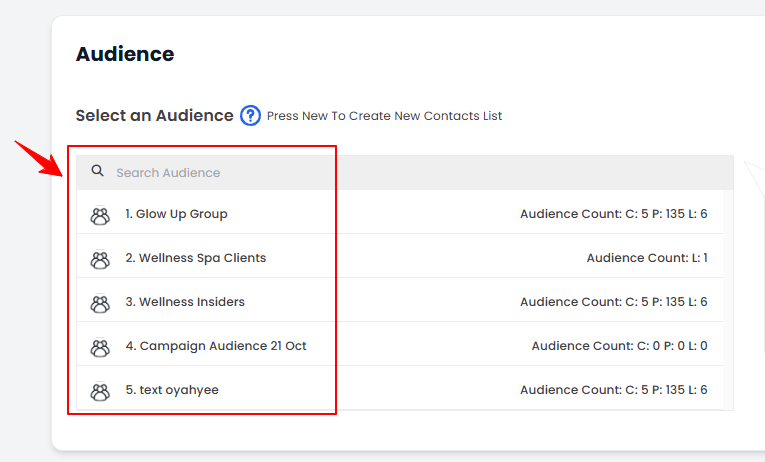 Note: “Audience” refers to the specific group of individuals, such as patients, selected for the campaign based on criteria like demographics, behavior, and interests. For detailed instructions on adding a new audience, refer to “Manage Email Campaign Audience” user guide.
- In Step 4, select the audience from the dropdown menu to whom you want to send the email campaign or click on the ‘’+New’’ button in the top right corner to create a new audience. A preview of the selected audience will be displayed on the right. Once you are finished, click on the ‘’Next’’ button to proceed.
- Step 5: Schedule
- In Step 5, create the campaign schedule by entering the number of recipients in the “Audience Count to Send” field to determine how many contacts will receive the campaign.
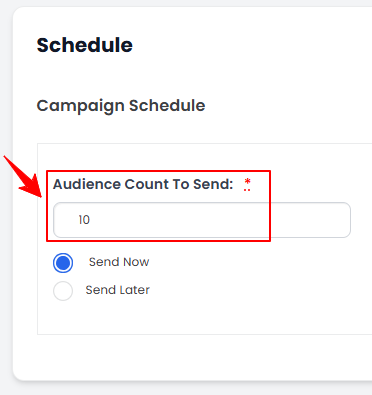
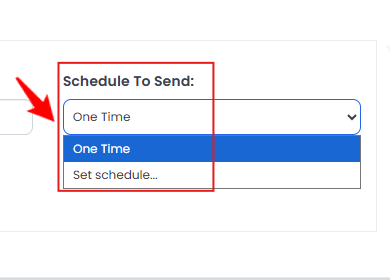
- If you check the ‘’Send Now’’ then the email campaign will be sent just as you complete and send the campaign. Click the “Schedule to Send” dropdown menu and select “One Time” if you want to send the email campaign only once.
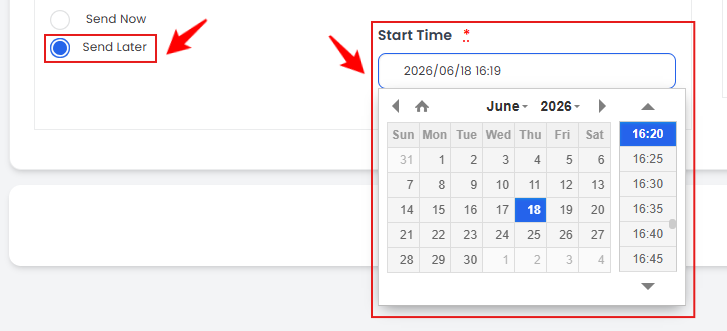
- If you select the ‘’Send Later’’ option then set a ‘’Start Time’’ for sending the campaign.
 Note: Sending the campaign labeled “One Time” means that the email campaign is sent only once to the selected audience at a specific start time, with no repetitions.
 - If you choose to “Set a Schedule” for the campaign then a popup will appear to set the schedule for the campaign. Choose the Frequency for sending the campaign from the dropdown menu and press ‘’OK’’ button to confirm.
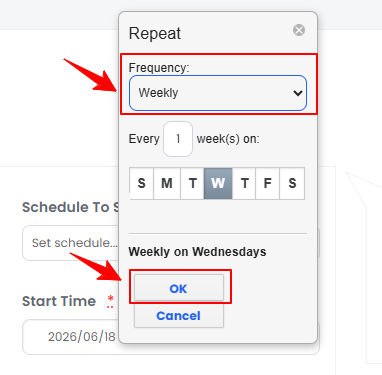 Note: Scheduling an email campaign allows it to be sent multiple times according to a defined schedule. This option lets you specify the start time, the frequency of repetitions, and the total number of occurrences. “Frequency” refers to how often emails are sent to the target audience within a specific time period.
 - If you mark the Repetition for the campaign as ‘’No’’ then enter the number of contacts to whom you want to send the campaign per schedule in the ‘’Audience Count To Send Per Schedule’’ field. Select the ‘’Start Time’’ and ‘’End Time’’ for the campaign.
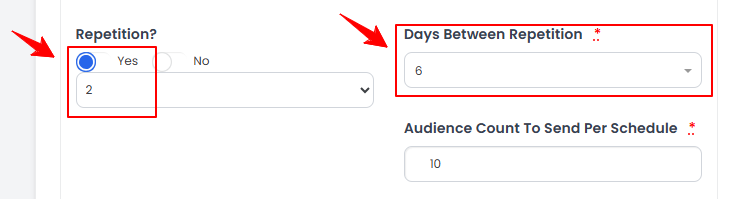
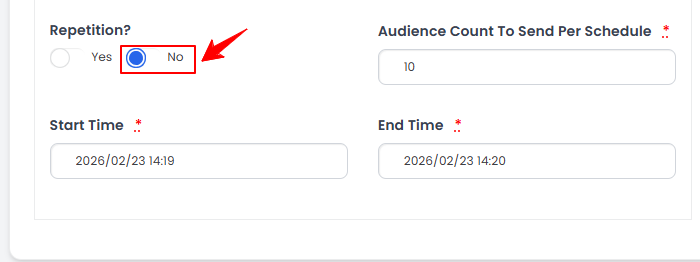 Note: “Repetition” refers to a structured schedule where emails are sent repeatedly to the target audience at set intervals. “Start Time” is when the email campaign sends emails to the target audience. “End Time” is when the email campaign stops sending emails, marking the conclusion of the scheduled delivery period.
 - If you mark the Repetition for the campaign as “Yes,” then select the number of repetitions and the “Days Between Repetitions” from the dropdown menus. Enter the “Audience Count to Send Per Schedule,” as well as the “Start Time” and “End Time” for the campaign.
- In Step 5, create the campaign schedule by entering the number of recipients in the “Audience Count to Send” field to determine how many contacts will receive the campaign.
- Step 6: Summary
- In Step 6, a summary of the email campaign will be displayed. To make changes, click the “Edit” button in the top-right corner, or click the “Edit” button next to each step to update specific steps of the campaign. Once you have completed the campaign, click the “Send” button to send it.
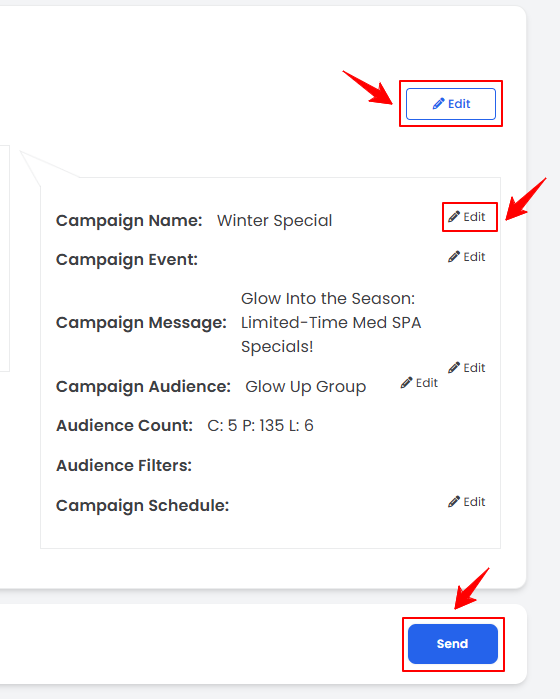
The email campaign has been successfully sent!
- In Step 6, a summary of the email campaign will be displayed. To make changes, click the “Edit” button in the top-right corner, or click the “Edit” button next to each step to update specific steps of the campaign. Once you have completed the campaign, click the “Send” button to send it.
Update Email Campaign
- From the email campaign list, click the three dots under the action column and select “Update” for the specific campaign you want to update.
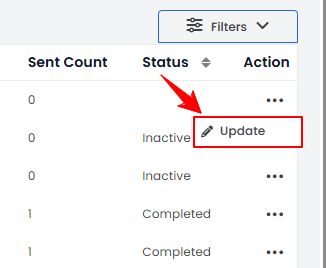 Note: For incomplete campaigns, clicking “Update” will resume the campaign from the step where you left off. If the campaign is complete, clicking “Update” will allow you to change the campaign status.
 - Select the status of the campaign from the dropdown menu. If the campaign is active select ‘’True’’ and if you want to make it inactive select ‘’False.’’
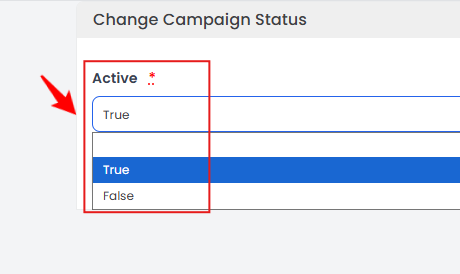 Note: "Active" status means the campaign is ongoing, with regular emails sent and engagement tracked. "Inactive" status indicates the campaign has ended or paused, often due to low engagement.
 - Once you have changed the campaign's status, click the "Update" button to save the change.
The email campaign has been successfully updated!