

 DigiMEDSPA EMR
 DigiMEDSPA CONNECT ™
Book an Appointment Through New Booking
This user guide offers step-by-step instructions to help you quickly create and schedule a booking using the New Booking feature.
Understanding Terminologies
New Booking
New booking is an efficient scheduling system that allows patients to schedule a session with a single provider at a specific location. It captures essential information for both booking and patient needs. It allows multiple services to be selected, ensuring a quick and seamless patient and provider experience.
Access this link: https://digimedspa.com/ap2/bookings
Book an Appointment Through New Booking
- The user can book an appointment through New Booking accessible via three entry points.
- From the EMR Board, click on ‘’New Booking.’’


- Navigate to the Bookings List Screen to book an appointment through New Booking.
- From the EMR Board Tabs, click on “Bookings.”

- On the Bookings List Screen, click on the “New Booking” button in the top right corner of the screen.
- From the EMR Board Tabs, click on “Bookings.”
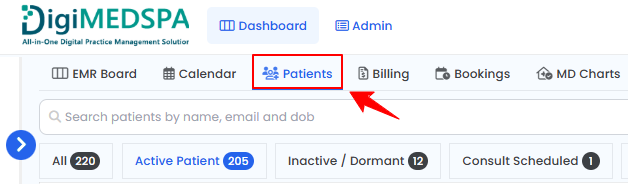
- The user can also book an appointment through New Booking accessible via Patients List Screen.
- From the EMR Board Tabs, click on ‘’Patients.’’
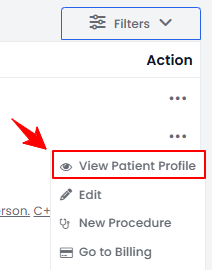
- To view a specific patient from the list, click the three dots under the action column and select "View Patient Profile," or simply click anywhere on the patient’s data.
- On the patient profile, click on the ‘’New Booking’’ button on the top right side of the screen.Note: All three entry points open the New Booking form.
- From the EMR Board Tabs, click on ‘’Patients.’’
- From the EMR Board, click on ‘’New Booking.’’
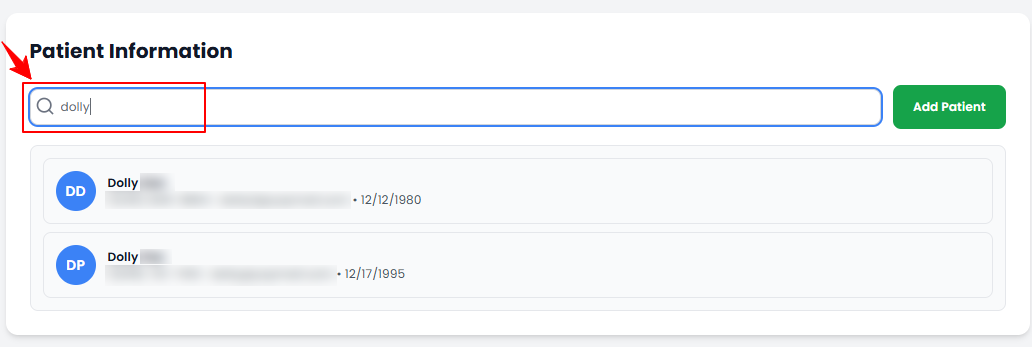
- The New Booking form has two sections: Patient Information and Booking Details. In the Patient Information section, search for an existing patient by name, phone, or email. Select the patient from the dropdown to auto-fill their details if they are already in the portal.
- Click “Edit” to update the patient’s information or “Change” to select a different patient.

- To create a booking for a new patient, click “Add Patient” and enter the required details, including Full Name, Phone, Email, Date of Birth, Gender, Address, City, State, Zip Code, and Tags.
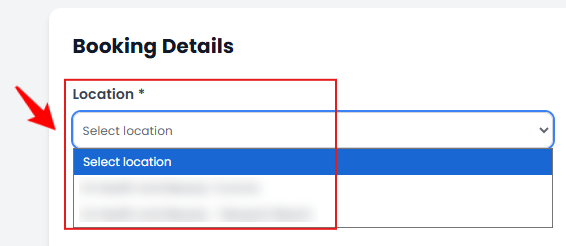
- In the Booking Details section, select the location for the booking from the dropdown menu.
- Select the Service you want to book from the dropdown menu.
 Note: You can select multiple services if needed. All selected services will be included in a single booking, allowing patients to access them in one appointment.
 - Once the service is selected, the Duration for that procedure will be auto-filled. Then select the Provider from the dropdown menu.

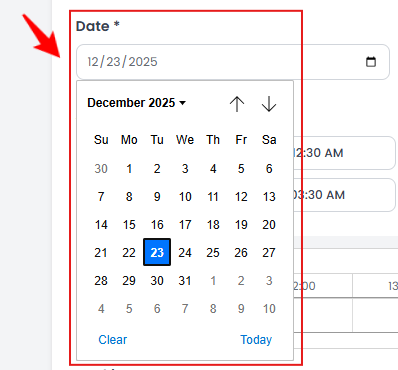
- Choose the Date from the calendar on which you want to schedule the booking.
 Note: If multiple services are selected, the Duration will display the total time for all services combined.
 - Choose the slot you want to book from the Available Slots.
 Note: “Available Slots” show the time slots when the selected Med SPA provider is available, based on their working hours and existing bookings. These slots update automatically as bookings are made, ensuring that only open times are shown when creating a new booking. The “Real-Time Calendar Booking” feature displays each provider’s booked slots in their designated color. When you select an available slot, that provider’s color automatically highlights your chosen time, ensuring clear visibility and seamless scheduling.
 - If no appointment slots are available, select the "Could Not Find Slots. Add Patient to Waitlist" option. You can then choose "First Available" to be scheduled for the next open slot, or select your preferred date from the calendar and choose a time from the dropdown menu.
- To use dot phrases, type a dot to quickly insert your pre-saved text in the booking notes. Before that, you must create and save these repetitive phrases in the Dot Phrases List Screen.
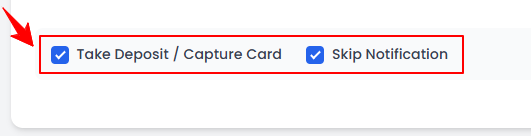
Note: Dot phrases can be created and managed within “Clinical Documentation” in the portal. For step-by-step instructions, refer to the “Manage Dot Phrases” user guide. - To take an advance deposit, select the “Take Deposit / Capture Card” option. To skip sending a booking notification to the patient, select the “Skip Notification” option. When finished, click “Create Booking.”
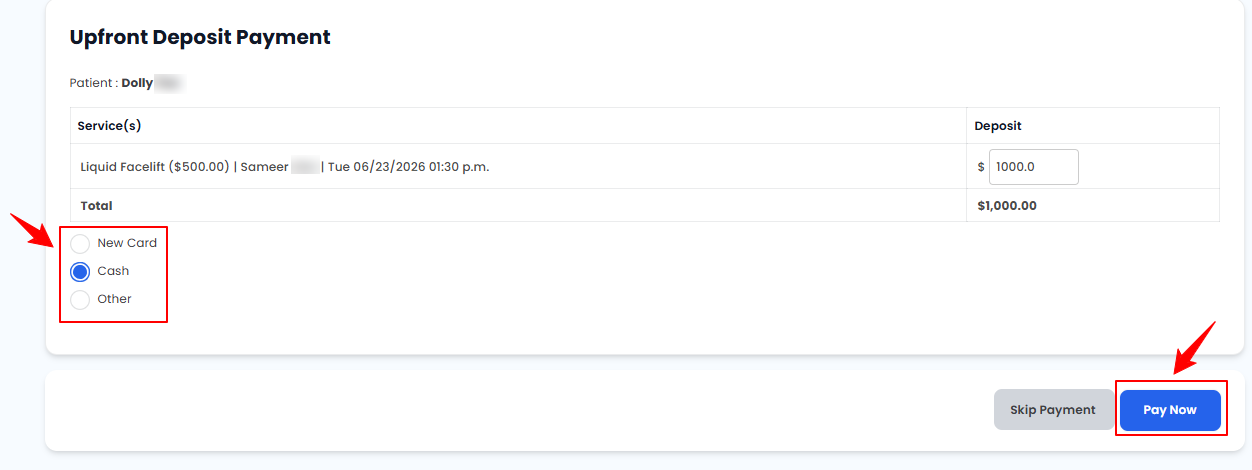
- If you do not select the “Take Deposit / Capture Card” option, the booking is created and you are directed to the EMR Board. If you select “Take Deposit / Capture Card,” you are directed to the Upfront Deposit Payment Screen, which displays the required deposit amount.
Note: When multiple services are selected, the deposit shown will be the total of all service deposits. The deposit amount can also be edited directly from the Upfront Deposit Payment Screen. - Choose the payment method (New Card, Cash or Other), fill in the required details and click “Pay Now” to proceed.
 Note: When you select card payment, click the Capture Only option to complete the payment using funds that were already authorized on the card. No new authorization will be requested from the cardholder.
You have successfully booked an appointment through New Booking!
View the Booking
- To view the booking created, return to the EMR Board by clicking “EMR Board” on the Top Menu Navigation.
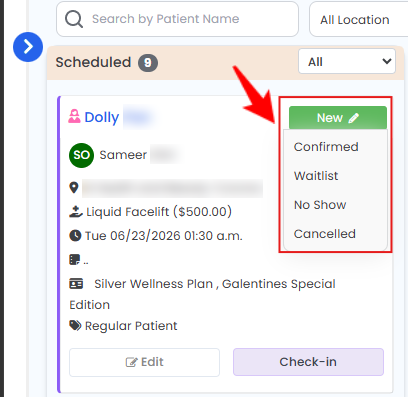
- The EMR Board displays all bookings for the day, making it easy to view details and confirm that your booking has been successfully scheduled.
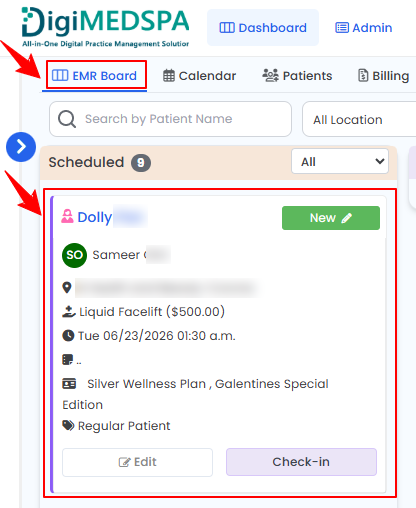
- In our portal, patients can be marked as “Confirmed,” “Waitlist,” “No Show,” or “Cancelled” directly from the EMR Board.
 Note: "Confirmed" means that the patient has acknowledged and verified their scheduled appointment. This status indicates that the appointment is set to proceed as planned, with no further confirmation needed. “Waitlist” represents a patient who is on a waiting list for an appointment. This status is often used when the desired time slot is unavailable, and the patient is waiting for an opening. “No Show” denotes that the patient did not arrive for their scheduled appointment without prior cancellation or rescheduling. “Cancelled” indicates that the appointment has been canceled by the patient before the scheduled time.