

 DigiMEDSPA EMR
 DigiMEDSPA CONNECT ™
Add / View / Edit / Delete Email Campaign Schedule
This user guide provides instructions for managing the schedule of an autoresponder email campaign. It includes how to set the timing to ensure your campaign is sent at the optimal moment.
Understanding Terminologies
Email Campaign Schedule
An email campaign schedule is a strategic timeline that outlines when marketing emails are delivered to a targeted audience. It is designed to send messages at optimal times, helping to maximize engagement, open rates, and overall campaign effectiveness.
Autoresponder Campaigns
Autoresponder campaigns are automated email sequences that are triggered by specific actions or timelines, such as a new patient sign-up, post-treatment follow-up, or upcoming appointment. These campaigns help Med SPAs maintain consistent, timely communication with patients—boosting engagement, retention, and overall patient satisfaction without manual effort.
Add Email Campaign Schedule
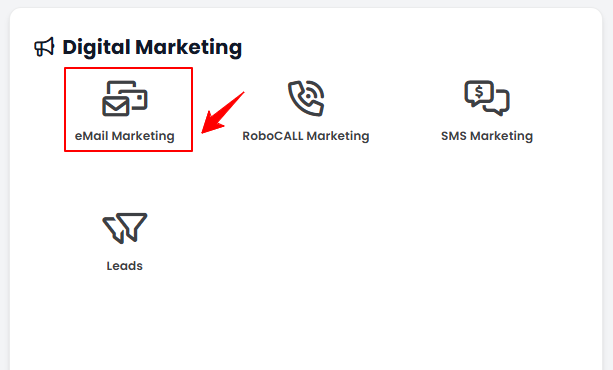
- The user can create a campaign schedule by accessing “eMail Marketing” in the Digital Marketing Panel from two entry points.
- Click “Apps” in the Top Menu Navigation to access the applications.


- Navigate to the Digital Marketing Panel and click on “eMail Marketing.”
- Navigate to the Digital Marketing Panel and click on “eMail Marketing.”
- From the Left Navigation, click on the “Digital Marketing” dropdown menu, and select “eMail Marketing.’’ Alternatively, you can type “eMail Marketing” into the search bar in the Left Navigation.
- Click “Apps” in the Top Menu Navigation to access the applications.
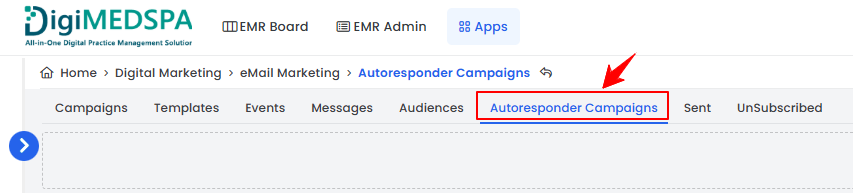
- On the Campaigns List Screen, click on ‘’Autoresponder Campaigns’’ tab.
- To create a new campaign schedule, click on the ‘’New Campaign Schedule’’ button in the top right corner of the screen.
- Enter a Tag, select when to send the campaign from the dropdown menu, and check the “Active” box if the campaign is currently active.
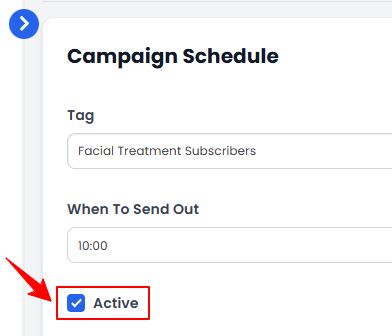 Note: A “Tag” is a label assigned to contacts that determines if or when they should receive a scheduled email campaign. It helps segment the audience so that only those with specific tags receive the message at the scheduled time.
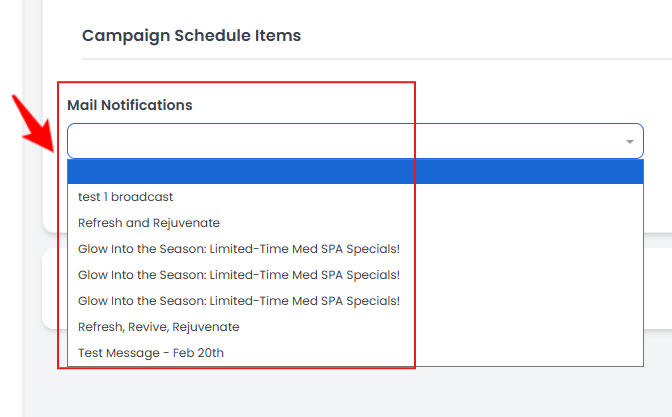
 - To add a campaign schedule, click on “Add New Campaign Schedule Item.”
- Choose a mail notification from the Mail Notifications dropdown menu.
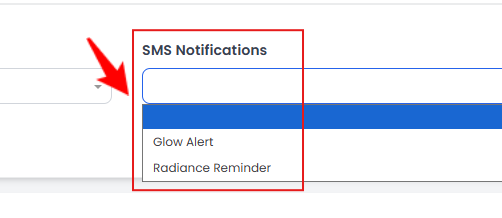
- Choose a SMS notification from the SMS Notifications dropdown menu.
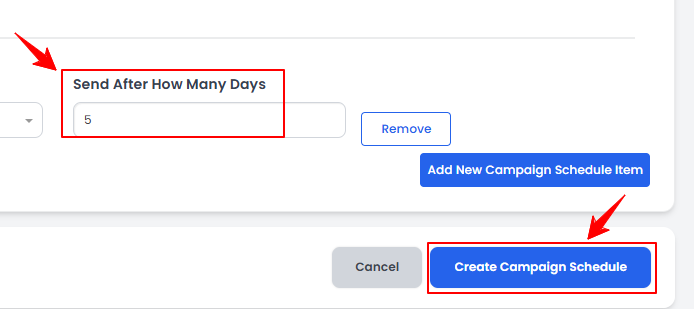
- Enter the number of days after which the campaign will be sent, then click “Create Campaign Schedule” to save.
 The email campaign schedule has been successfully created!
View Email Campaign Schedule
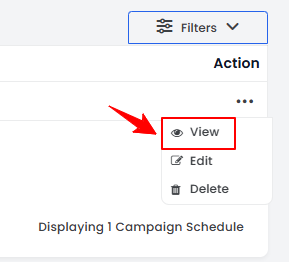
- To view a campaign schedule from the list, click the three dots under the action column and select "View,” or simply click anywhere on the schedule’s data.
- The Campaign Schedule View Screen will open, displaying all campaign schedule details.
Edit Email Campaign Schedule
- There are two ways to edit an existing campaign schedule.
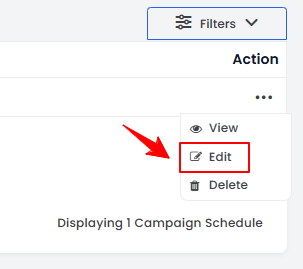
- From the Campaign Schedule List Screen, click on the three dots under the action column and select "Edit" for the specific campaign schedule.
- On the Campaign Schedule View Screen, hover over the “Actions” menu on the right corner of the screen and select “Edit Campaign Schedule” from the dropdown menu.
- From the Campaign Schedule List Screen, click on the three dots under the action column and select "Edit" for the specific campaign schedule.
- Make the necessary changes and click “Update Campaign Schedule” to save your updates.The email campaign schedule has been successfully edited!
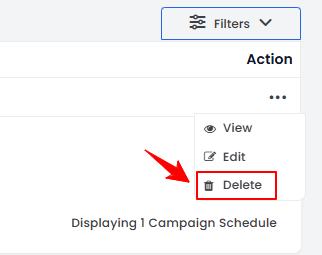
Delete Email Campaign Schedule
- There are two ways to delete an existing campaign schedule.
- From the Campaign Schedule List Screen, click on the three dots under the action column and select "Delete" for the specific campaign schedule.
- On the Campaign Schedule View Screen, hover over the “Actions” menu on the right corner of the screen and select “Delete Campaign Schedule” from the dropdown menu.
- From the Campaign Schedule List Screen, click on the three dots under the action column and select "Delete" for the specific campaign schedule.
- A confirmation pop-up will appear. To delete the campaign schedule, click ”OK.”The email campaign schedule has been successfully deleted!