

 DigiMEDSPA EMR
 DigiMEDSPA CONNECT ™
Add / View / Edit Email Campaign Message
This guide provides clear instructions on creating and customizing messages for the email campaign, with options to personalize content for effective communication.
Understanding Terminologies
Email Campaign Message
An email campaign message refers to a professionally crafted email sent as part of a marketing or communication strategy to engage, inform, or retain patients. These messages can include appointment reminders, promotional offers, post-treatment follow-ups, service announcements, or seasonal campaigns. Each message is designed to deliver targeted content that enhances the patient experience and encourages interaction with the Med SPA’s services.
Add Message
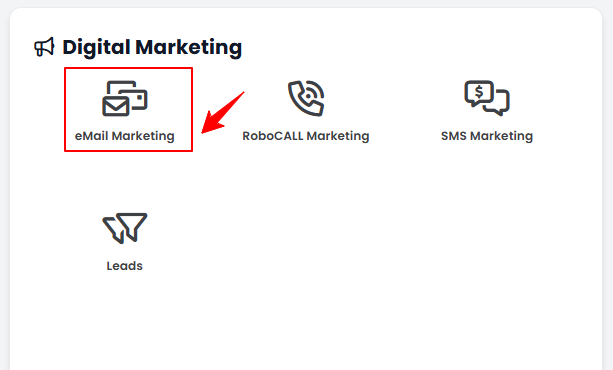
- The user can create a message by accessing “eMail Marketing” in the Digital Marketing Panel from two entry points.
- Click “Apps” in the Top Menu Navigation to access the applications.


- Navigate to the Digital Marketing Panel and click on “eMail Marketing.”
- Navigate to the Digital Marketing Panel and click on “eMail Marketing.”
- From the Left Navigation, click on the “Digital Marketing” dropdown menu, and select “eMail Marketing.’’ Alternatively, you can type “eMail Marketing” into the search bar in the Left Navigation.
Note: The user can also create a message in the Step 3 of creating a new email campaign. For more information on creating an email campaign, refer to our ‘’Create and Manage Email Campaigns’’ user guide.
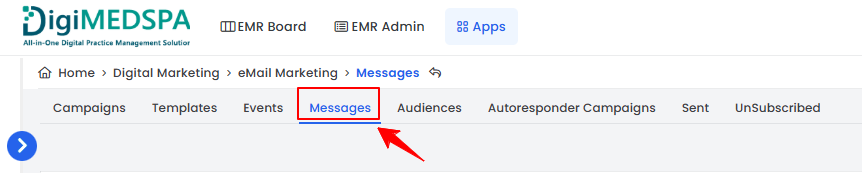
- Click “Apps” in the Top Menu Navigation to access the applications.
- On the Campaigns List Screen, click on ‘’Messages’’ tab.
- To create a new message, click on the ‘’New Message’’ button in the top right corner of the screen.
- Step 1: Message Title
- Enter a Name for the message, then enter the sender’s email address in the “From” field. In the “Reply” field, enter the email address where replies should be directed. To add an attachment, select “Add New Attachment.”
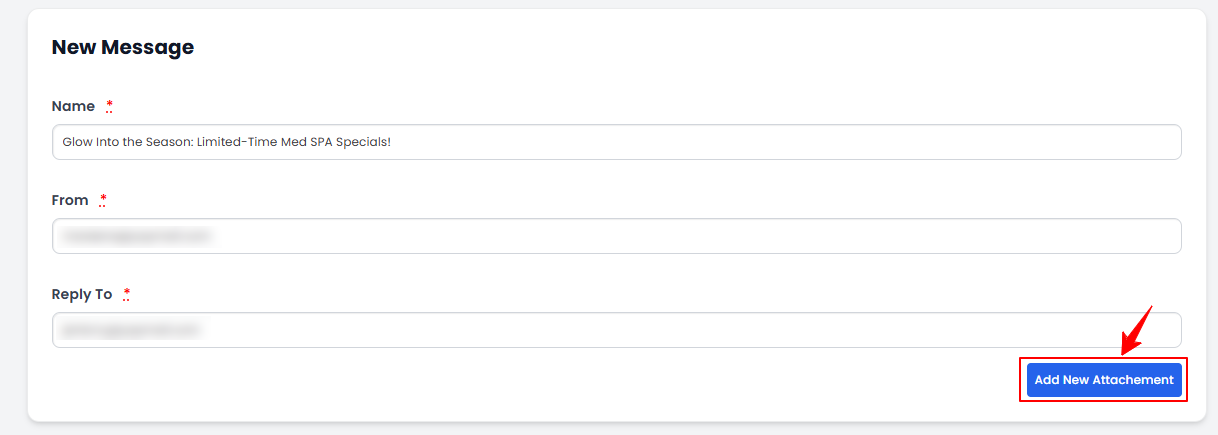
- Upload the file in the Email Attachment and once done click on ‘’Next’’ button to proceed.
- Enter a Name for the message, then enter the sender’s email address in the “From” field. In the “Reply” field, enter the email address where replies should be directed. To add an attachment, select “Add New Attachment.”
- Step 2: Template
- In Step 2, select a Template for the message then press ‘’Next’’ button to proceed.Note: Click “Preview” to see a live view of the template before finalizing your message.
- Step 3: Message Content
- In Step 3, create Message Content, first upload Company Logo and Banner Image. Enter an engaging Title and detailed Body Text, followed by Action Buttons that include Labels and URLs. You can easily add or remove Action Buttons by selecting the "Add Action Button" or "Delete" button respectively. Complete the Footer and Copyright Text. Additionally, add Footer Links with Names and URLs as needed. You can add or remove Footer Links by using the "Add Footer Links" and "Delete" buttons respectively. A preview of the content will be shown on the right to help you refine your content. Once you are done, press the ‘’Next’’ button to proceed.
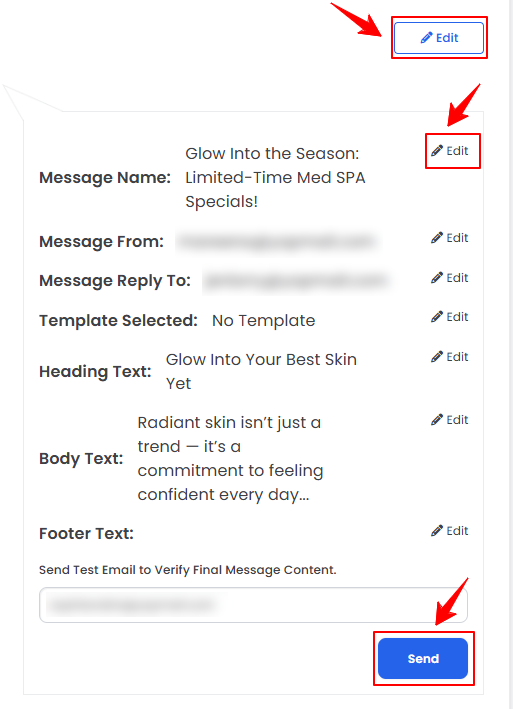
- Step 4: Summary
- In Step 4, the Summary of the message will be displayed. If you want to make any changes click on the ‘’Edit’’ button in the top right corner of the screen. You can also edit individual steps by clicking on the ‘’Edit’’ next to each step. Enter the email address to whom you want to send the final message content to verify and press the ‘’Send’’ button. Once you are done, press the ‘’Finish’’ button.
The message has been successfully created!
- In Step 4, the Summary of the message will be displayed. If you want to make any changes click on the ‘’Edit’’ button in the top right corner of the screen. You can also edit individual steps by clicking on the ‘’Edit’’ next to each step. Enter the email address to whom you want to send the final message content to verify and press the ‘’Send’’ button. Once you are done, press the ‘’Finish’’ button.
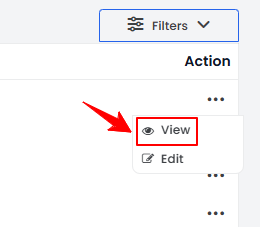
View Message
- To view a specific message from the list, click the three dots under the action column and select "View.”
- The Message View Screen will open, displaying all message details. Enter an email address in the Test Email field and click “Send” to send the message.
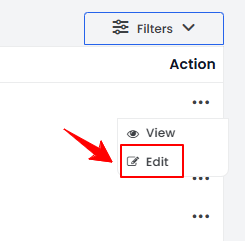
Edit Message
- There are two ways to edit an existing message.
- From the messages list, click on the three dots under the action column and select "Edit" for the specific message.
- On the Message View Screen, click on the ‘’Edit Message’’ button on the top right corner of the screen.
- From the messages list, click on the three dots under the action column and select "Edit" for the specific message.
- Navigate to the step where you'd like to make changes, and click “Finish” in Step 4 to save them.Note: To edit the template, click on the “Edit” icon next to the template on the Message View Screen.
The message has been successfully edited!