

Understanding Terminologies
- Prescribe a Drug
Prescribing a drug means a licensed healthcare provider (such as a doctor, nurse practitioner, or physician assistant) authorizes and directs a patient to use a specific medication. The prescription typically includes the drug name, dosage, instructions for use, and duration of treatment.
- e-Prescribing
e-Prescribing (electronic prescribing) is the process of creating, signing, and sending prescriptions digitally from a healthcare provider to a pharmacy. It eliminates the need for handwritten or faxed prescriptions, improves accuracy, reduces errors, and enhances patient safety by allowing direct, secure communication between providers and pharmacies.
Part 1 of 6
Prescribe a Drug through e-Prescribing Dashboard
-
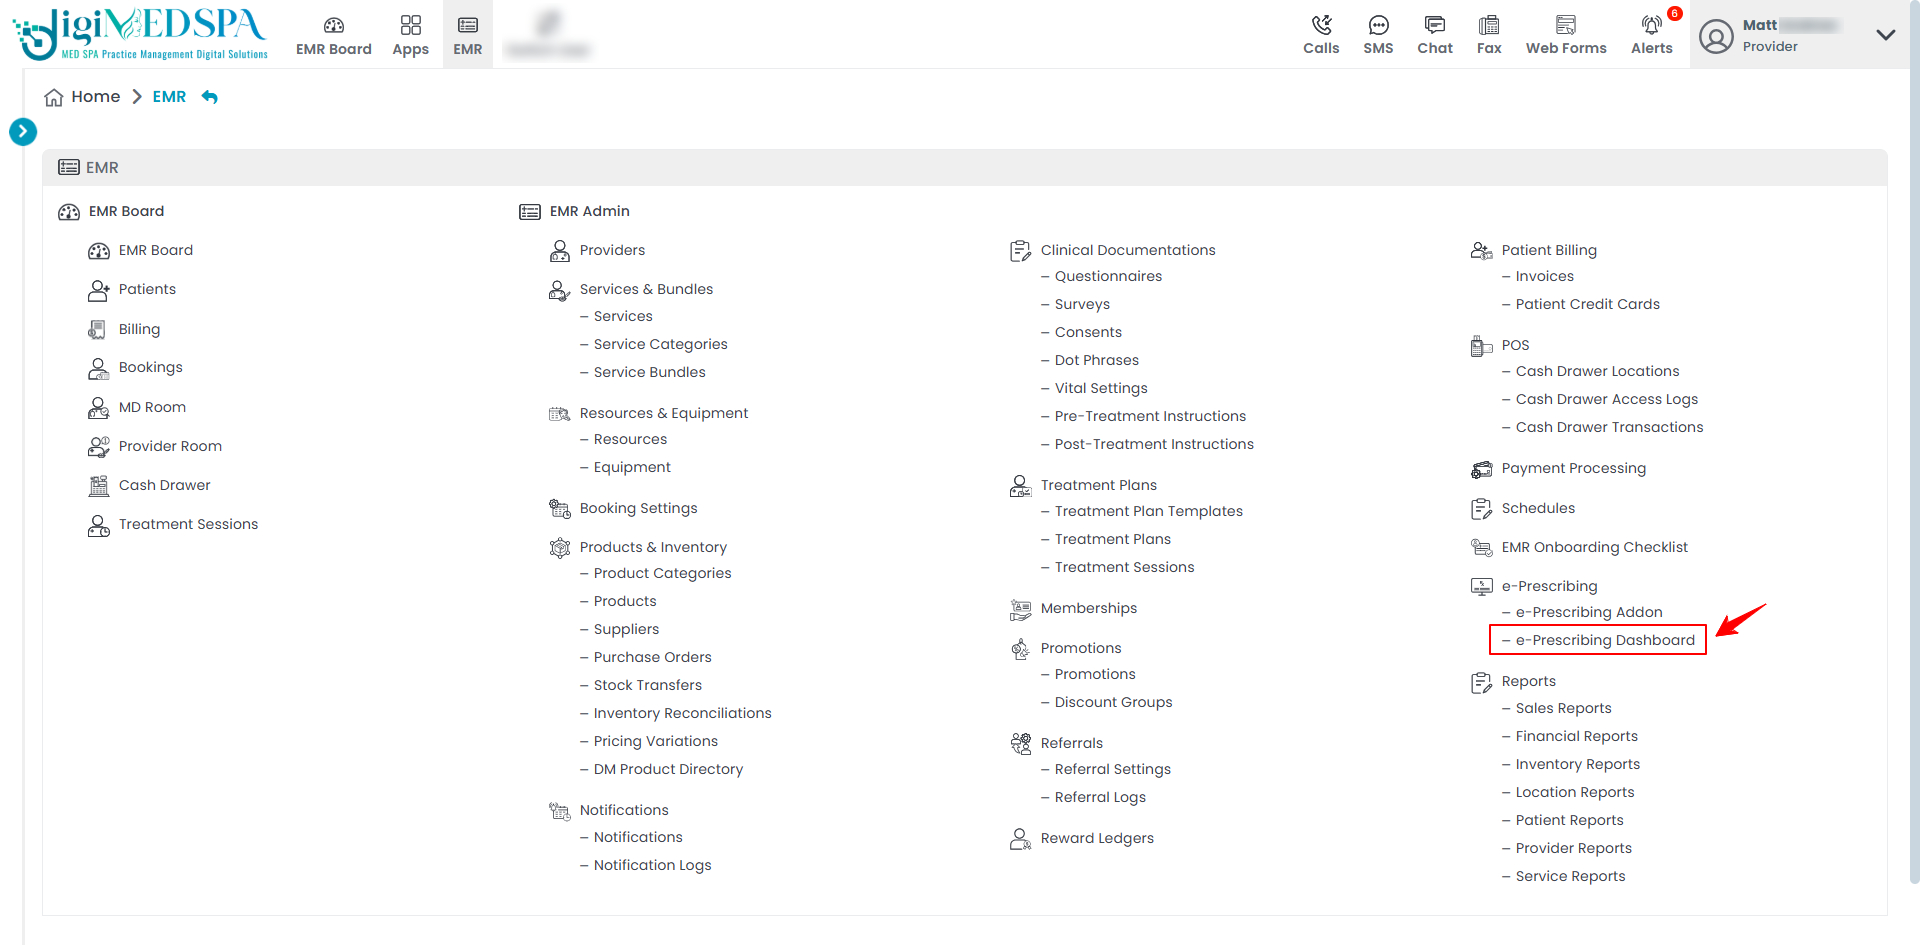
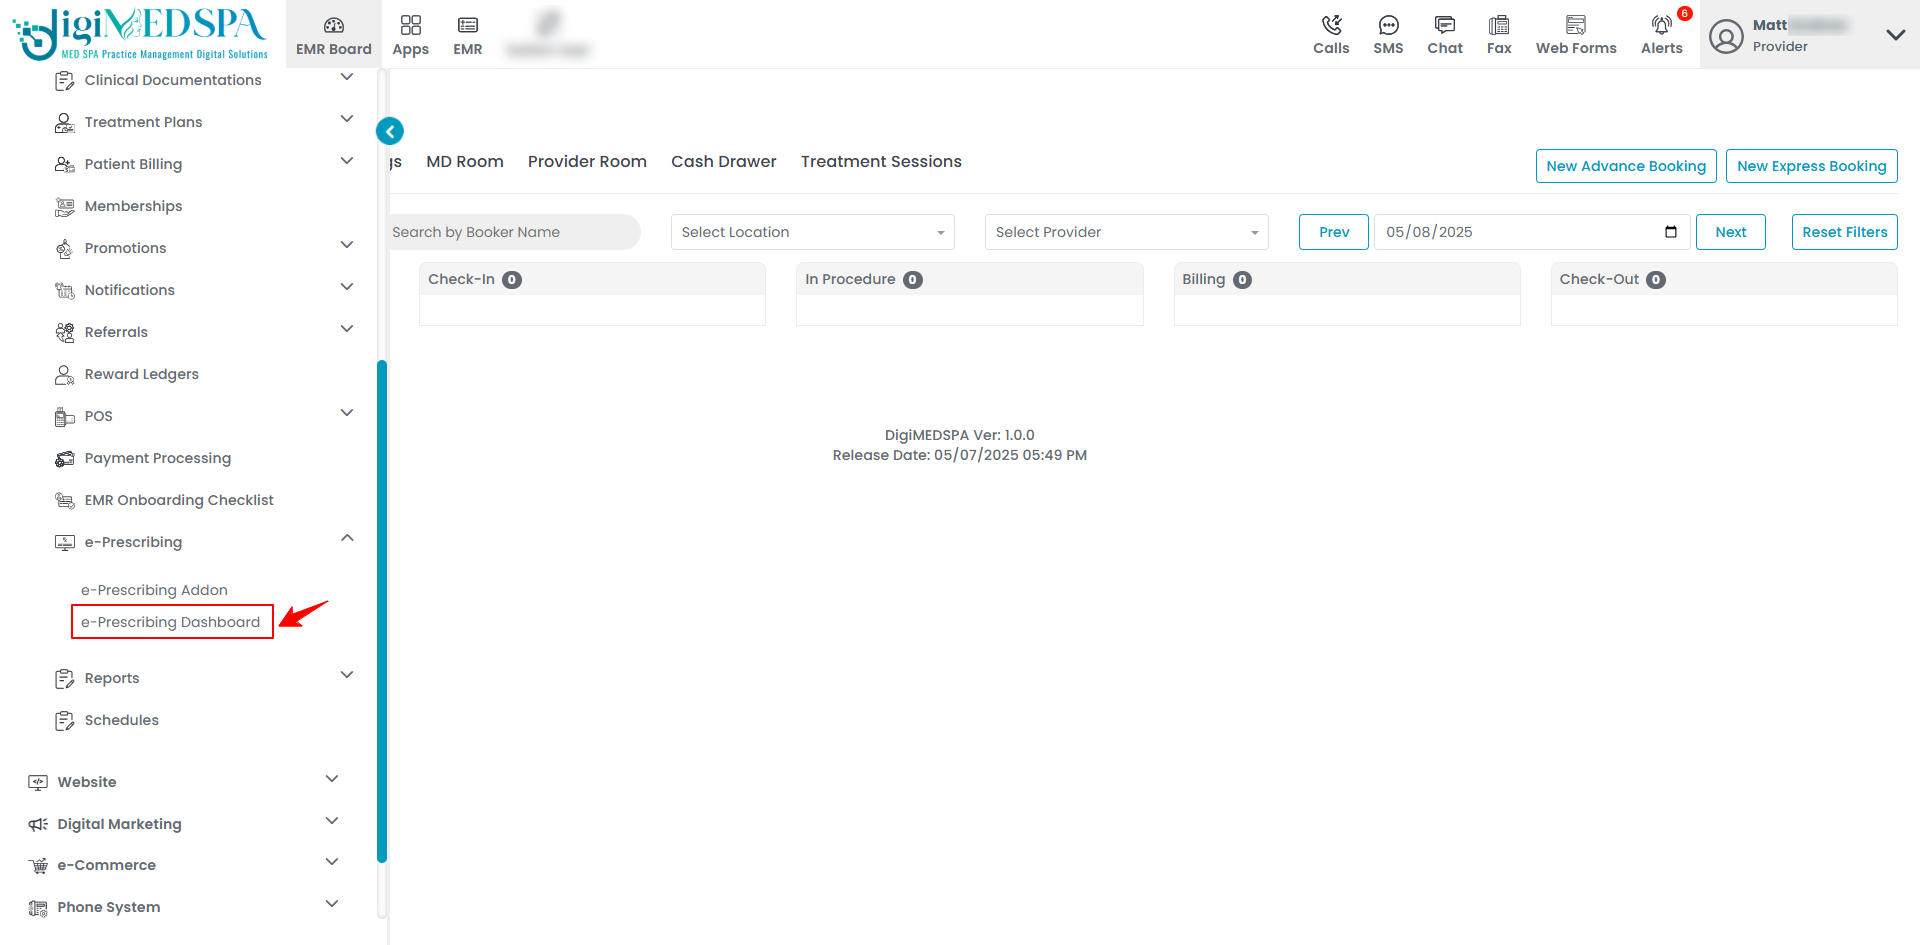
The provider can prescribe a drug through e-Prescribing by accessing the e-Prescribing Dashboard from two entry points.
-
From the EMR Panel, click on “e-Prescribing Dashboard” under “e-Prescribing.”
-
From the Left Navigation, open the “EMR Admin” dropdown menu, select “e-Prescribing,’’ and then choose “e-Prescribing Dashboard” from the subsequent dropdown menu.
-
-
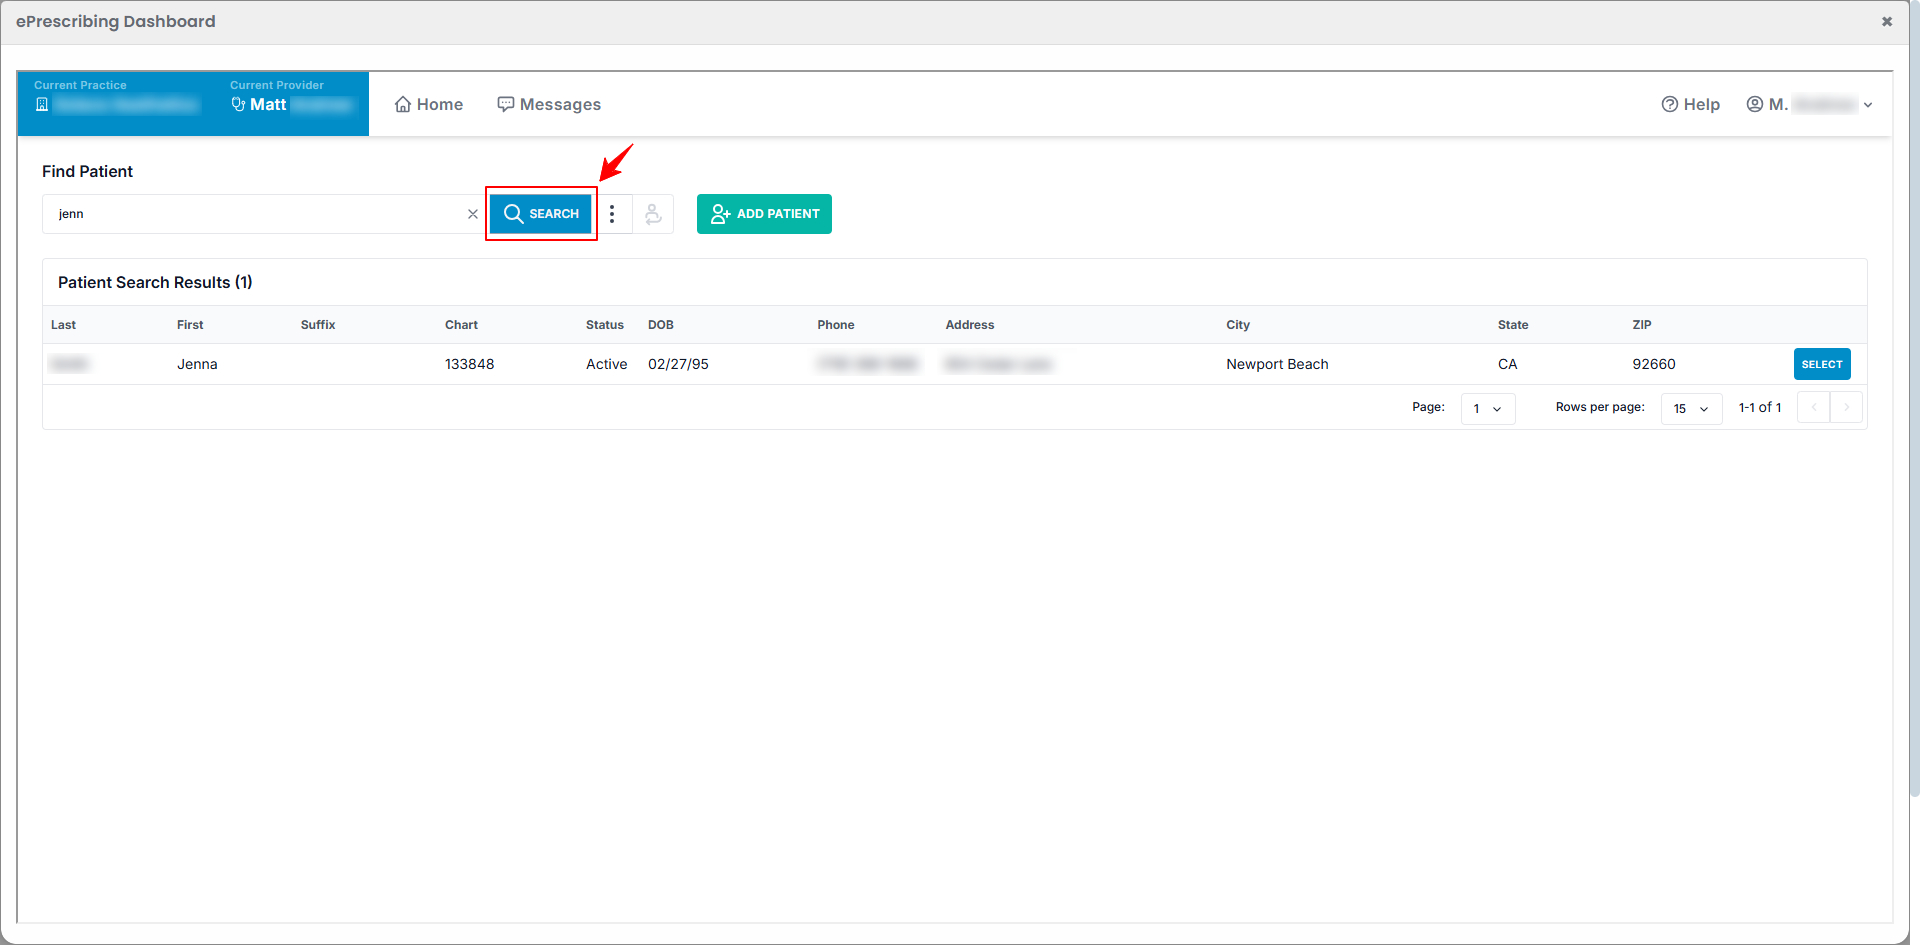
Before prescribing a drug, a procedure must be created for the patient. After the procedure is created, you can find the patient by entering their name into the search bar on the e-Prescribing Dashboard and clicking “Search.” The patient's details will then be displayed for you to proceed with the prescription.
-
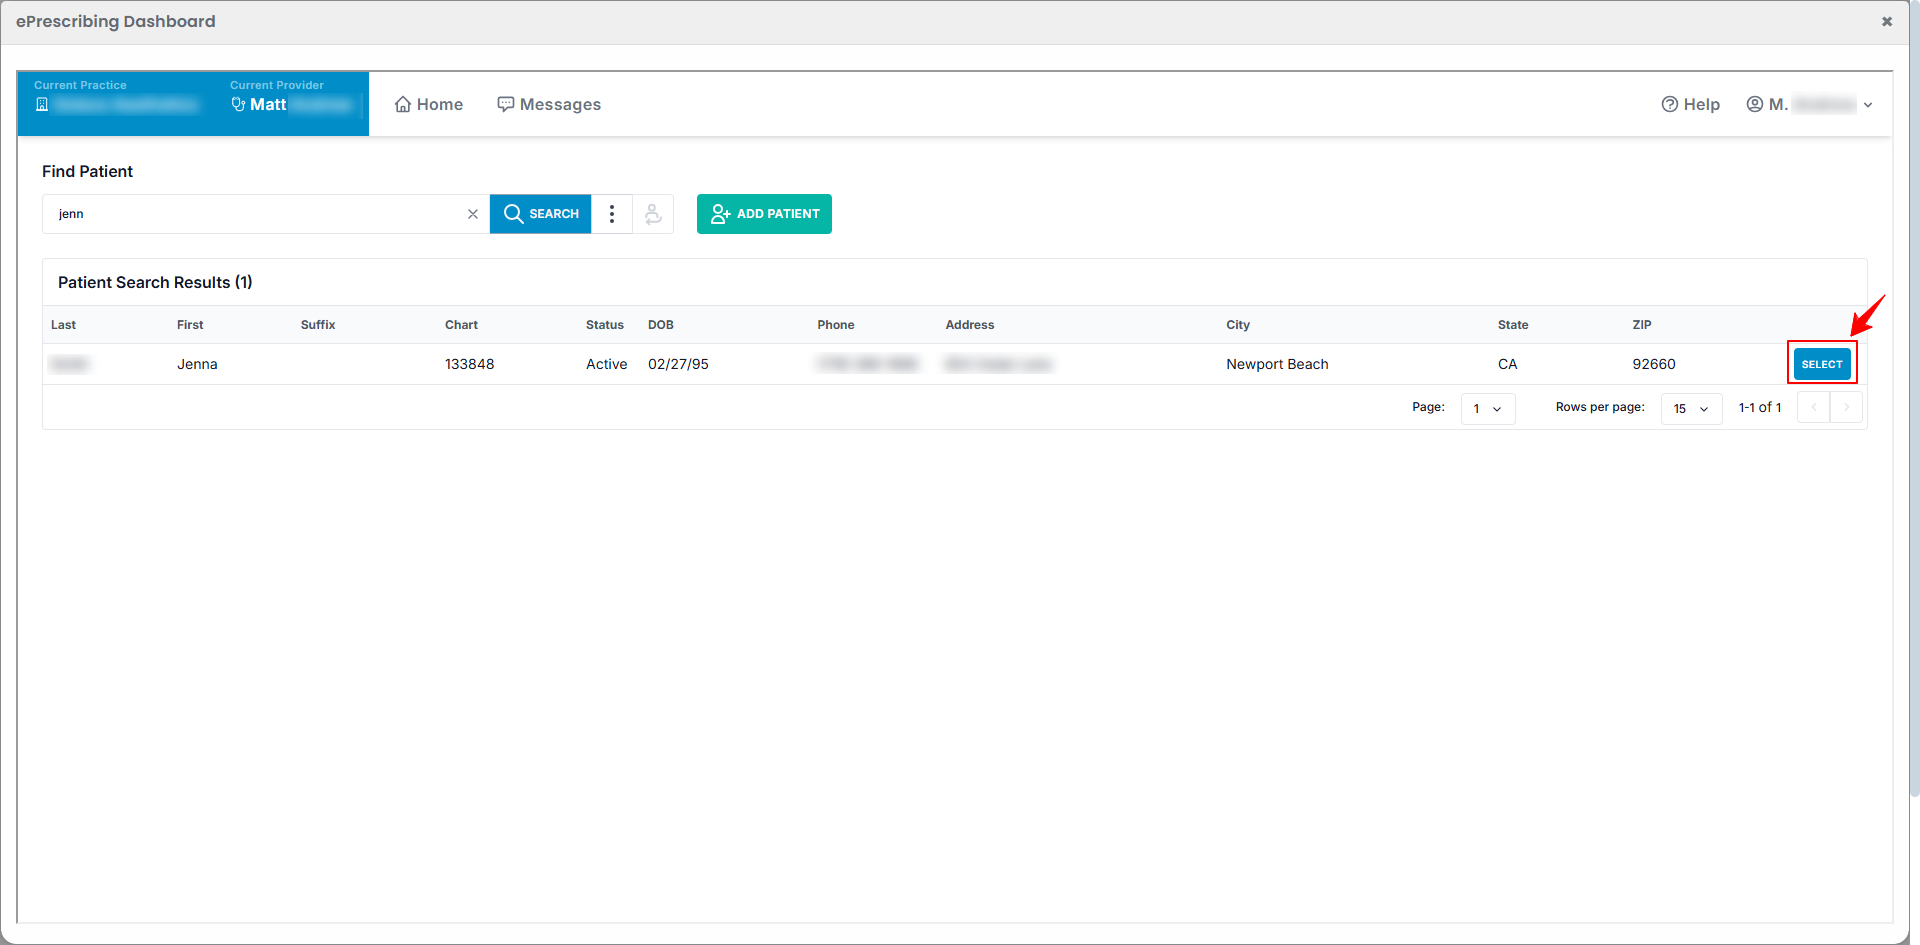
To open the patient's profile, click anywhere on the patient's information or click the "Select" button.
-
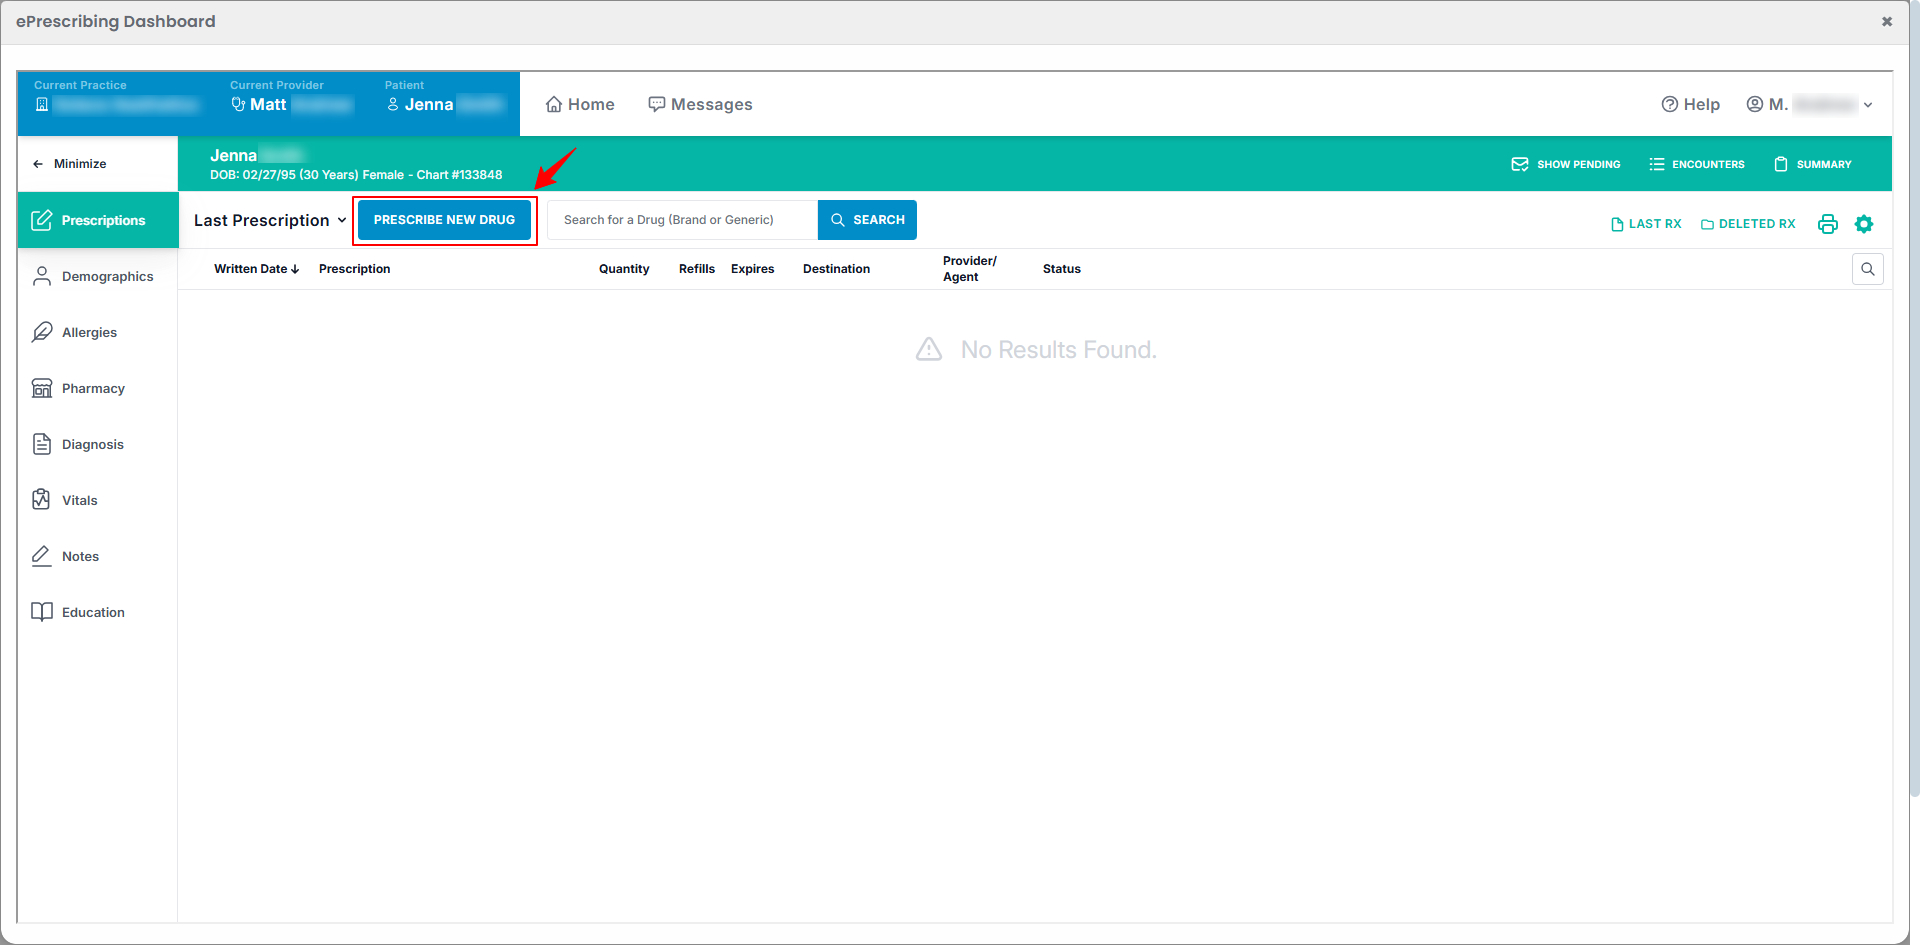
To prescribe a drug to the patient, click on the “Prescribe New Drug” button.
-
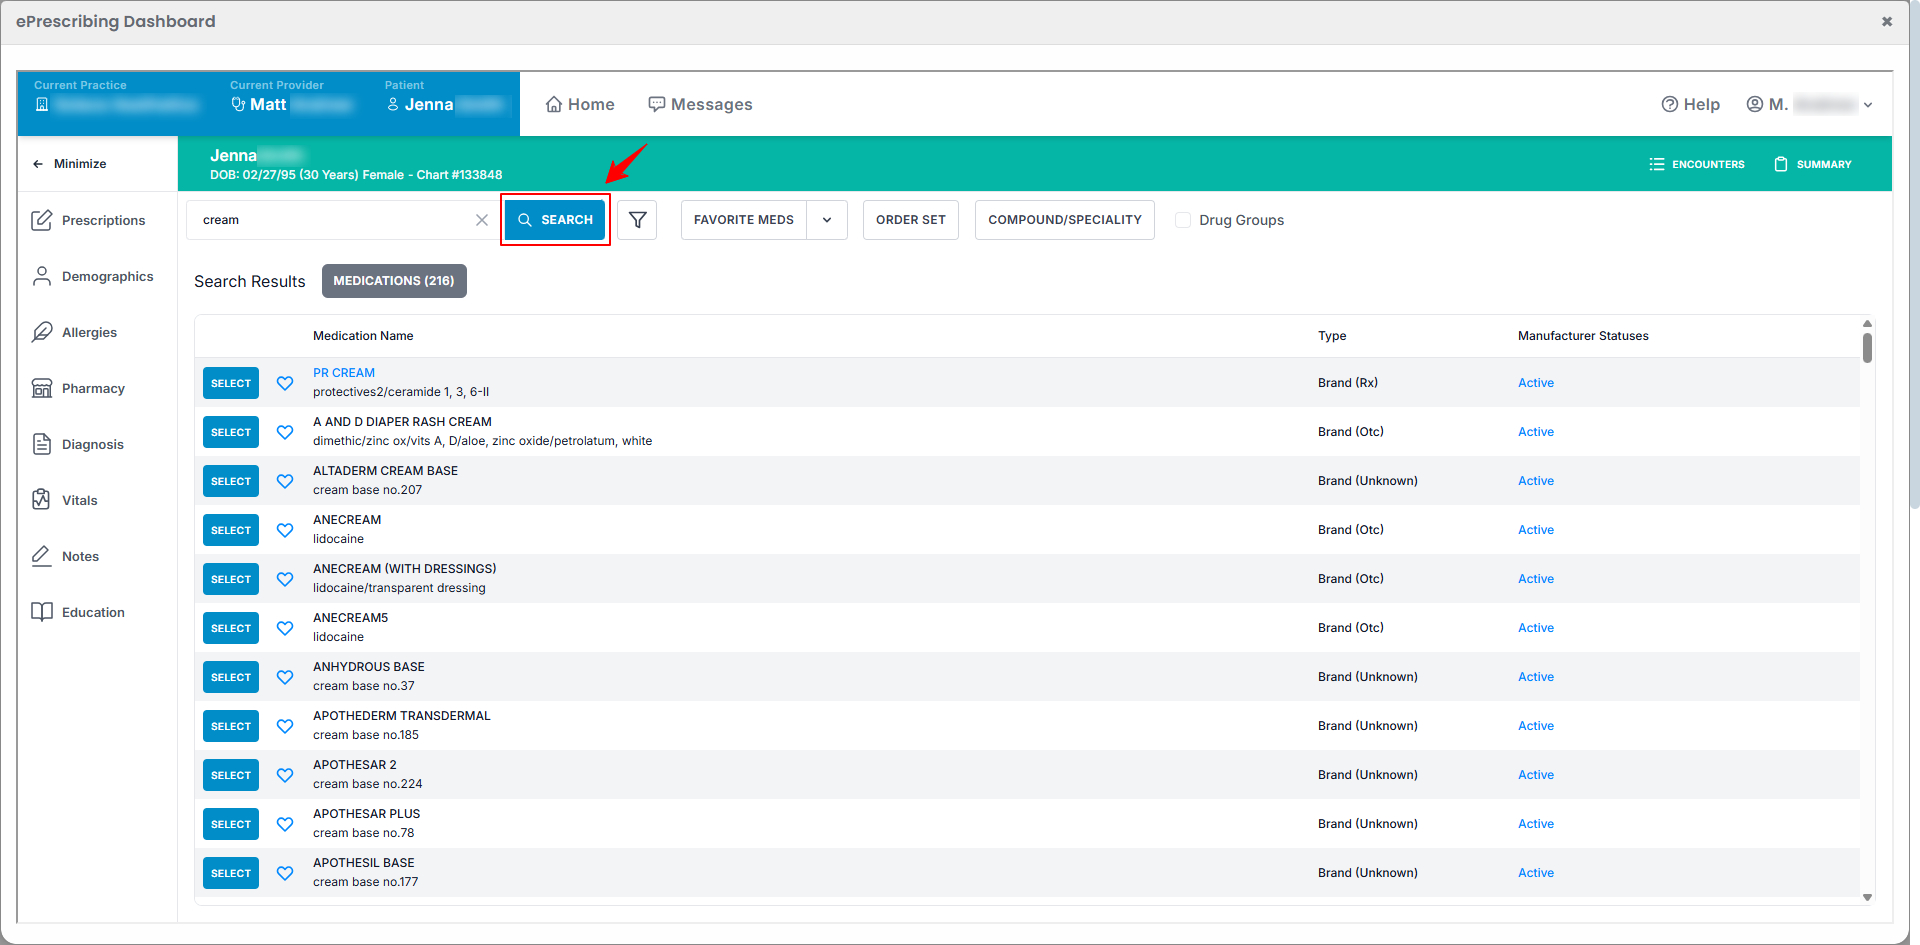
Enter the drug name in the search bar and click “Search” to view the results.
-
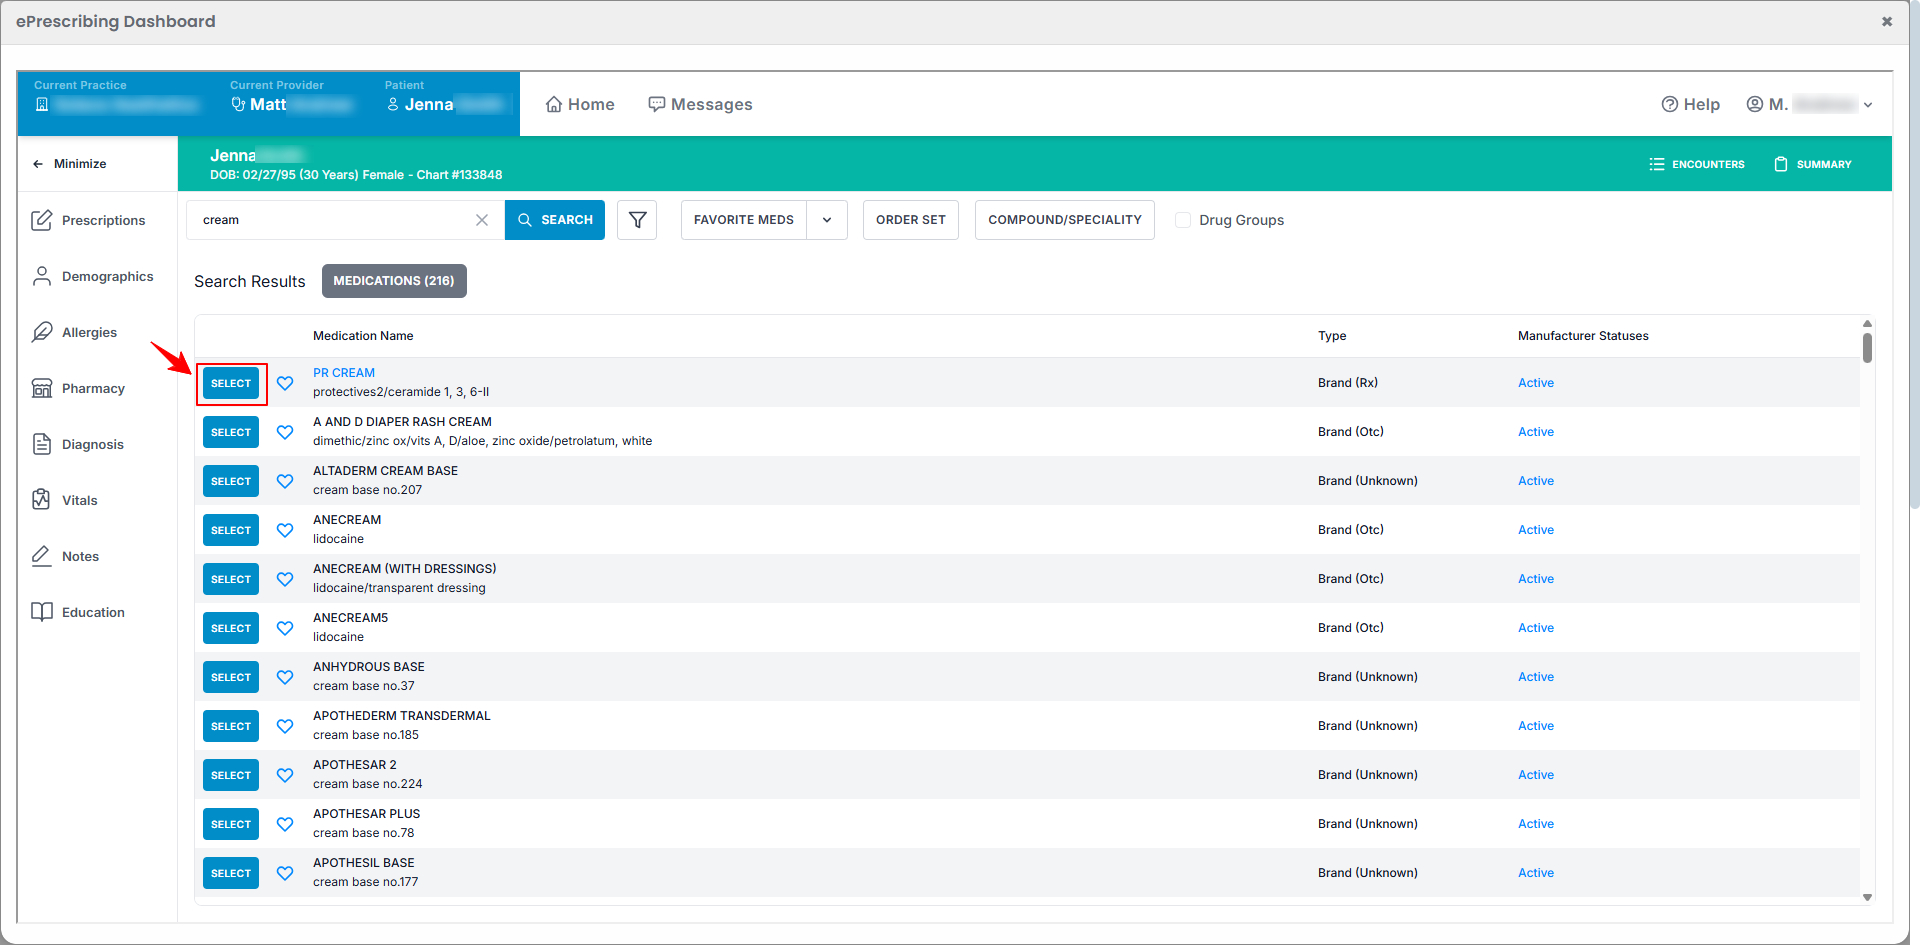
Click “Select” next to the drug you wish to prescribe.
-
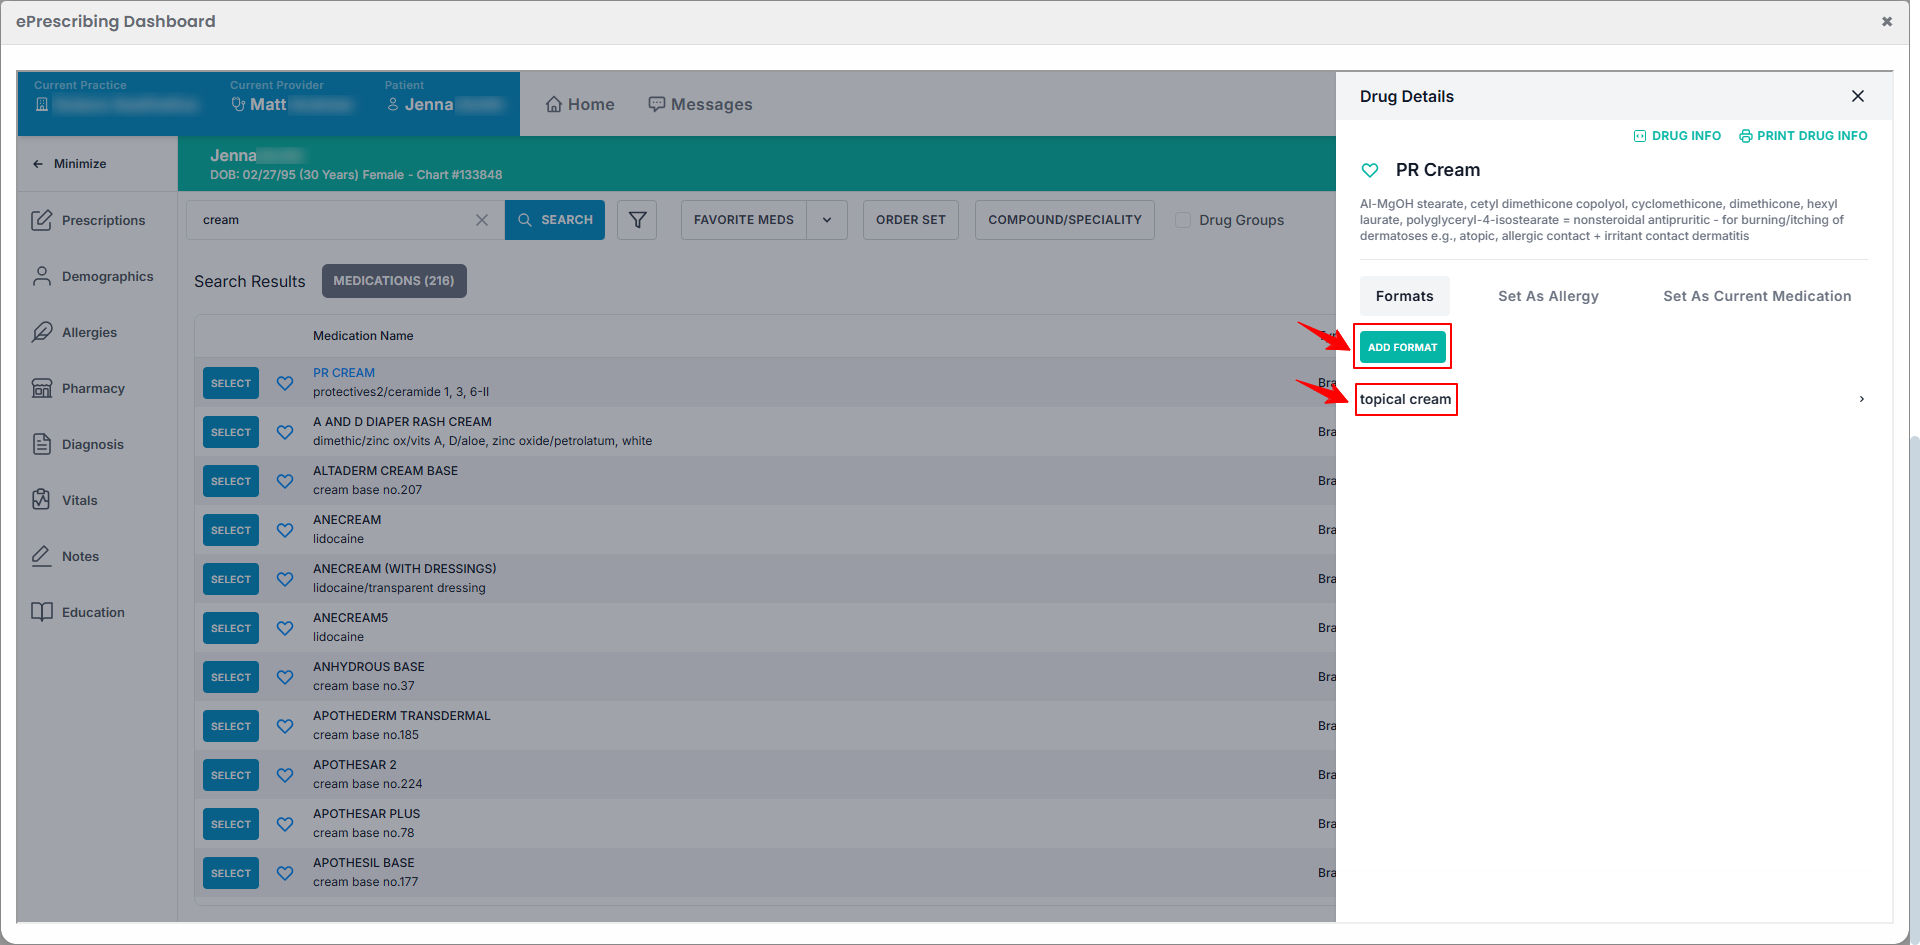
Once the drug is selected, the Drug Details window will appear, showing the drug information. Choose a format by selecting an existing one or click “Add Format” to create a new format.
-
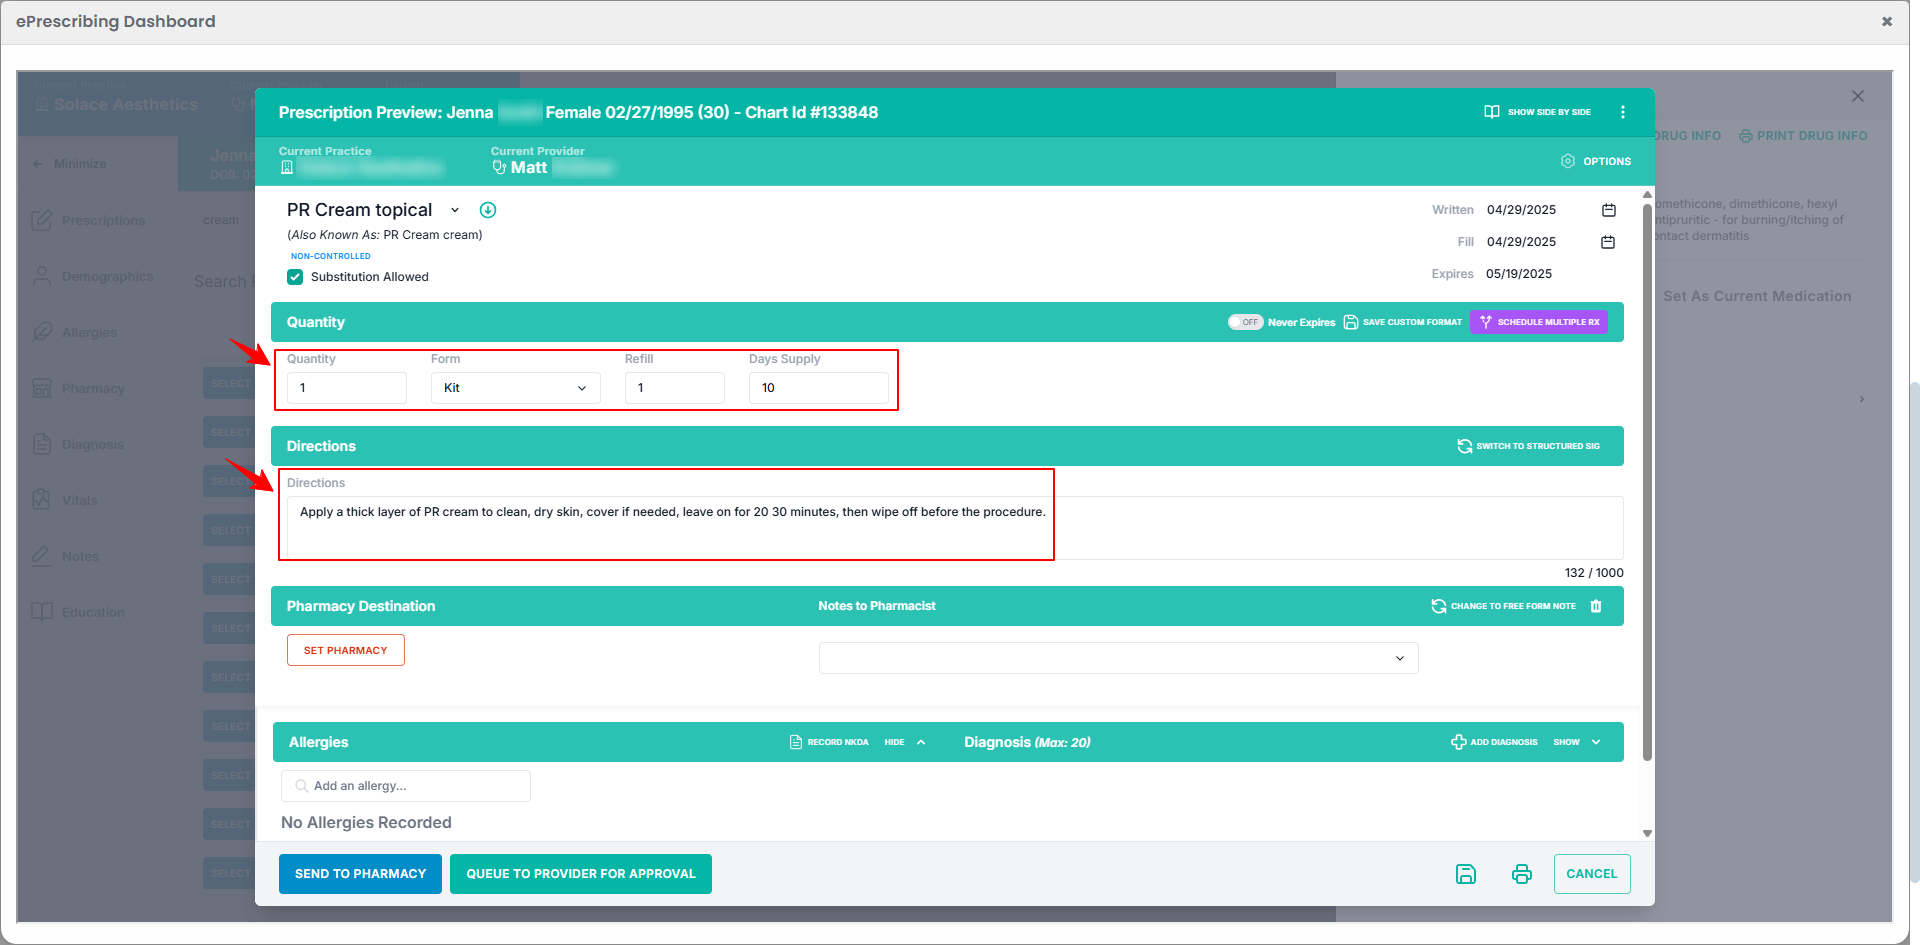
Select the Quantity, Form, Refills, and Days Supply from the dropdown menus. Then enter the Directions to use the selected drug.
-
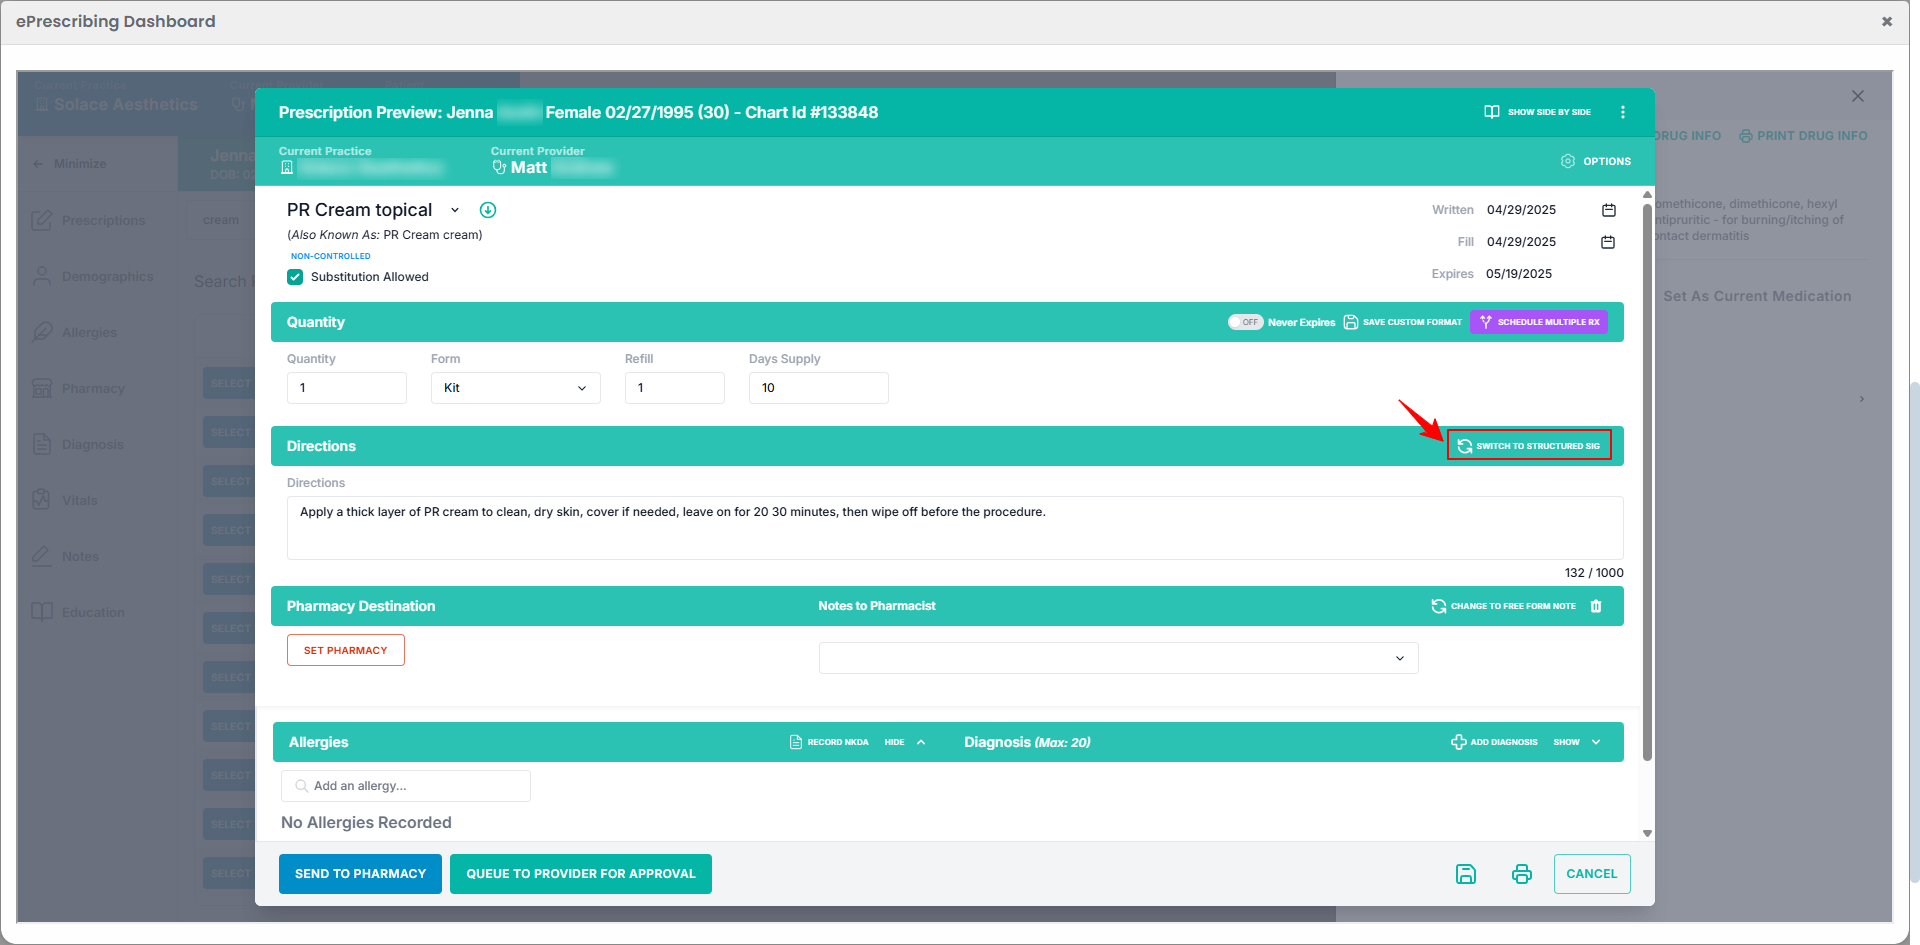
To write the directions in a structured format, click on “Switch to Structured Sig” in the right corner.
-
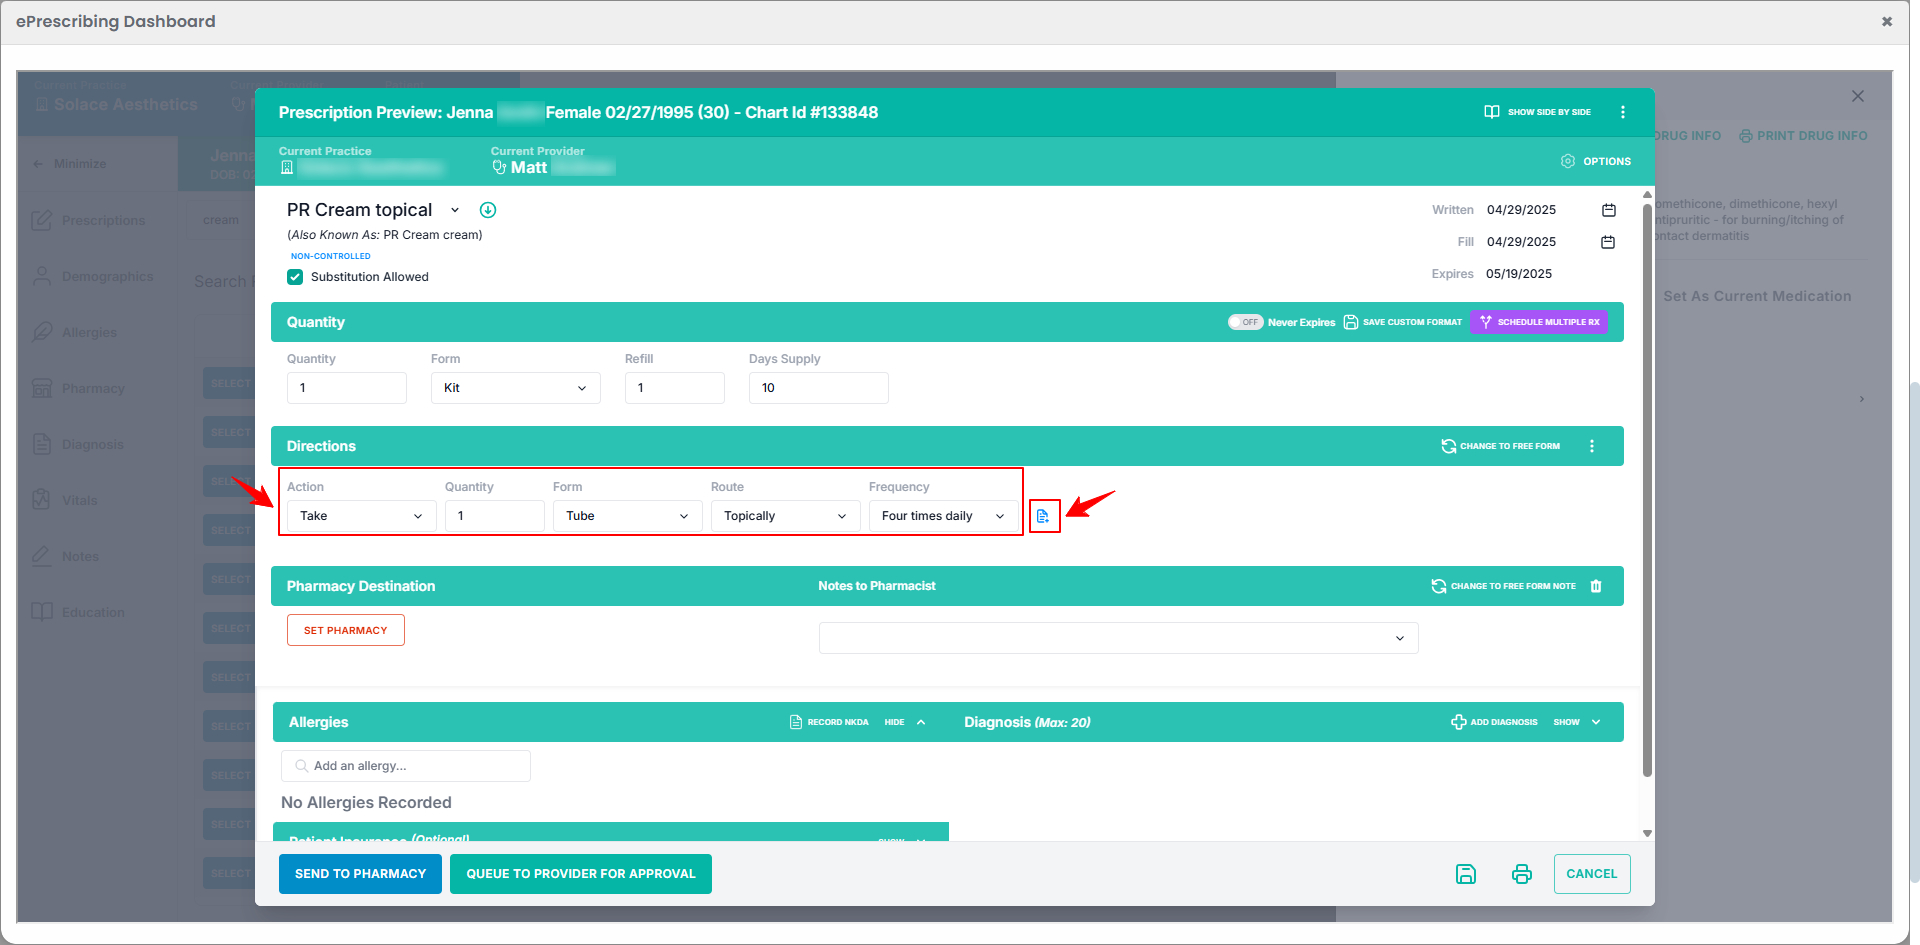
Set the Directions by selecting the appropriate Action, Quantity, Form, Route, and Frequency. To include any additional instructions, click the blue document icon.
-
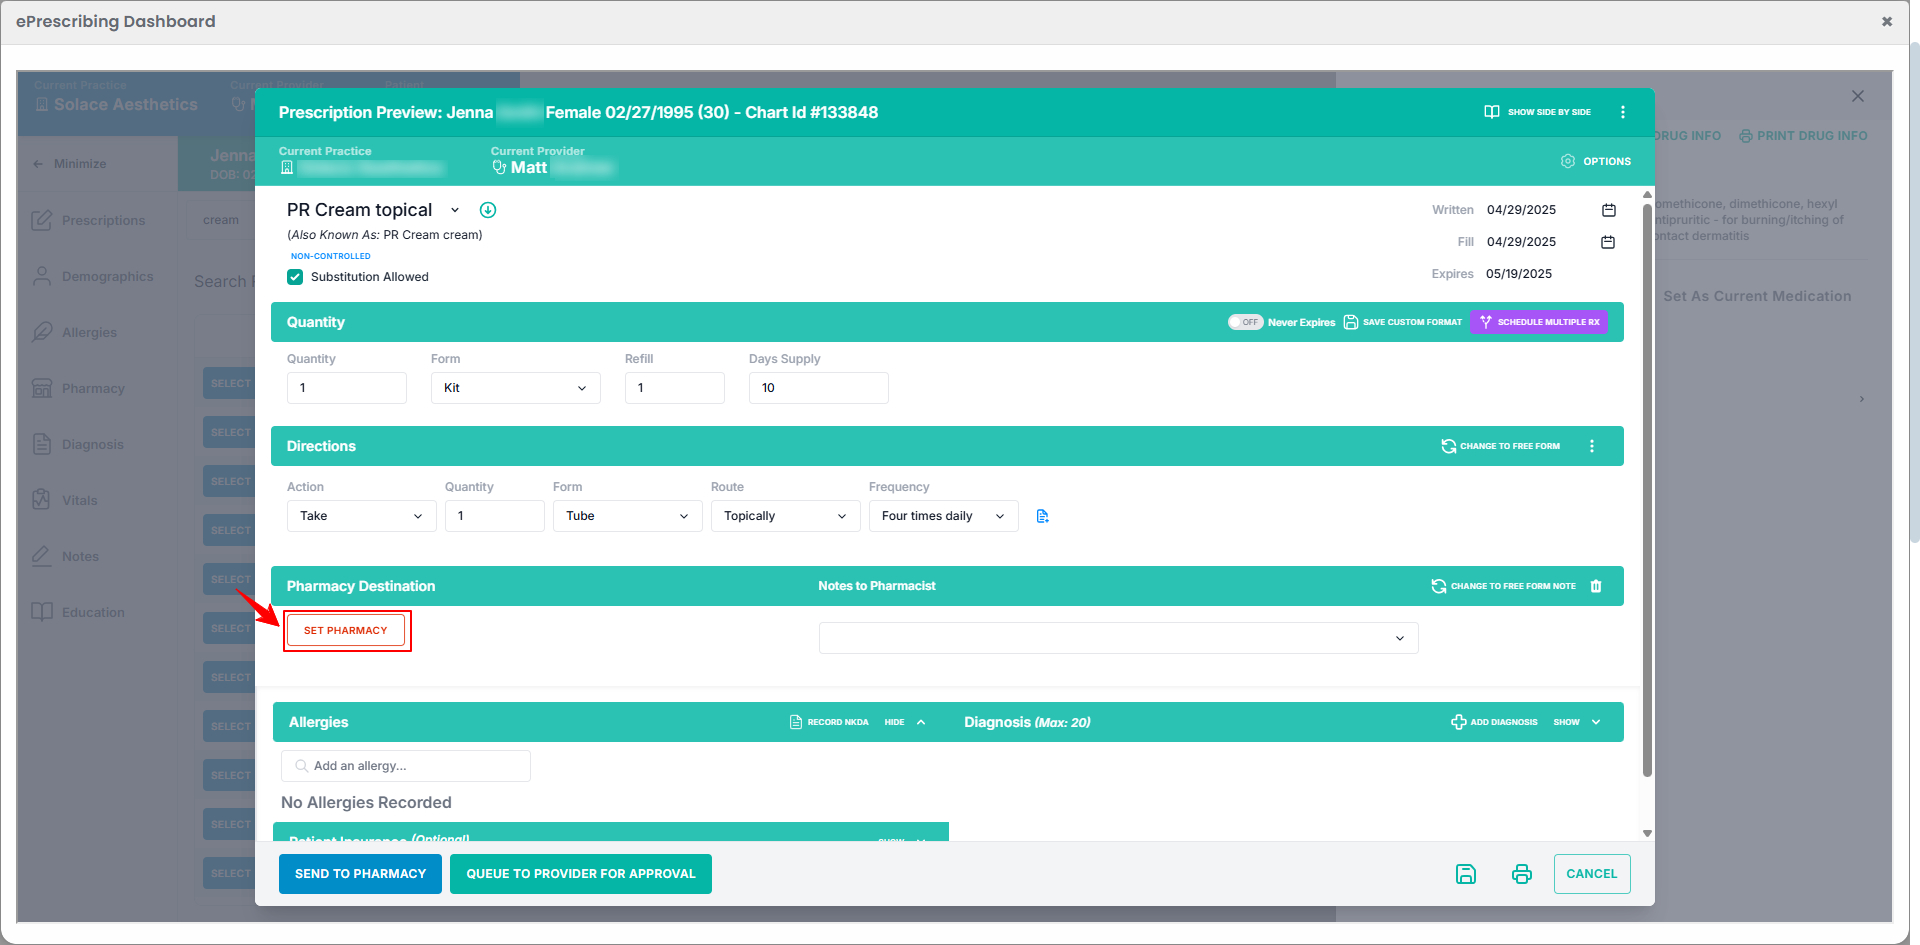
To select a Pharmacy Destination, click on the “Set Pharmacy” button.
-
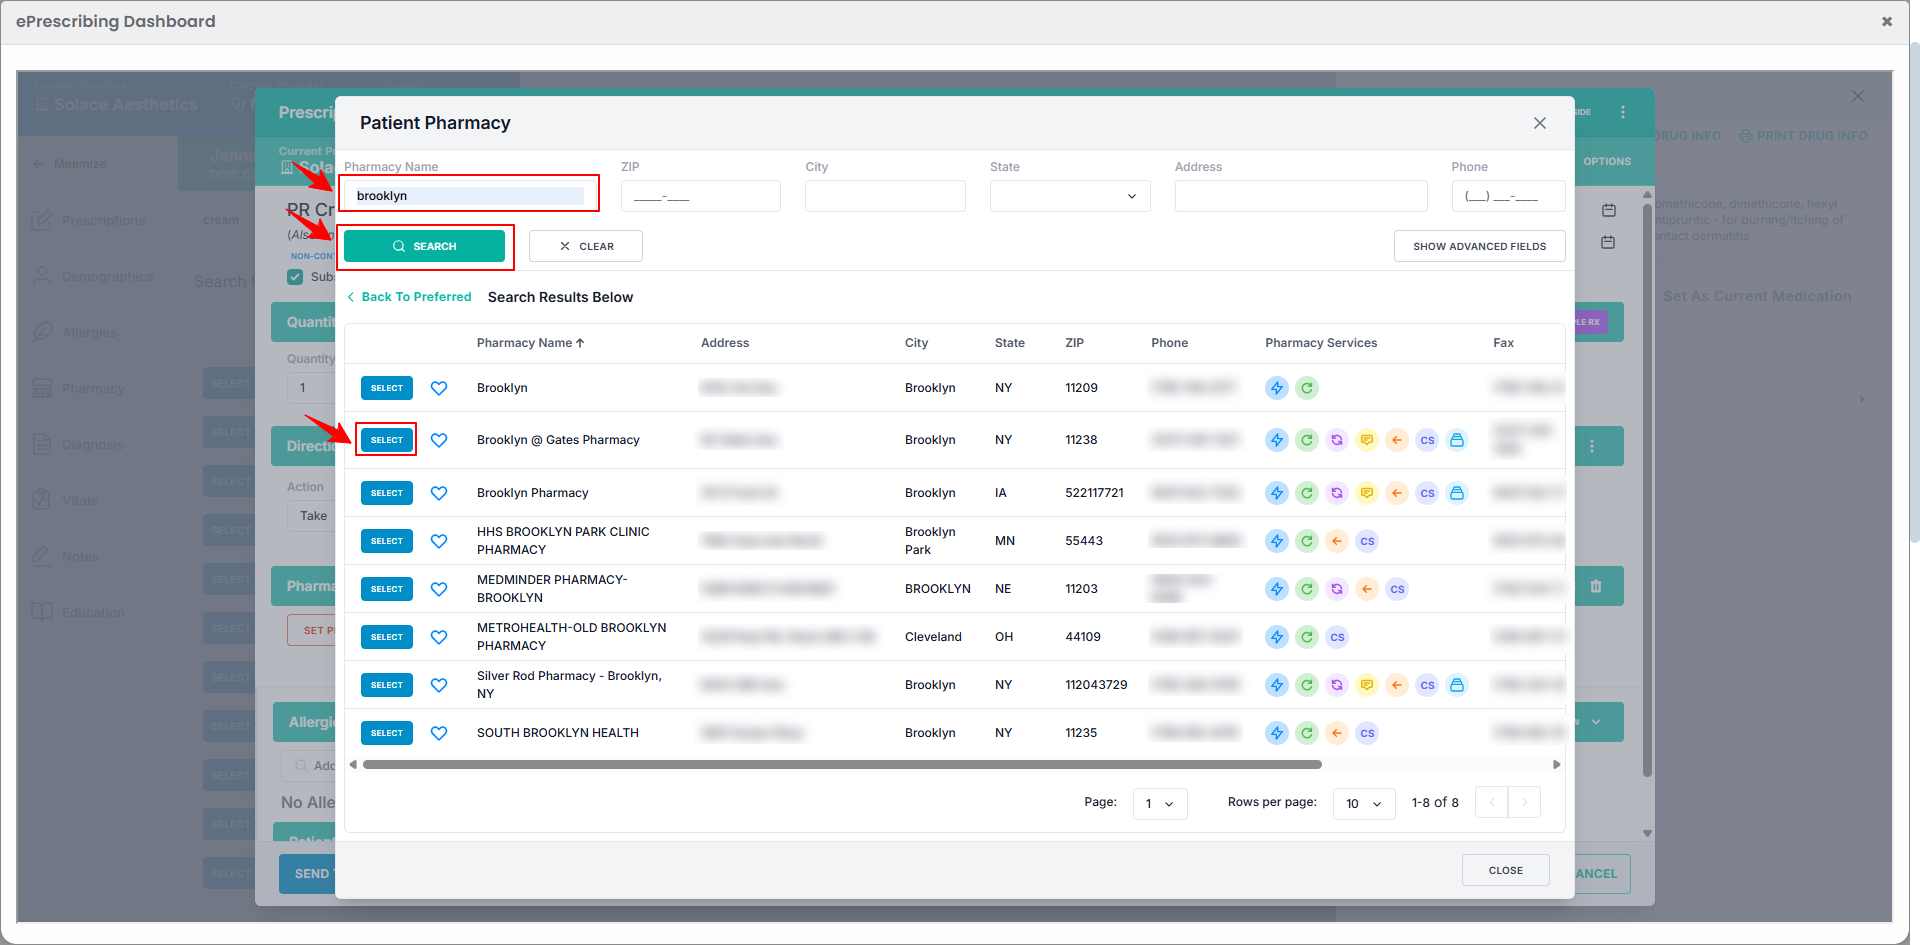
Type the pharmacy name in the search bar and click “Search.” When the results appear, click “Select” next to the desired pharmacy.
-
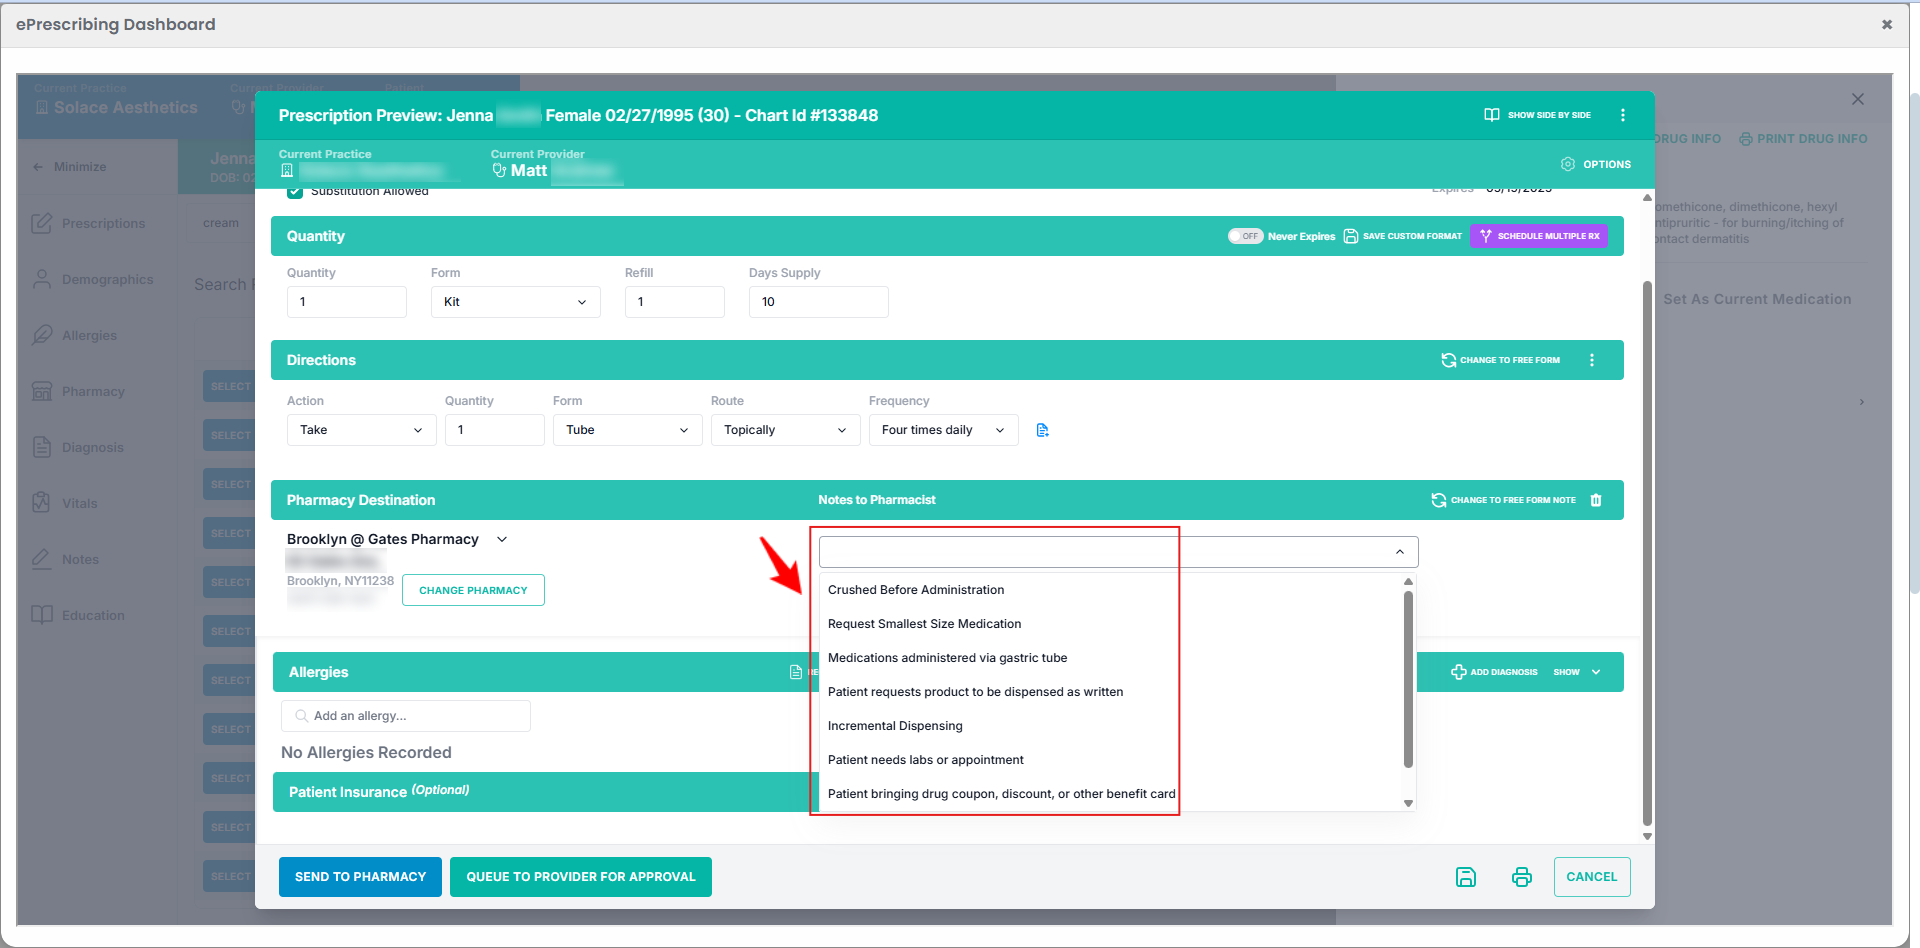
Once the pharmacy is selected, select the appropriate Note to Pharmacist from the dropdown menu.
-
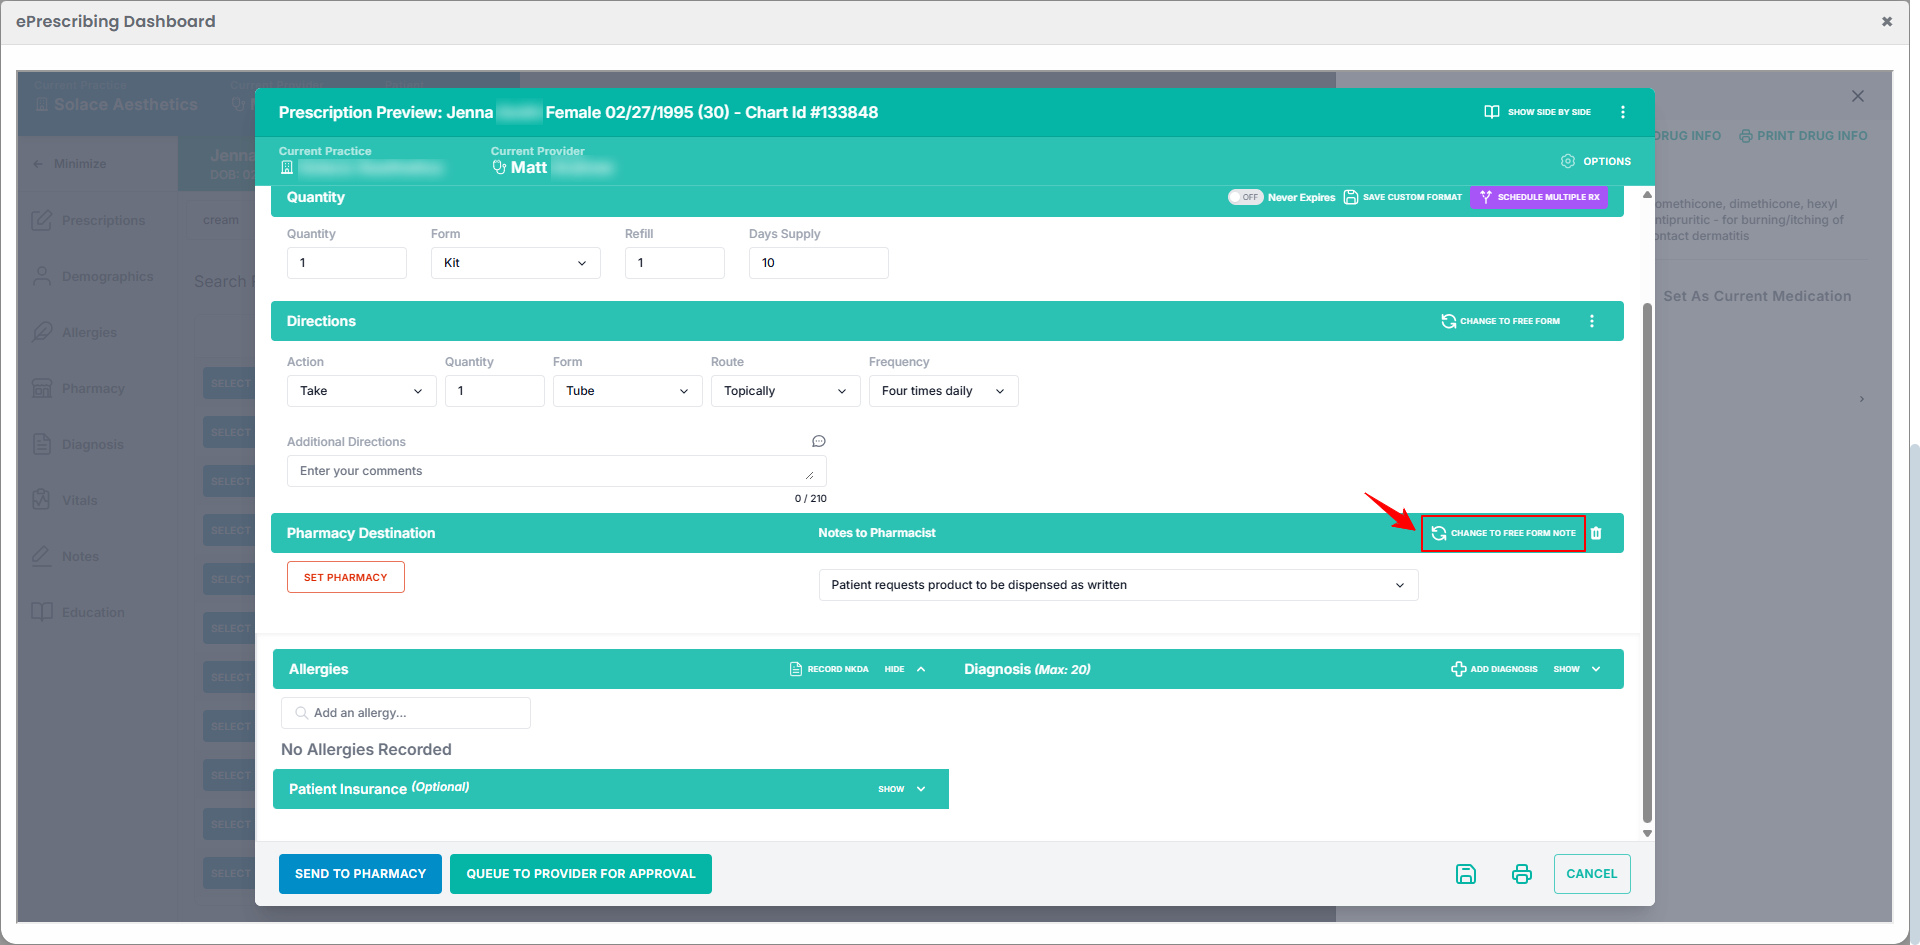
To write the notes to the pharmacist in a free form, click on “Change to Free Form Note” in the right corner.
-
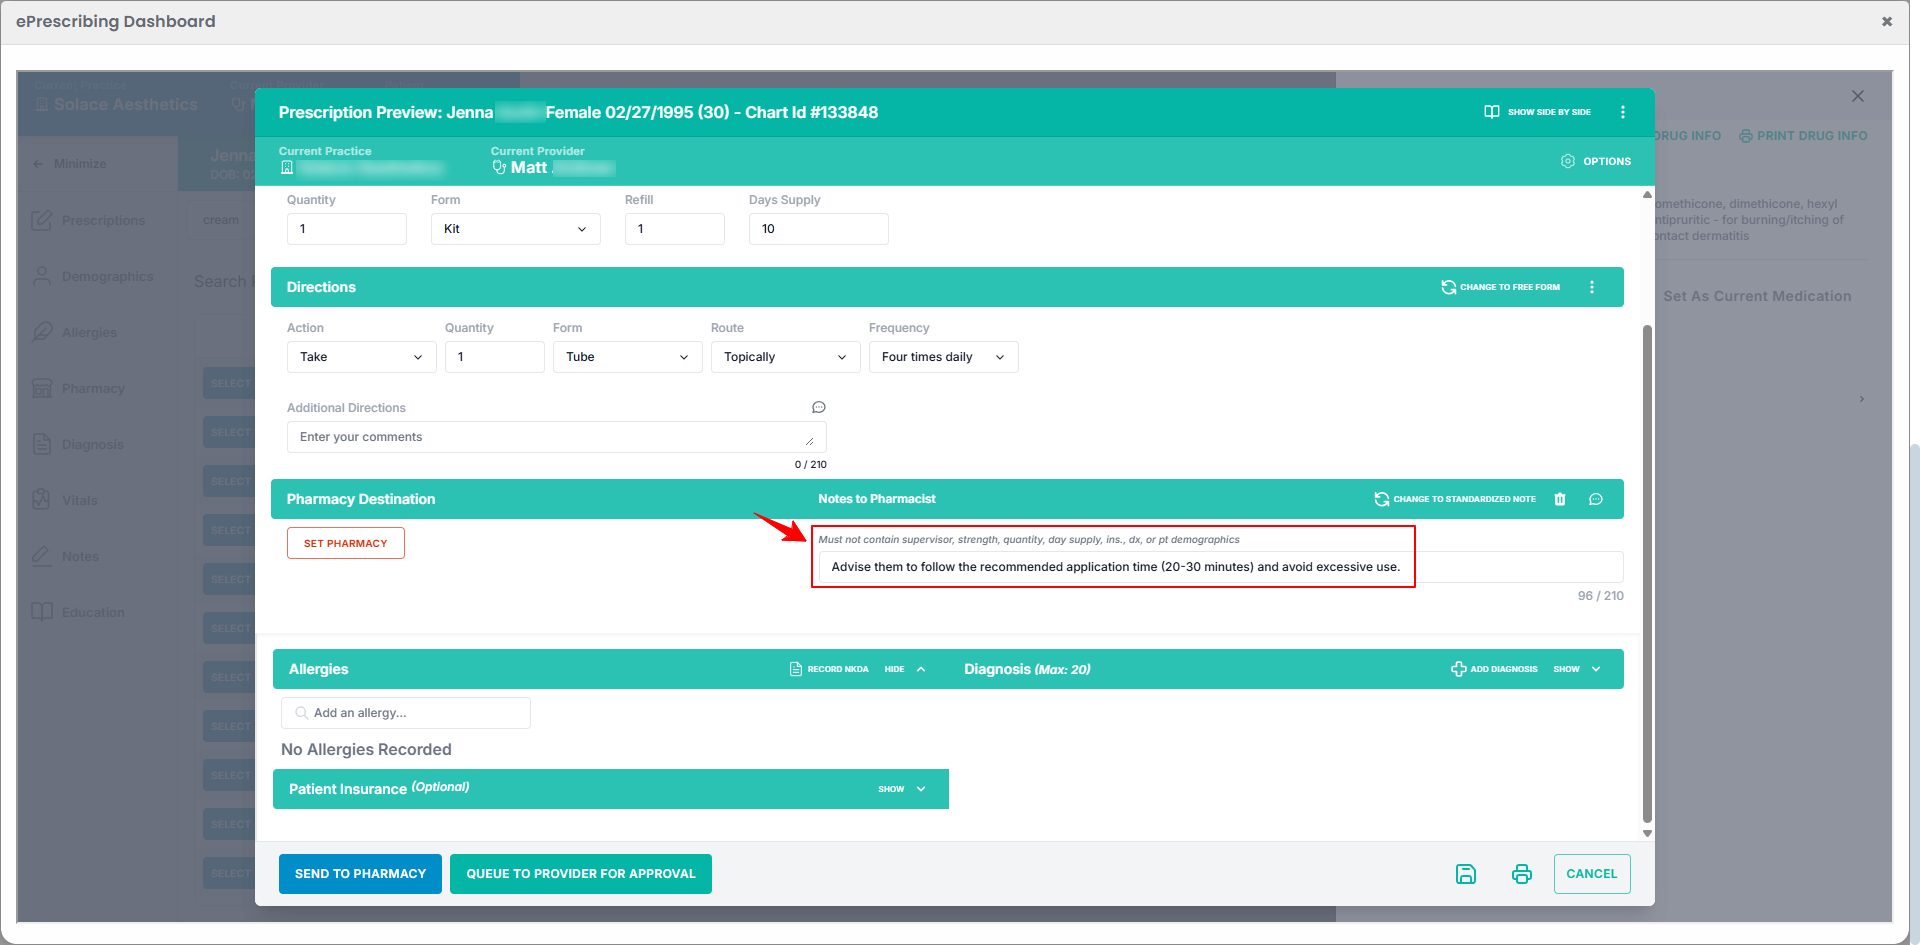
Selecting the “Free Form Note” option allows you to manually enter a custom note in the provided text field.
-
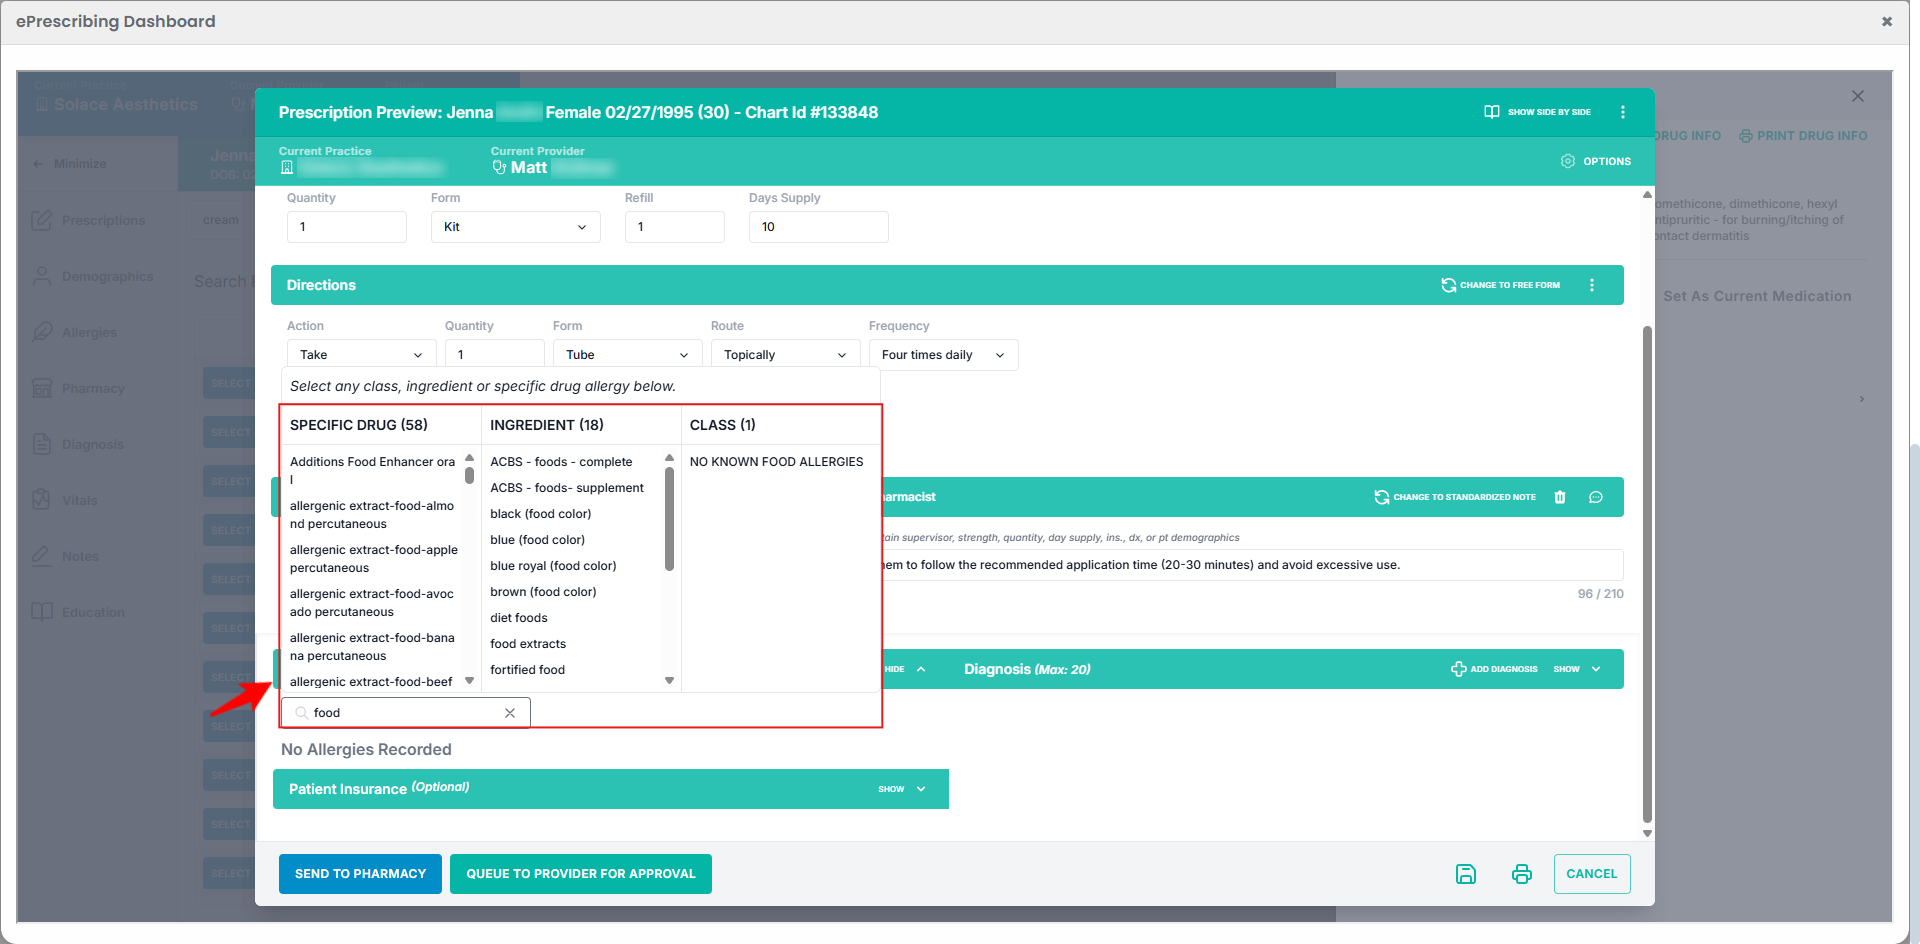
If the patient has any allergies, type the allergy in the search bar and select the relevant option from the Specific Drug, Ingredient, or Drug Class dropdown.
-
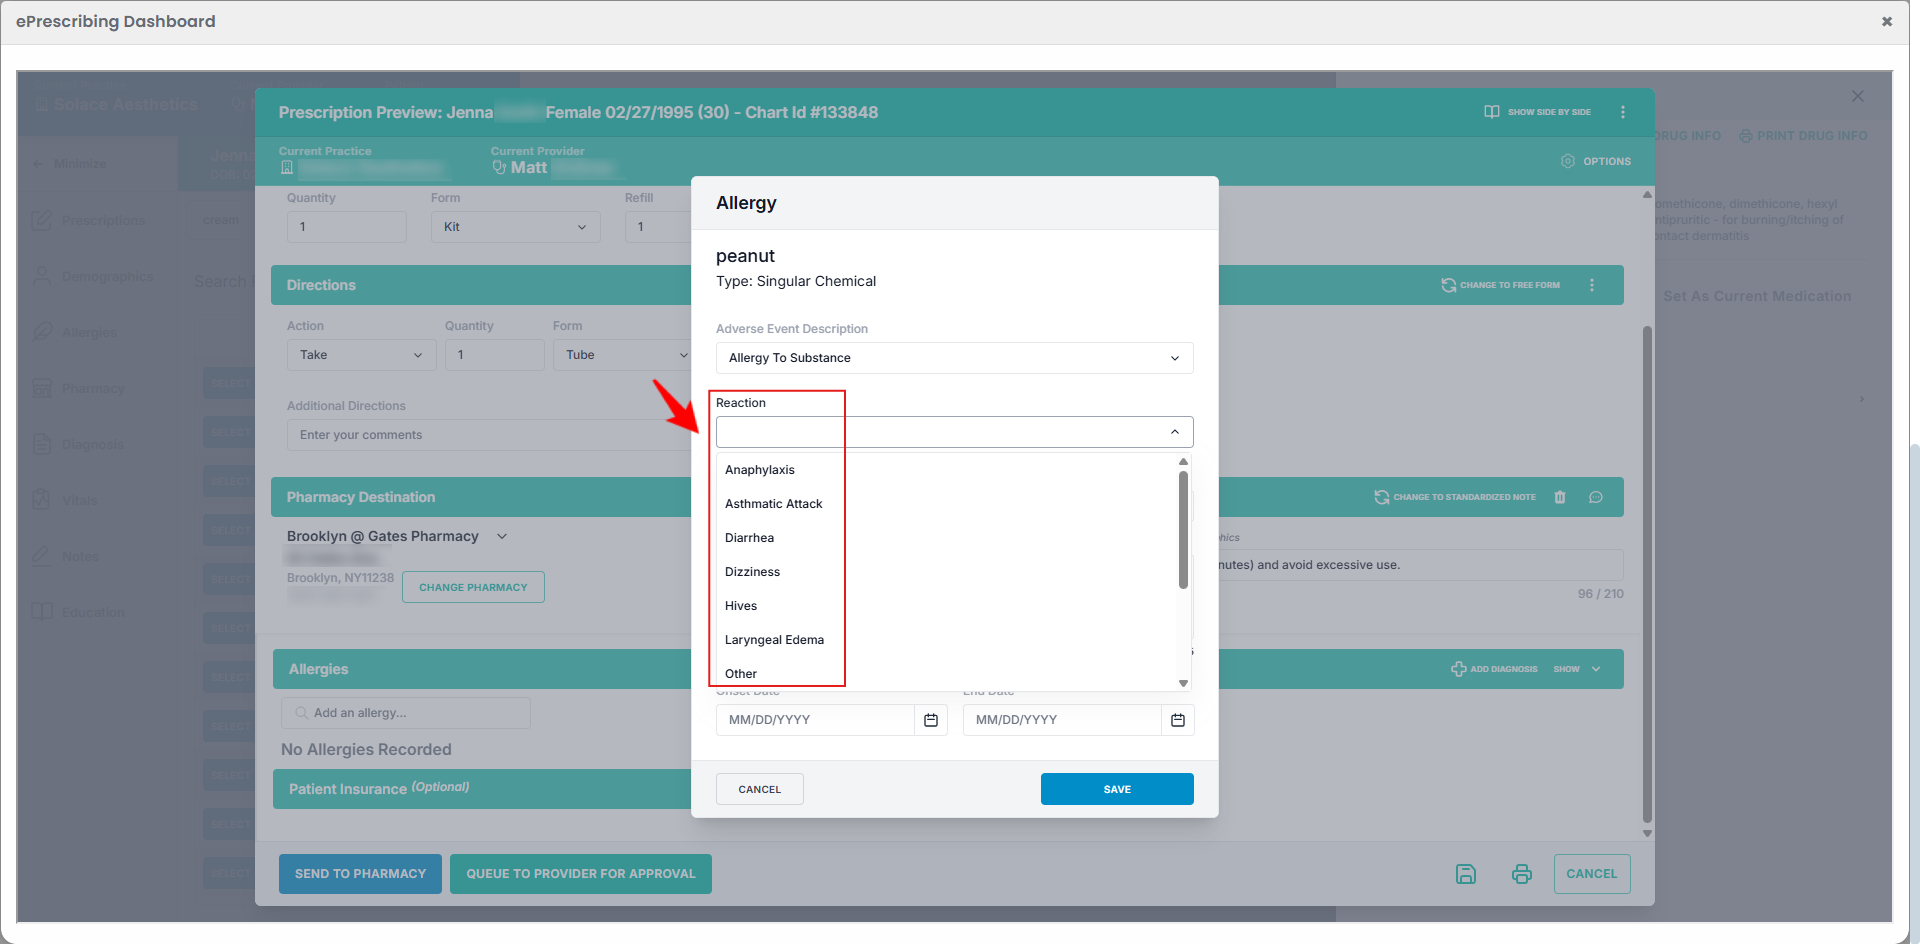
After selecting an allergy, a window will appear with the Adverse Event Description pre-filled. Choose the relevant Reaction from the dropdown menu.
-
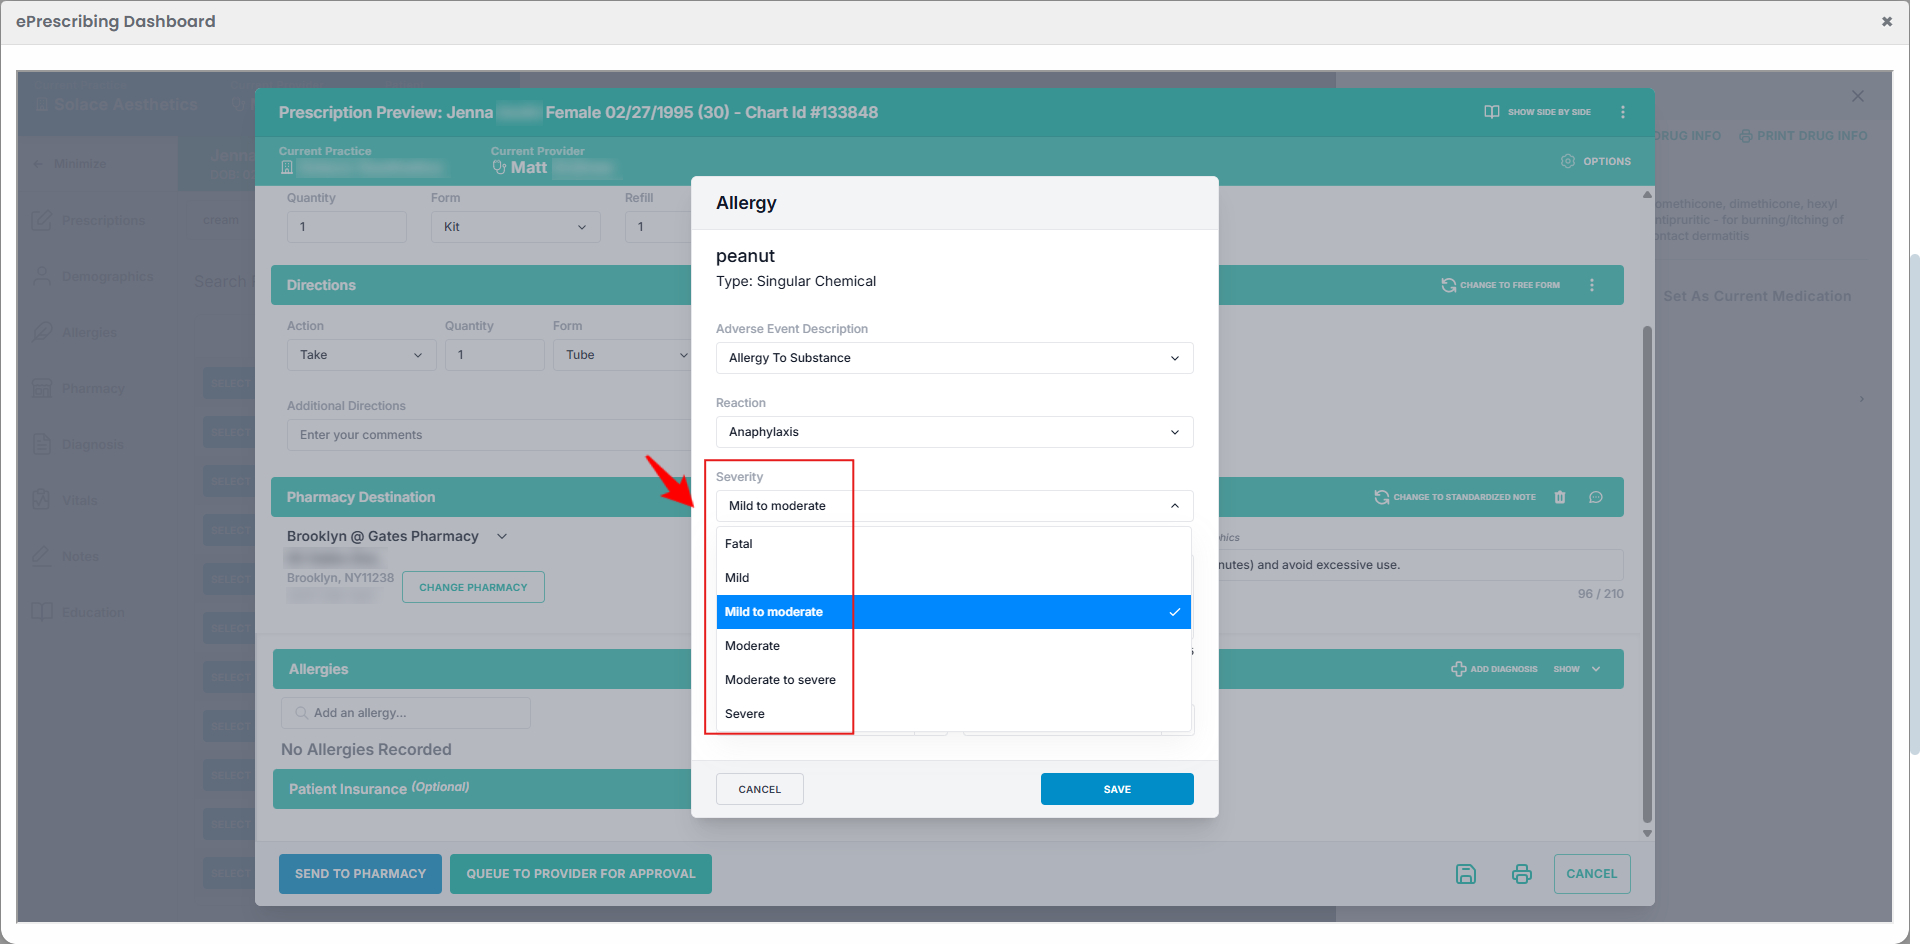
Select the Severity of allergy from the dropdown menu.
-
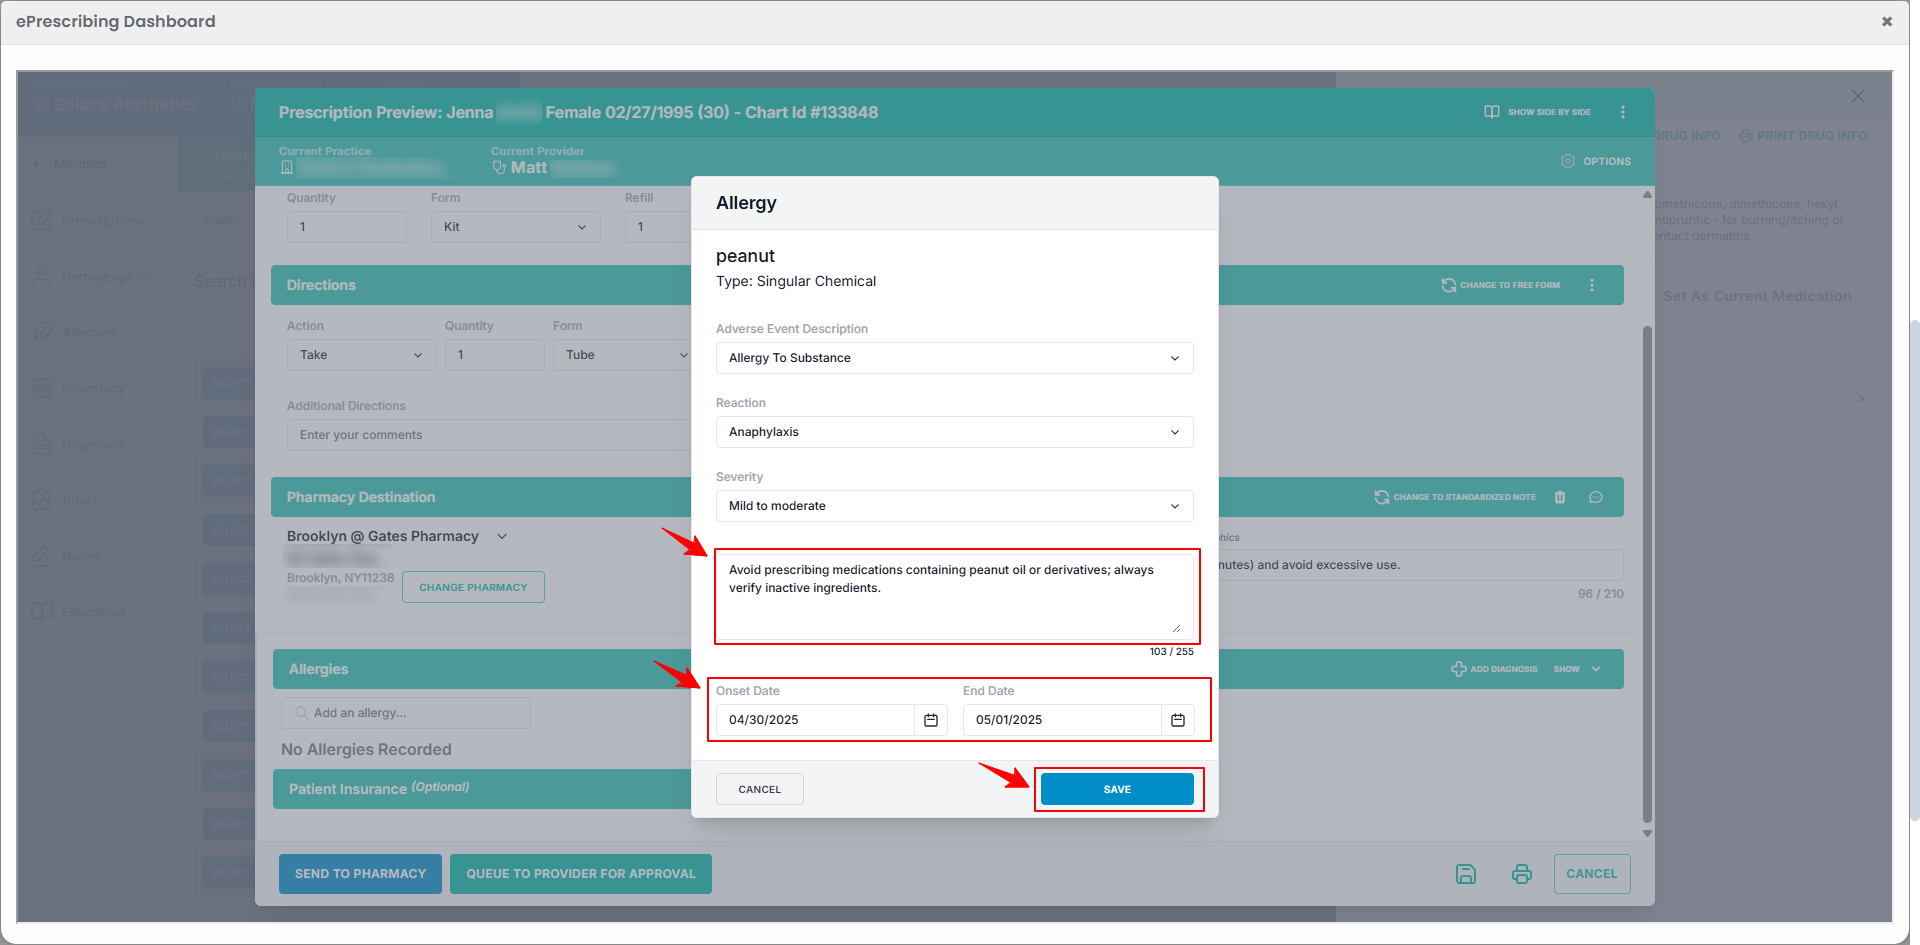
Enter a Comment for the selected allergy, set the Onset and End Date, and click “Save” to record the information.
-
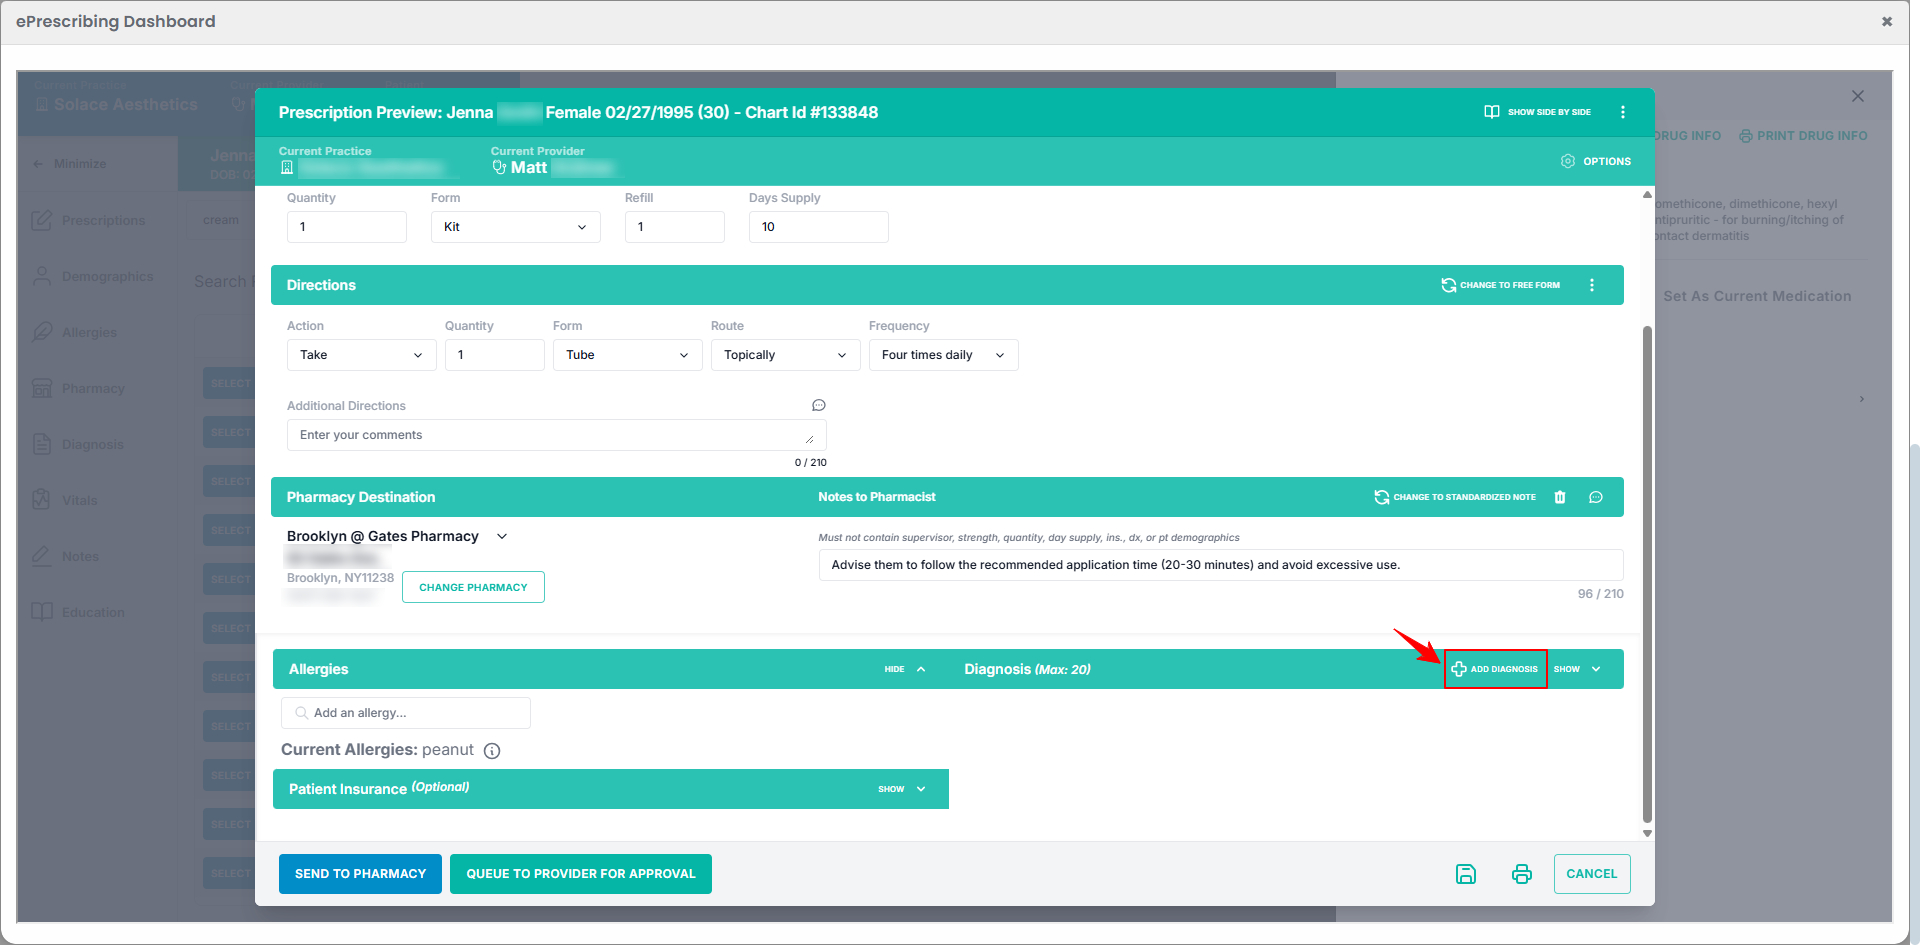
To add a diagnosis for the patient, click “Add Diagnosis” on the right side of the screen.
-
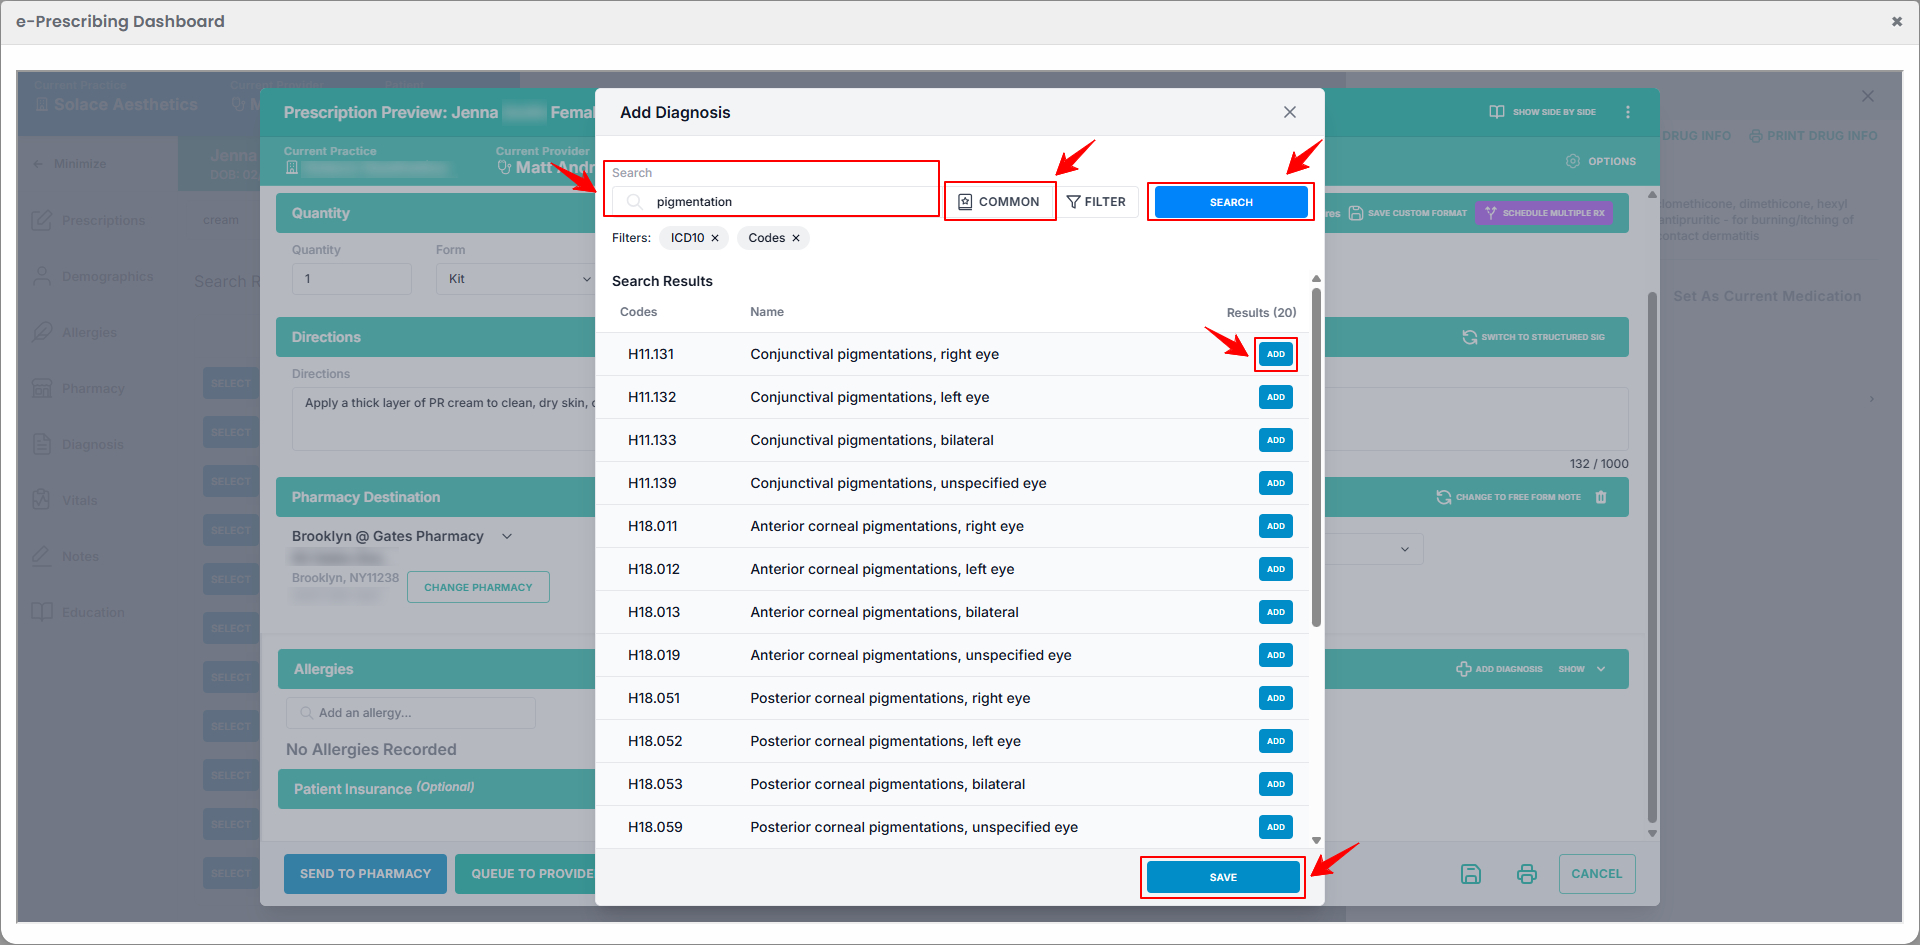
Type the diagnosis in the search bar and click “Search.” Select the appropriate diagnosis from the results and click “Add.” You may also click “Common” to view frequently used diagnoses. Once the diagnosis is added, click “Save” to confirm.
 NoteProviding patient insurance details is optional. Enter the relevant insurance information if available.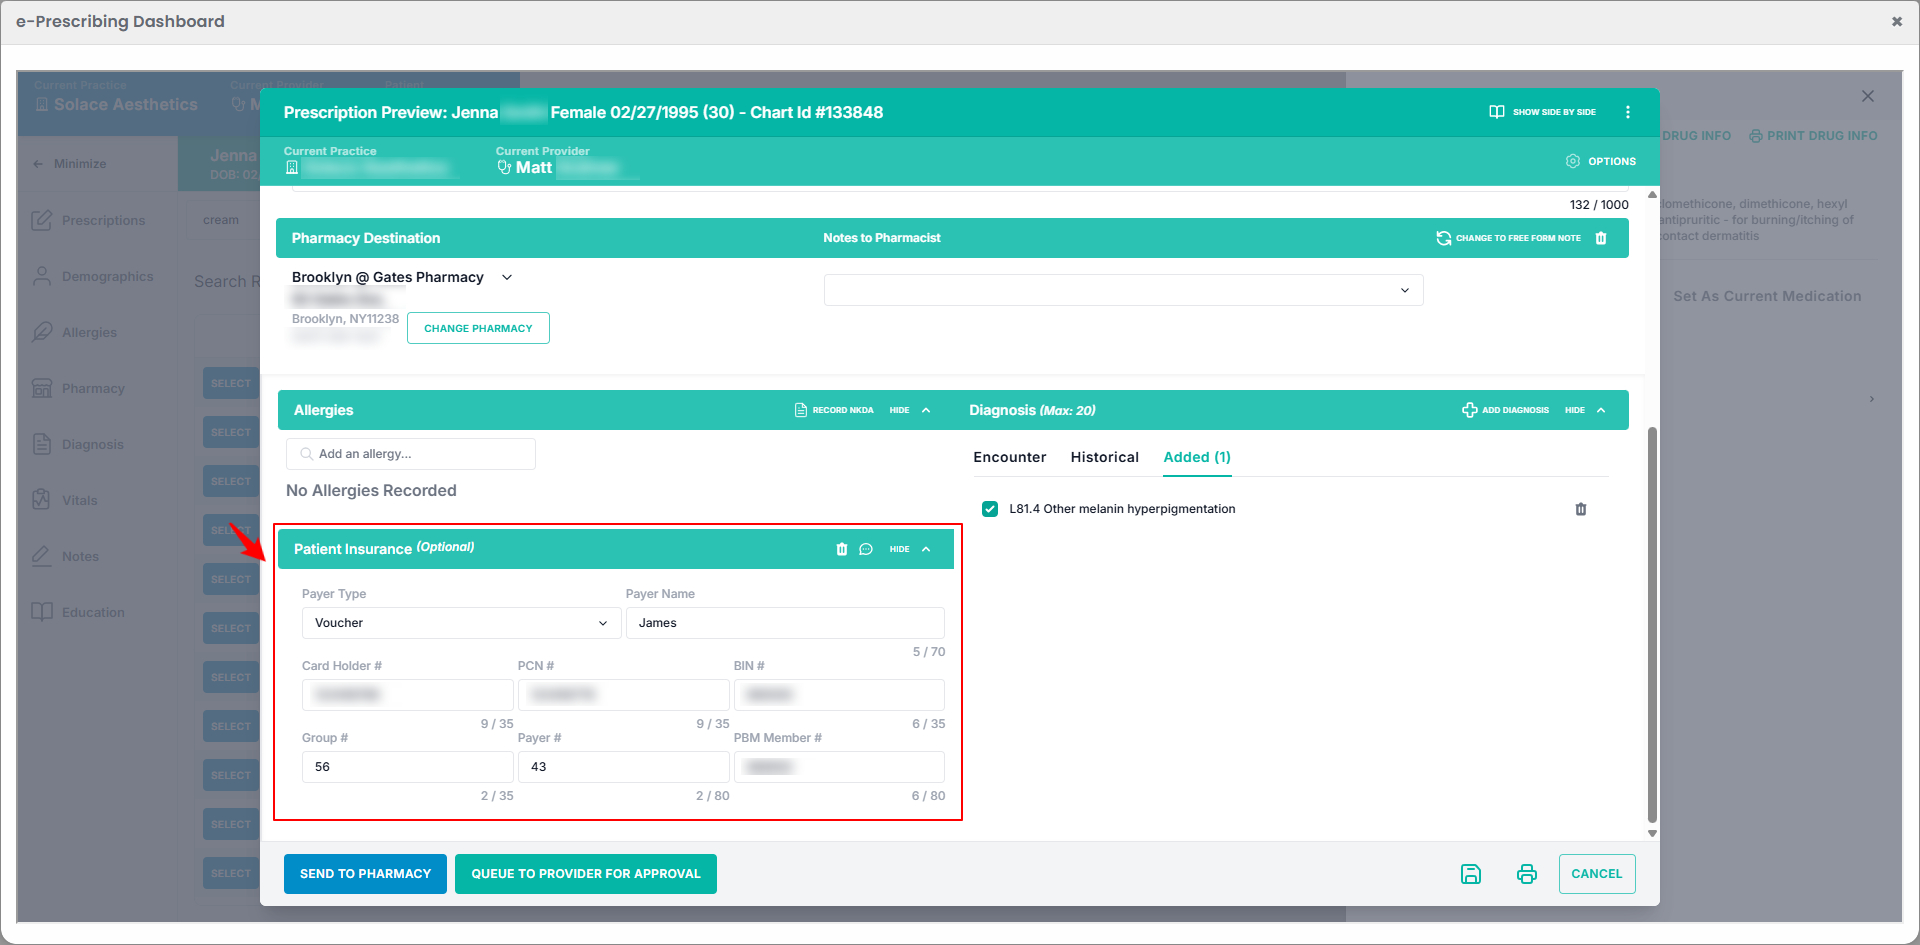
-
After entering all required details, click “Send to Pharmacy” to submit the prescription. If provider approval is needed, click “Queue to Provider for Approval” instead.
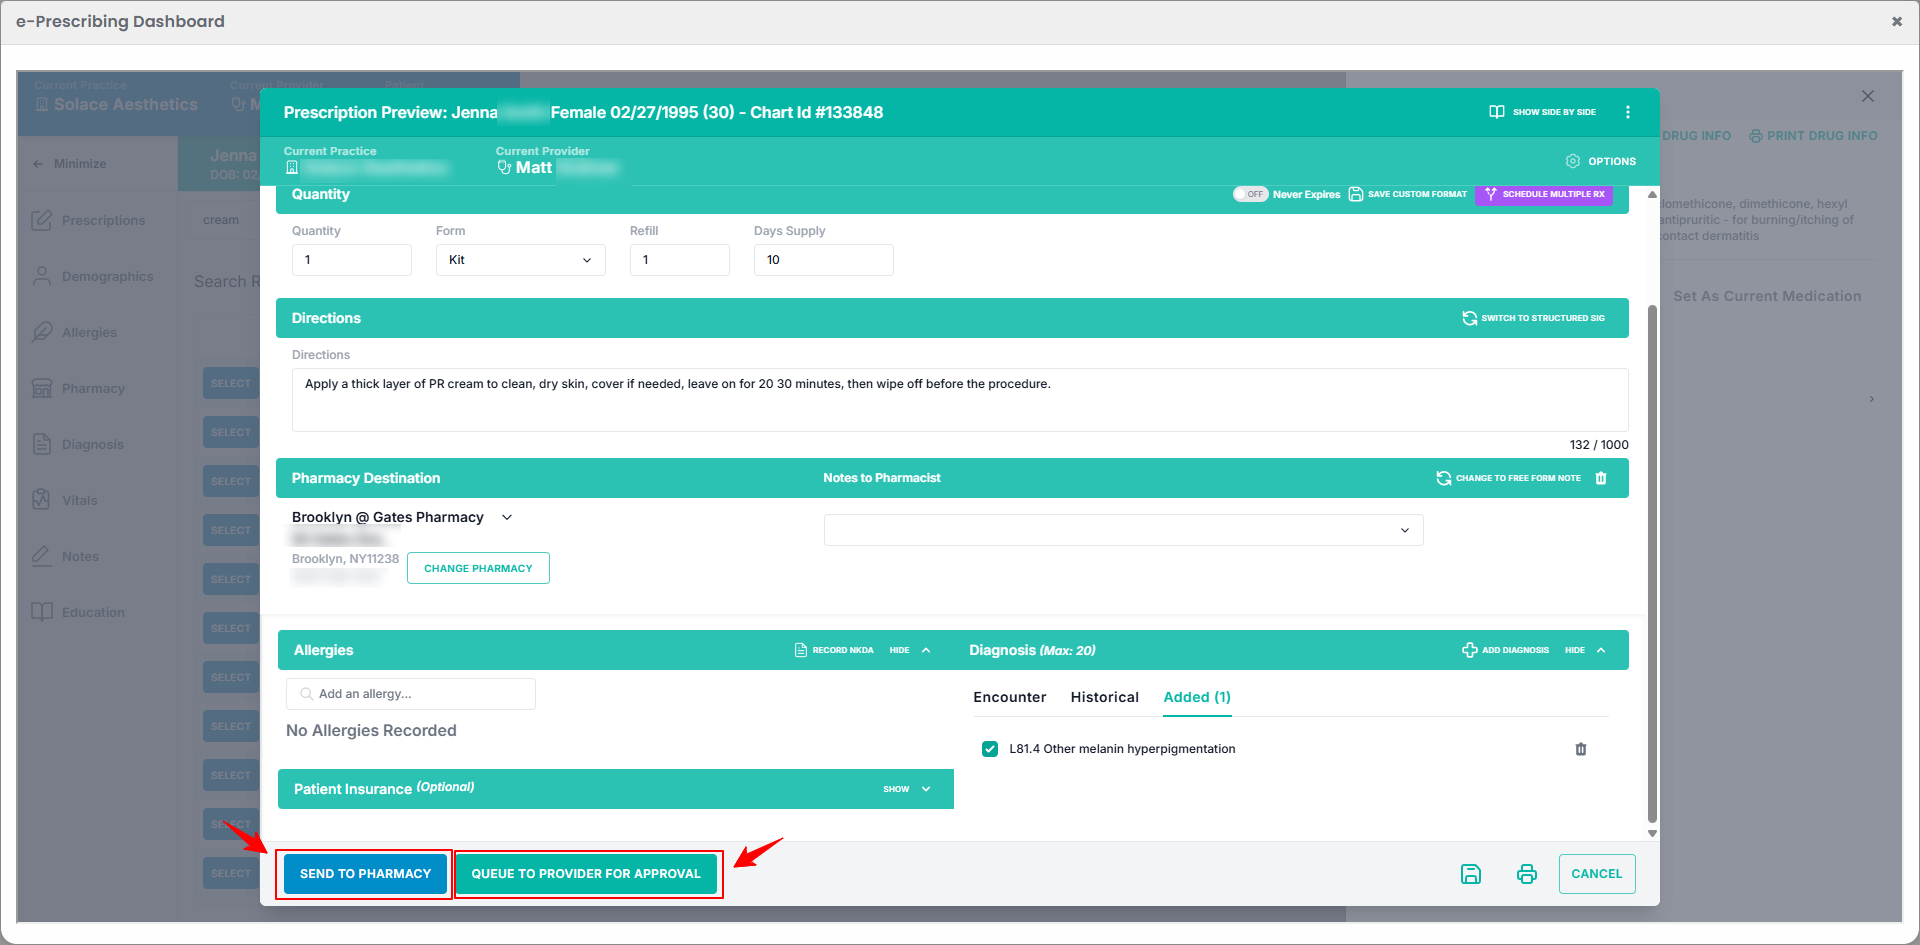 NotePrescriptions sent to the prescriber for approval will appear in the “Queue” section of the e-Prescribing Dashboard.
 -
Review the prescription details and click “Approve and Send” to send the prescription to the pharmacy.
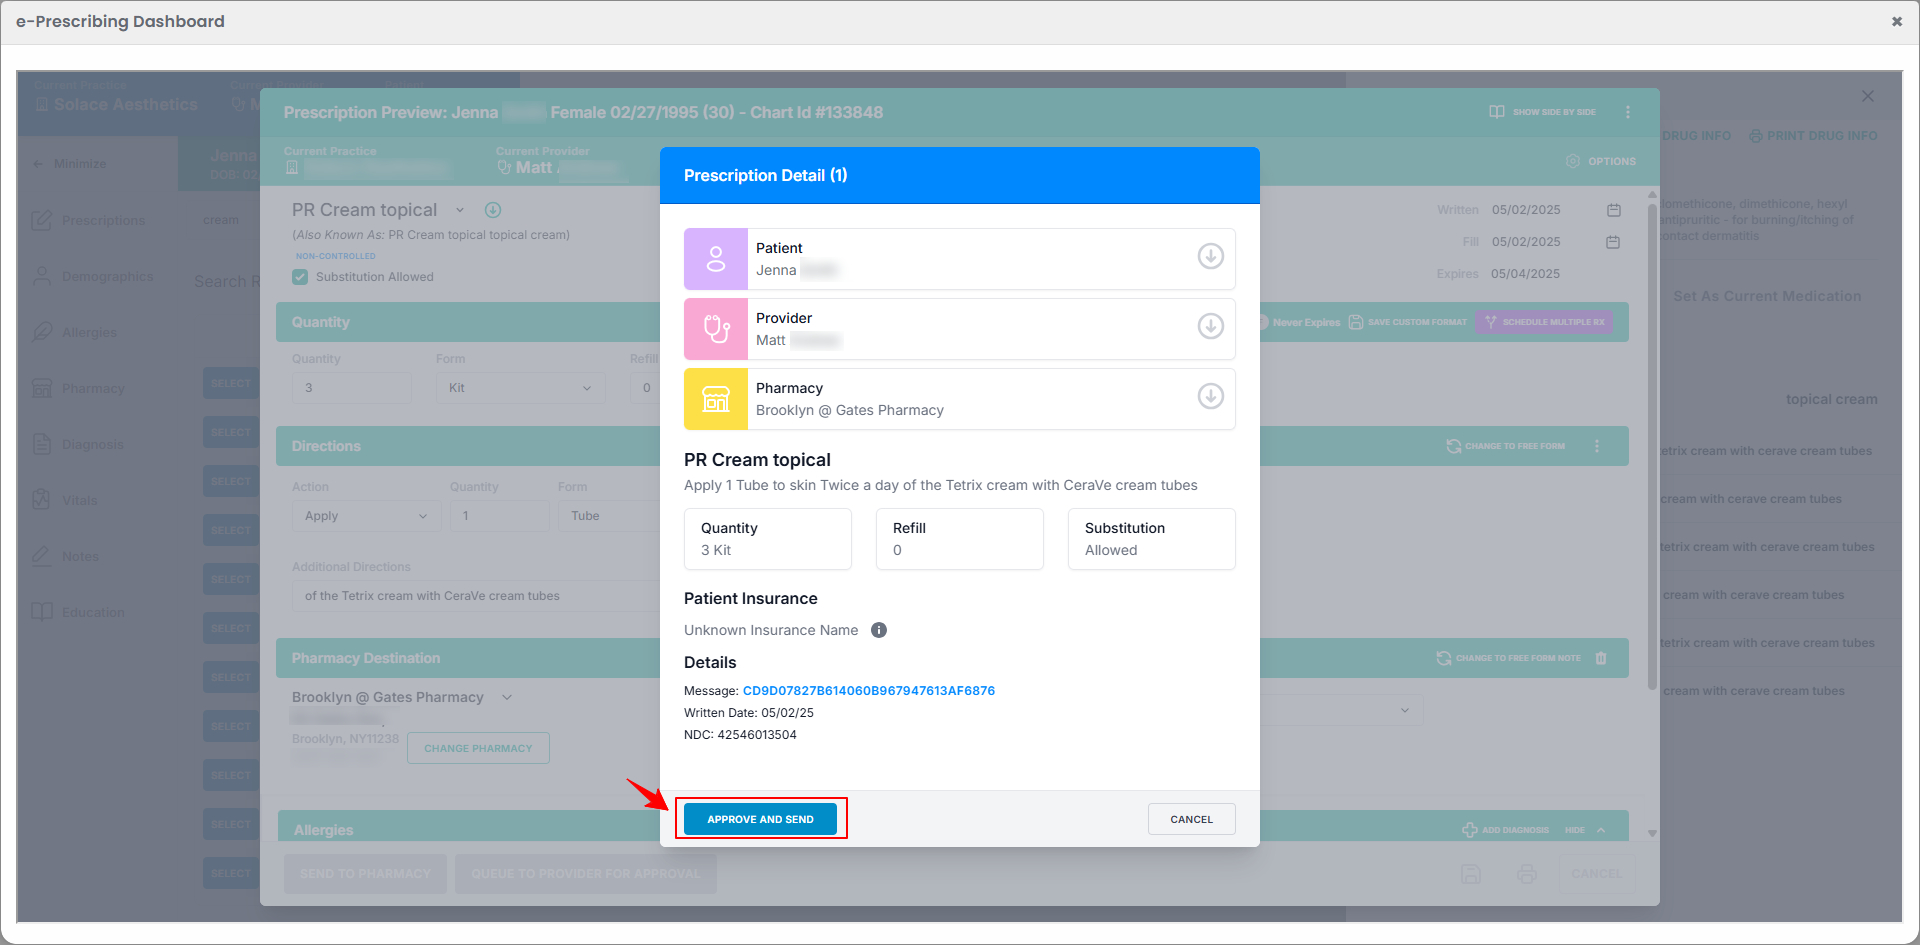 The e-prescribing has been successfully sent to the pharmacy and the new prescription format has been added!
-
-
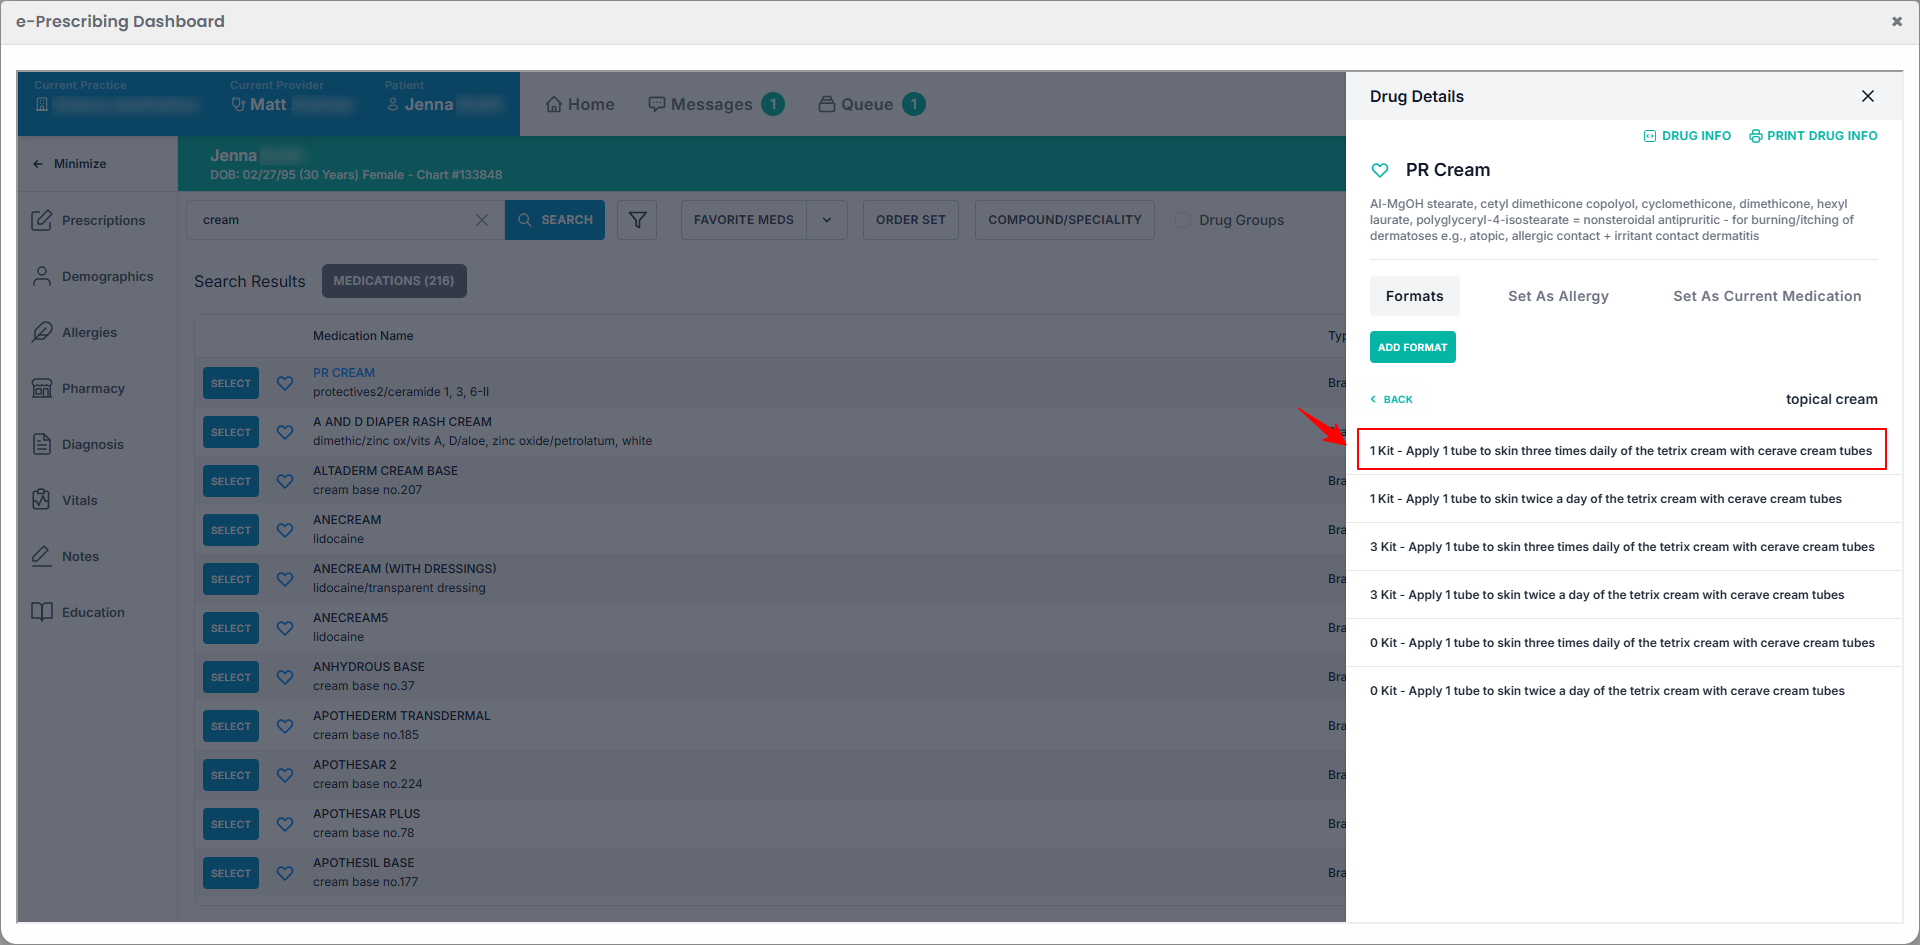
To continue without creating a new prescription format, simply select one from the available options.
-
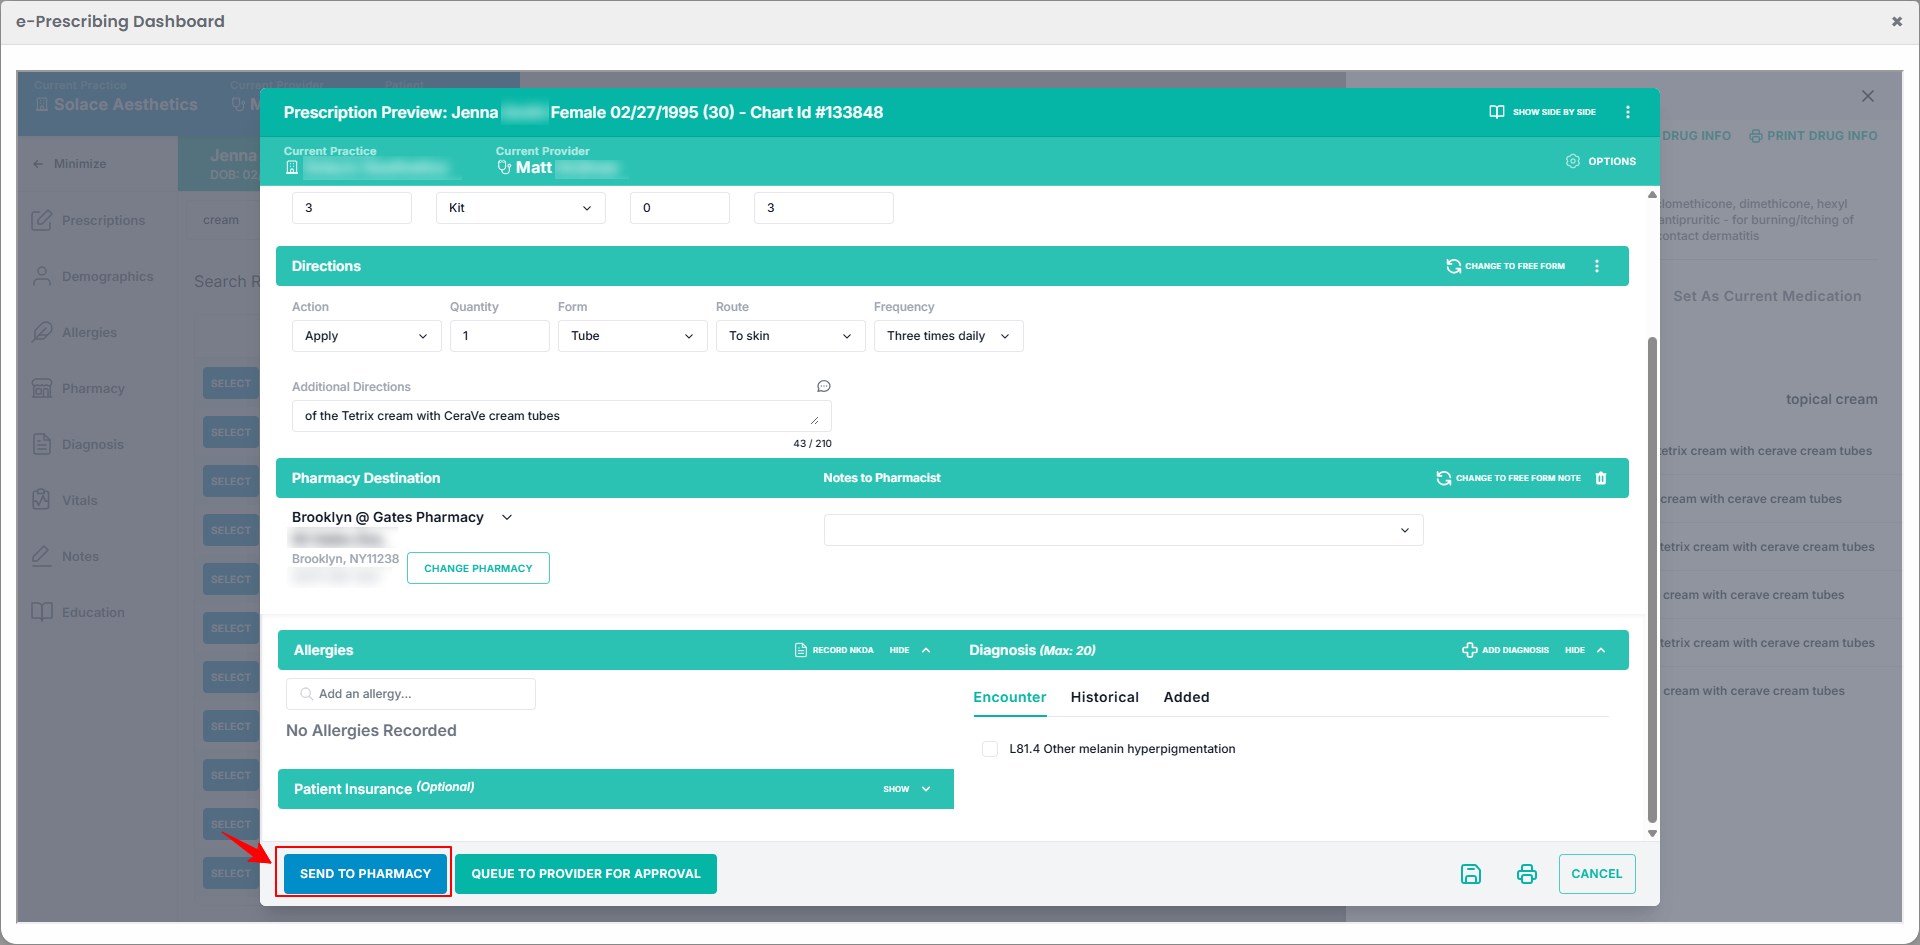
The prescription preview will open. Review the information, make any necessary changes, and click “Send to Pharmacy.”
-
Review the prescription details and click “Approve and Send” to send the prescription to the pharmacy.
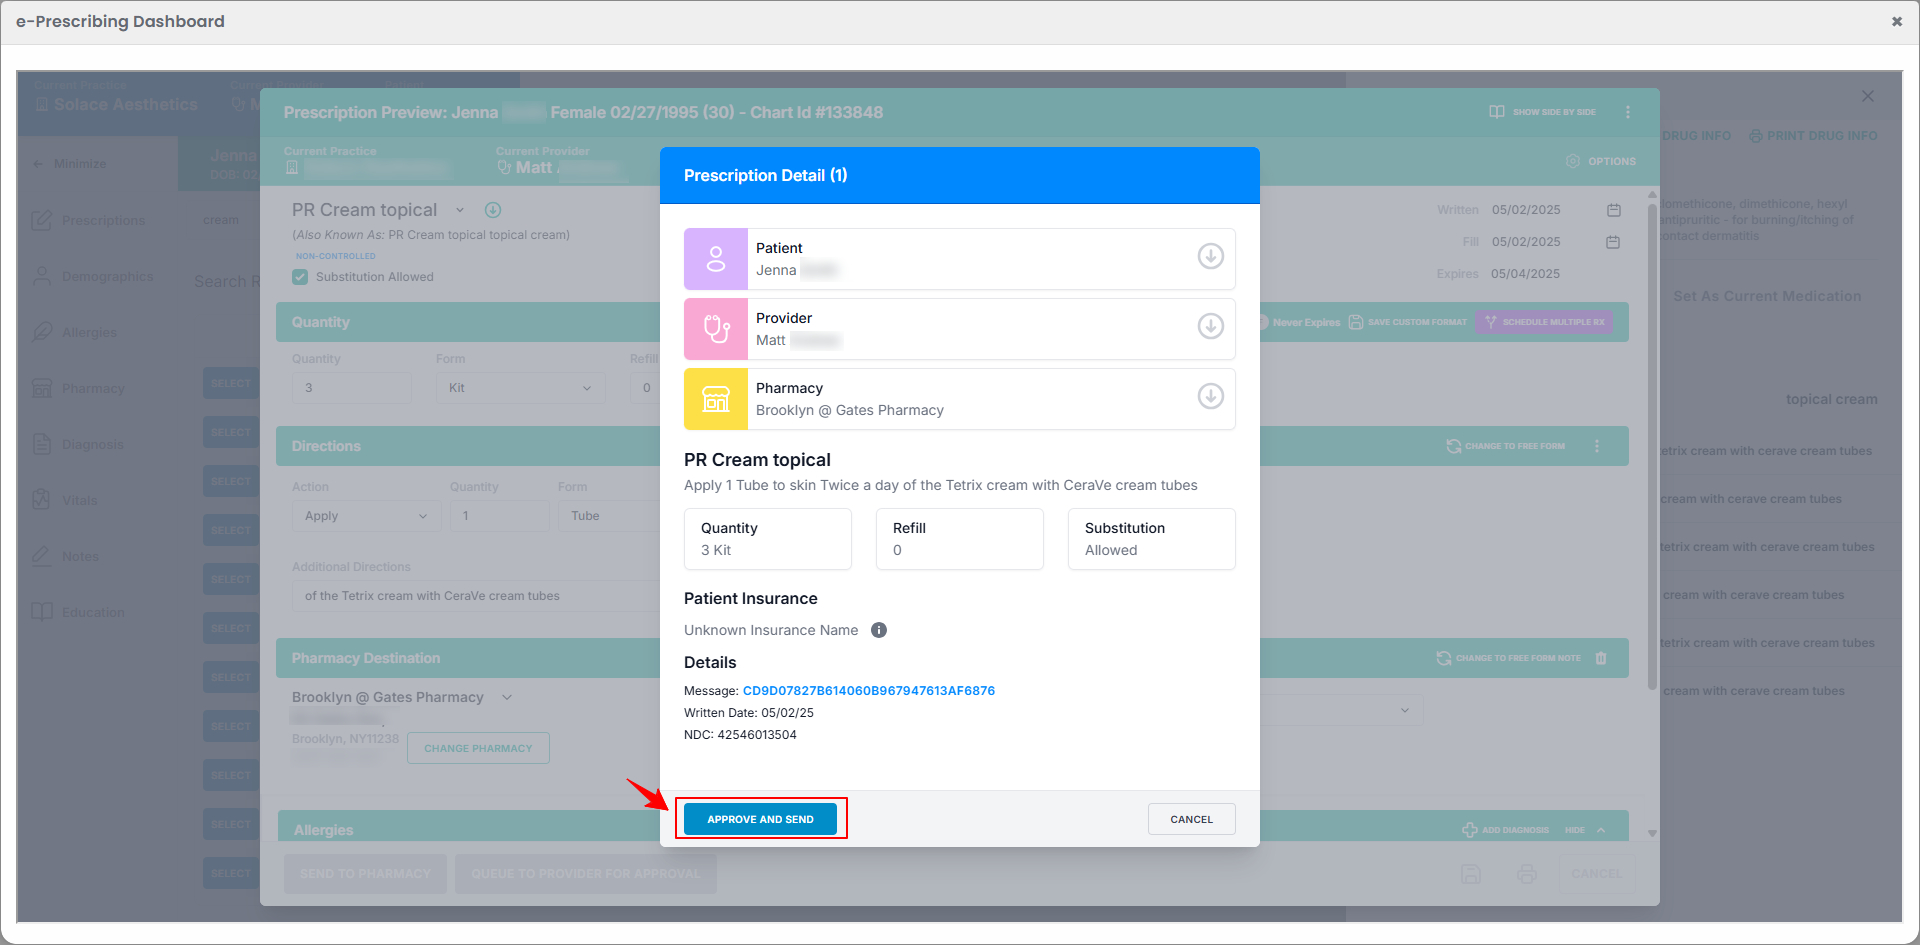 The prescription has been successfully sent to the pharmacy and the drug has been prescribed to the patient!
Part 2 of 6
Prescribe a Drug through e-Prescribing while Creating a Health Procedure
-
The provider can prescribe a drug through e-Prescribing while creating a health procedure.
-
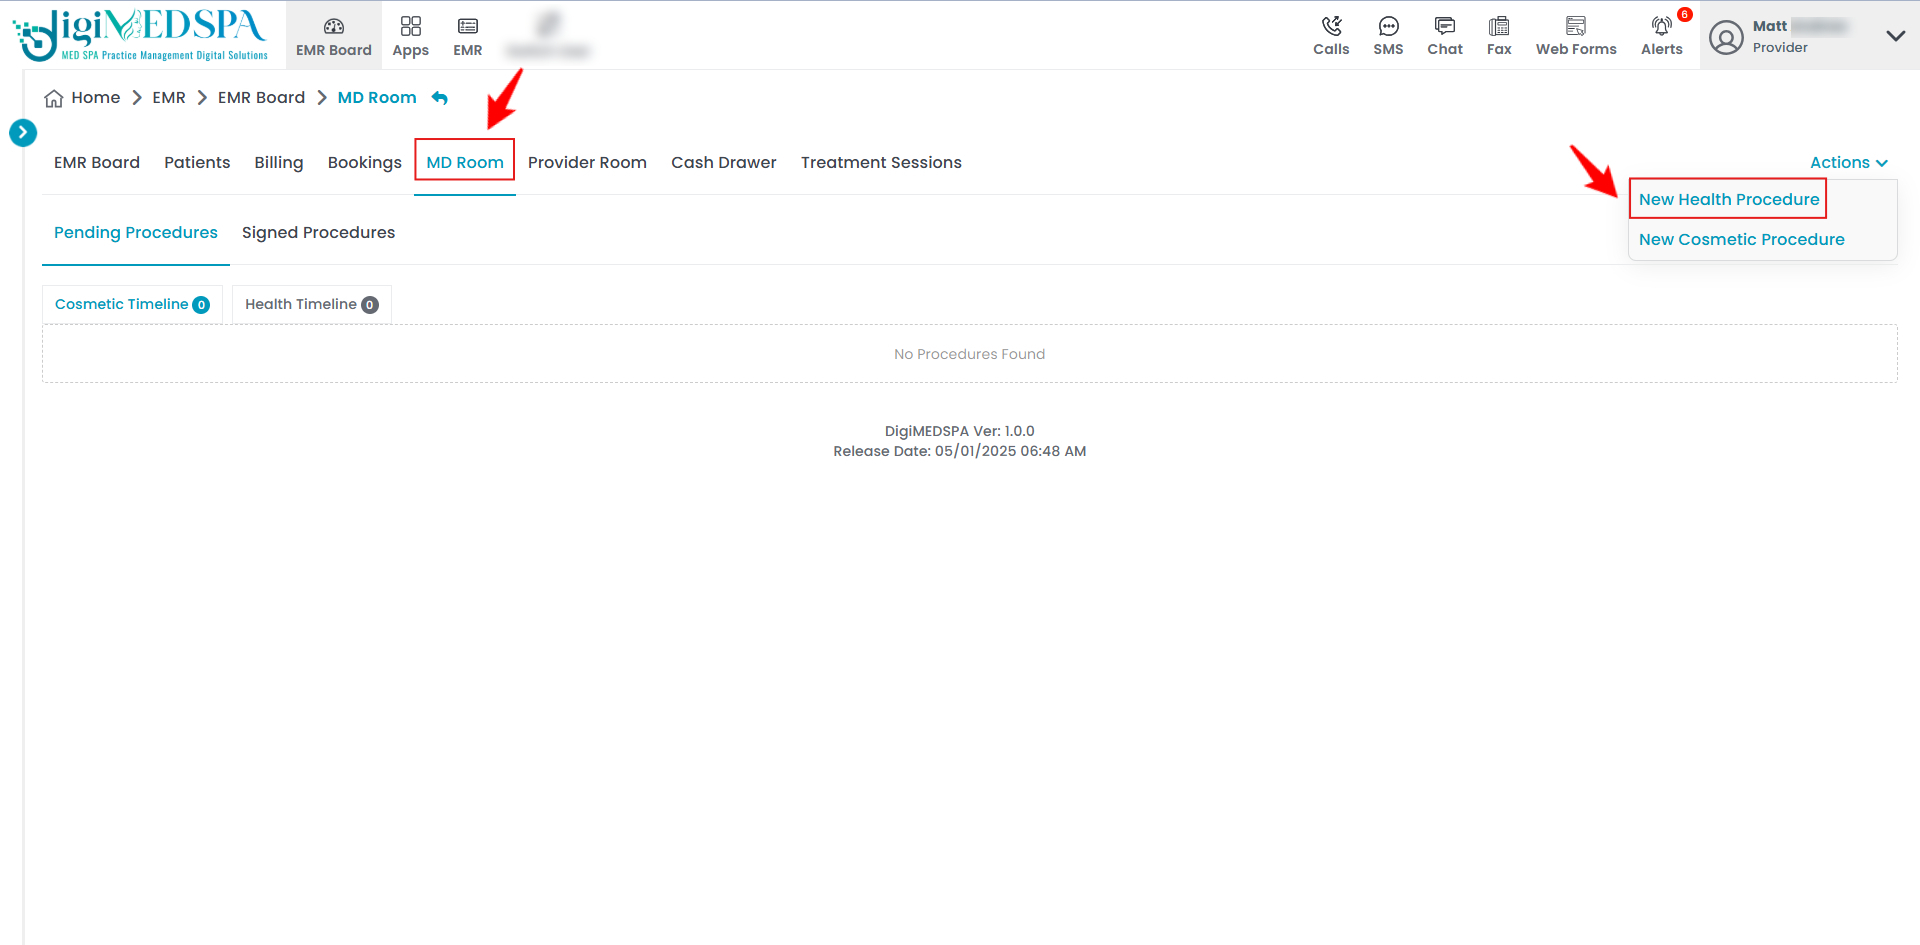
From the EMR Board Tabs, click on the “MD Room” tab, hover over the “Actions” menu, and select “New Health Procedure” from the dropdown menu.
-
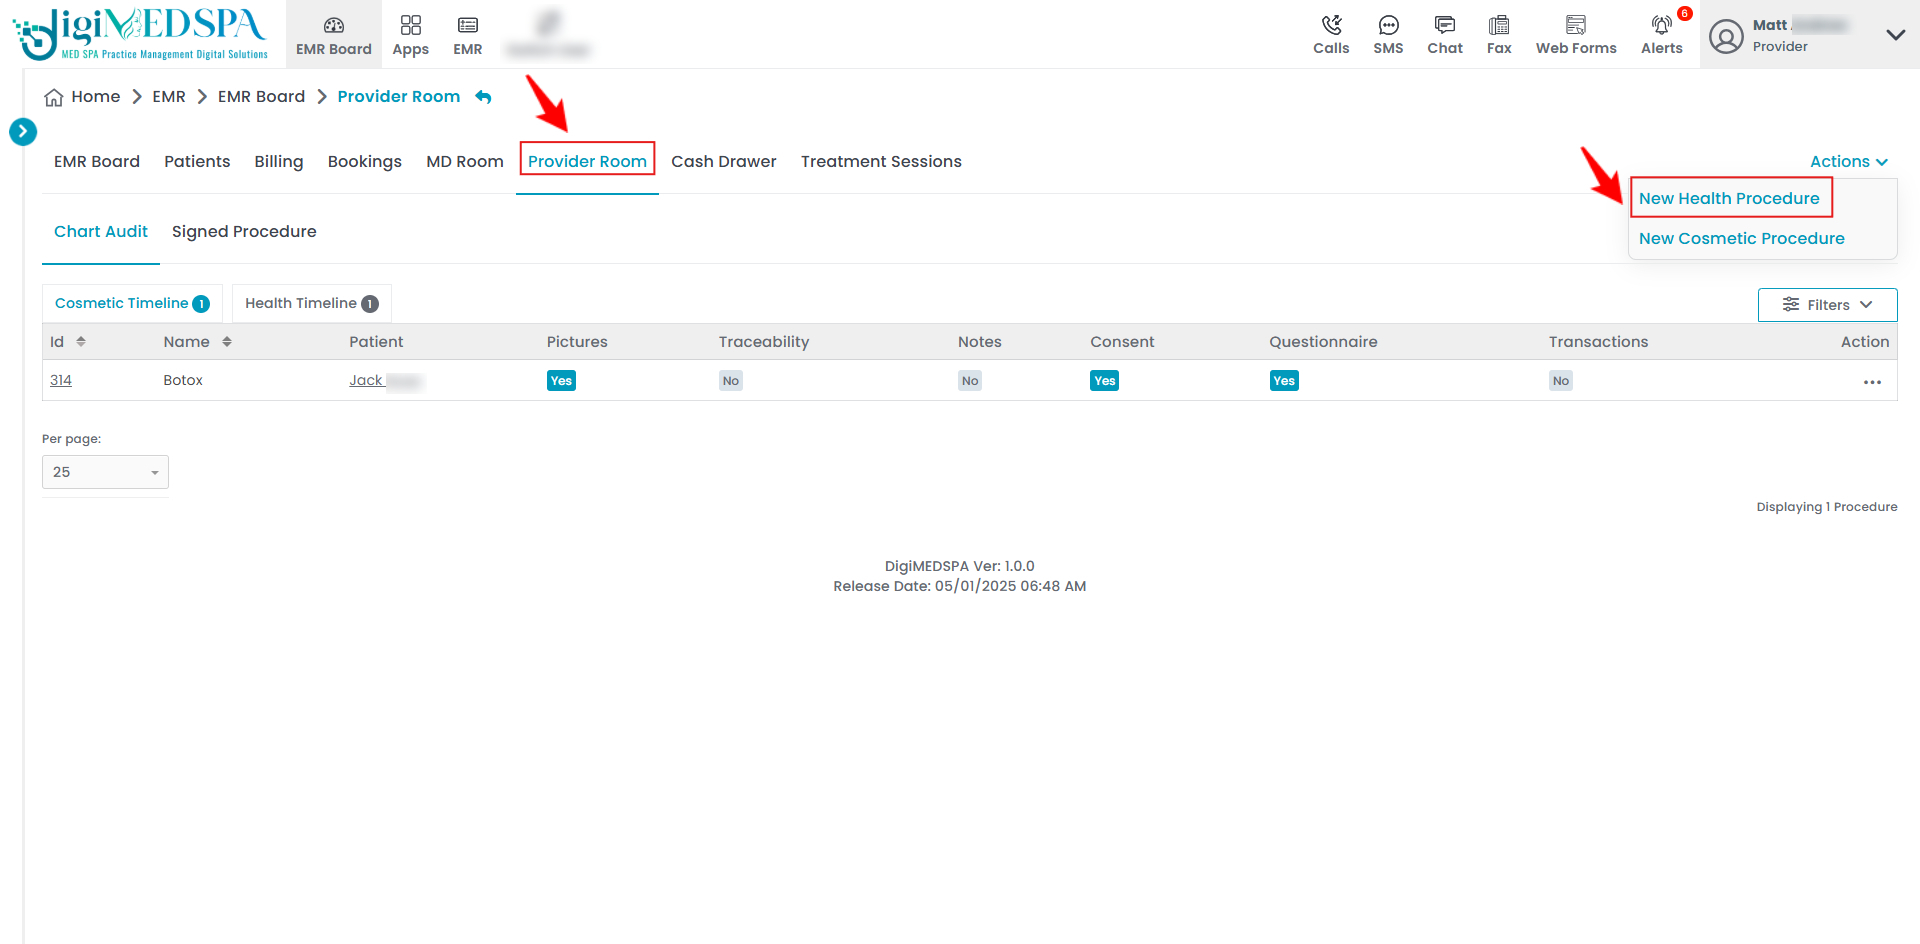
From the EMR Board Tabs, click on the “Provider Room” tab, hover over the “Actions” menu, and select "New Health Procedure” from the dropdown menu.
-
-
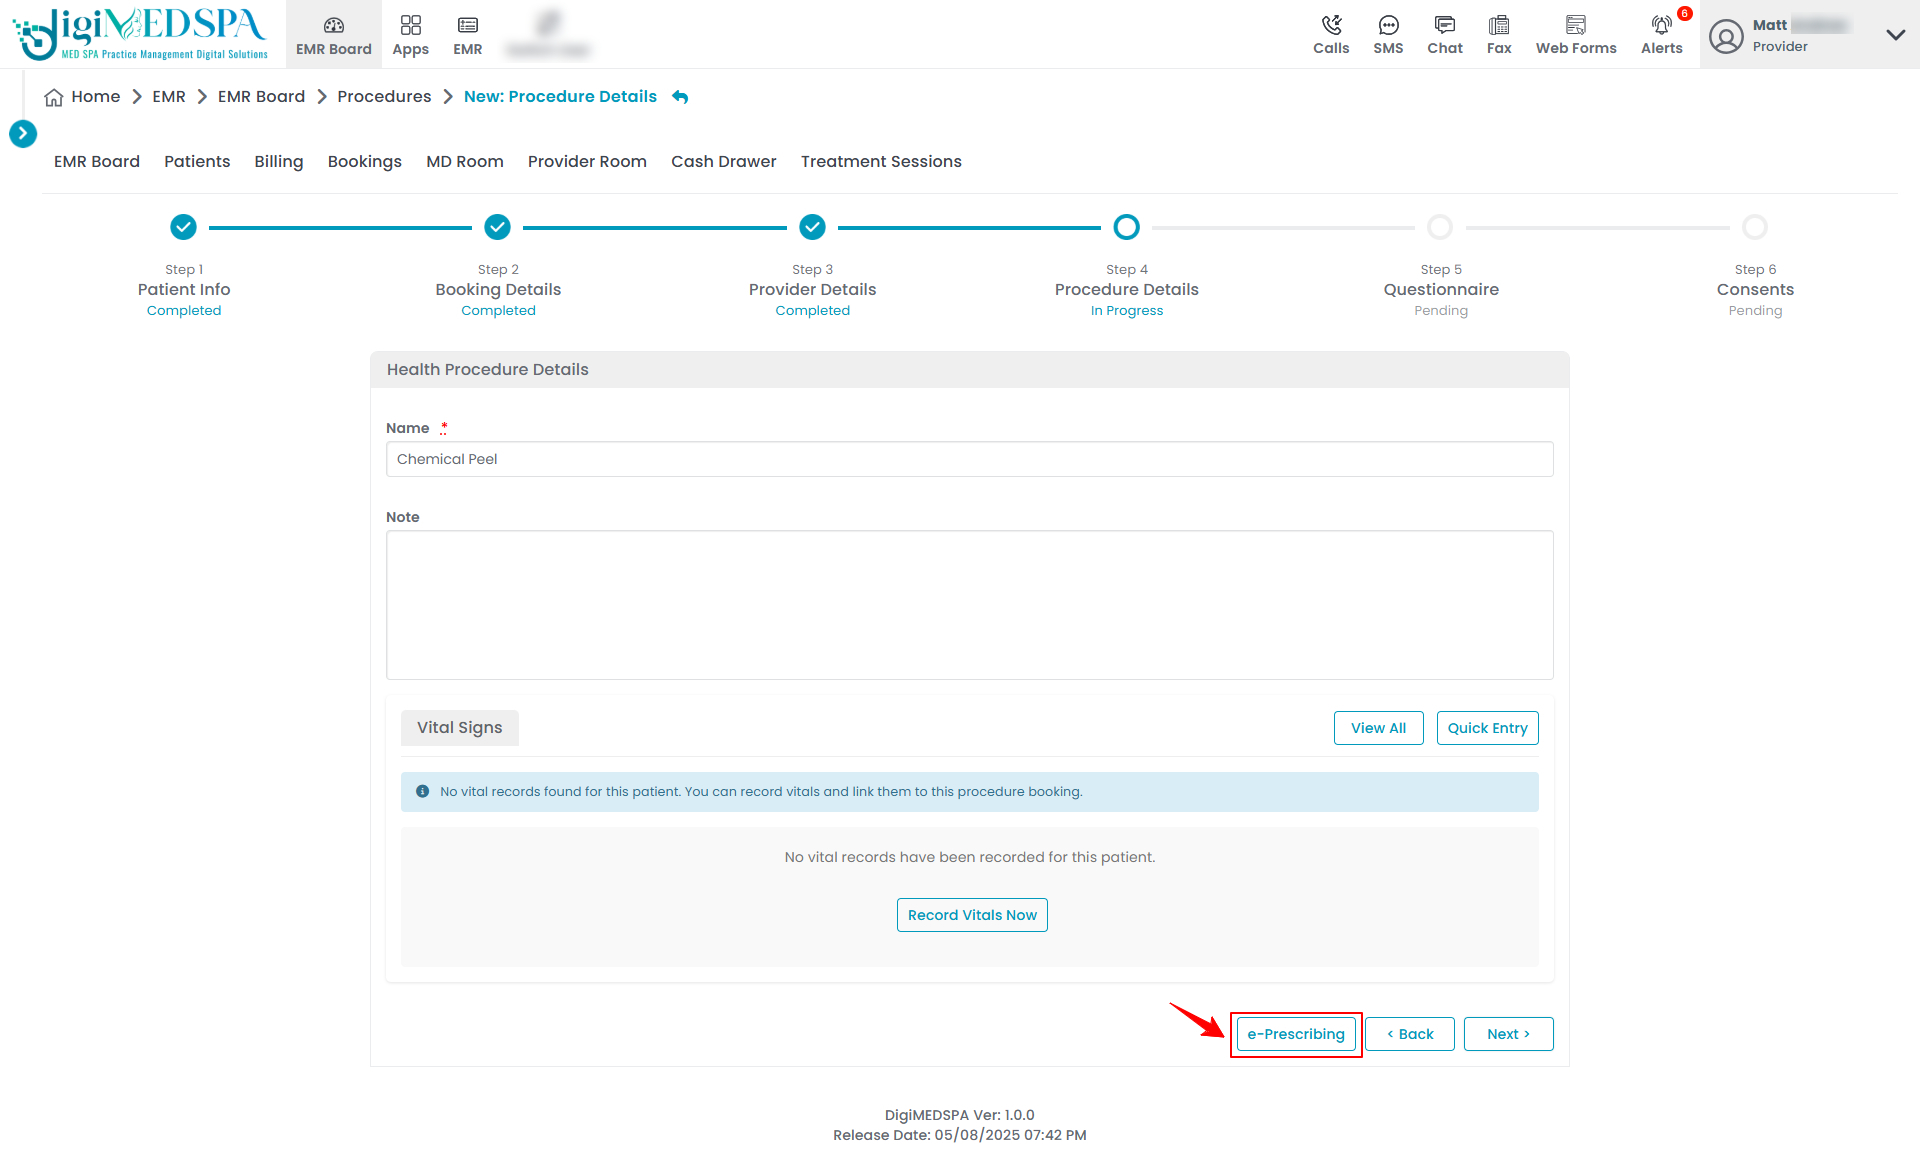
In Step 4 of creating a health procedure, click on the “e-Prescribing” button to prescribe a drug through e-Prescribing.
 NoteFor detailed instructions on health procedure, refer to “Create a Health Procedure” user guide.Continue with the same steps previously outlined in this guide to complete the drug prescription using e-Prescribing.
Part 3 of 6
Prescribe a Drug through e-Prescribing while Creating a Cosmetic Procedure
-
The provider can prescribe a drug through e-Prescribing while creating a cosmetic procedure.
-
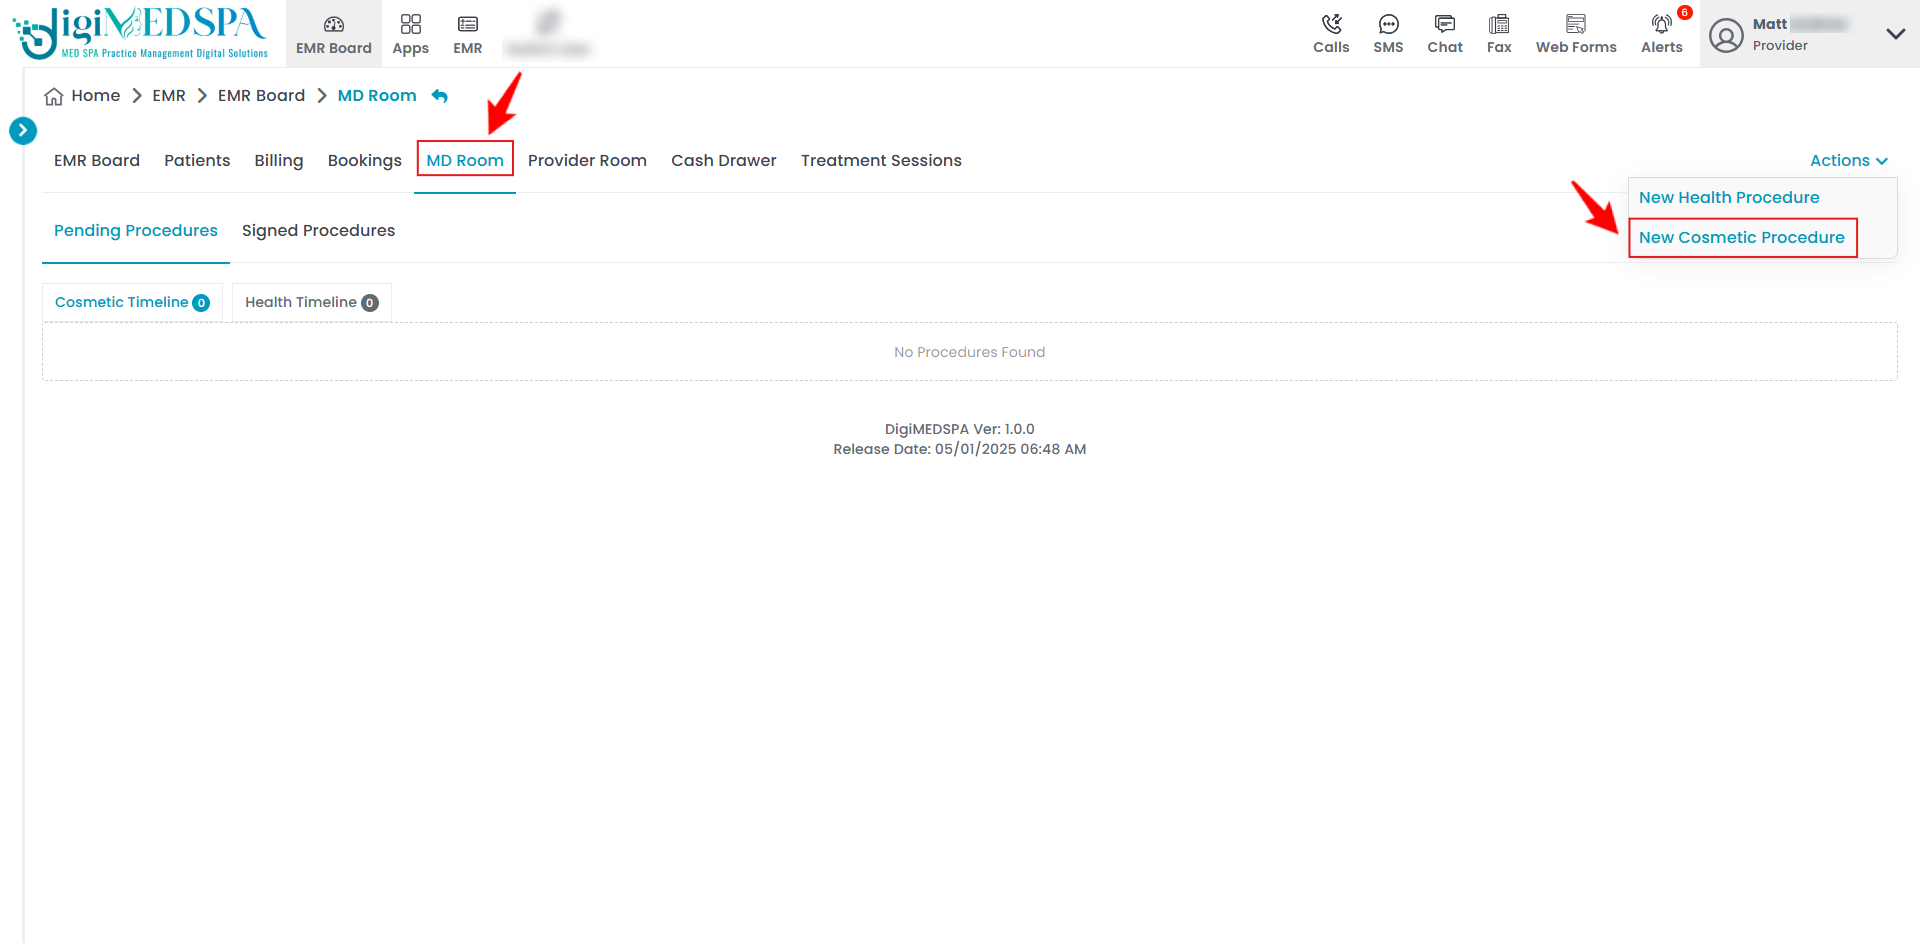
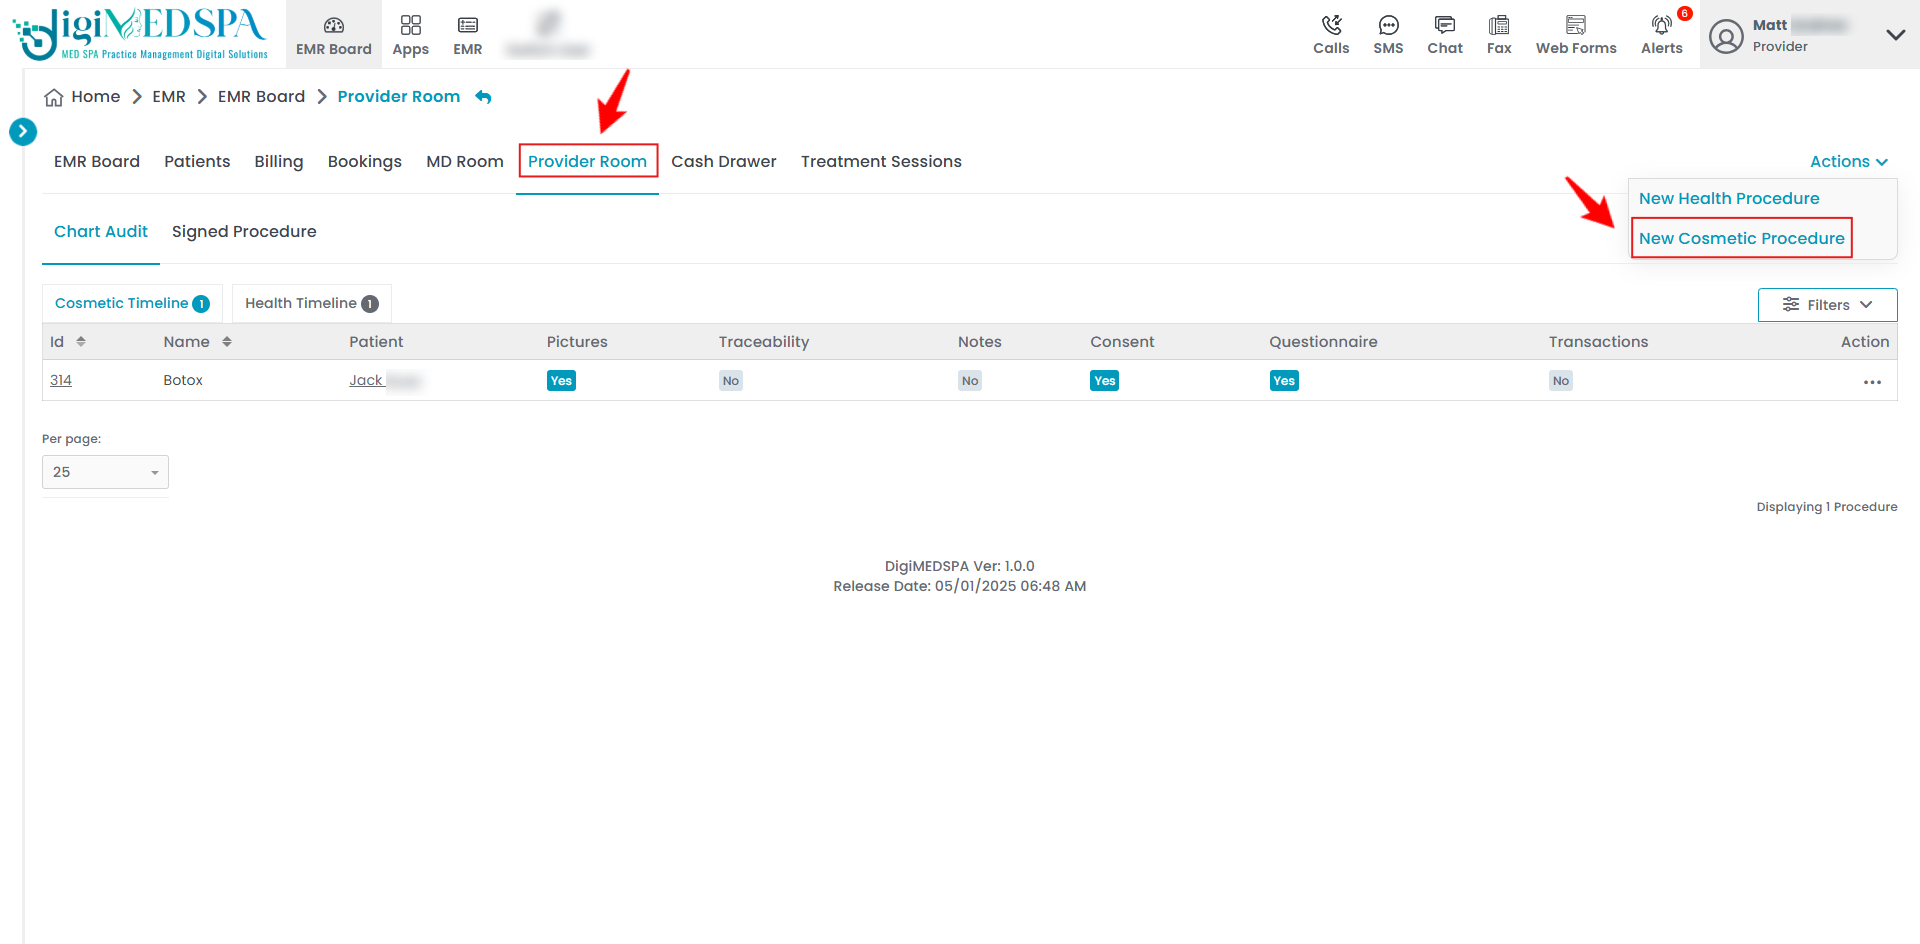
From the EMR Board Tabs, click on the “MD Room” tab, hover over the “Actions” menu, and select “New Cosmetic Procedure” from the dropdown menu.
-
From the EMR Board Tabs, click on the “Provider Room” tab, hover over the “Actions” menu, and select "New Cosmetic Procedure” from the dropdown menu.
-
-
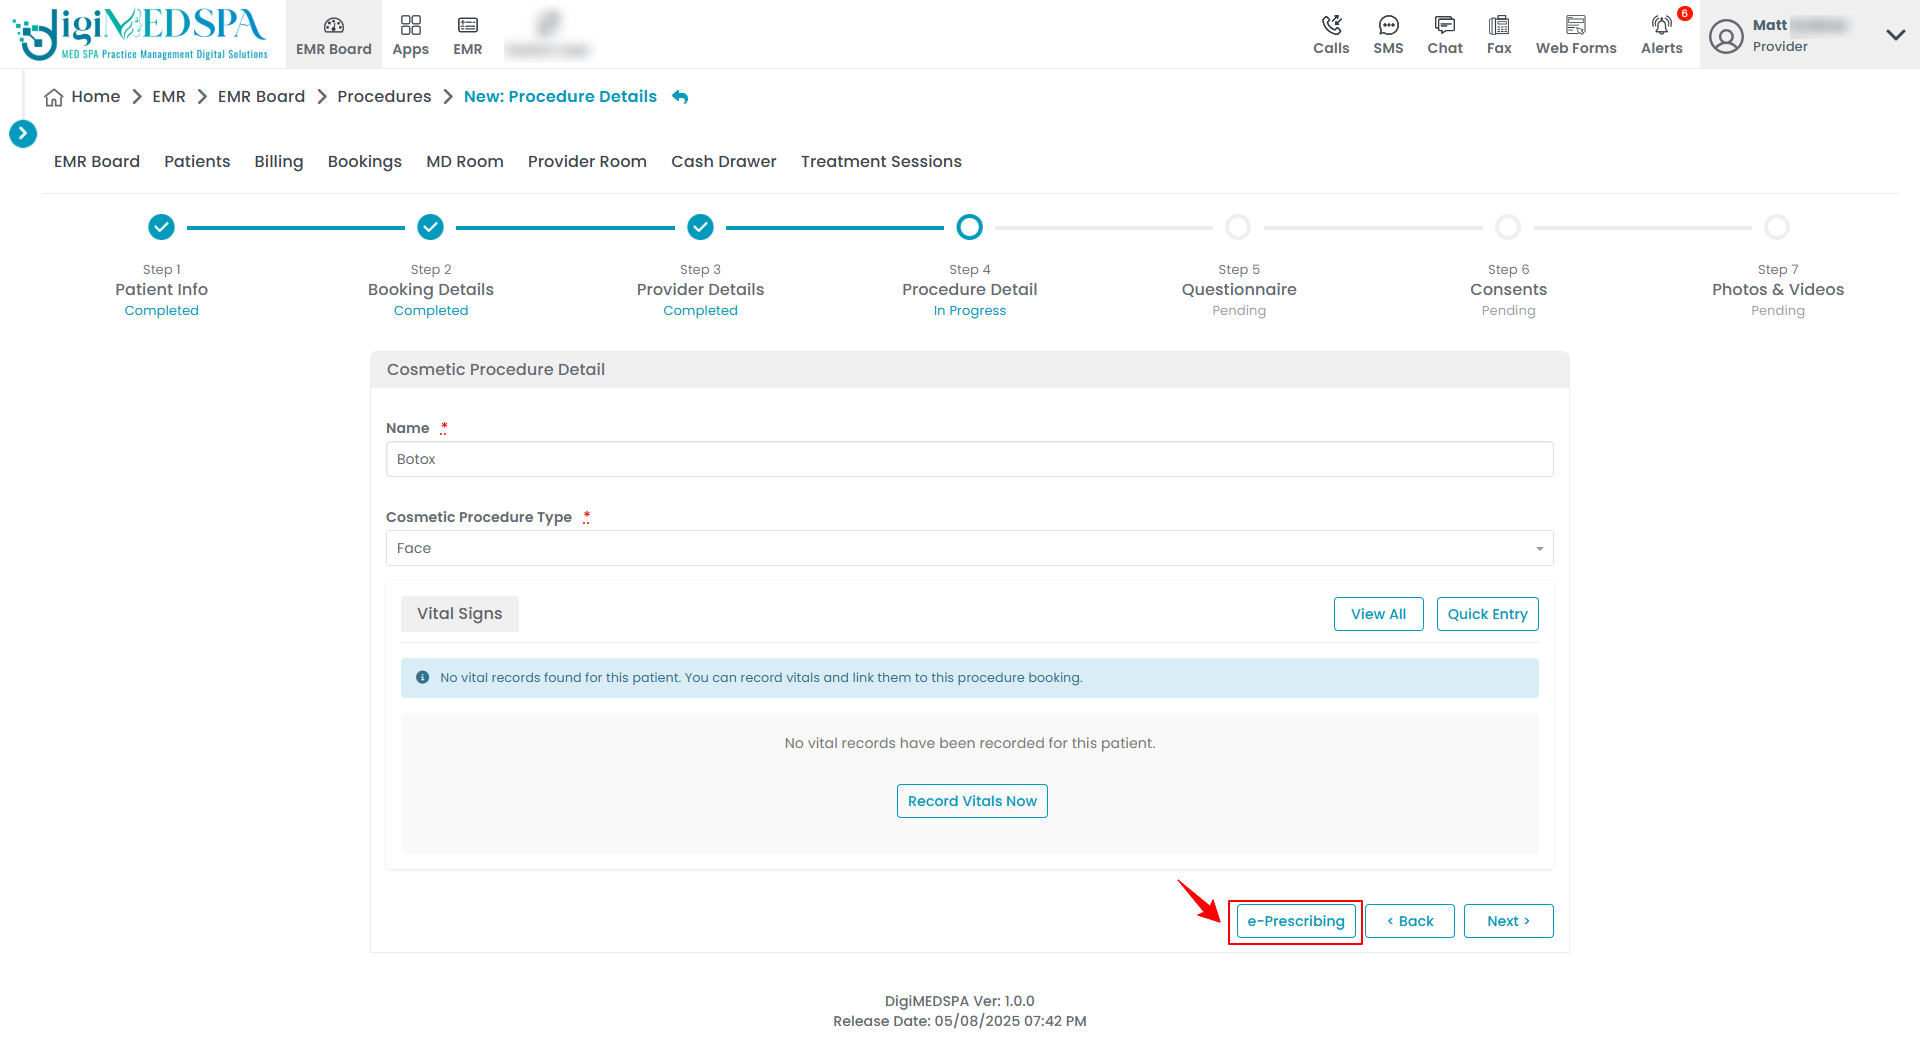
In Step 4 of creating a cosmetic procedure, click on the “e-Prescribing” button to prescribe a drug through e-Prescribing.
 NoteFor detailed instructions on cosmetic procedures, refer to “Create a Cosmetic Procedure” user guide.Continue with the same steps previously outlined in this guide to complete the drug prescription using e-Prescribing.
Part 4 of 6
Prescribe a Drug through e-Prescribing while Charting
-
The provider can prescribe a drug through e-Prescribing while charting.
-
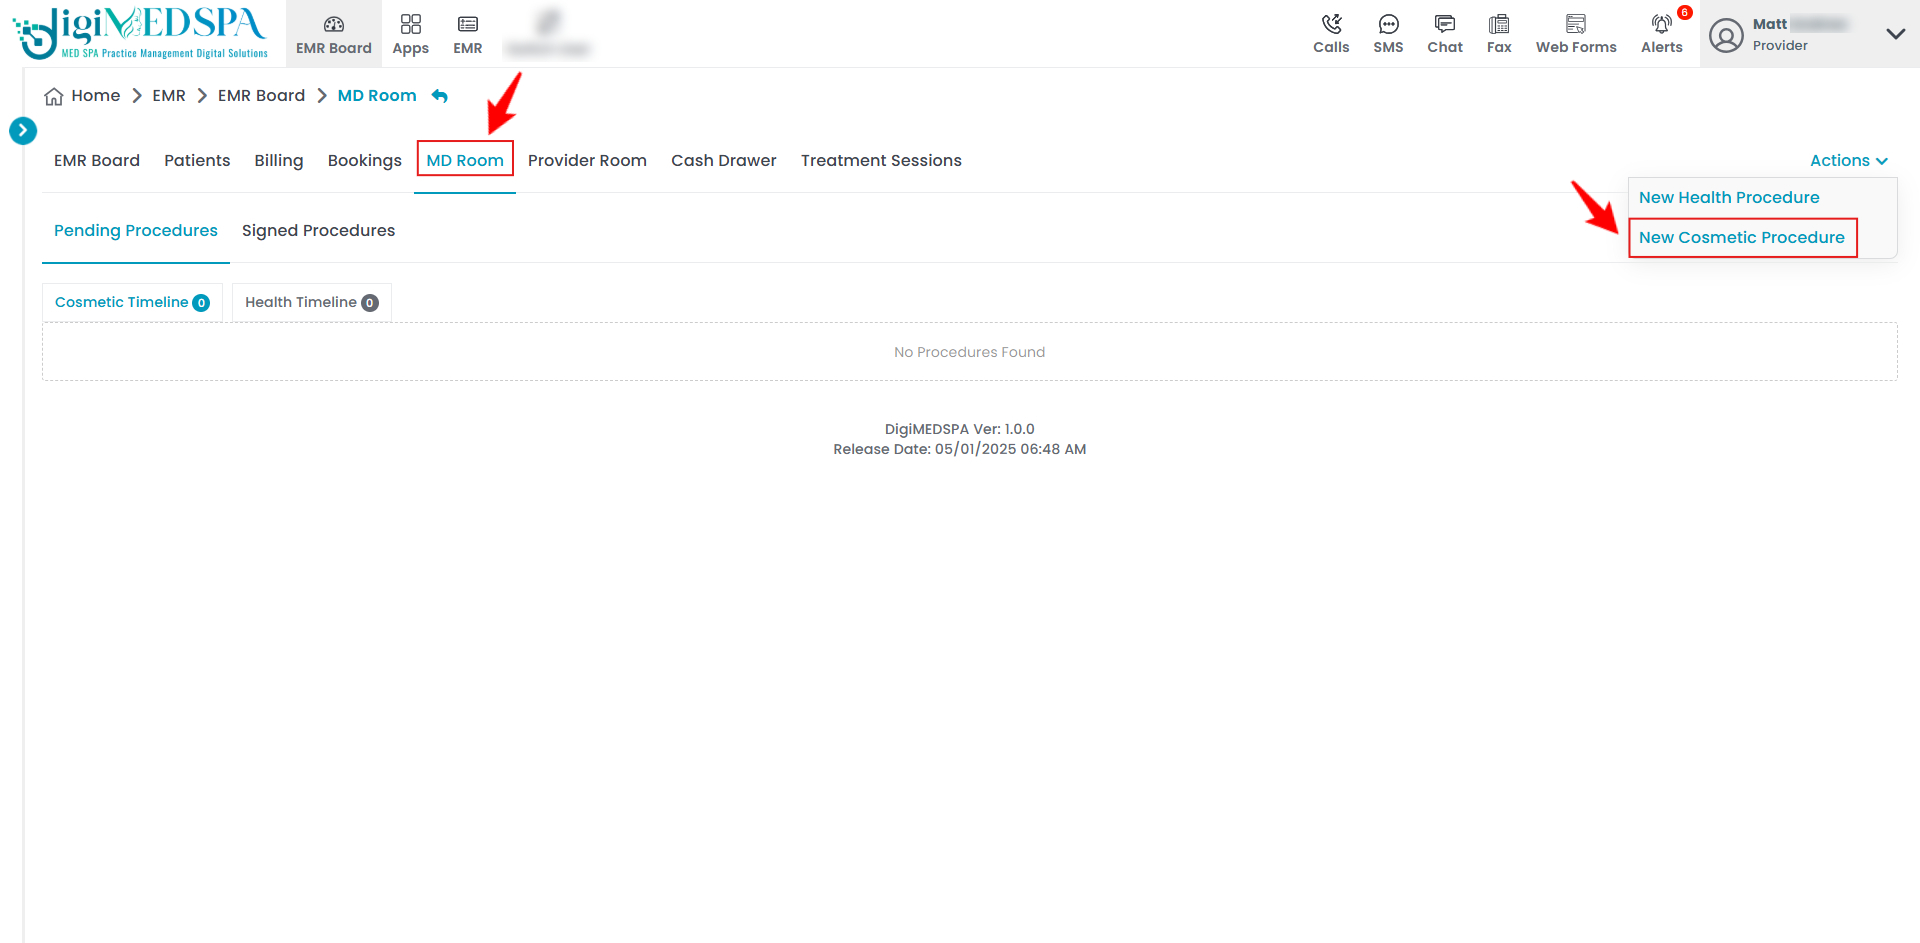
From the EMR Board Tabs, click on the “MD Room” tab, hover over the “Actions” menu, and select “New Cosmetic Procedure” from the dropdown menu.
-
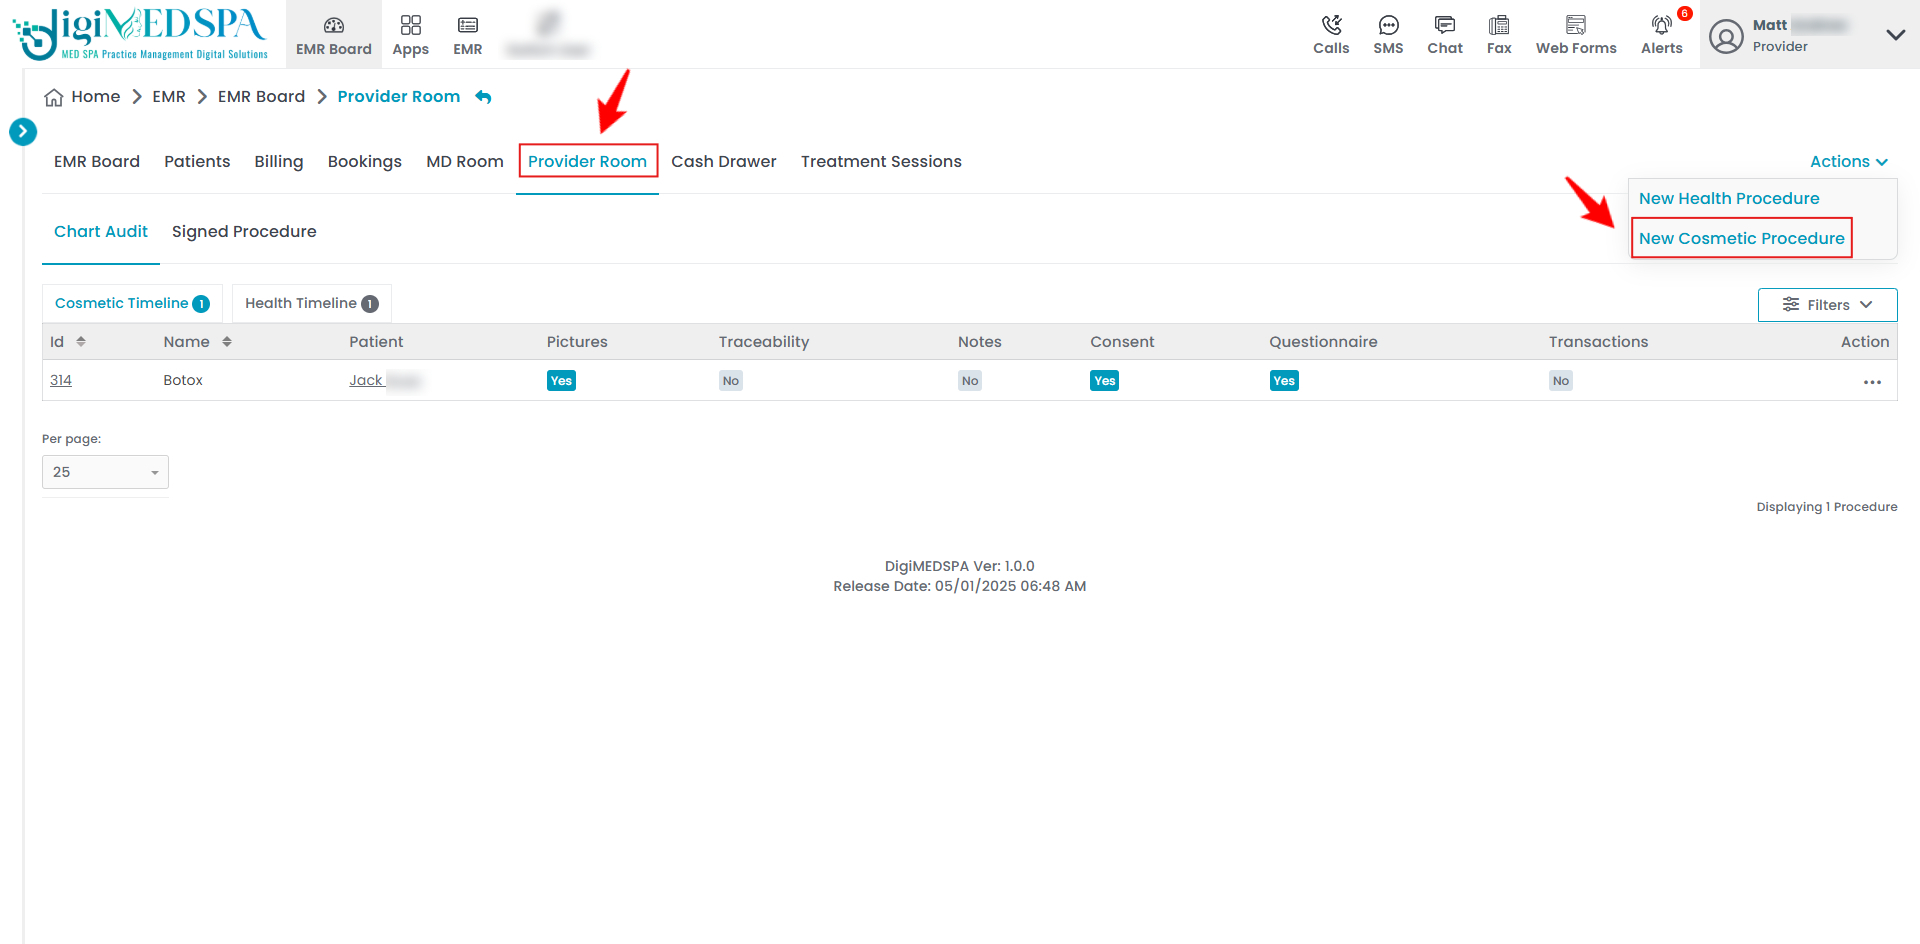
From the EMR Board Tabs, click on the “Provider Room” tab, hover over the “Actions” menu, and select "New Cosmetic Procedure” from the dropdown menu.
-
-
After completing all 7 steps of the cosmetic procedure, proceed to the Charting Screen and click the “e-Prescribing” button located at the bottom of the screen.
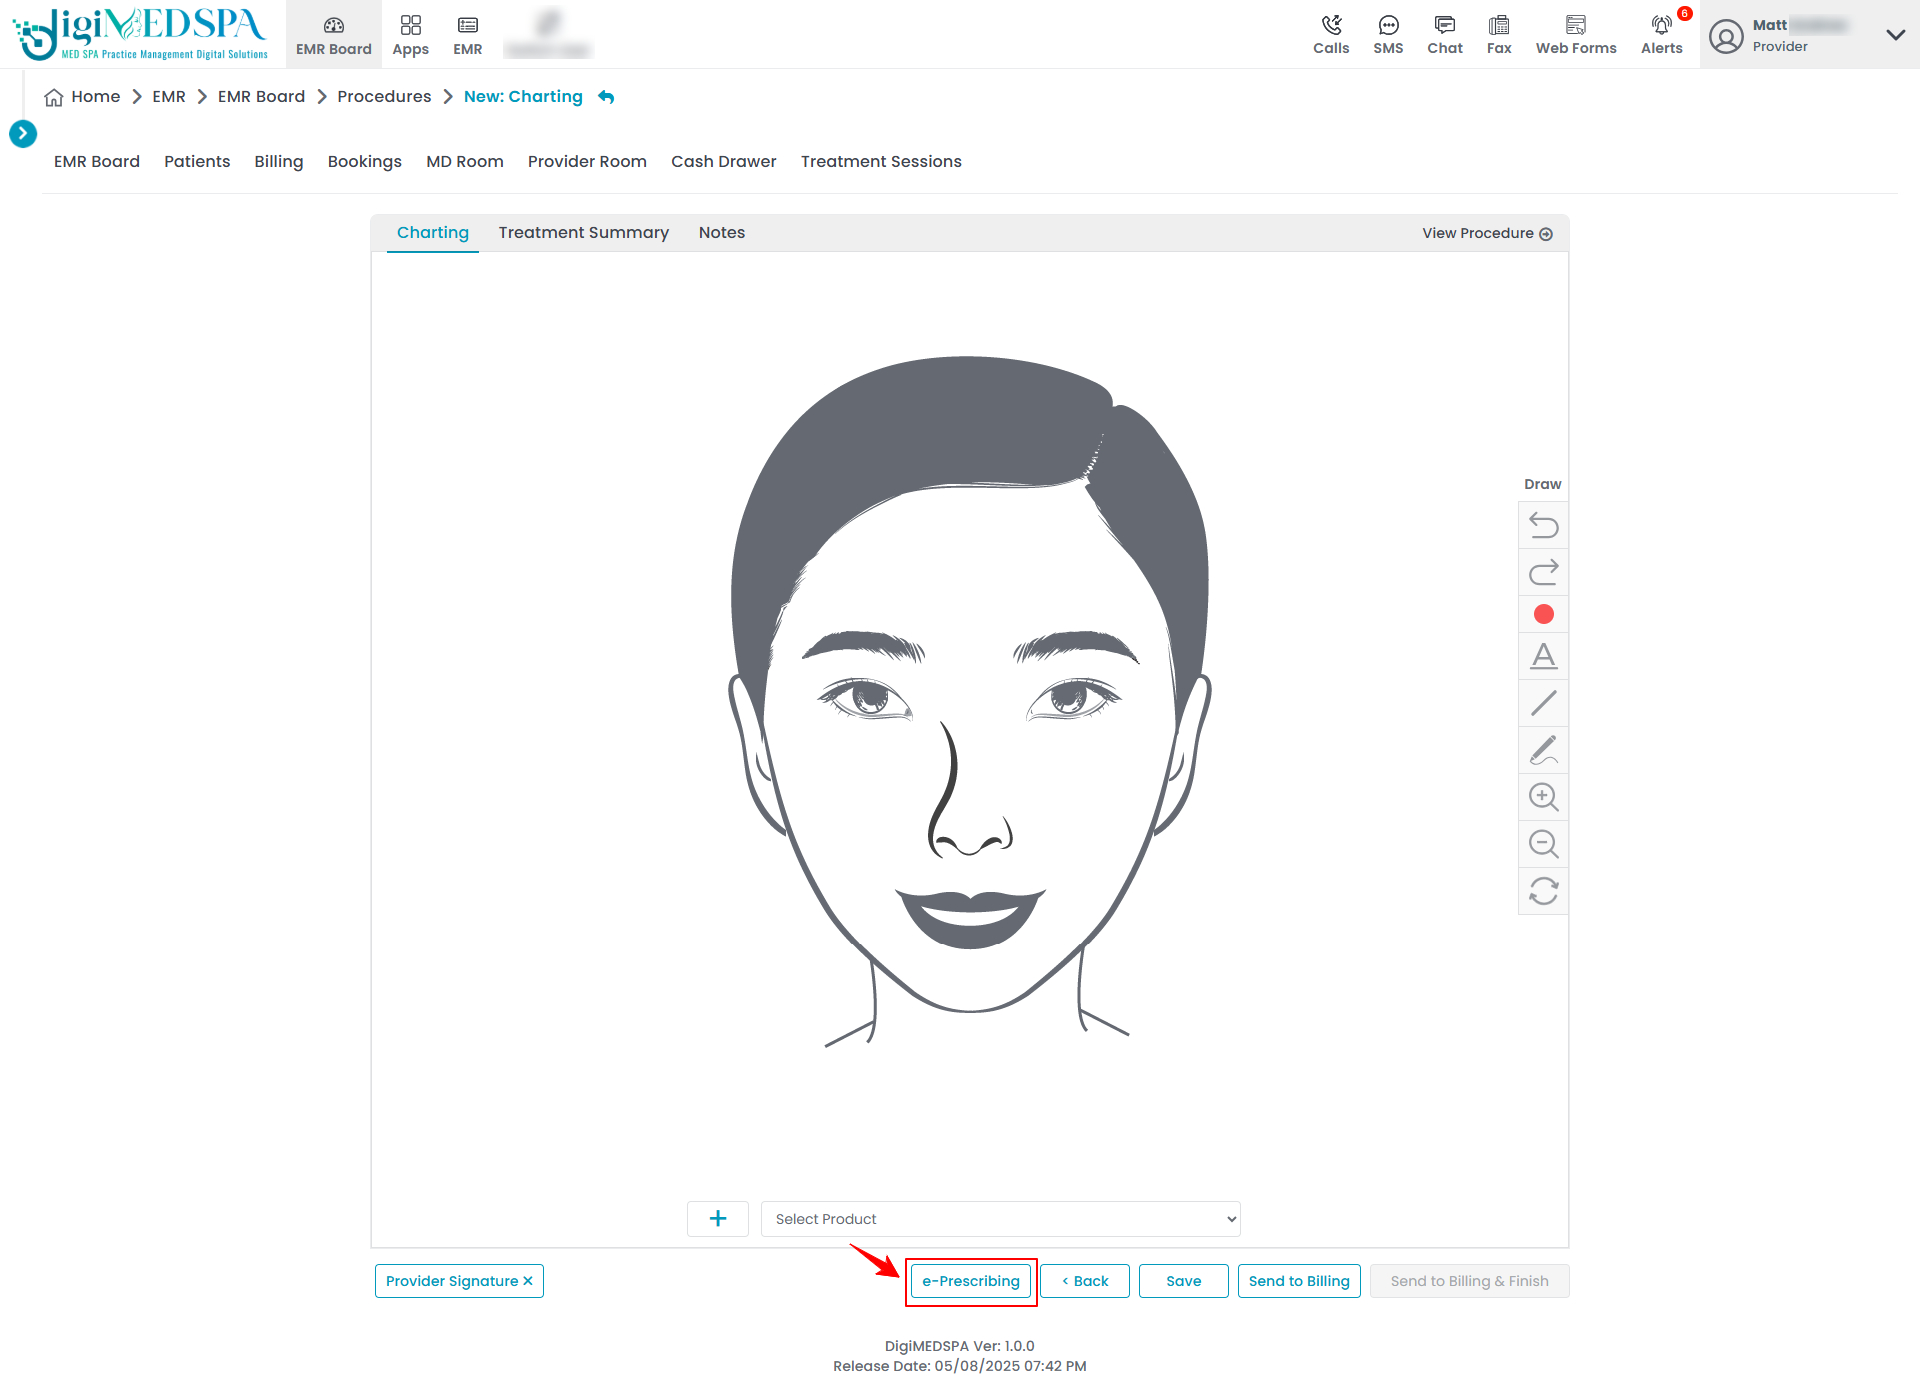 NoteFor detailed instructions on cosmetic procedures, refer to “Create a Cosmetic Procedure” user guide.Continue with the same steps previously outlined in this guide to complete the drug prescription using e-Prescribing.
Part 5 of 6
Prescribe a Drug through e-Prescribing from the Procedure View Screen
-
On the Procedure View Screen, hover over “Actions” on the right side of the screen and select “e-Prescribing” from the dropdown menu.
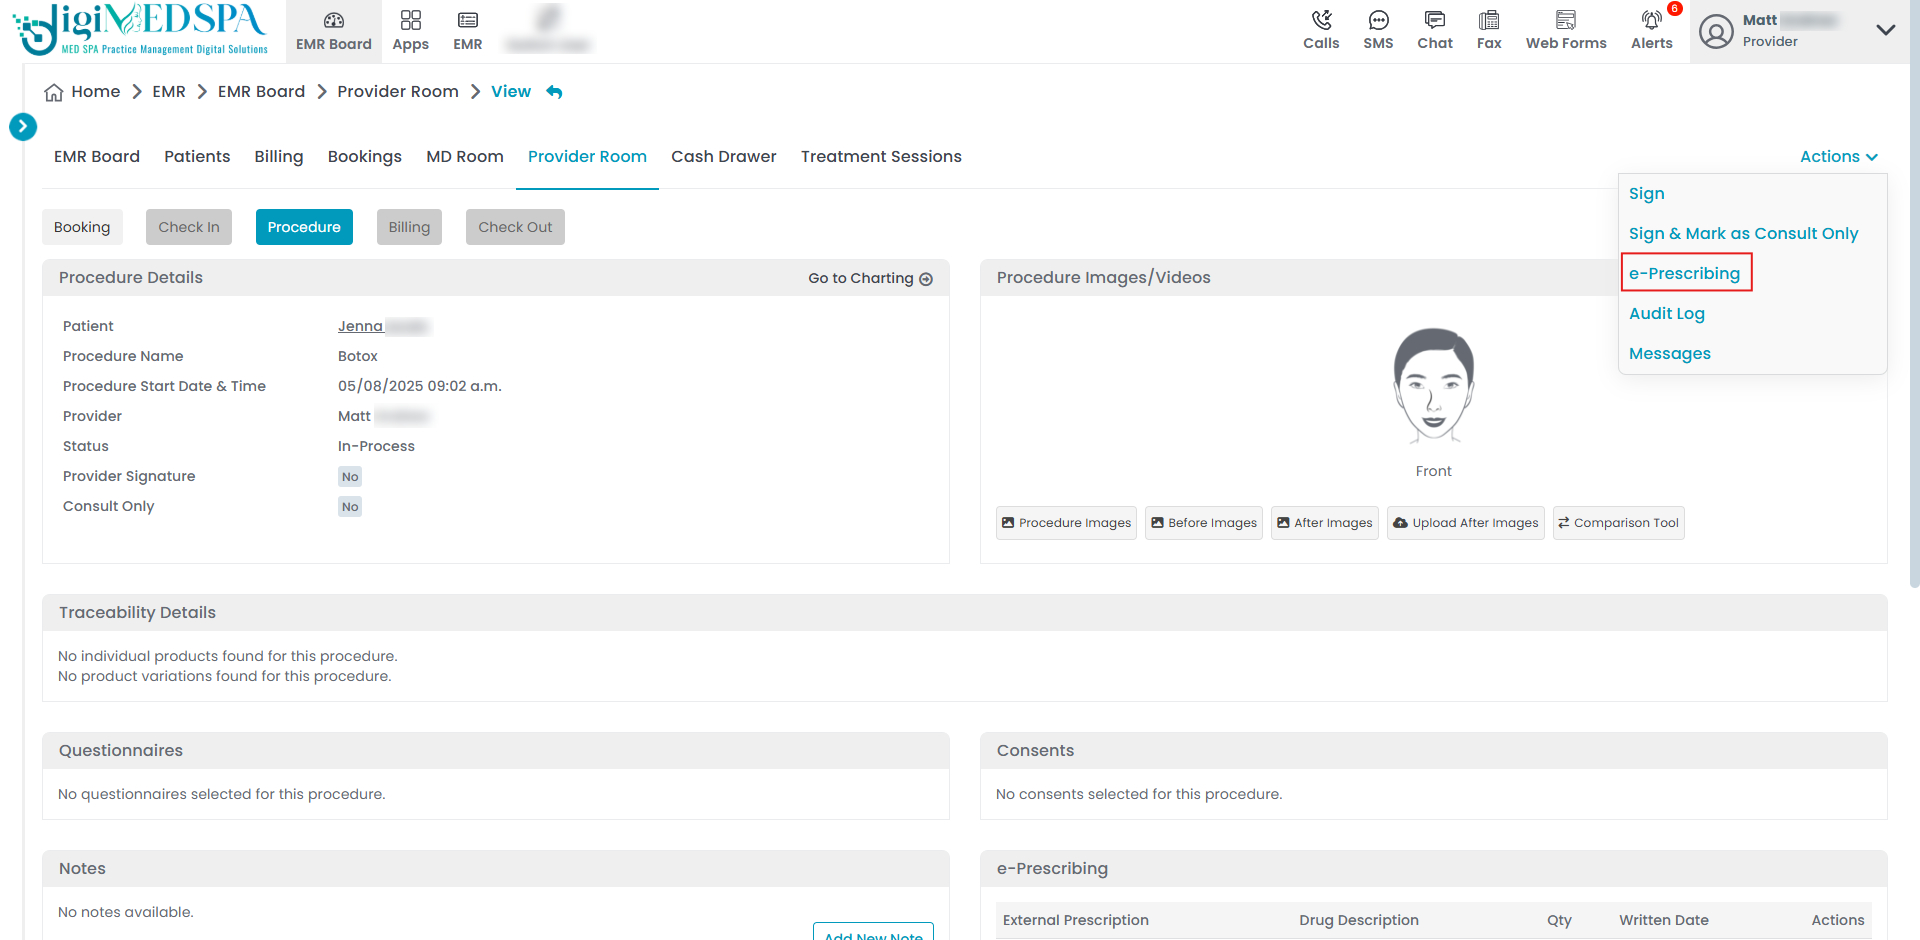 NoteContinue with the same steps previously outlined in this guide to complete the drug prescription using e-Prescribing.
Part 6 of 6
Prescribe a Drug through e-Prescribing from the Patient Profile
-
The provider can prescribe a drug through e-Prescribing from the patient profile.
-
From the EMR Board Tabs, select “Patients.”
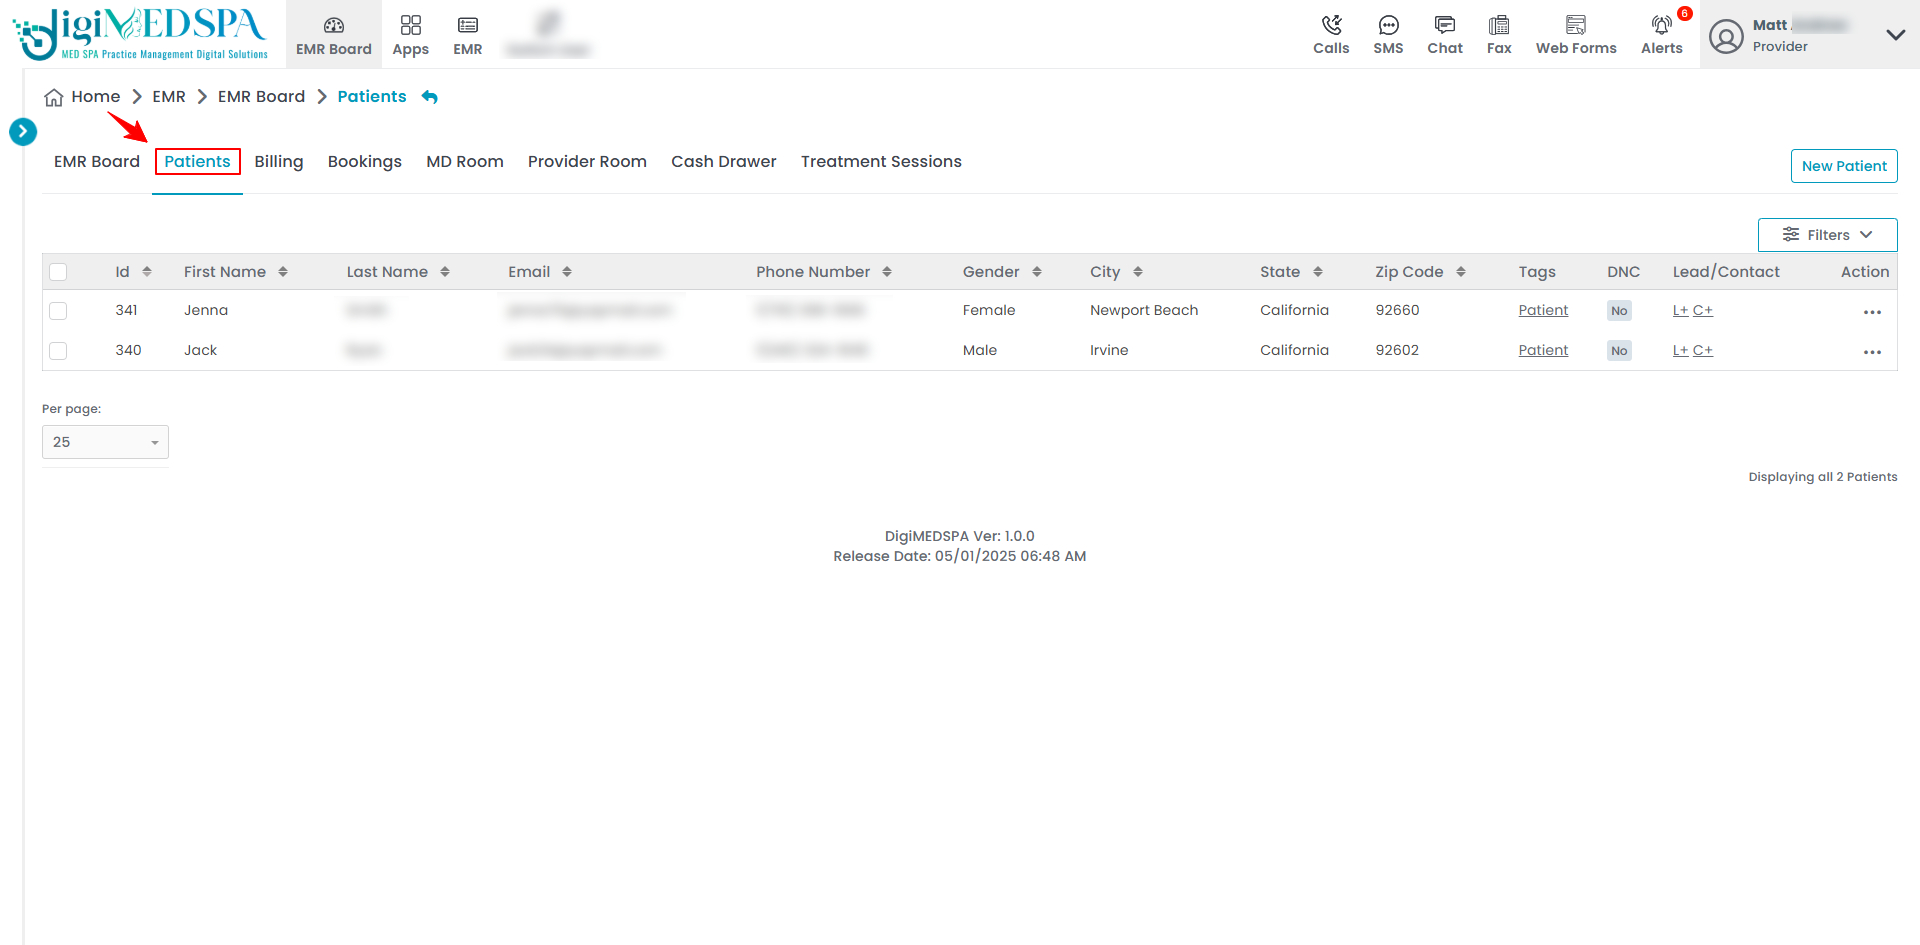
-
-
Click anywhere on the patient's data in the patient listing, or click the three dots under the action column next to the specific patient and select “View Patient Profile.”
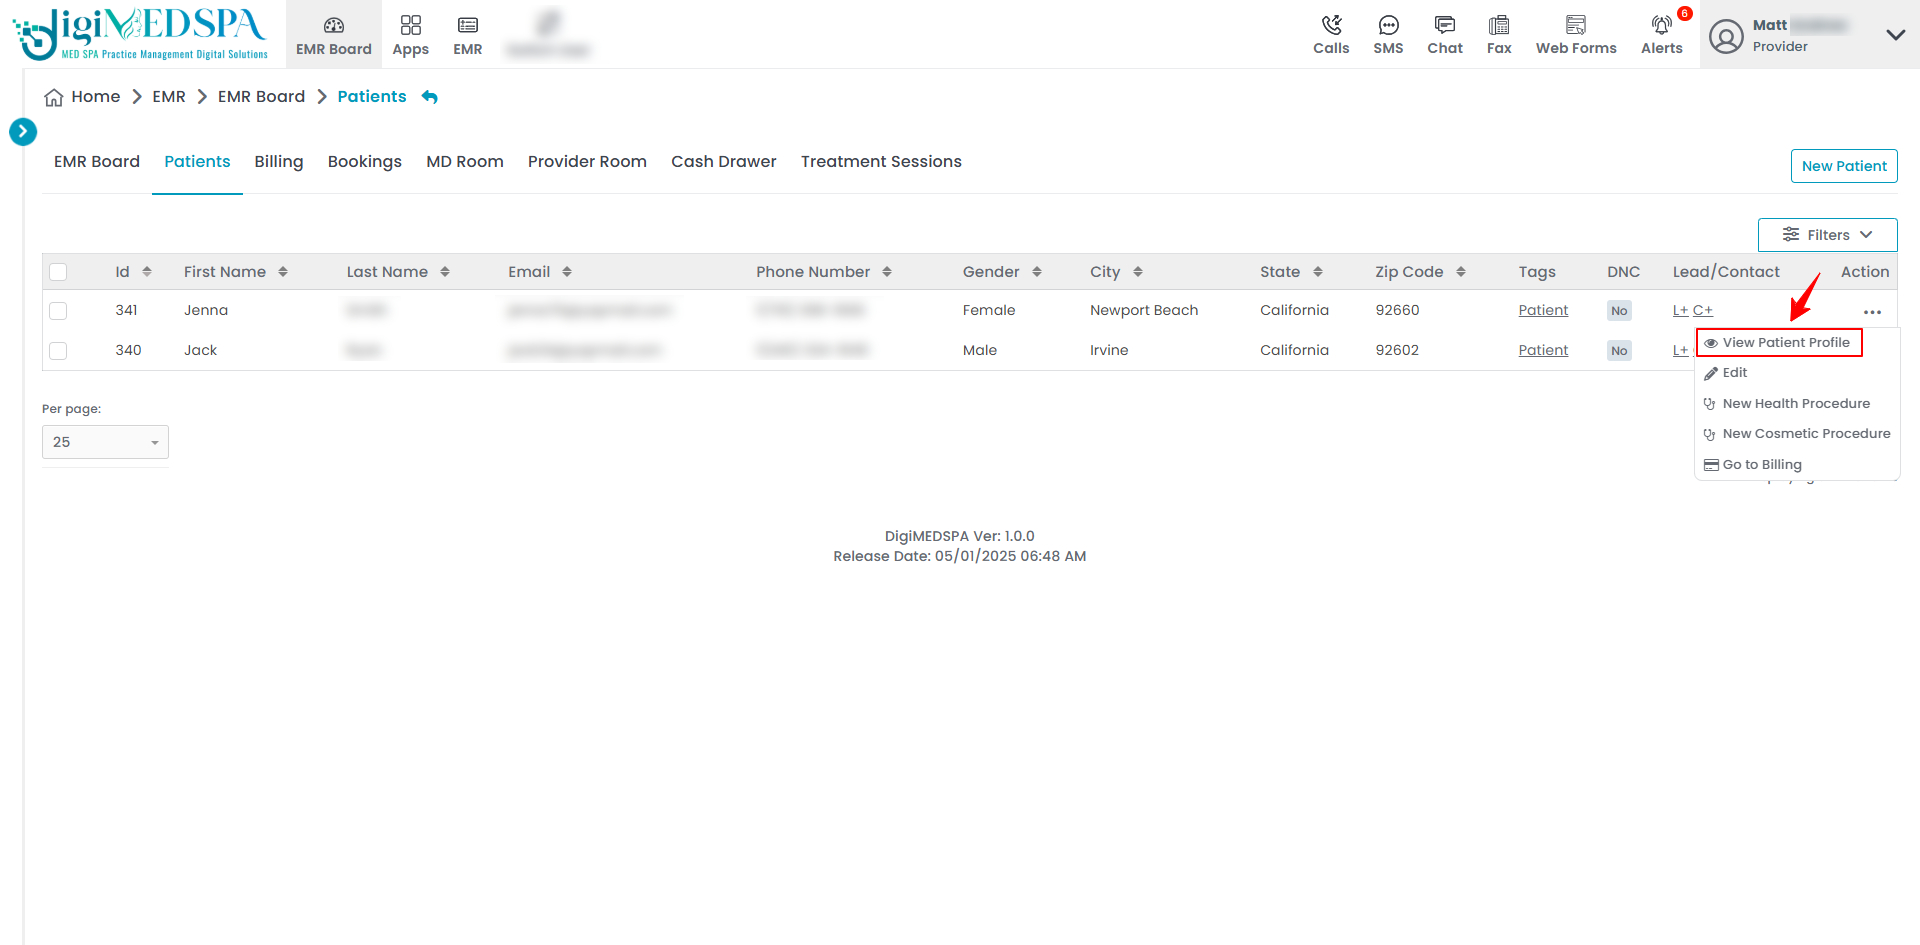
-
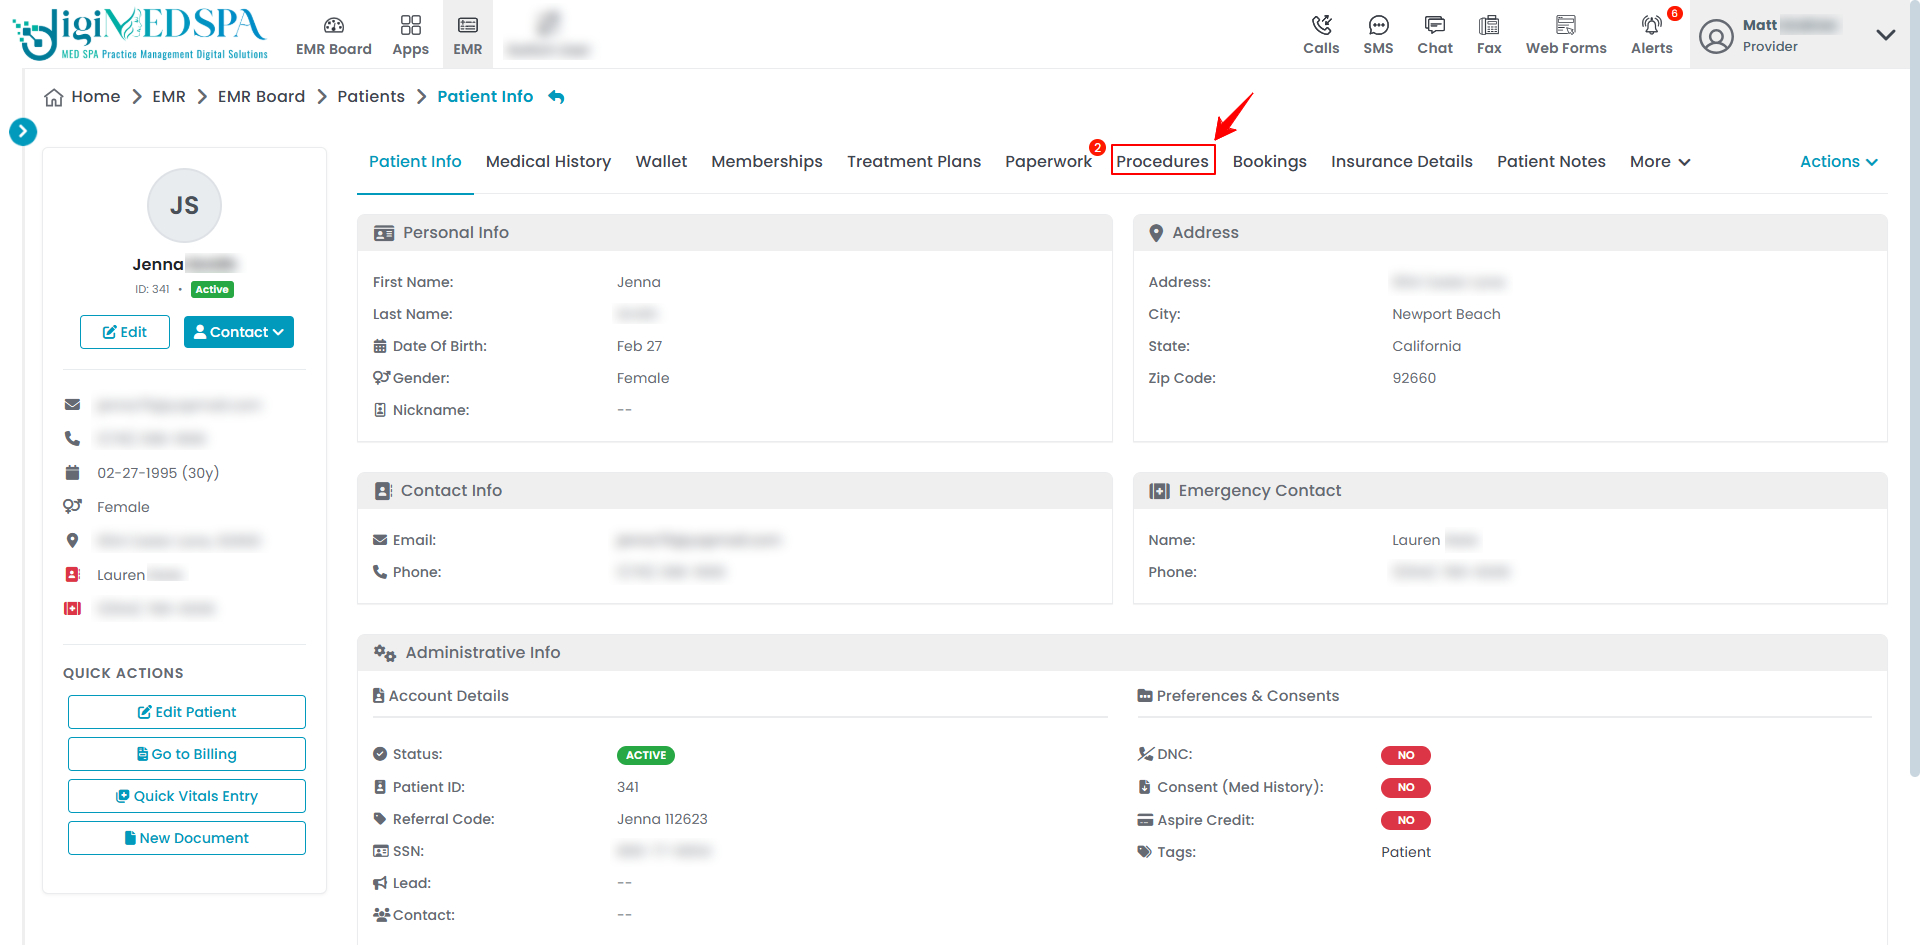
On the Patient Profile, users can access comprehensive patient details. To view procedures, simply click on the “Procedures” tab.
-
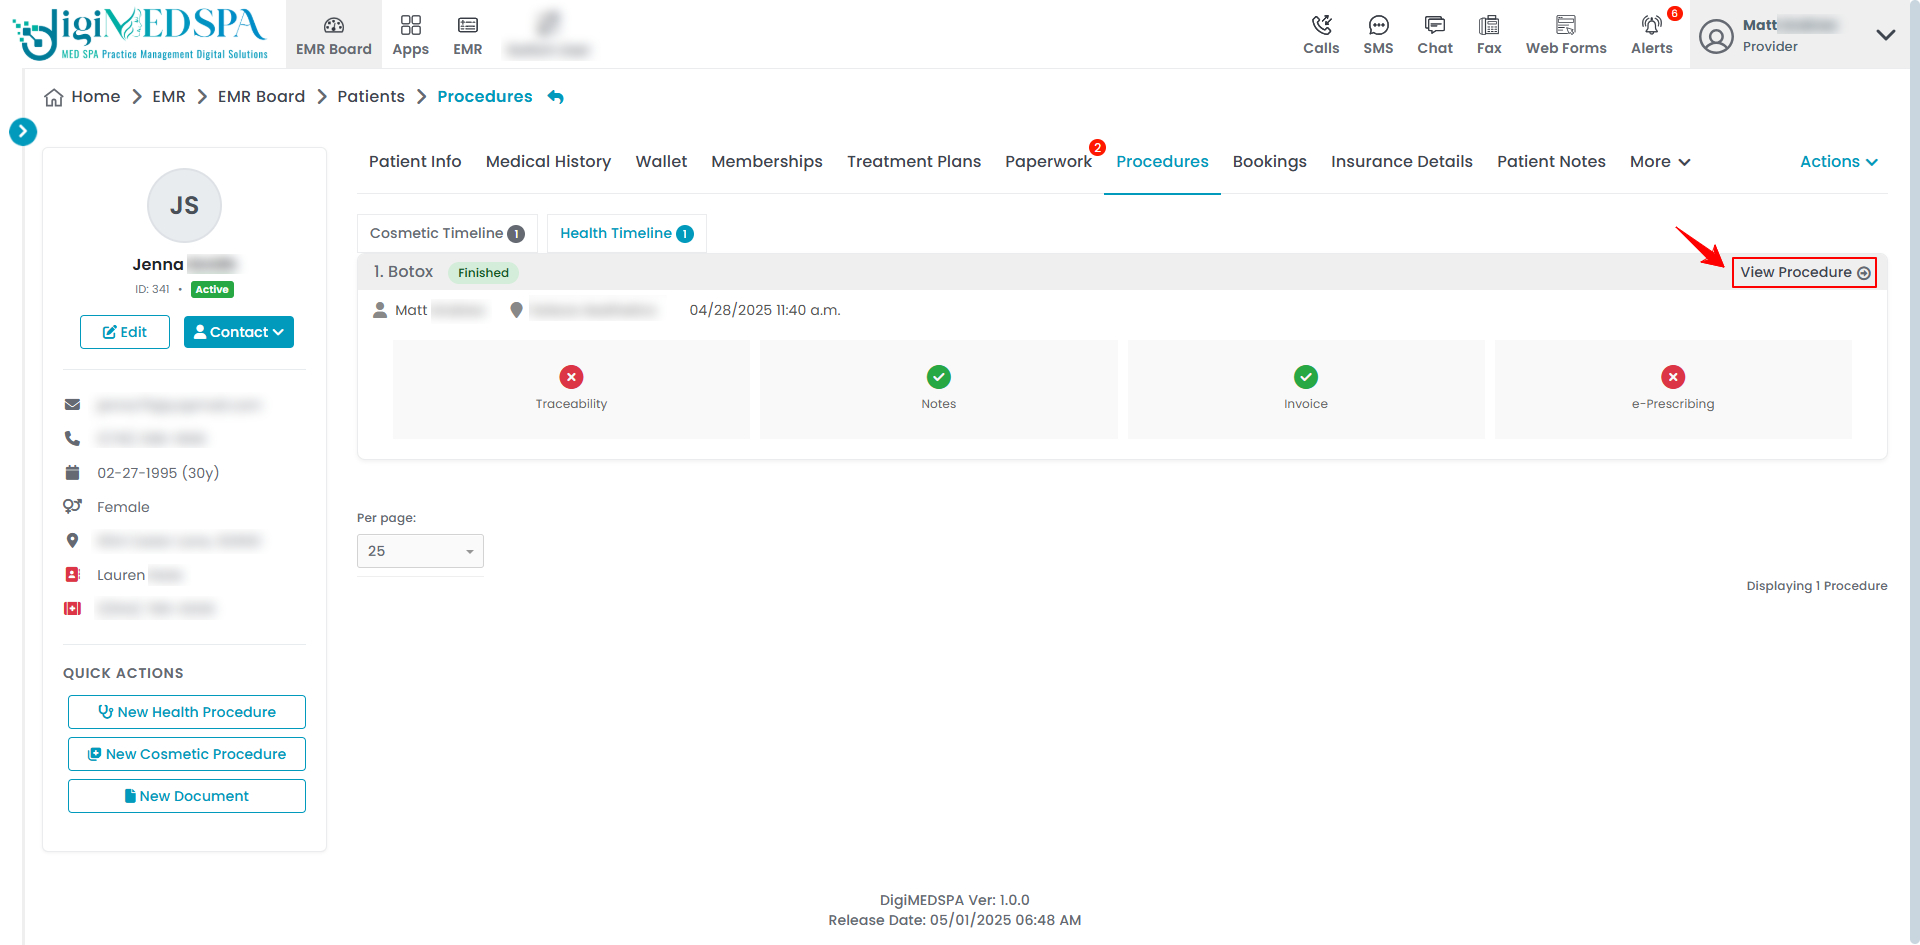
For any health or cosmetic procedure, click on “View Procedure” to open and review the details.
-
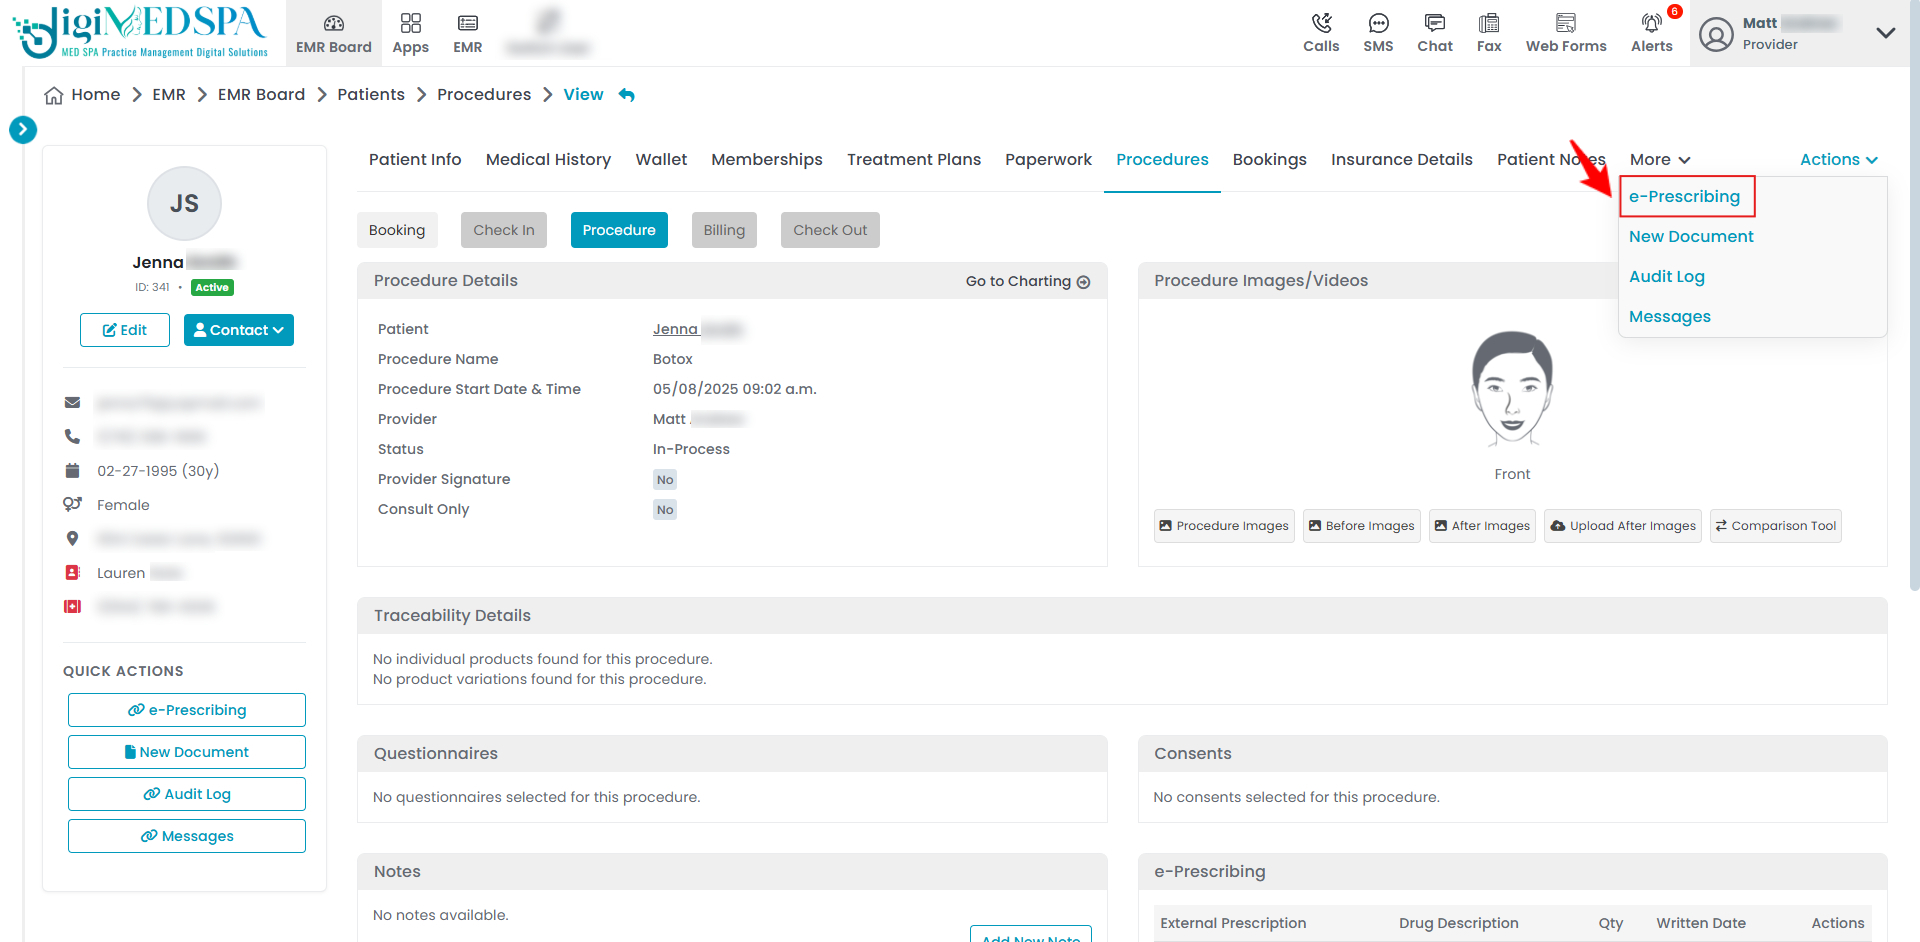
The procedure details will be displayed hover over the “Actions” menu on the right side of the screen and select “e-Prescribing” from the dropdown menu.
 NoteContinue with the same steps previously outlined in this guide to complete the drug prescription using e-Prescribing.
You’re all set
That’s every step of “Prescribe a Drug through e-Prescribing”.