

 DigiMEDSPA EMR
 DigiMEDSPA CONNECT ™
Create a Procedure Through Single Page View
The DigiMEDSPA EMR Portal allows you to create two types of procedures: Cosmetic and Health. Both procedure types can be created using either Multi Page View or Single Page View. This user guide provides detailed instructions on how to efficiently create a procedure using the Single Page View option.
Understanding Terminologies
Single Page View
This option allows you to complete the entire procedure creation process within a single form. All required fields are displayed on one page, so you can fill in details and upload required files without navigating between pages.
Multi Page View
This option guides you through the procedure creation process step by step, across multiple pages. Each page contains a specific section of the form, making it easier to complete detailed entries in a structured manner.
Access this link: https://digimedspa.com/ap2/procedures
Create a Procedure Through Single Page View
- The user can create a procedure from three entry points:
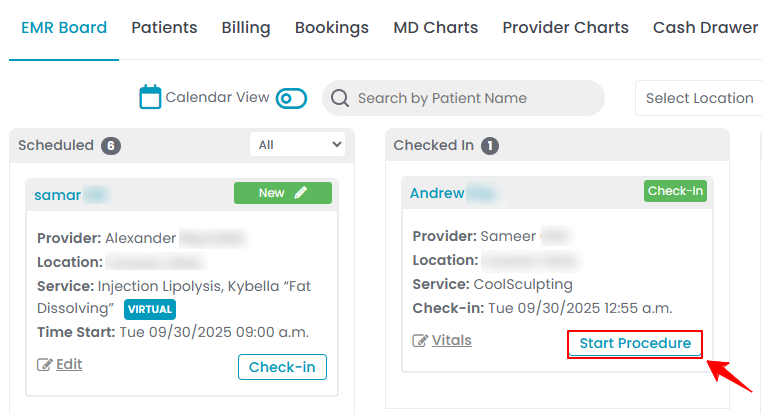
- From the EMR Board select a booking that is in the ‘’Checked In’’ step then press the ‘’Start Procedure’’ button to move that booking to the ‘’In Procedure’’ phase.

- Here, the user can choose to create either a “Multi Page View” procedure or a “Single Page View” procedure. Click on the “Single Page View” option.
- From the EMR Board tabs, click on “Patients.”
- From the patient list, click on three dots under the action column and select "Express Procedure" for the specific patient.
- Alternatively, you can click “View Patient Profile” from the three dots in the Action column. Within the patient profile, every page includes a “New Procedure” button in the Quick Actions, located at the bottom left under the patient’s information, then choose “Single Page View.”
- From the EMR Board tabs, click on “Bookings.”
- From the list of all bookings, click on three dots under the action column and select "New Procedure" for the specific booking, then choose “Single Page View.”Note: If patient information and booking details have already been entered, they will automatically appear in the procedure form.
- From the EMR Board select a booking that is in the ‘’Checked In’’ step then press the ‘’Start Procedure’’ button to move that booking to the ‘’In Procedure’’ phase.
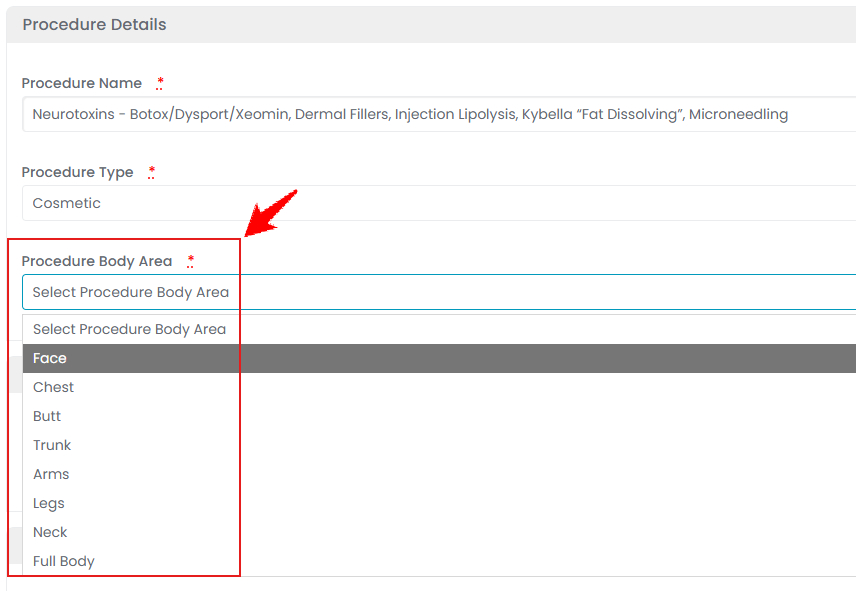
- In the Procedure Details section, enter the procedure name. This field will be auto-filled based on the booking details but can be edited for you to provide a more suitable name for easier identification.
- Select the Procedure Type as either Cosmetic or Health, based on your preference. Then, choose the Procedure Body Area from the dropdown menu, which includes options such as Face, Chest, Butt, Trunk, Arms, Legs, Neck, and Full Body. Select the appropriate type based on the area where the procedure will be performed.
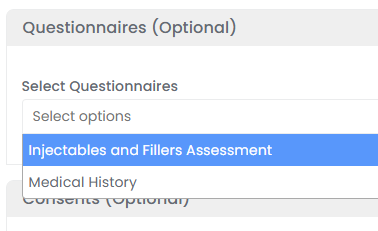
- The questionnaires linked to the selected service(s) will appear in the Questionnaires section. Select the relevant questionnaires to attach them to the procedure.
- After selecting the questionnaires, the “Save & Fill Questionnaire” button will appear at the bottom of the form. If the patient has already checked in at the Med Spa facility, you can click this button to have them complete the questionnaires on-site. Alternatively, the patient can log in to their Patient Portal and fill out the questionnaires before the procedure.
- If you click the “Save & Fill Questionnaire” button, you will be directed to the Patient Questionnaire Screen. Click “Fill Questionnaire”, complete the form, and then click “Submit” to proceed.Note: Filling the selected questionnaire (s) before beginning the procedure is mandatory.
- After selecting the questionnaires, the “Save & Fill Questionnaire” button will appear at the bottom of the form. If the patient has already checked in at the Med Spa facility, you can click this button to have them complete the questionnaires on-site. Alternatively, the patient can log in to their Patient Portal and fill out the questionnaires before the procedure.
- The consent forms linked to the selected service(s) will appear in the Consents section. Select the relevant consent forms to attach them to the procedure.
- After selecting the consent forms, the “Save & Fill Consent” button will appear at the bottom of the form. If the patient has already checked in at the Med Spa facility, you can click this button to have them sign the consent form(s) on-site. Alternatively, the patient can log in to their Patient Portal and fill out the consent form before the procedure.
- If you click the “Save & Fill Consent” button, you will be directed to the Patient Consent Screen. Click “Sign Consent”, fill and sign the form, then click “Submit” to proceed.Note: Signing the consent forms before beginning the procedure is mandatory.
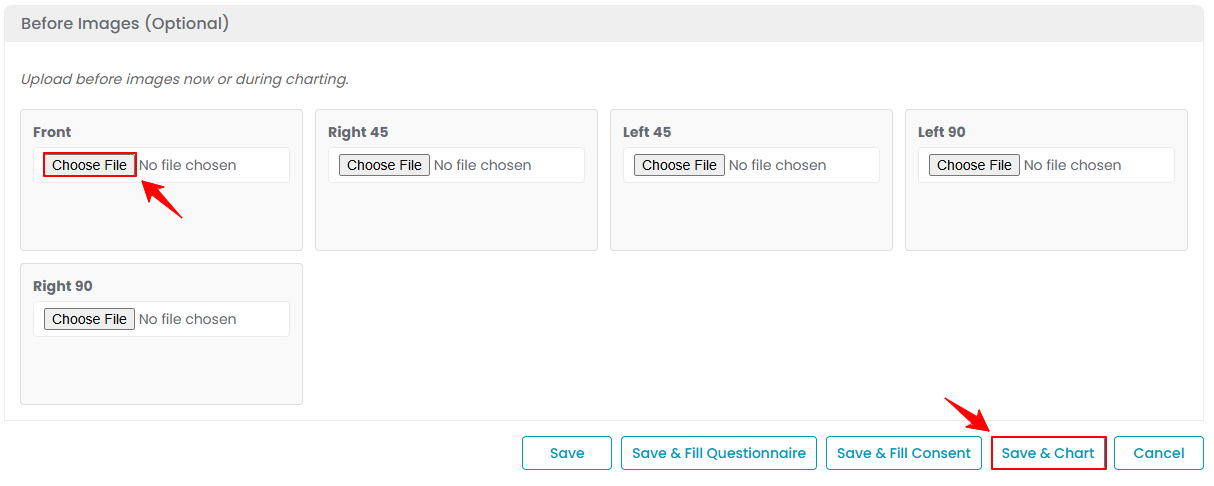
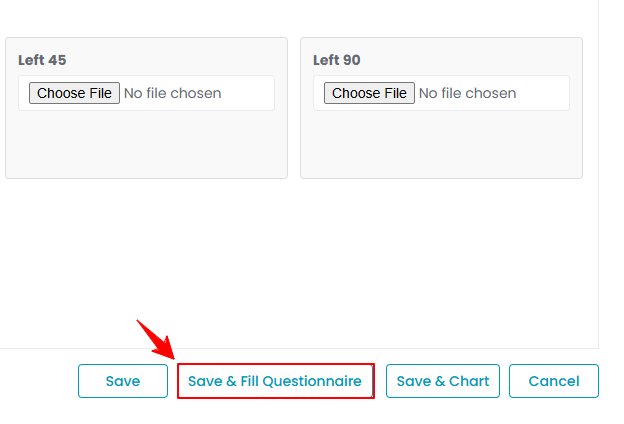
- In the final section, click “Choose File” to upload photos of the procedure area, ensuring all required angles are covered: Front, Right 45°, Left 45°, Right 90°, and Left 90°. These images are essential for treatment charting and injection markings. After uploading and selecting the images, click “Save & Chart” to save the procedure.
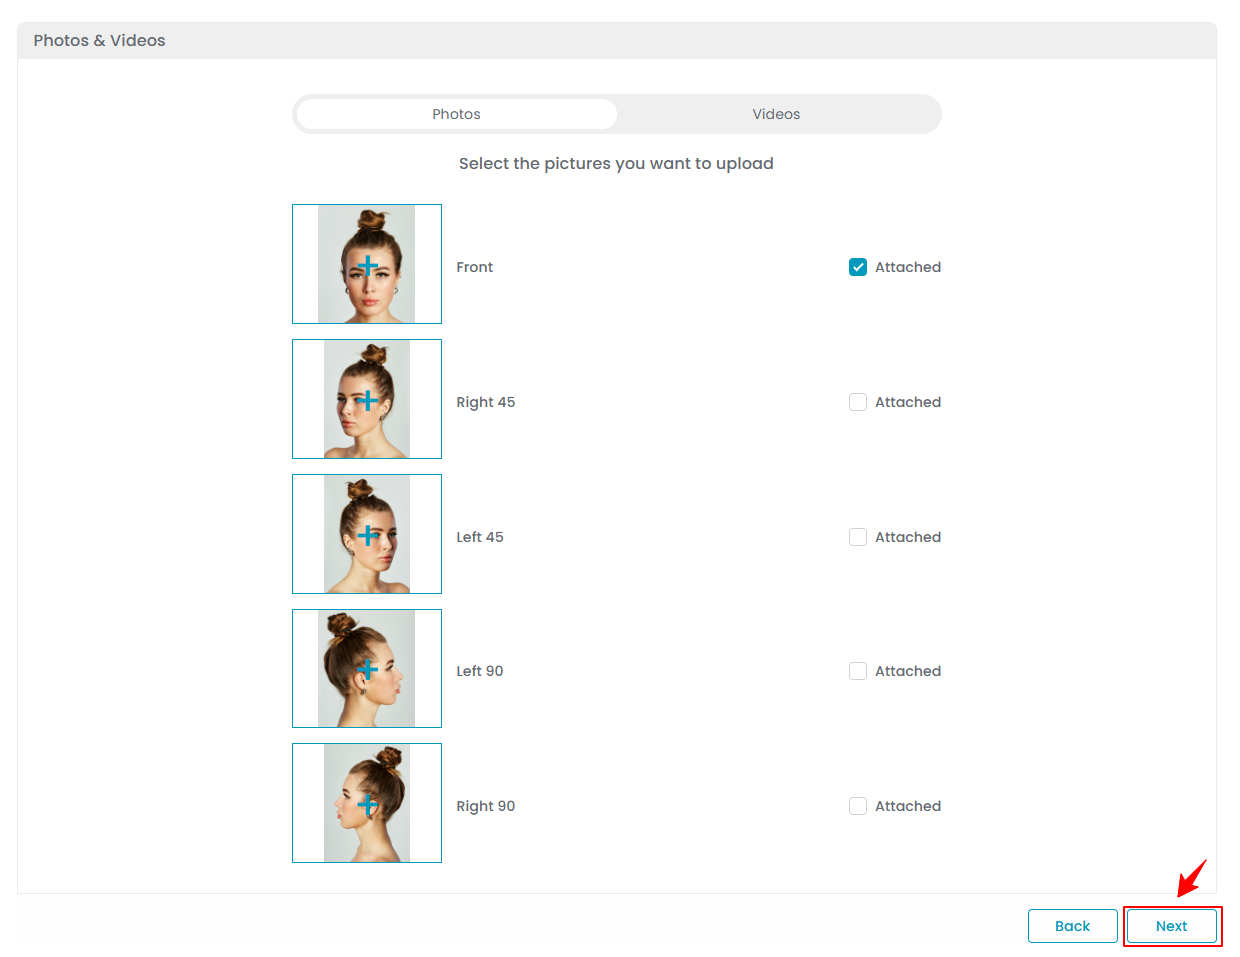
- Next, you can view and review the uploaded images on the screen. If needed, you can also change or upload more images from this section. Select the images you want to use for charting, then click “Next.”
- The “Marking Screen” will open, allowing the user to precisely chart drugs (products) and injection markings on the selected image for use during the procedure. Users can also utilize the drawing tools on the marking screen to annotate or highlight treatment areas.
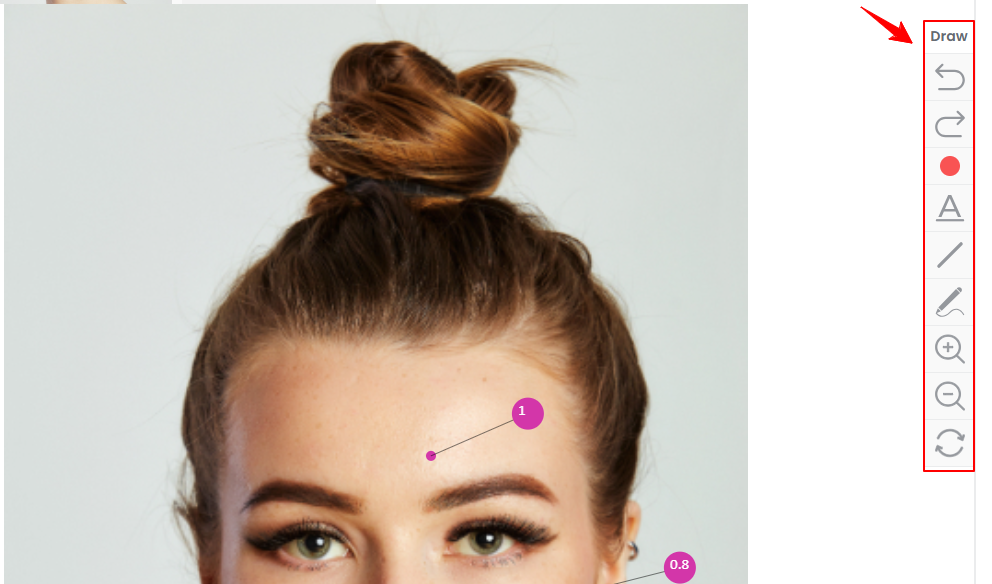
- The user can use the following drawing tools on the marking screen to enhance precision and clarity: Undo” reverts the last action performed on the marking screen, such as removing a drawing or marking.
“Redo” restores the last action that was undone, allowing you to reapply the previous change.
“Text”, denoted by “A” enables you to add text annotations directly on the marking screen, useful for labeling specific areas or providing additional notes.
“Draw” allows freehand drawing on the marking screen, letting users visually mark treatment areas or illustrate procedure details.
“Zoom In” magnifies the marking screen to provide a closer view, helping with precise markings.
“Zoom Out” reduces the zoom level to show a broader view of the marking screen, giving a clearer overview of the entire area being charted.
“Reset Text & Drawing” clears all text and drawing annotations on the chart, returning it to its original state. - To add products for injection markings on the marking screen, select “Add Product” from the dropdown menu to proceed.
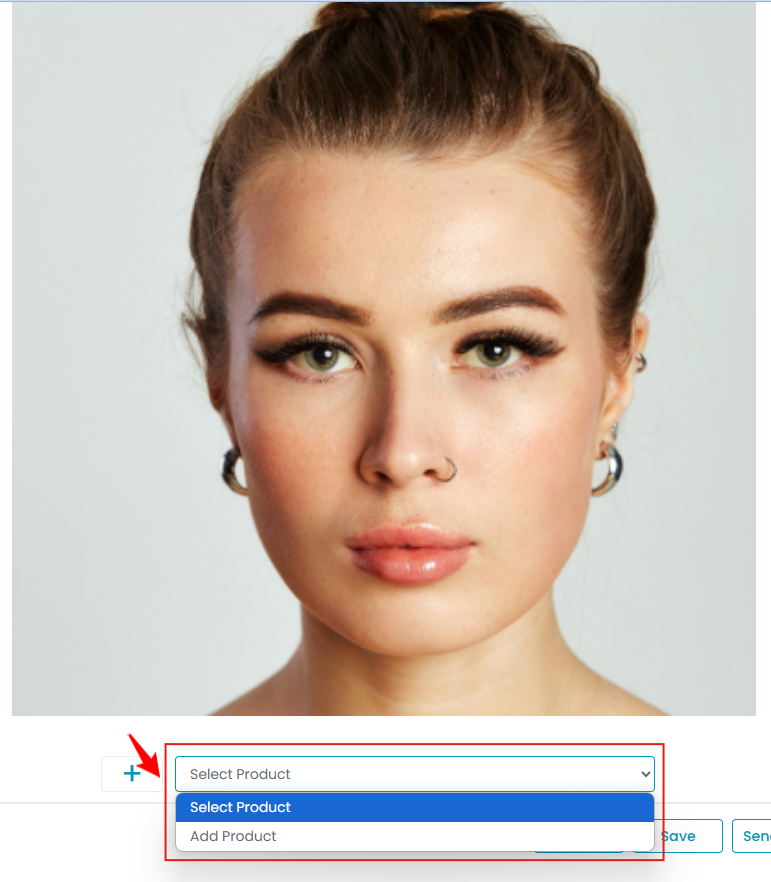 Note: You can also add a product by clicking Products on the top bar, then select “Add Product” and choose the desired item. Once selected, the product will appear on the Products screen and will also be available in the Select Product dropdown.
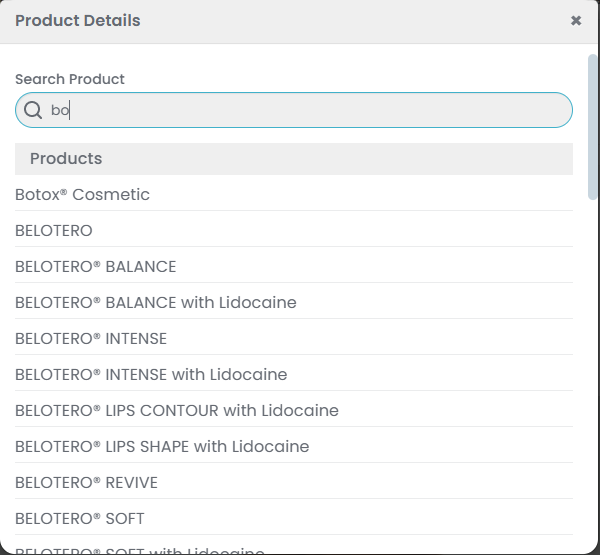
 - Select the treatment product from the dropdown menu for which you want to place the injection marking. The dropdown will display all available products.
 Note: The dropdown menu also displays the pricing variations created, enabling the user to select from those variations for injection markings.
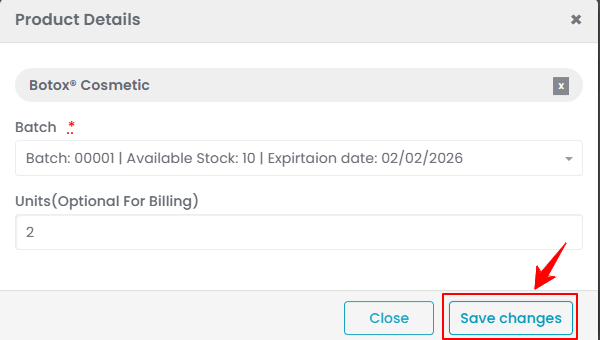
 - After adding the product, select the Batch ID, enter the Units and click on ‘Save Changes’ to confirm.
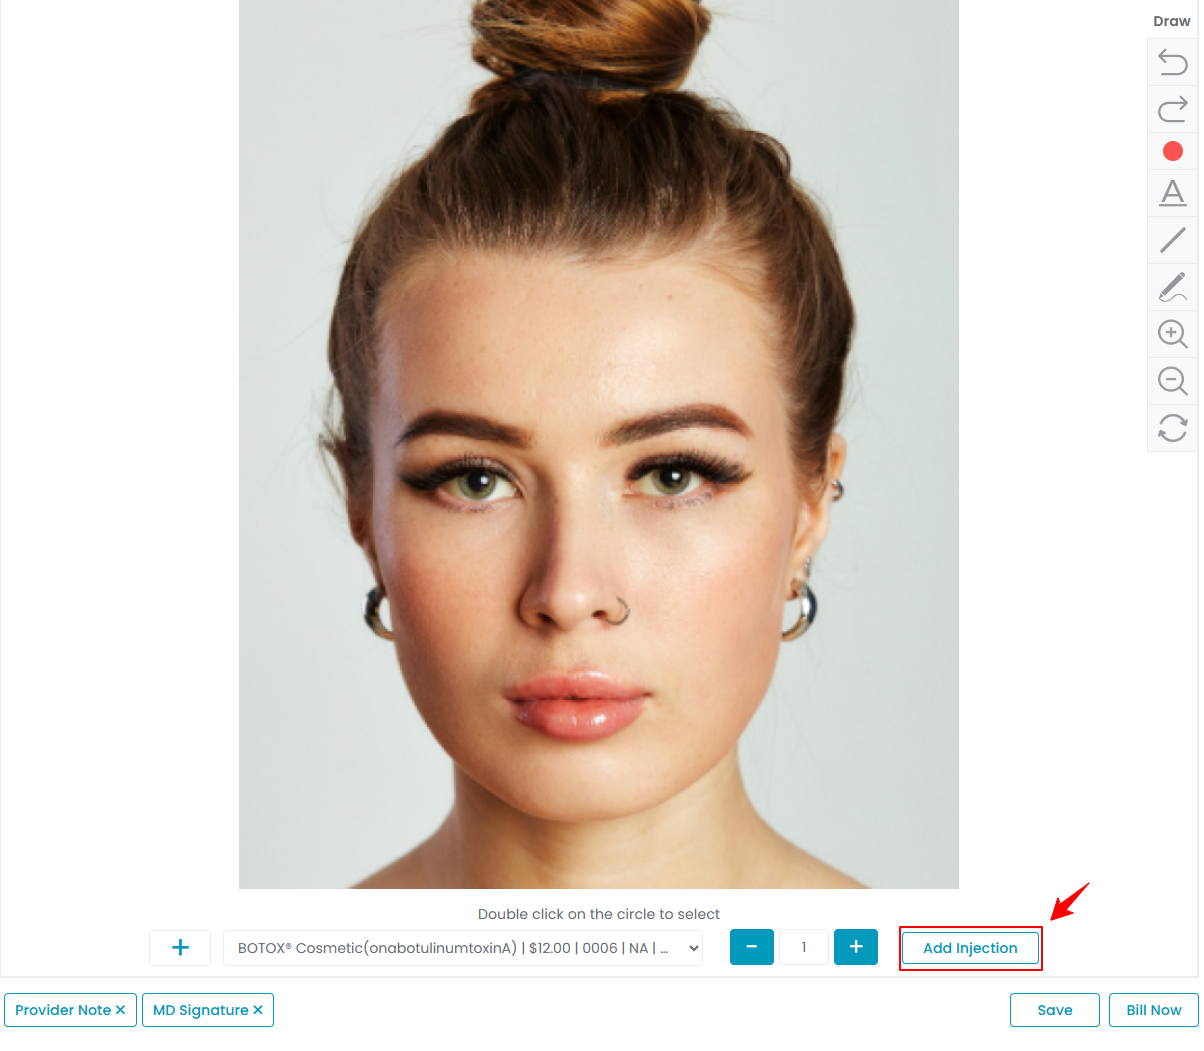
- Now, an option to add injections will appear. Click "Add Injection," then click on the area where you want to place the injection markings.
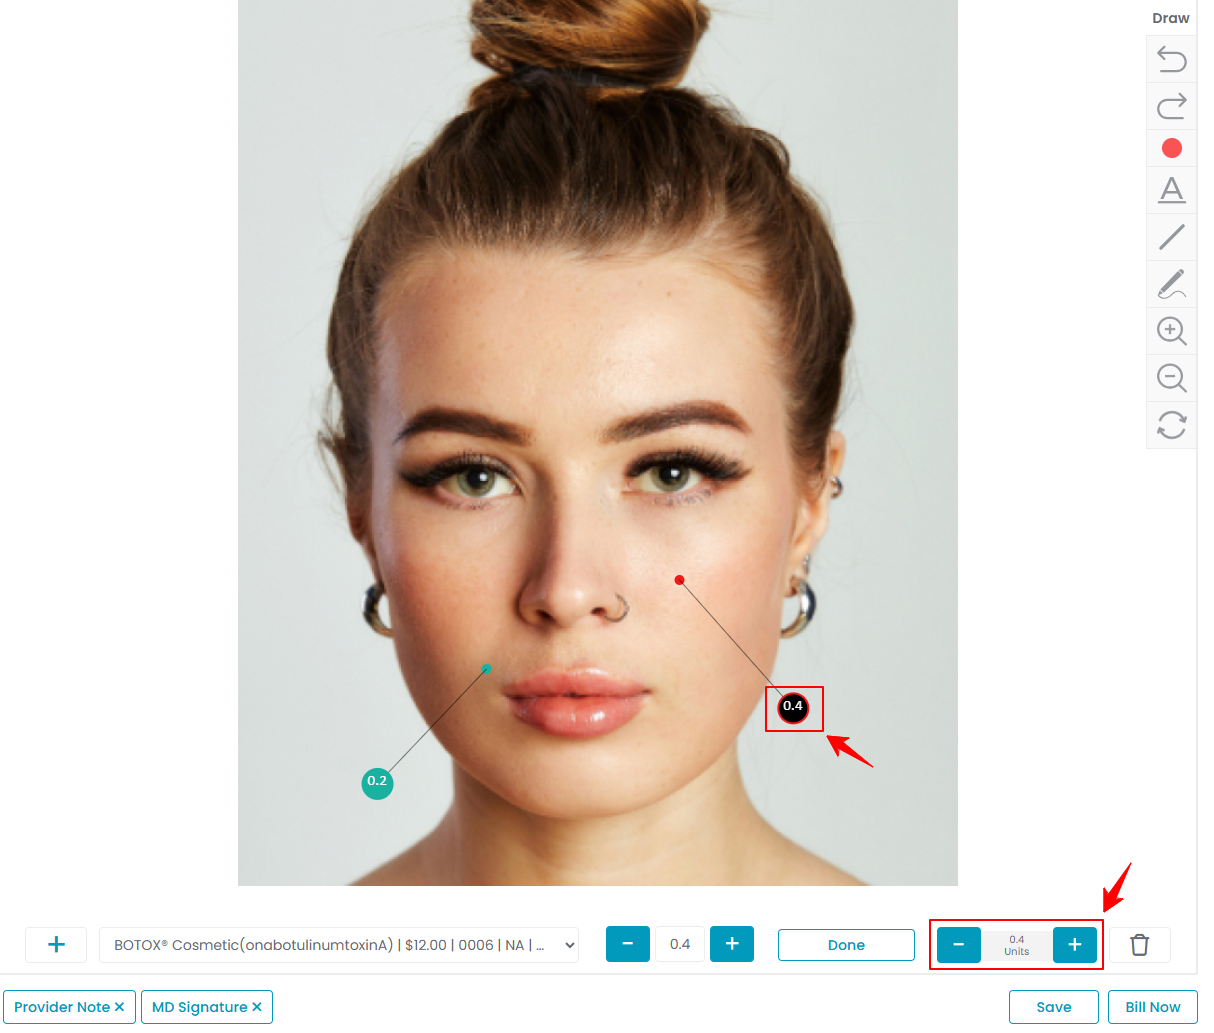
- After placing the injection markings, double-click on the circle to select the injection. Adjust the unit quantity as needed by clicking the "+" or "-" signs. Once finished, click “Save” to confirm your changes.
 Your procedure has successfully been created!
 - Click “Bill Now” to open the billing screen in the patient’s profile, where the payment details are displayed. Or click the “View Procedure” button to see the full details of the procedure you created.
View Traceability Information for the Procedure
- To view the traceability information for the procedure, click “Products” at the top.
- The “Products” displays details of all treatment products selected for the procedure, including Product Name, Batch ID, Expiry Date, Used Units, Charted Units, and Price. Under “Action”, the “Delete option” allows you to remove all injections of that product from the marking screen.
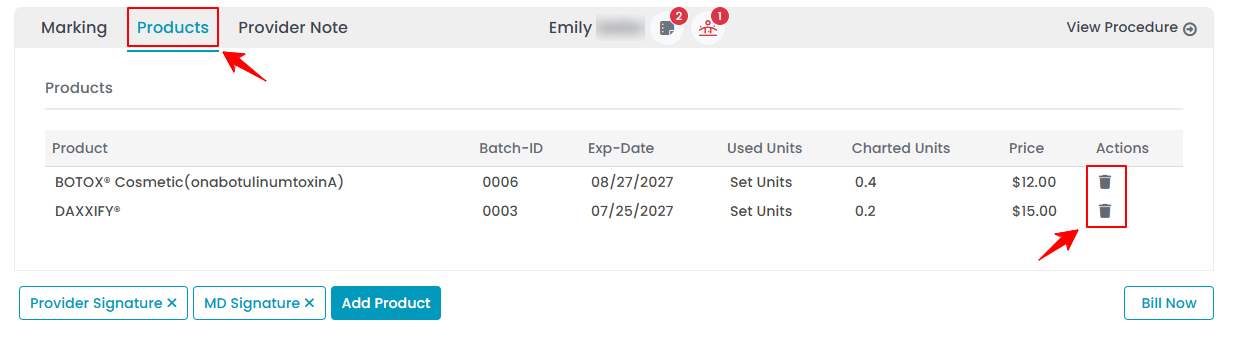 Note: You can click on the “Bill Now” button to proceed to the billing screen.
 - The cross next to the Provider Signature and MD Signature indicates that the procedure has not yet been signed.
Add Provider Notes for the Procedure
- The provider can add notes related to a procedure through the “Provider Note” tab while creating it. These notes are visible only to the provider and the admin.
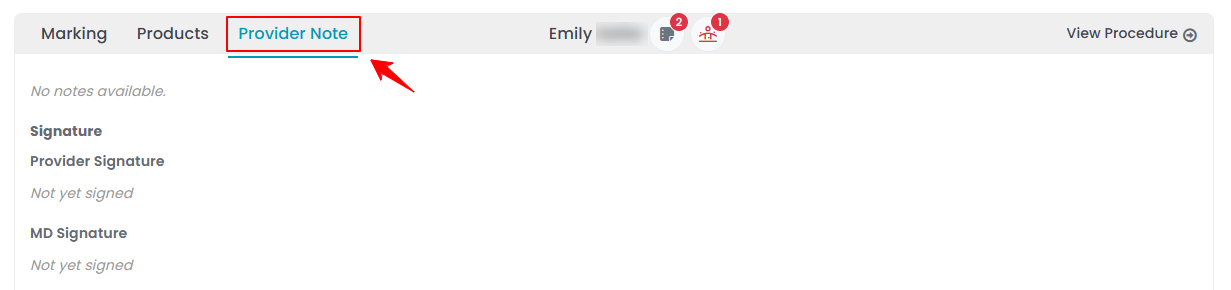 Note: These notes can only be added by the provider.
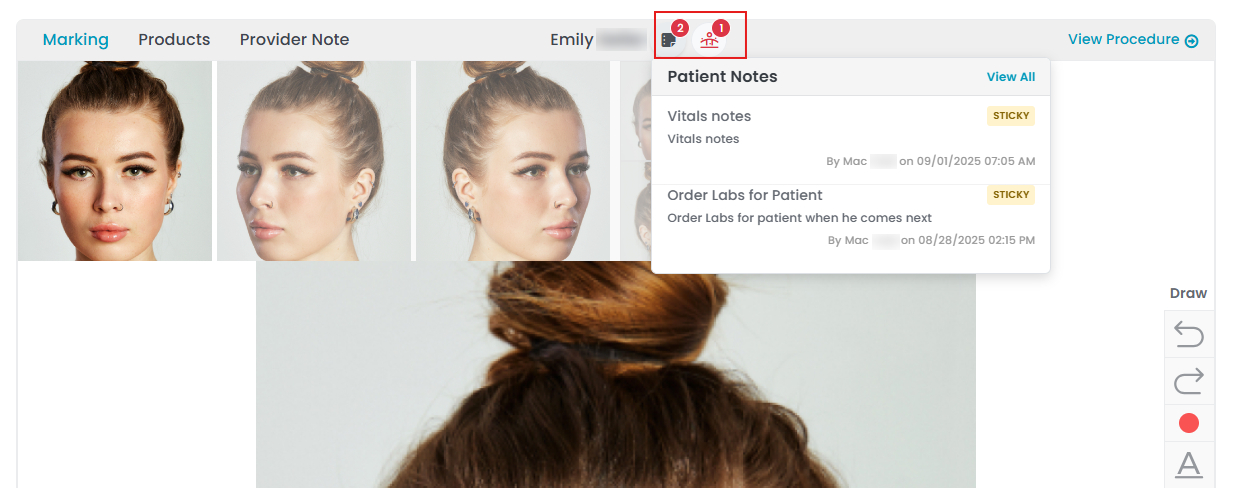
 - You can hover over the icons next to the patient’s name to view any patient notes and patient allergies stored in the patient’s profile.
- Providers can also add notes to a procedure after it has been created. Click “Add New Note” on the Procedure View Screen, enter the note, and then click “Save Note” to save it.