

This user guide offers detailed step-by-step instructions on how to add, edit, and delete an employee in the DigiMEDSPA Portal. By following these instructions, authorized users can maintain accurate and up-to-date employee records.
Understanding Terminologies
- Employee
An employee is an individual who works for an organization, providing services or performing tasks in exchange for compensation. A Med SPA employee could be a physician, nurse, esthetician, or administrative staff member who contributes to the daily operations and services provided to patients. Employees are typically responsible for specific roles and duties, as outlined by their employer.
Part 1 of 5
Add an Employee
-
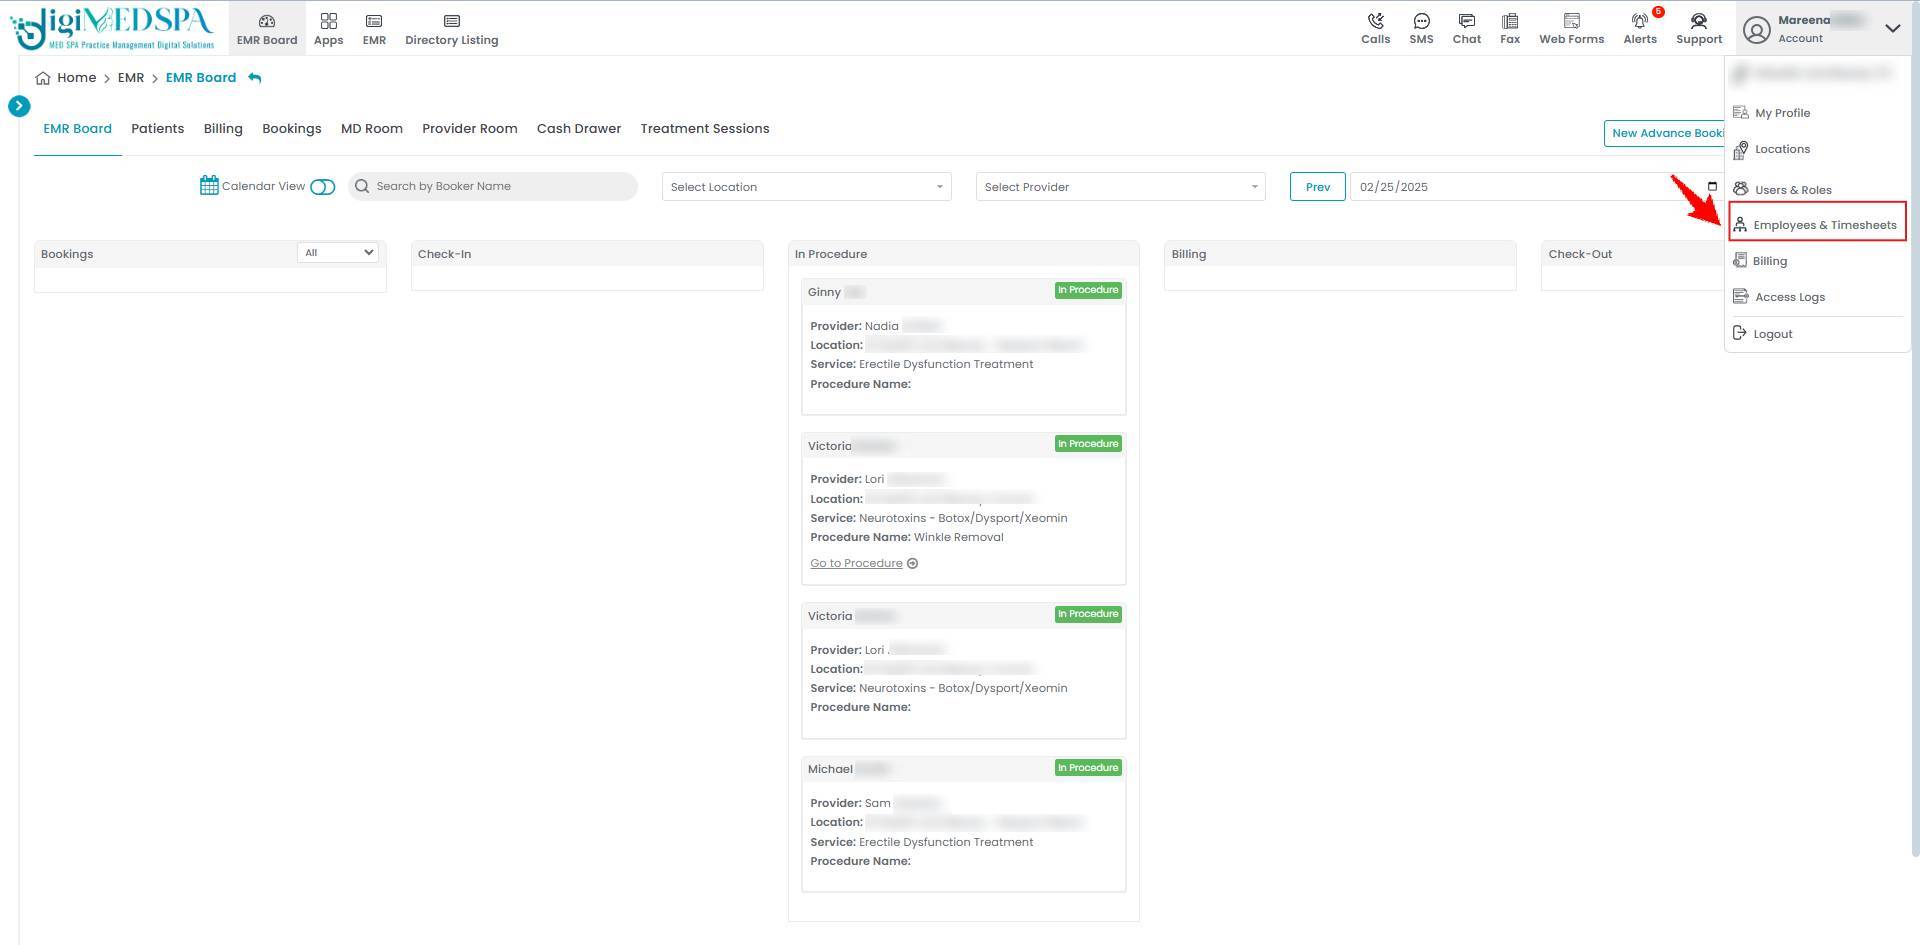
The user can add an employee by accessing the “Employees & Timesheets” App from two entry points.
-
From the Top Right Profile dropdown, select “Employees & Timesheets.”
-
From the Left Navigation, click on the “My Account” dropdown and select “Employees & Timesheets.”
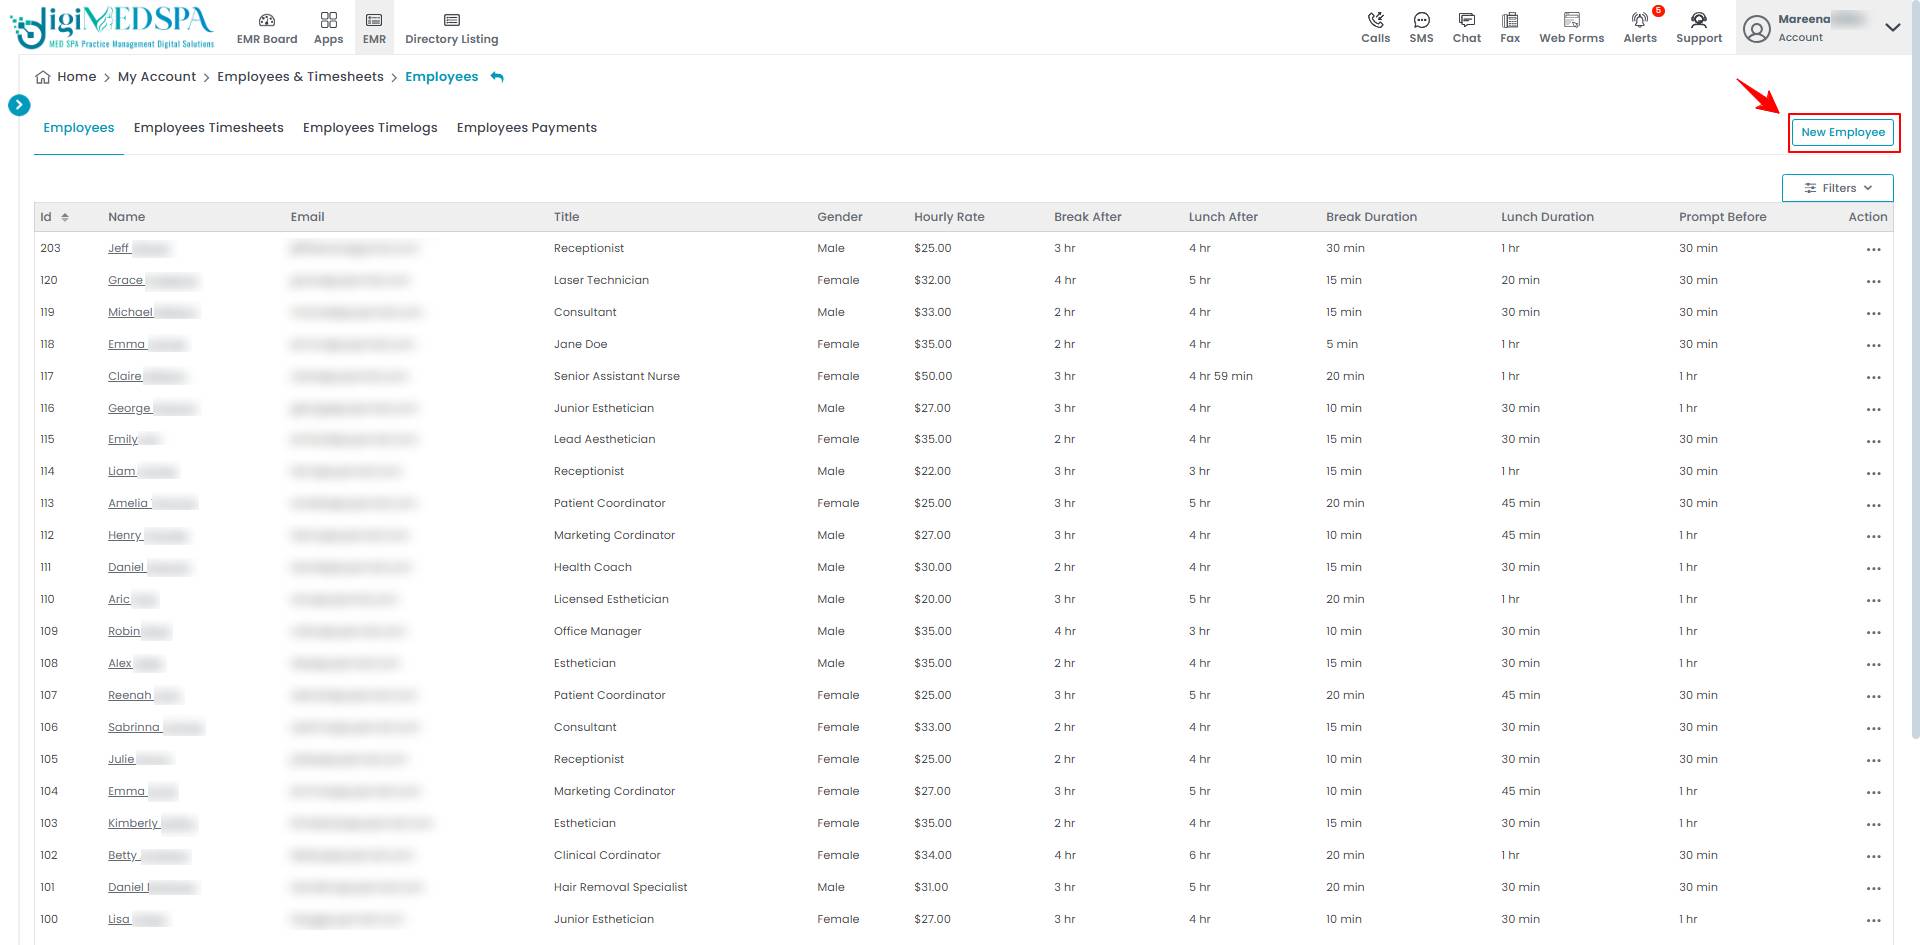
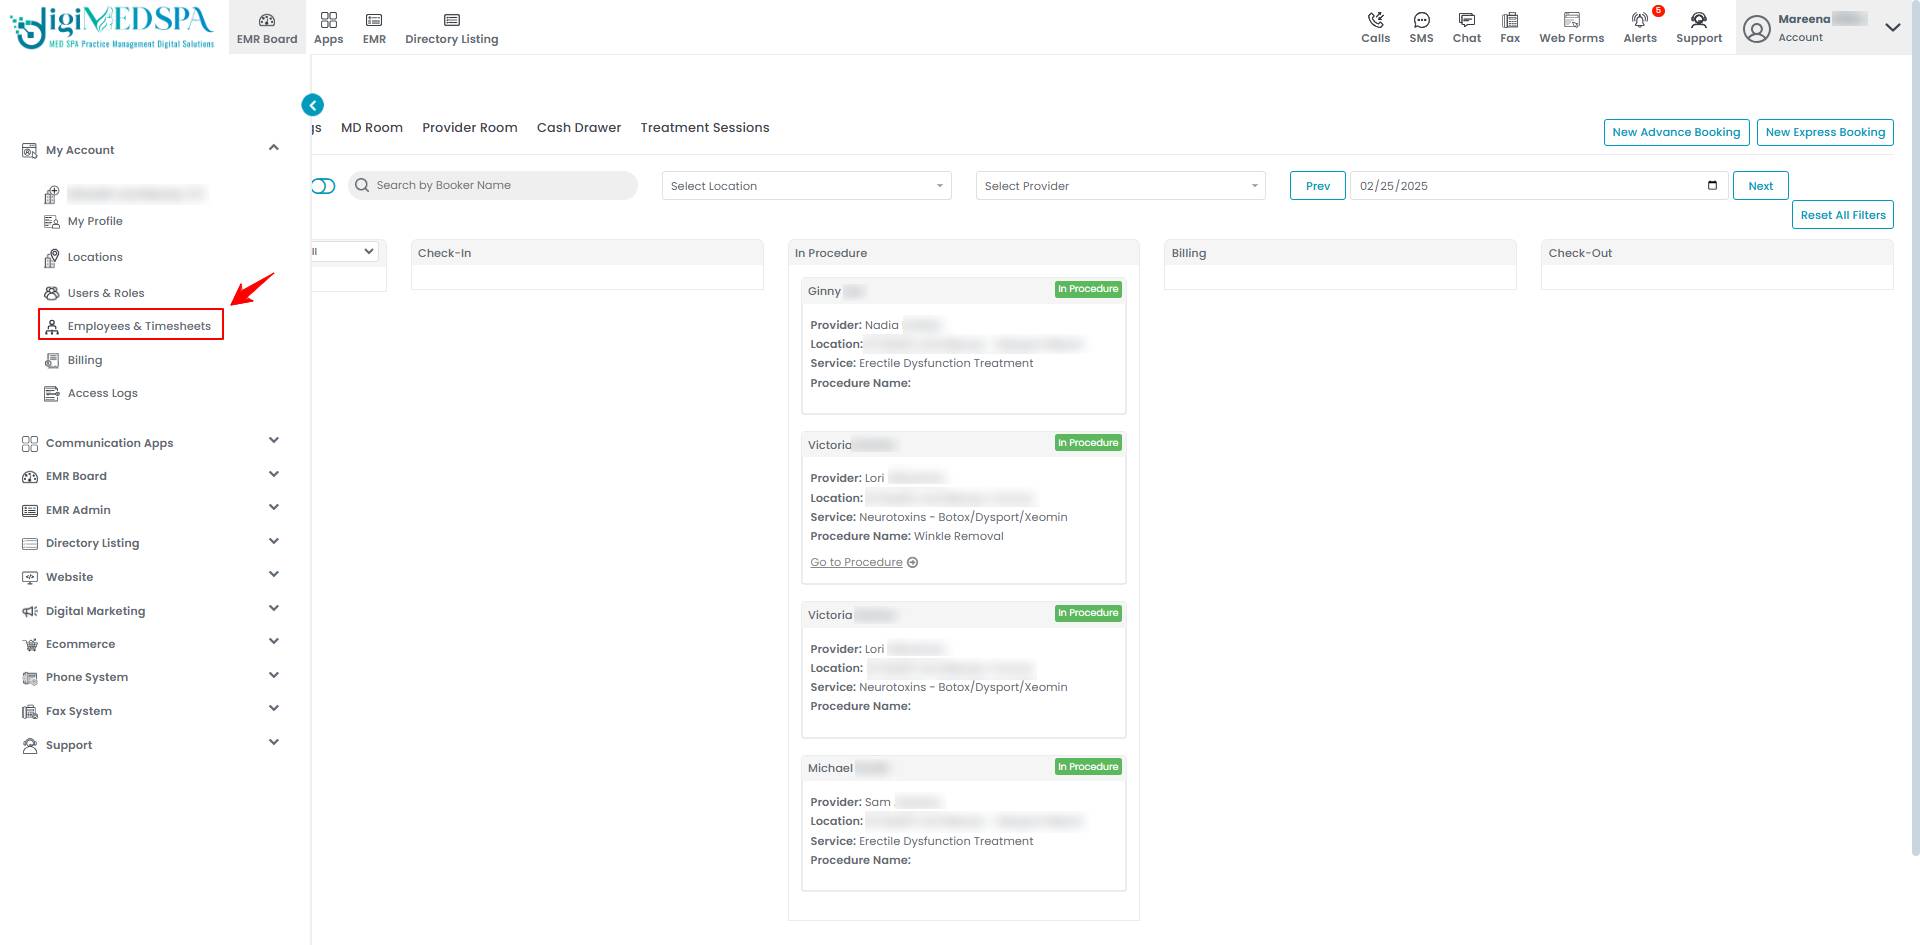 NoteOnce you are in the “Employees & Timesheets App”, the employee list will open by default as it is the first option in the Employees and Timesheets App.
-
-
To add a new employee, click on the “New Employee‘’ button in the top right corner of the screen.
-
Select from the dropdown whether the new employee you are adding is a "New User" or an "Existing User."
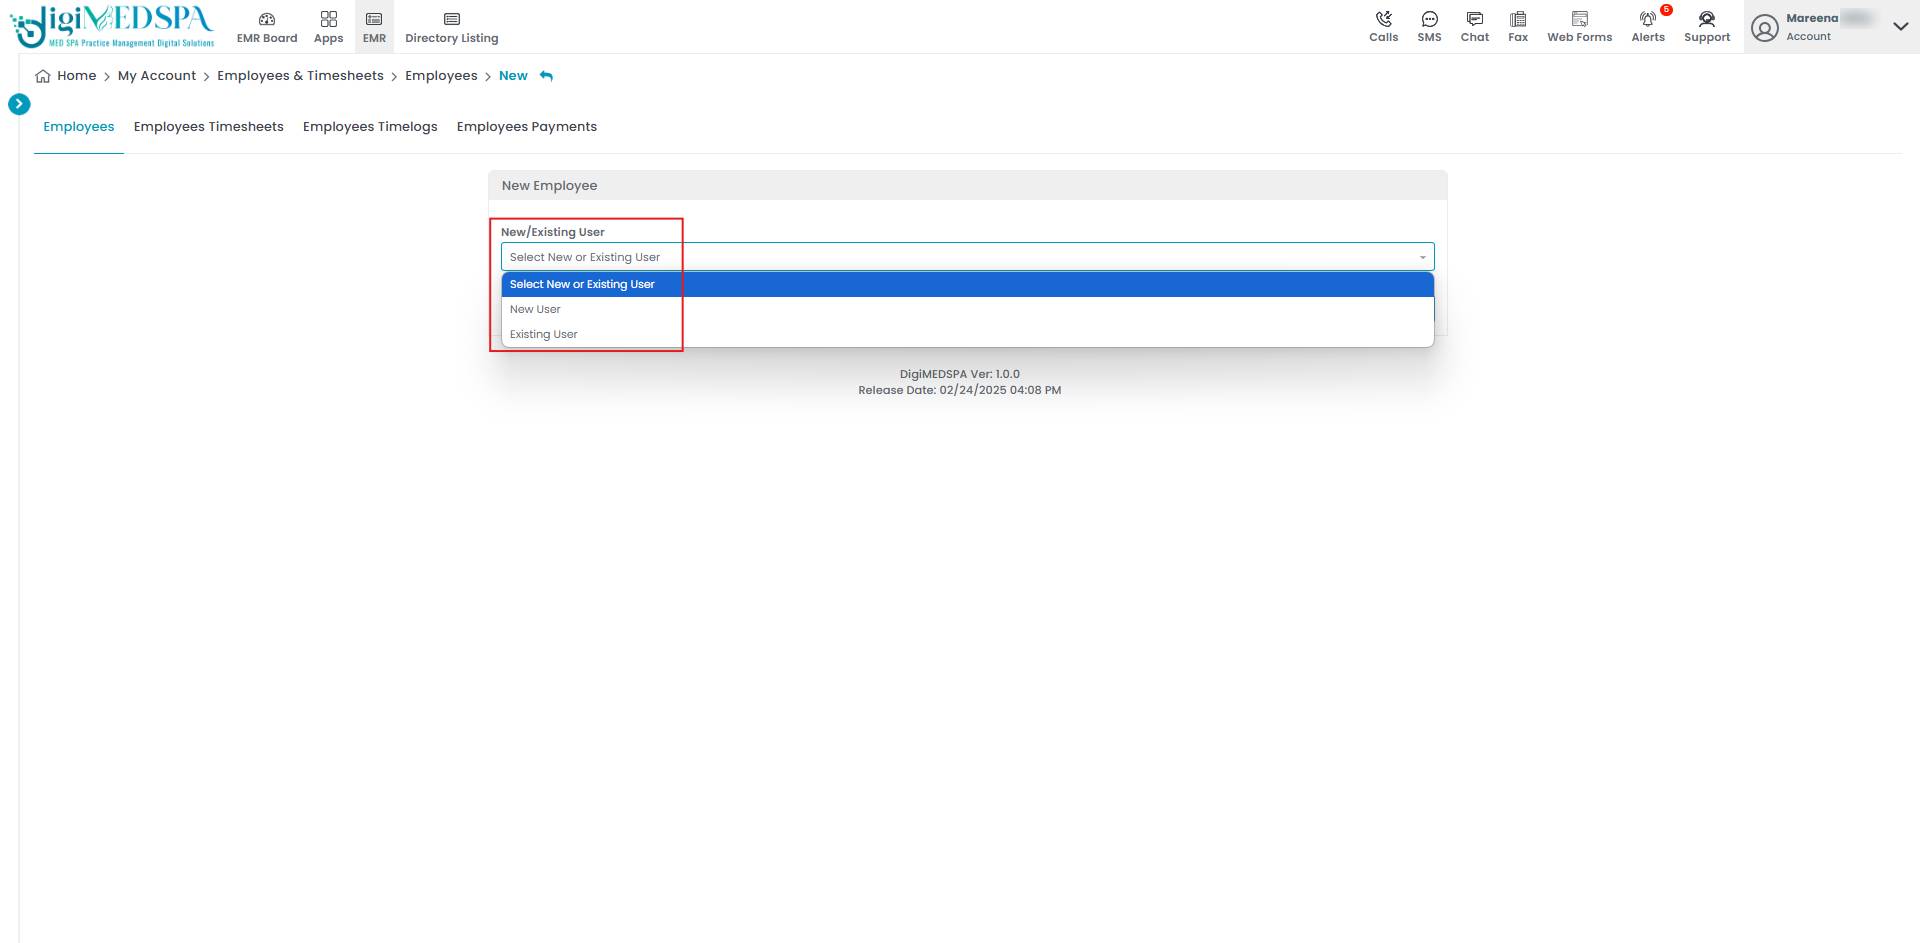 NoteSelect “New User” if the employee has never been added to the system before. You will need to create a new profile for the employee with all the relevant information. Select “Existing User” if the employee already has a profile in the system.Their existing information will be linked, eliminating the need to re-enter all details. The dropdown will only display existing users who have not been entered as employees yet.
Part 2 of 5
Adding an Employee by Selecting New User
-
After selecting "New User," you will see options to add a "New User" or "New Provider." Choose "New User" to add an employee.
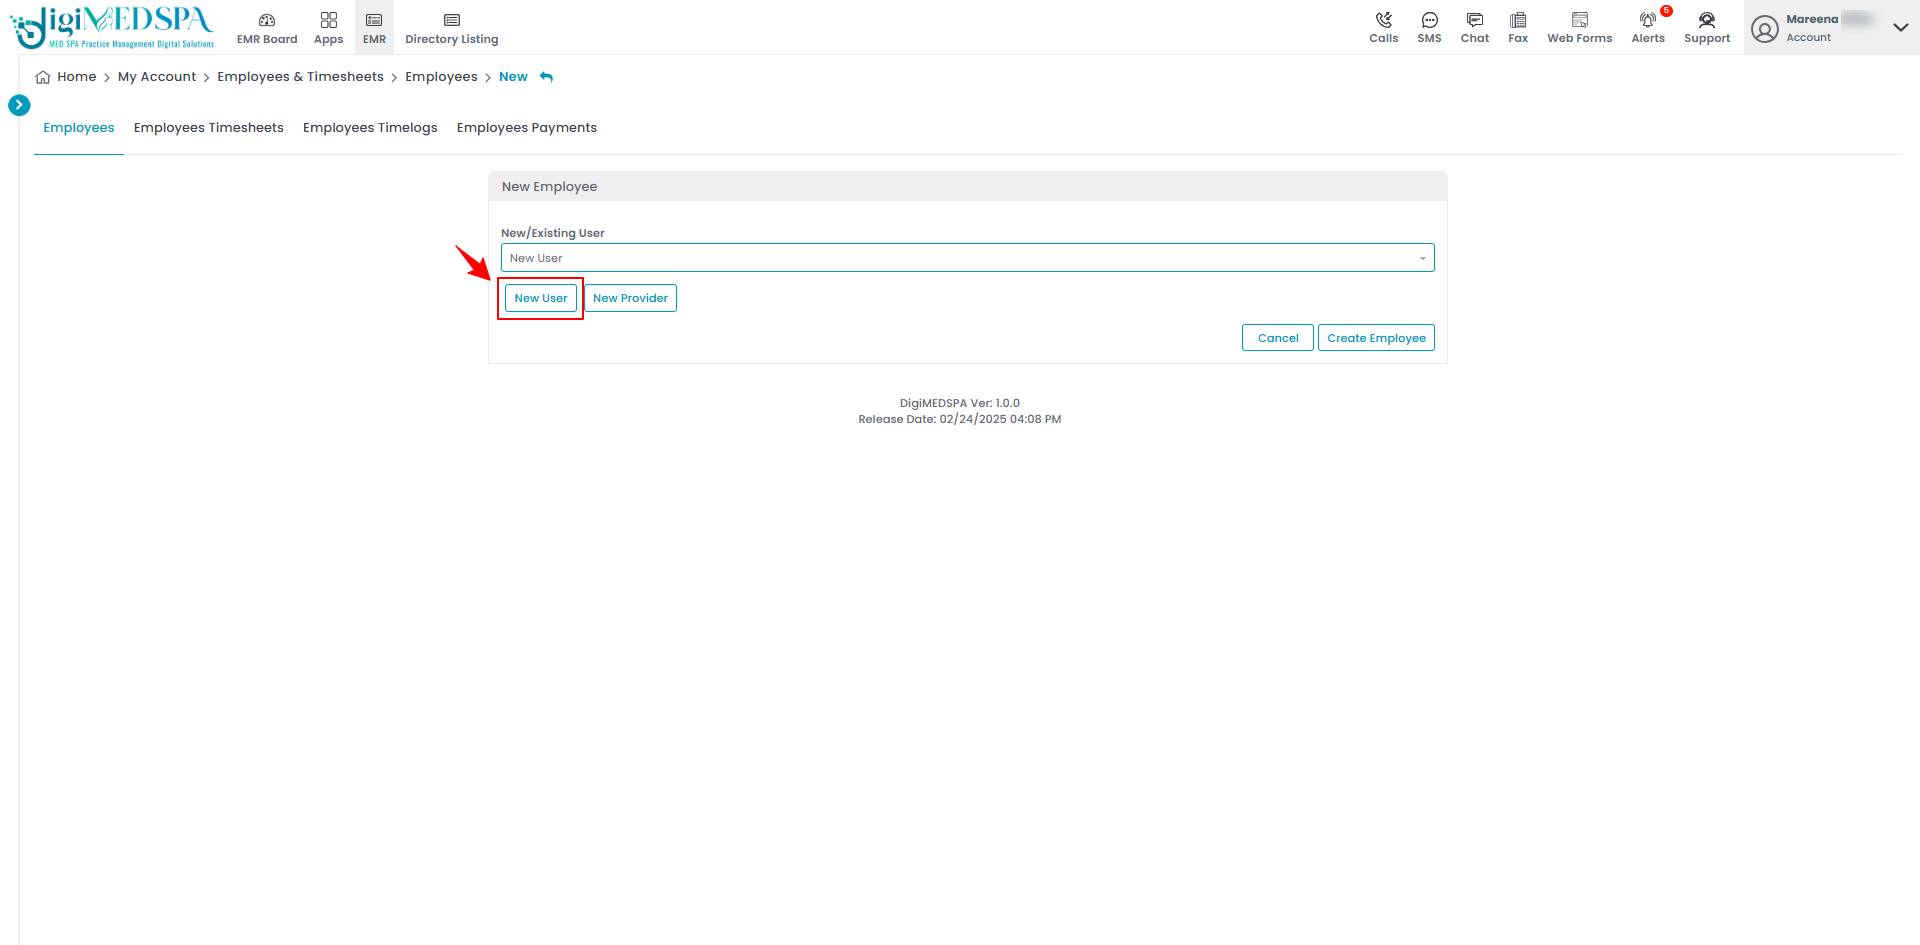 NoteClicking on ‘New Provider’ will take you to the Provider Profile form. Refer to our ‘’Add / Edit Provider’’ user guide for detailed instructions on adding a provider.
 -
Clicking on ‘New User’ will take you to the user profile form. Enter the required information, including First and Last Name, County, Address, Zip, State, City, Phone Number, Email, Password, and Password Confirmation. Select the Role from the dropdown menu. You can select multiple roles for the user.
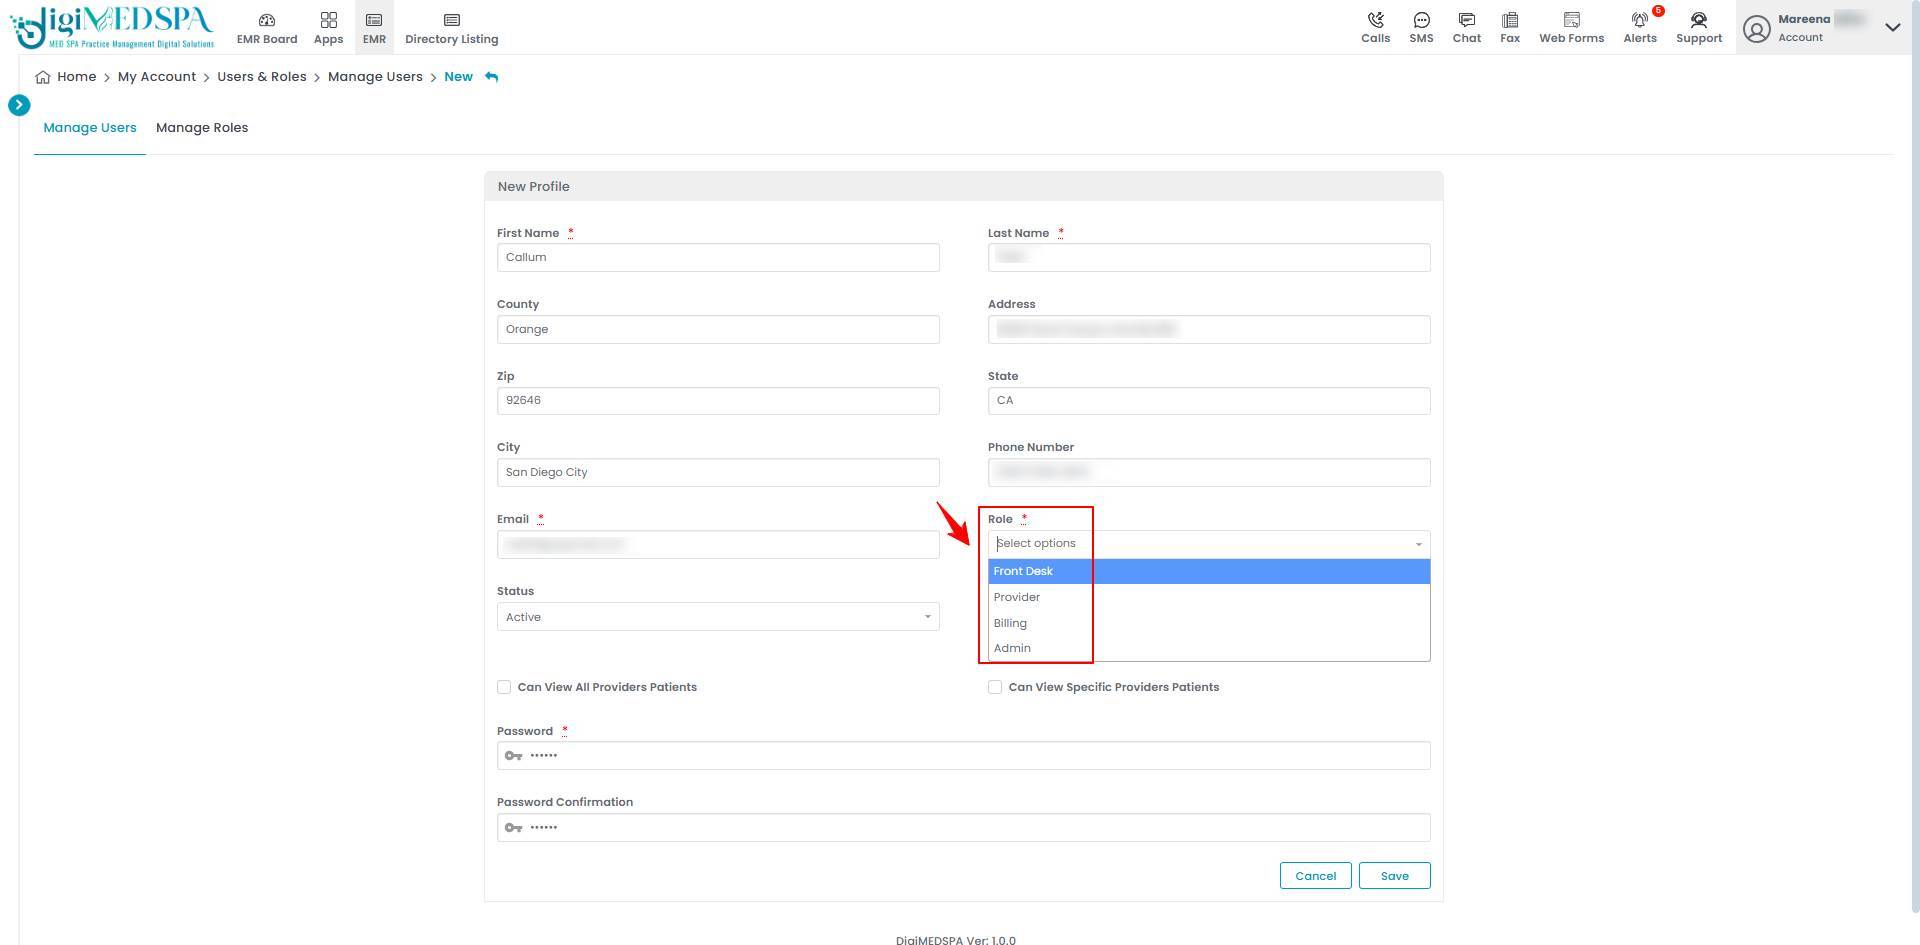 NoteThe “password” is required to create secure login credentials for the employee. It allows them to access the DigiMEDSPA Portal with a unique username (email) and password, ensuring the security of sensitive information and enabling personalized access to the system based on their role and permissions. ‘Role’ refers to the specific position or access level assigned to a user within the system. Roles define responsibilities and permissions, such as Administrator, Provider, Nurse, Receptionist, or Office Manager, determining what actions they can perform in the platform.
 -
Select a status for the employee from the dropdown menu.
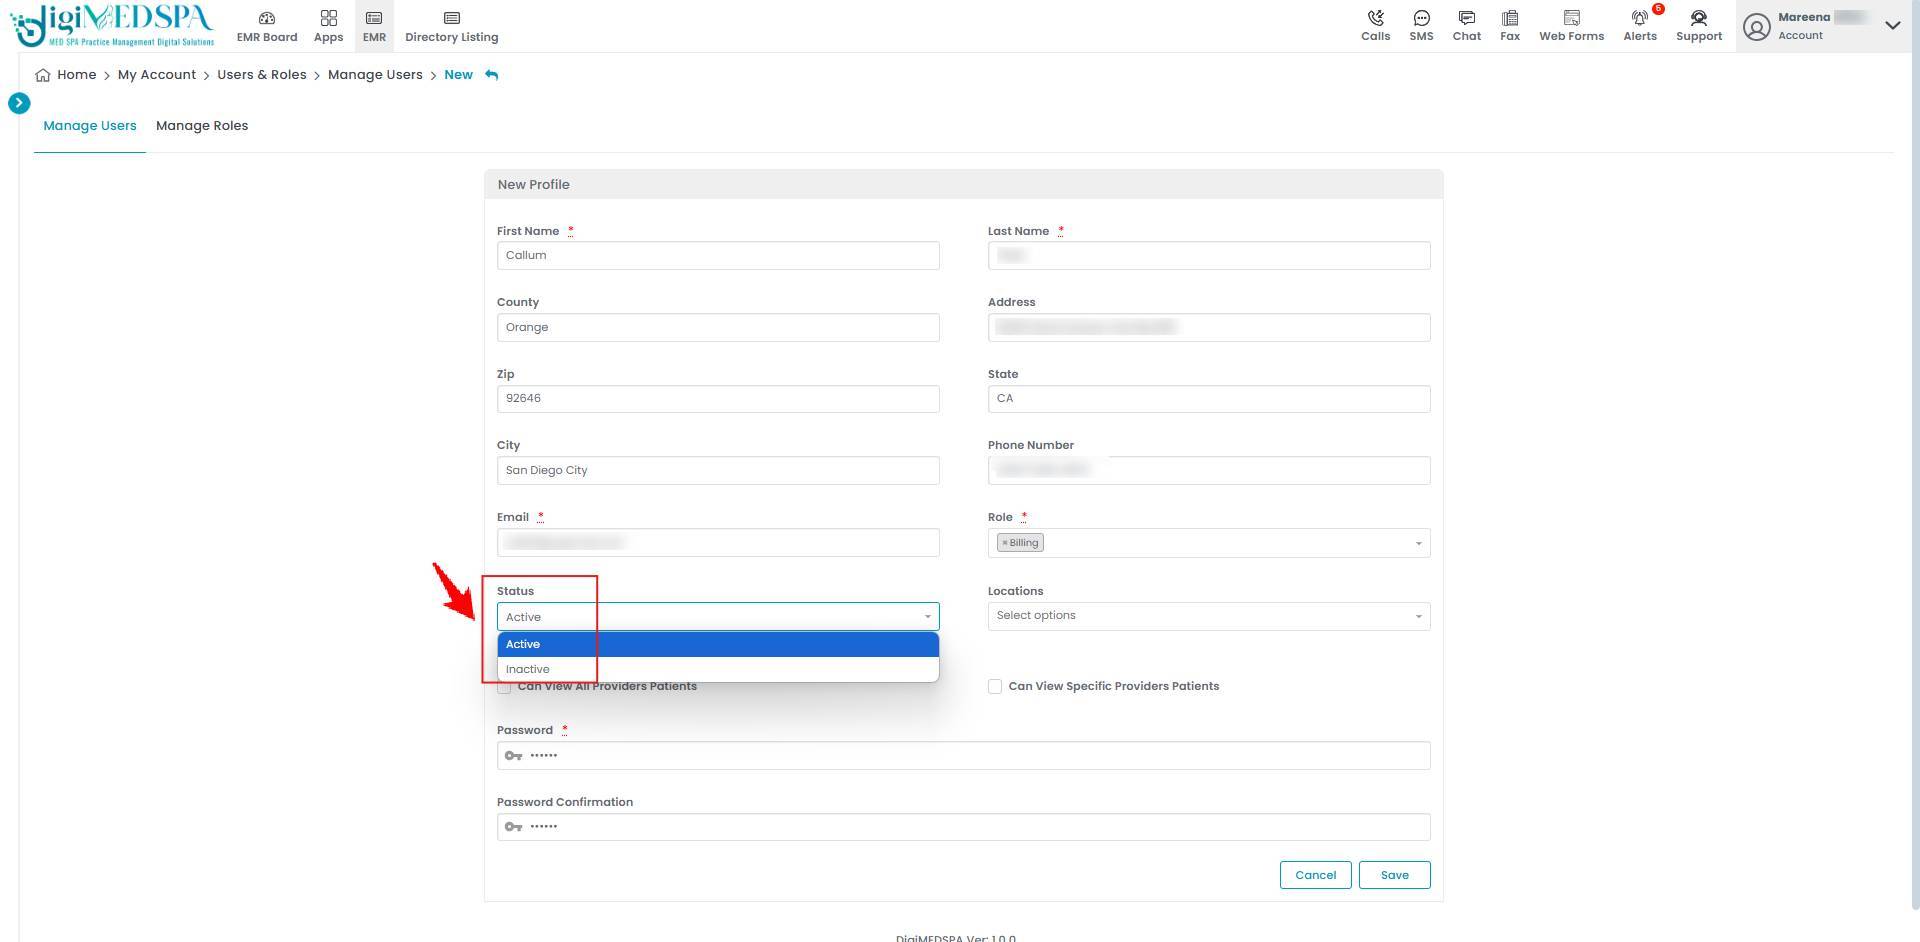 Note'Active' refers to an employee who has access to the system and can perform their assigned duties. ‘Inactive’ refers to an employee whose access is disabled, preventing them from logging in or performing any tasks.
 -
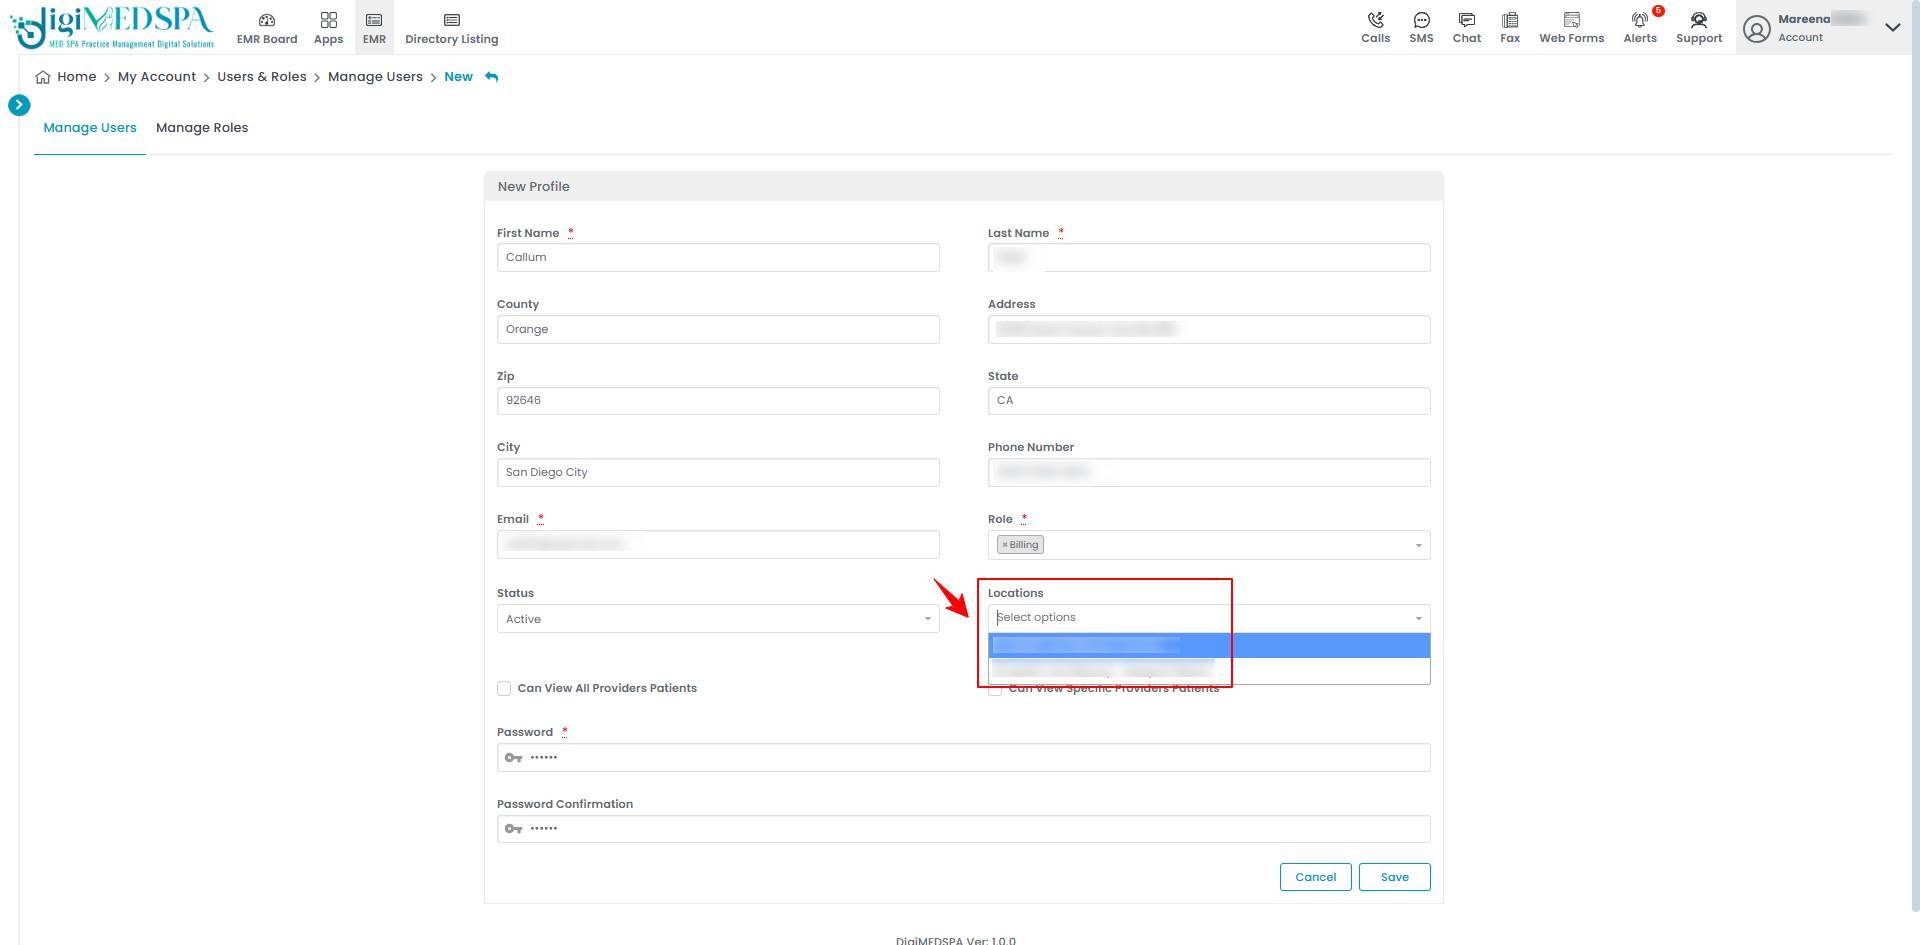
Select a Location from the dropdown menu. You can select one or multiple locations.
-
Choose whether the employee can view All Providers' Patients or only Specific Providers' Patients. If you select Specific Providers' Patients, choose those specific providers from the dropdown menu.
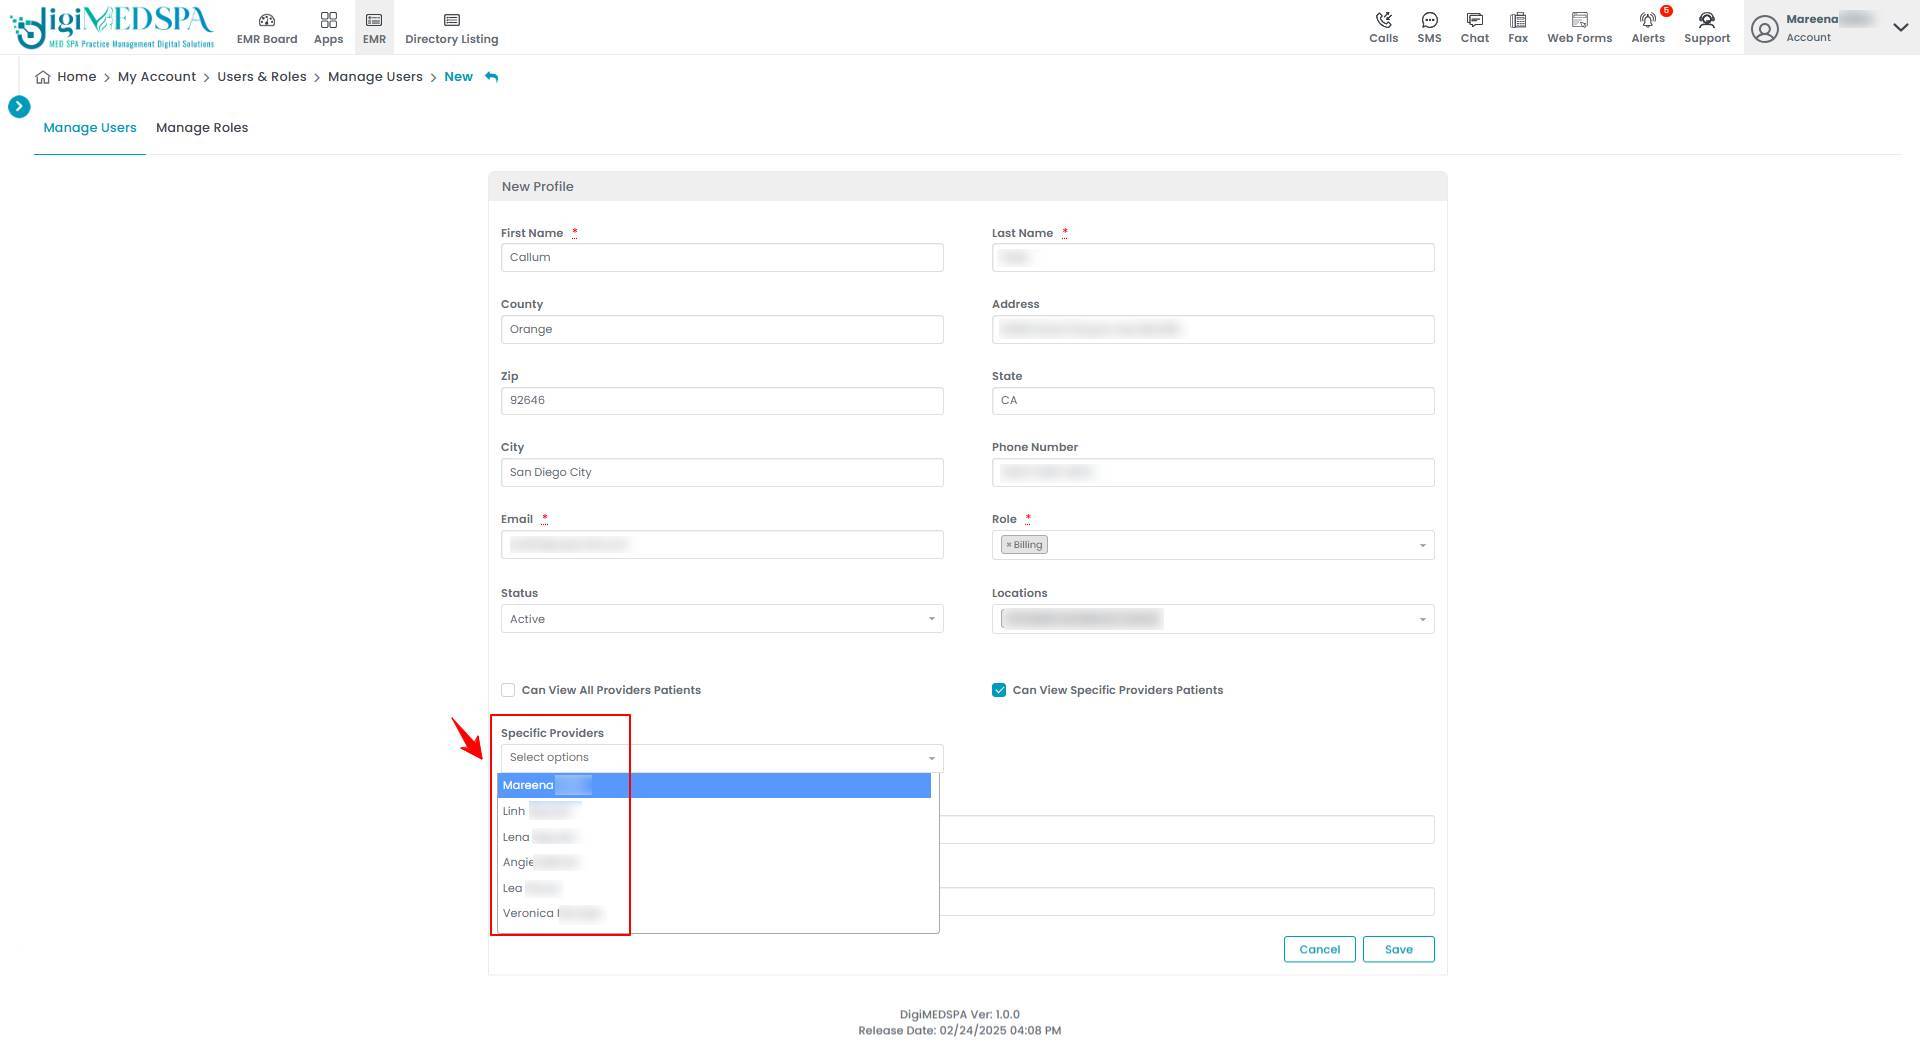 NoteSelecting 'View All Providers' Patients' allows the employee to see all patient records in the system. Selecting 'Specific Providers' Patients' allows the employee only to see records of patients linked to specific providers.
 -
After entering all the required information, click "Save" to add the employee.
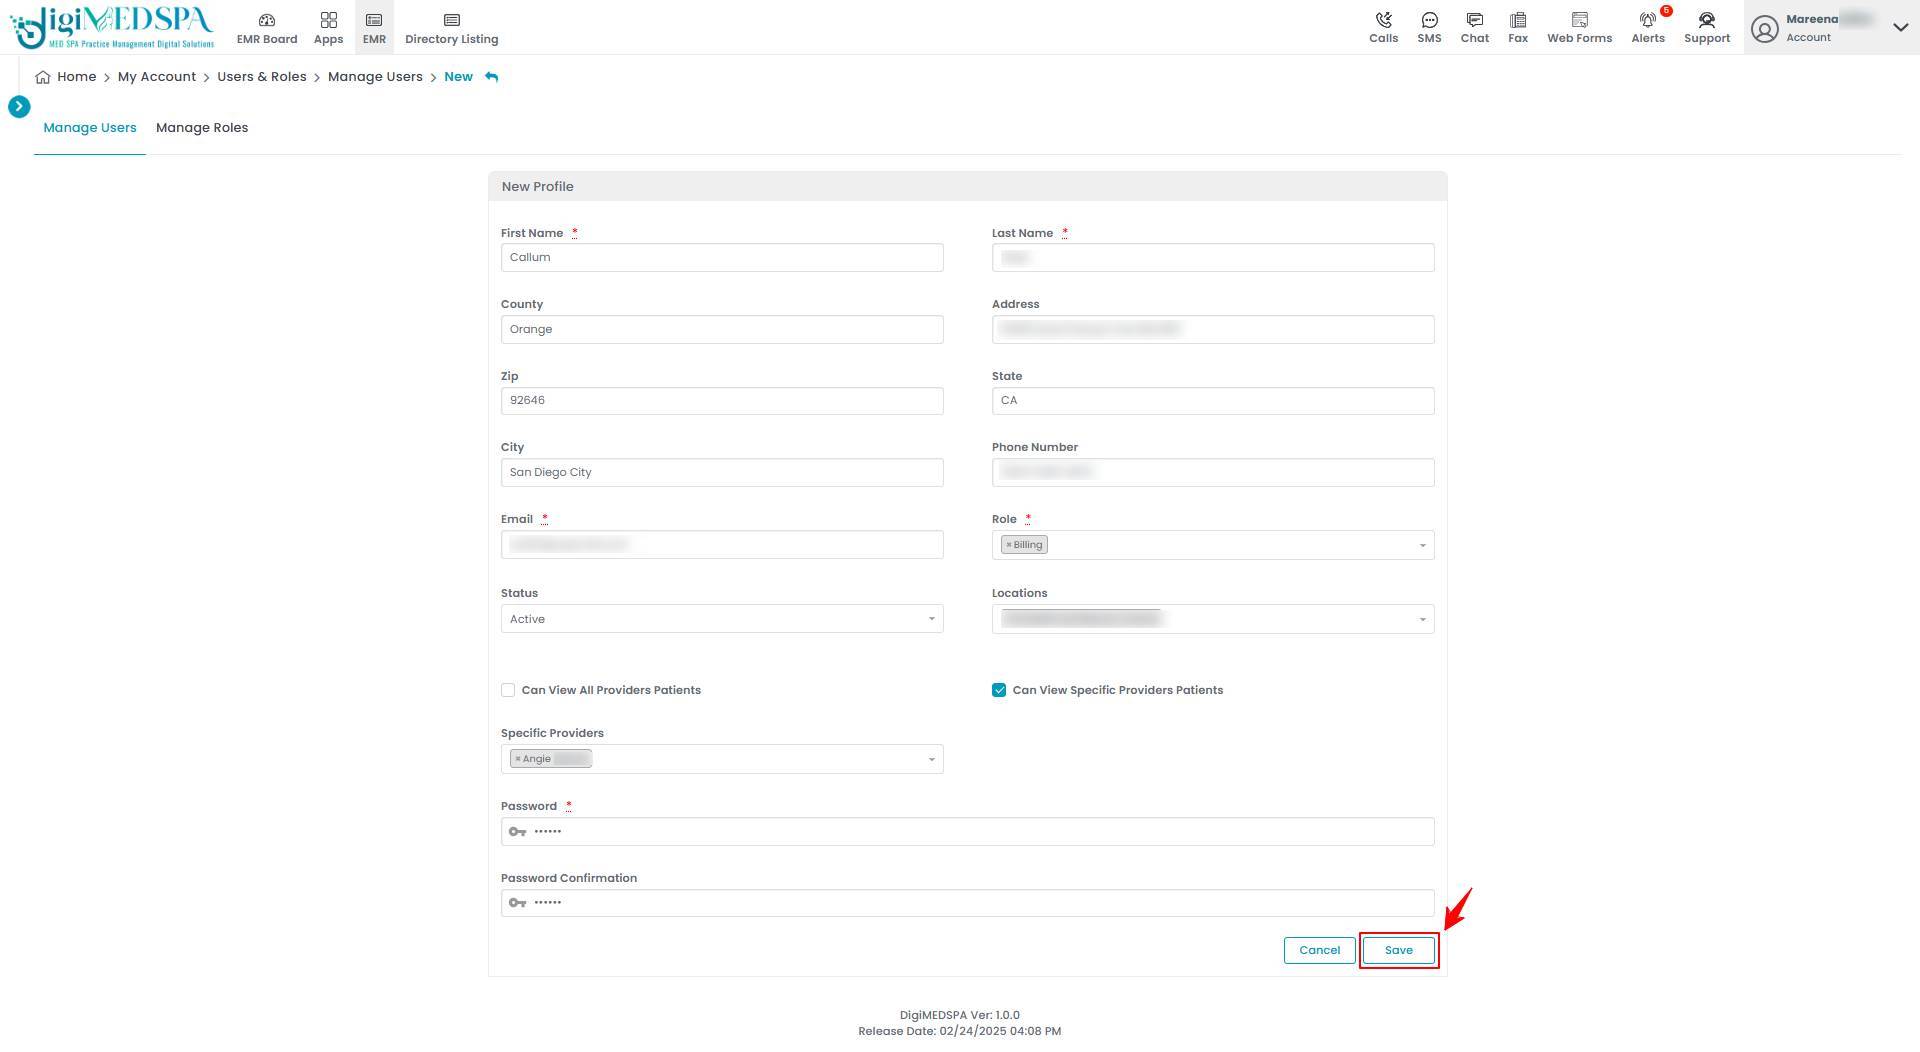 A new employee has been added successfully!
Part 3 of 5
Adding an Employee by Selecting Existing User
-
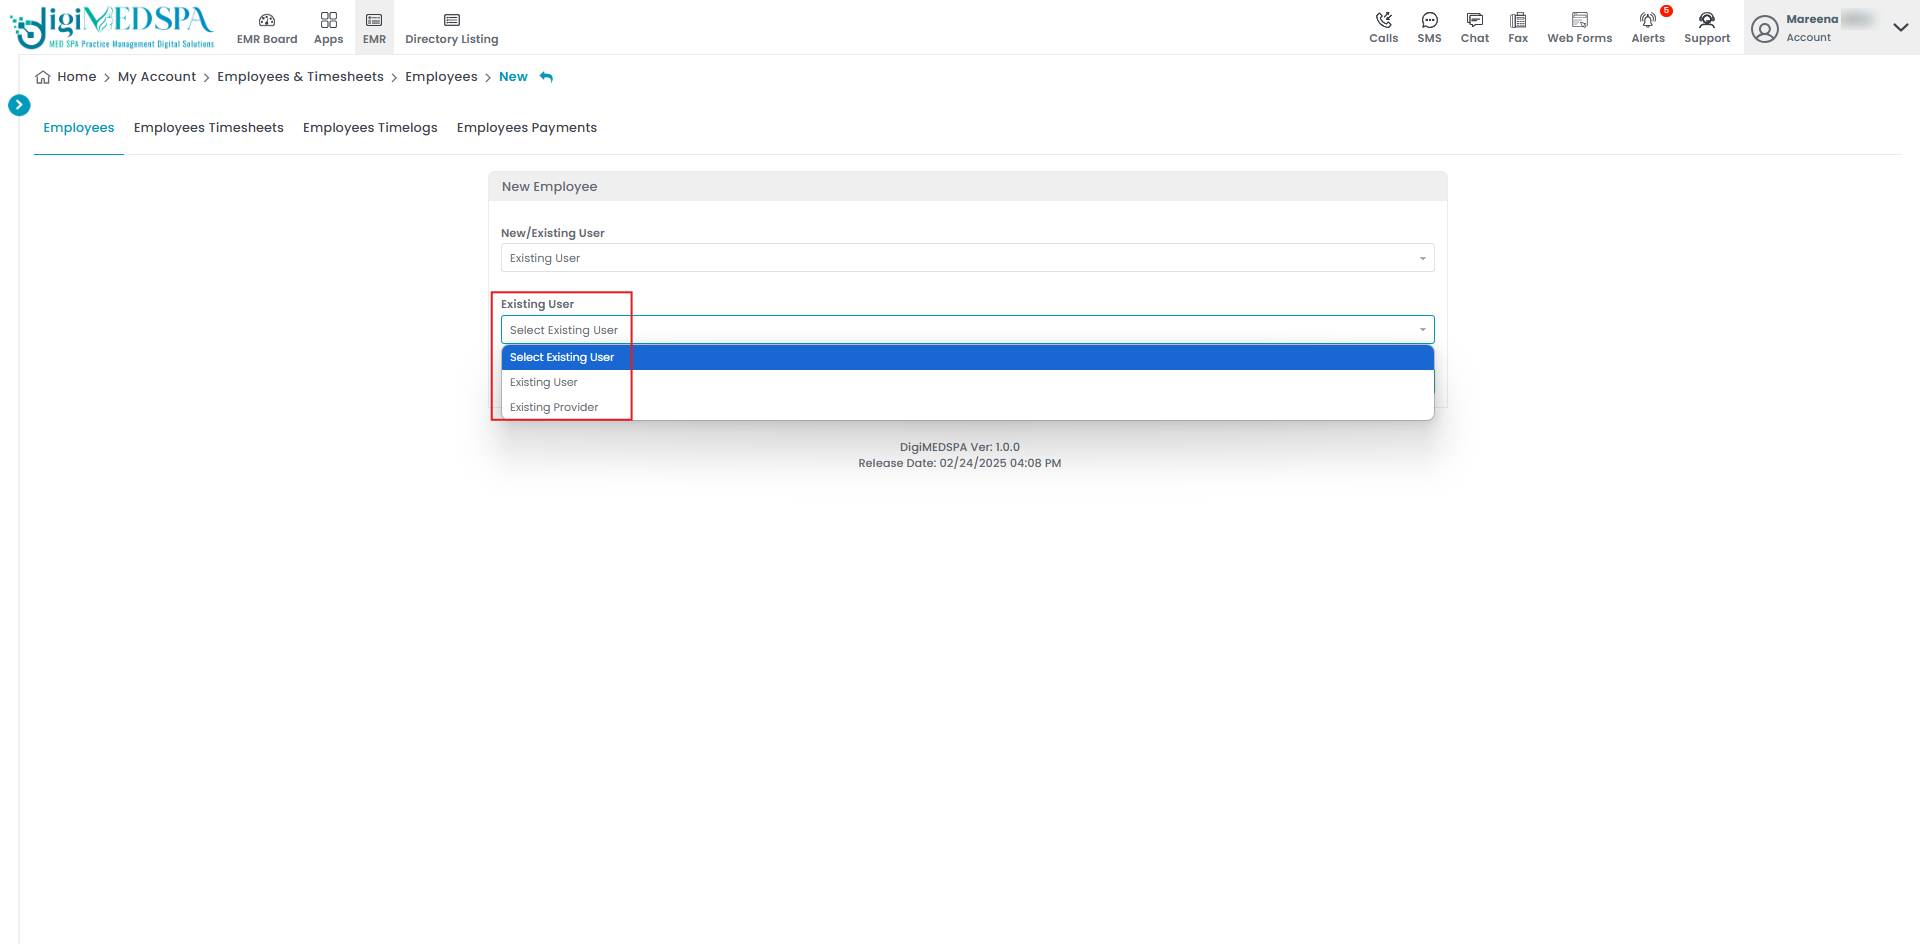
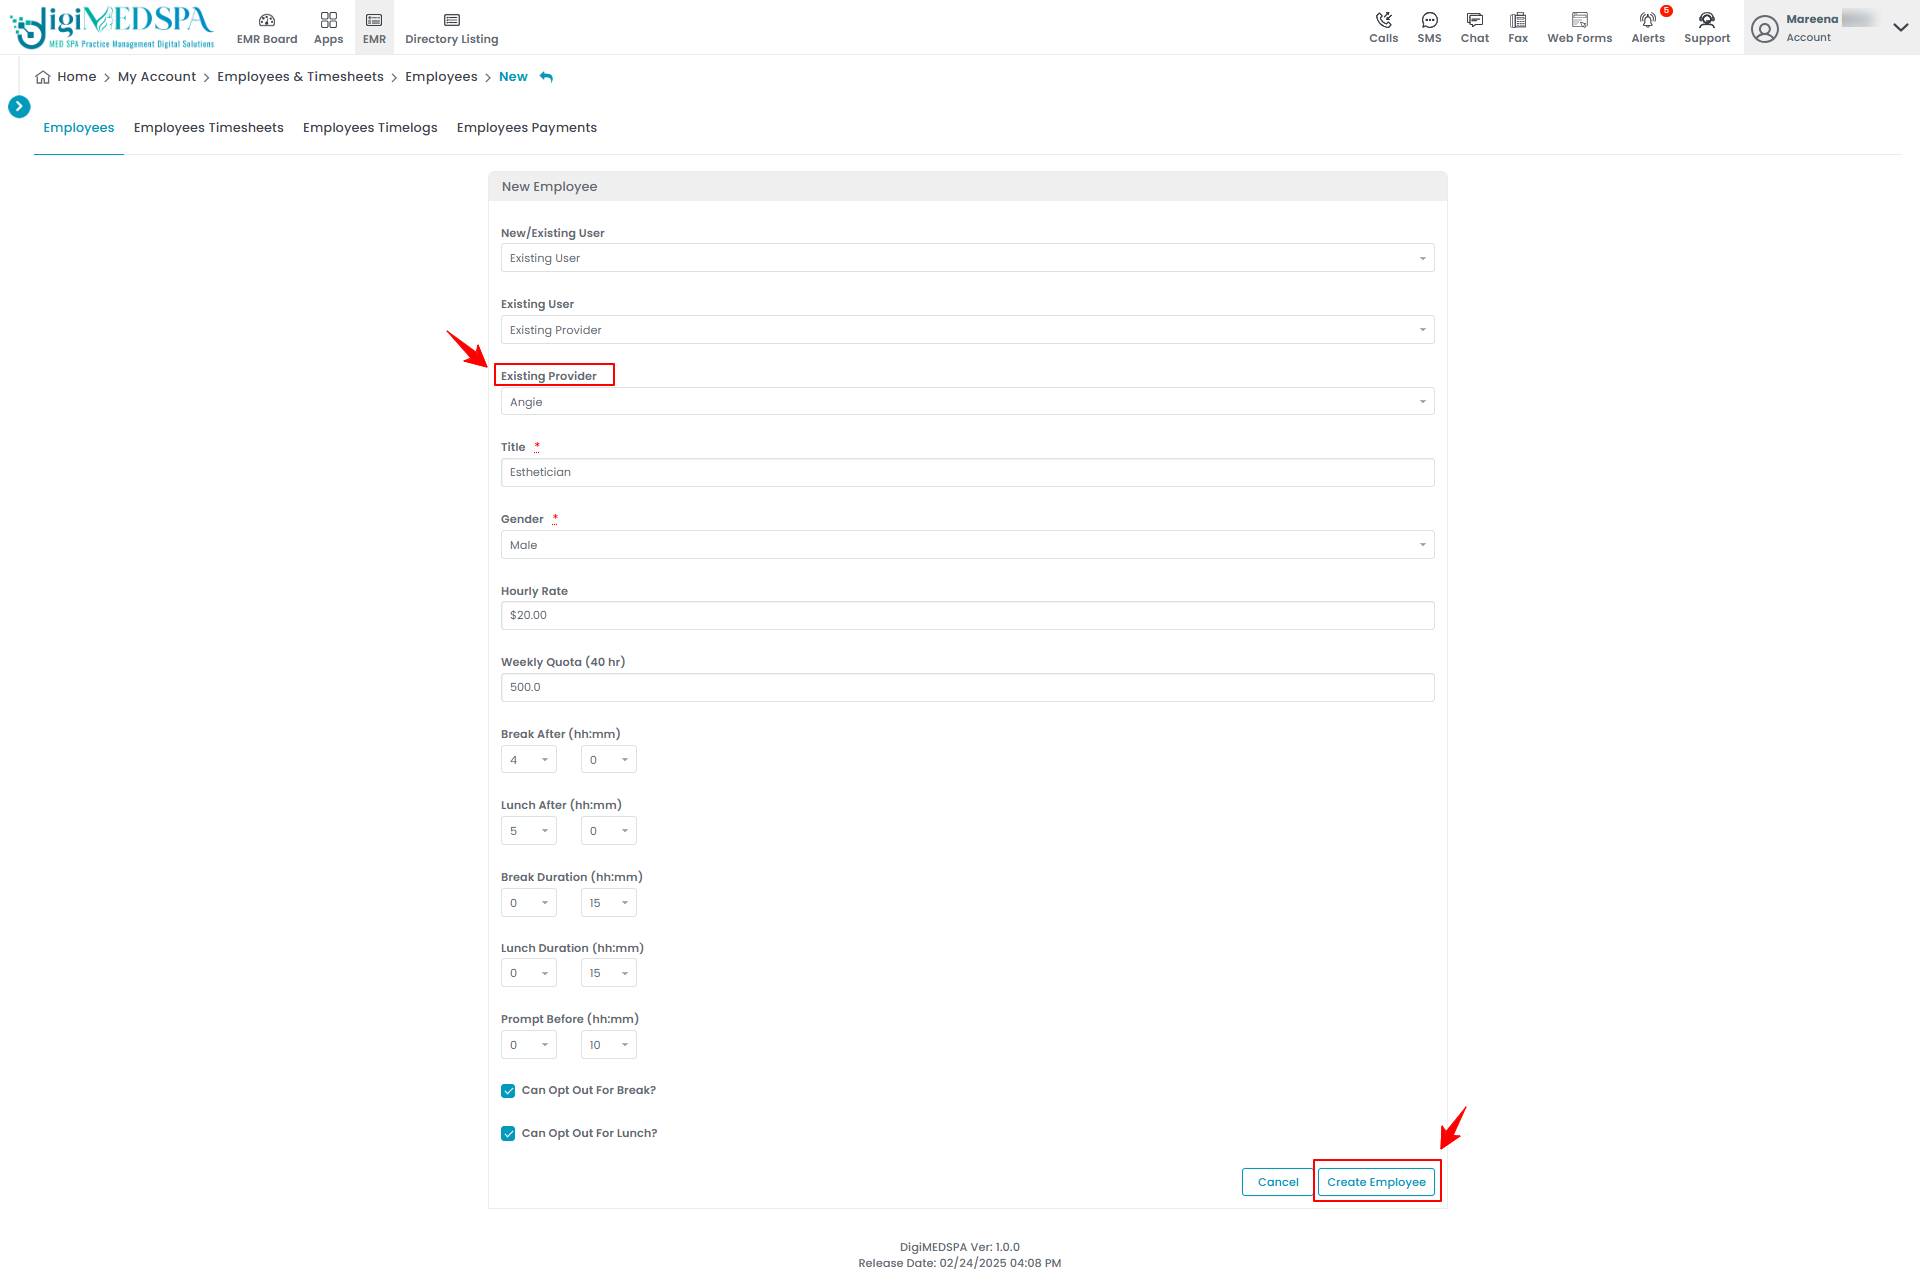
If you select ‘’Existing User," you will see options to add an "Existing User" or "Existing Provider." Choose "Existing User" from the dropdown to add an existing employee.
-
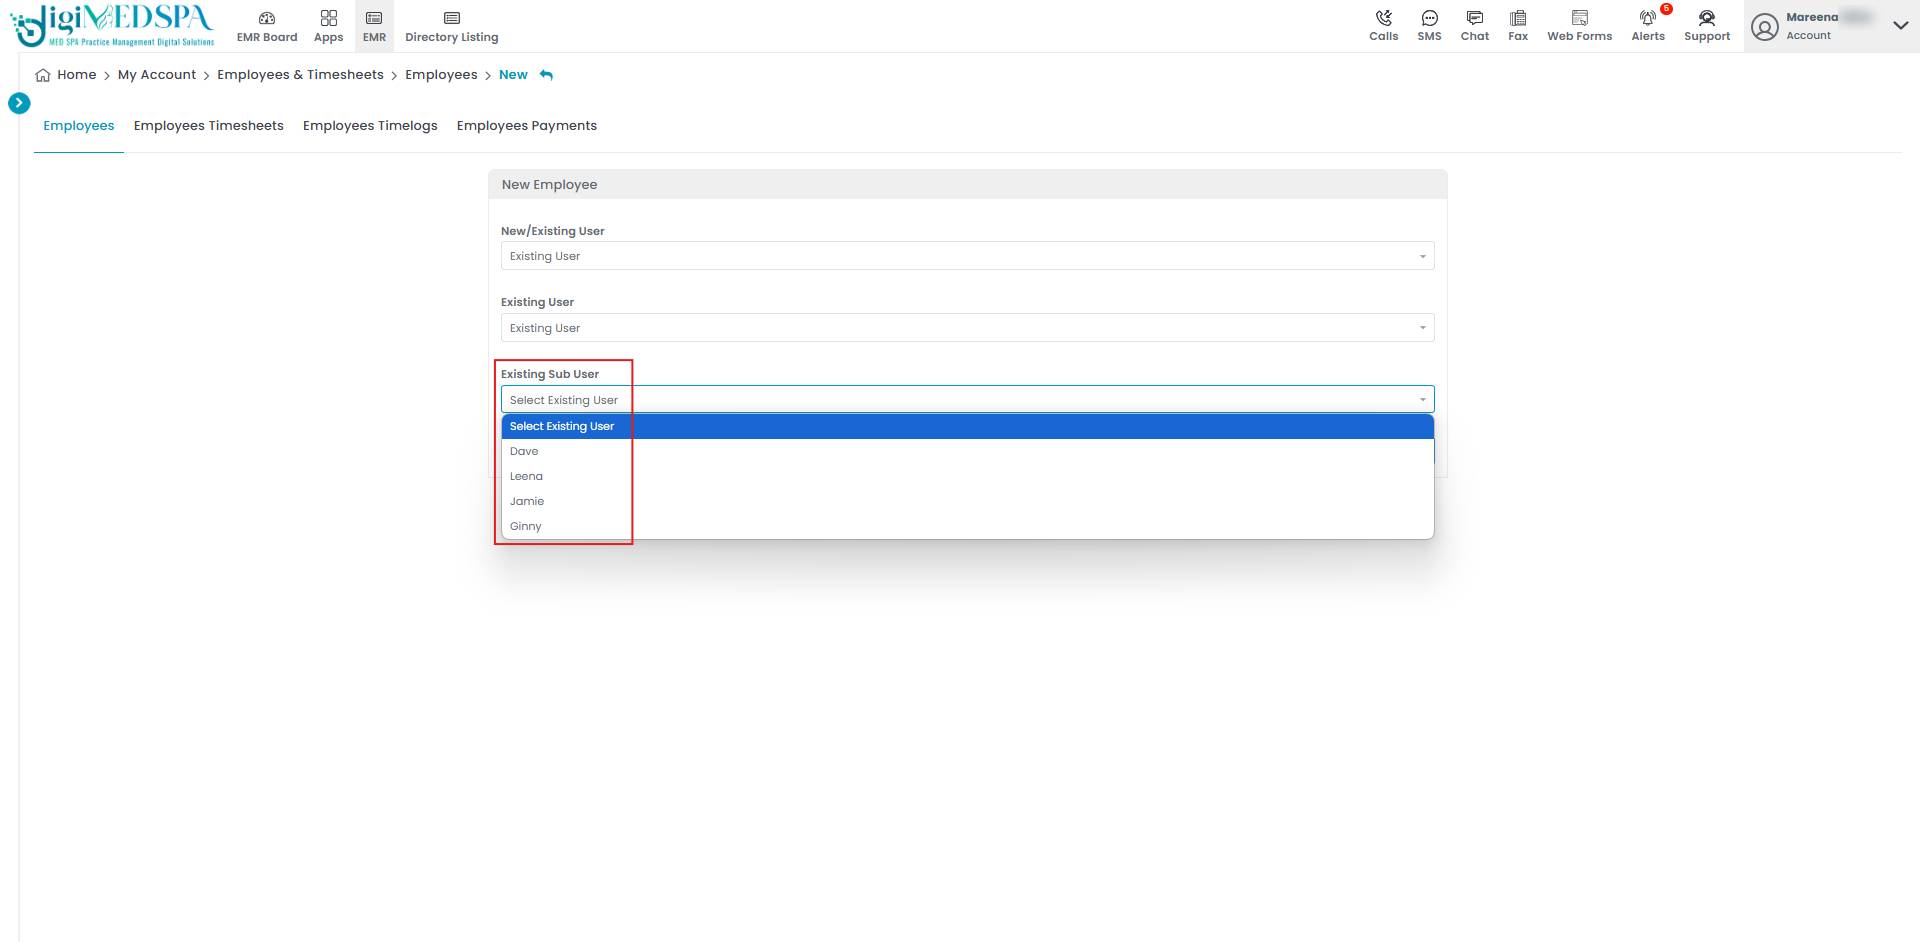
Choose an existing user from the dropdown menu.
-
Choosing an existing user will open new fields, including Title, Gender, Hourly Rate, Weekly Quota, Break After (in minutes), Break Duration (in minutes), Lunch After (in minutes), Lunch Duration (in minutes), and Prompt Before (in minutes). Additionally, you can indicate whether the employee can opt out of breaks and lunches by selecting the options “Can Opt Out for Break” and “Can Opt Out for Lunch.” After entering all the required information, click “Create Employee” to save the new employee profile.
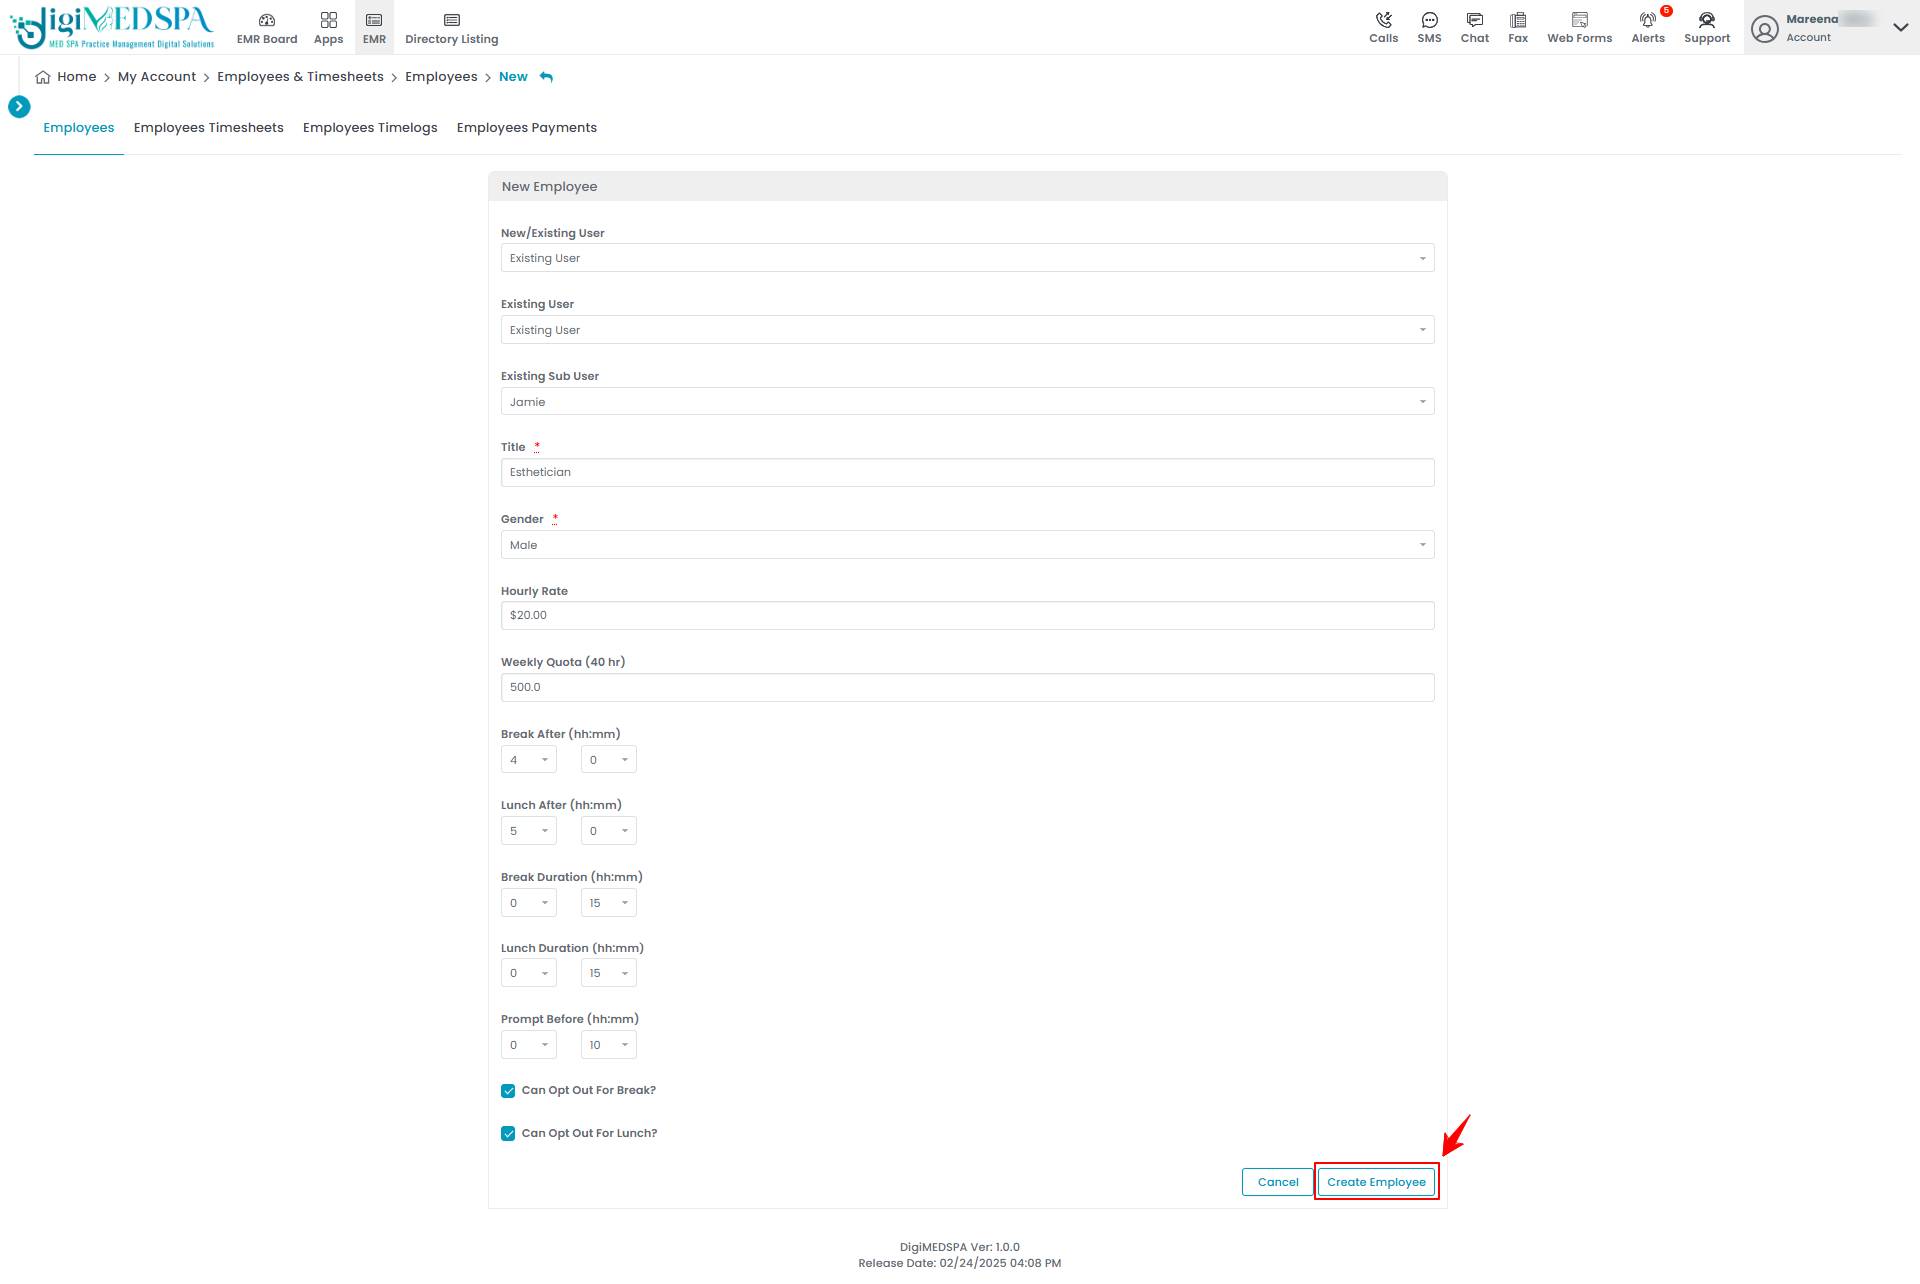 NoteThe ‘’Title’’ is the job position or designation assigned to an employee (e.g., Esthetic Nurse, Laser Technician, Front Desk Coordinator). ‘’Hourly Rate’’ is the amount an employee earns per hour of work. ‘’Weekly Quota’’ is the required or expected number of hours an employee must work in a week. ‘’Break After’’ is the duration (in minutes) after which an employee is eligible for a scheduled break. ‘’Break Duration’’ (in minutes) is the length of the scheduled break. ‘’Lunch After’’ (in minutes) is the duration after which an employee is eligible for a lunch break. ‘’Lunch Duration’’ (in minutes) is the length of the scheduled lunch break. ‘’Prompt Before’’ (in minutes) is a notification or reminder given a certain number of minutes before a scheduled break, lunch, or shift event. ‘’Opt-Out for Break’’ is a setting that allows an employee to waive or decline scheduled break periods. ‘’Opt-Out for Lunch’’ is a setting that allows an employee to waive or decline a scheduled lunch break.New employee has been added successfully!
 -
Clicking on ‘Existing Provider’ will open the same fields as for an existing user. Enter the required information accordingly and click on ‘’Create Employee.’’
 New employee has been added successfully!
Part 4 of 5
Edit an Employee
-
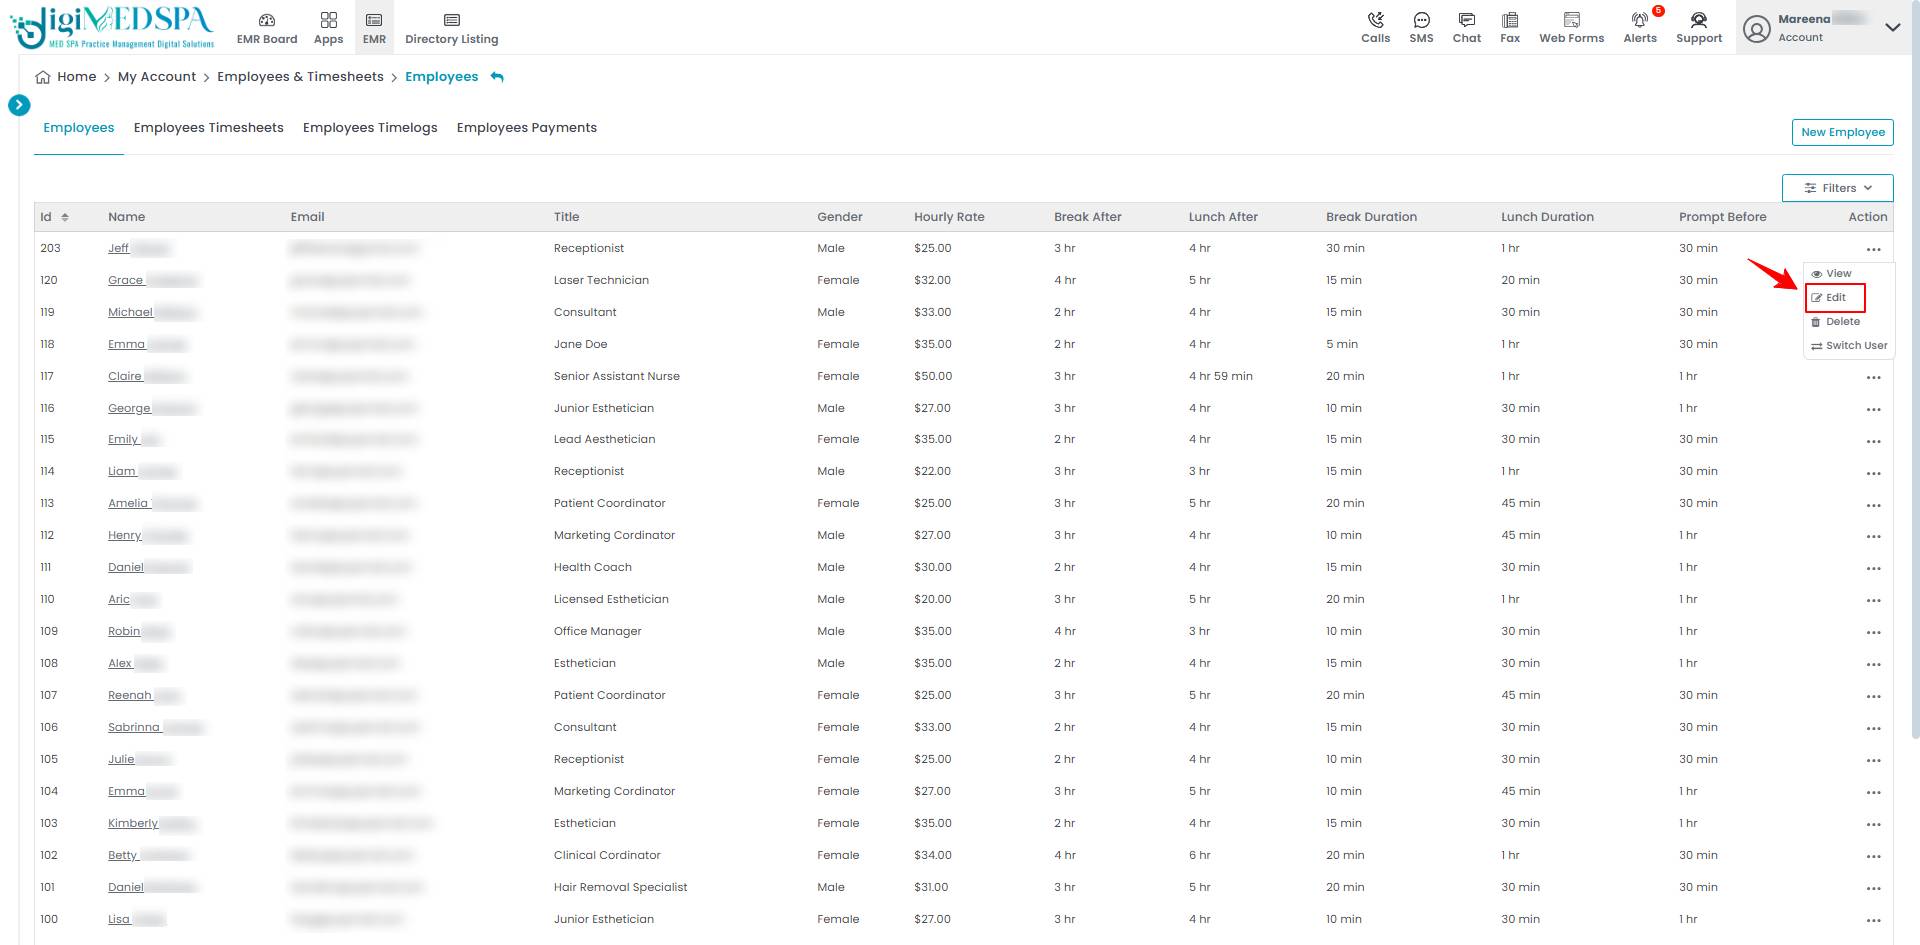
From the employee list, click on three dots under the action column and select "Edit" for the specific employee.
-
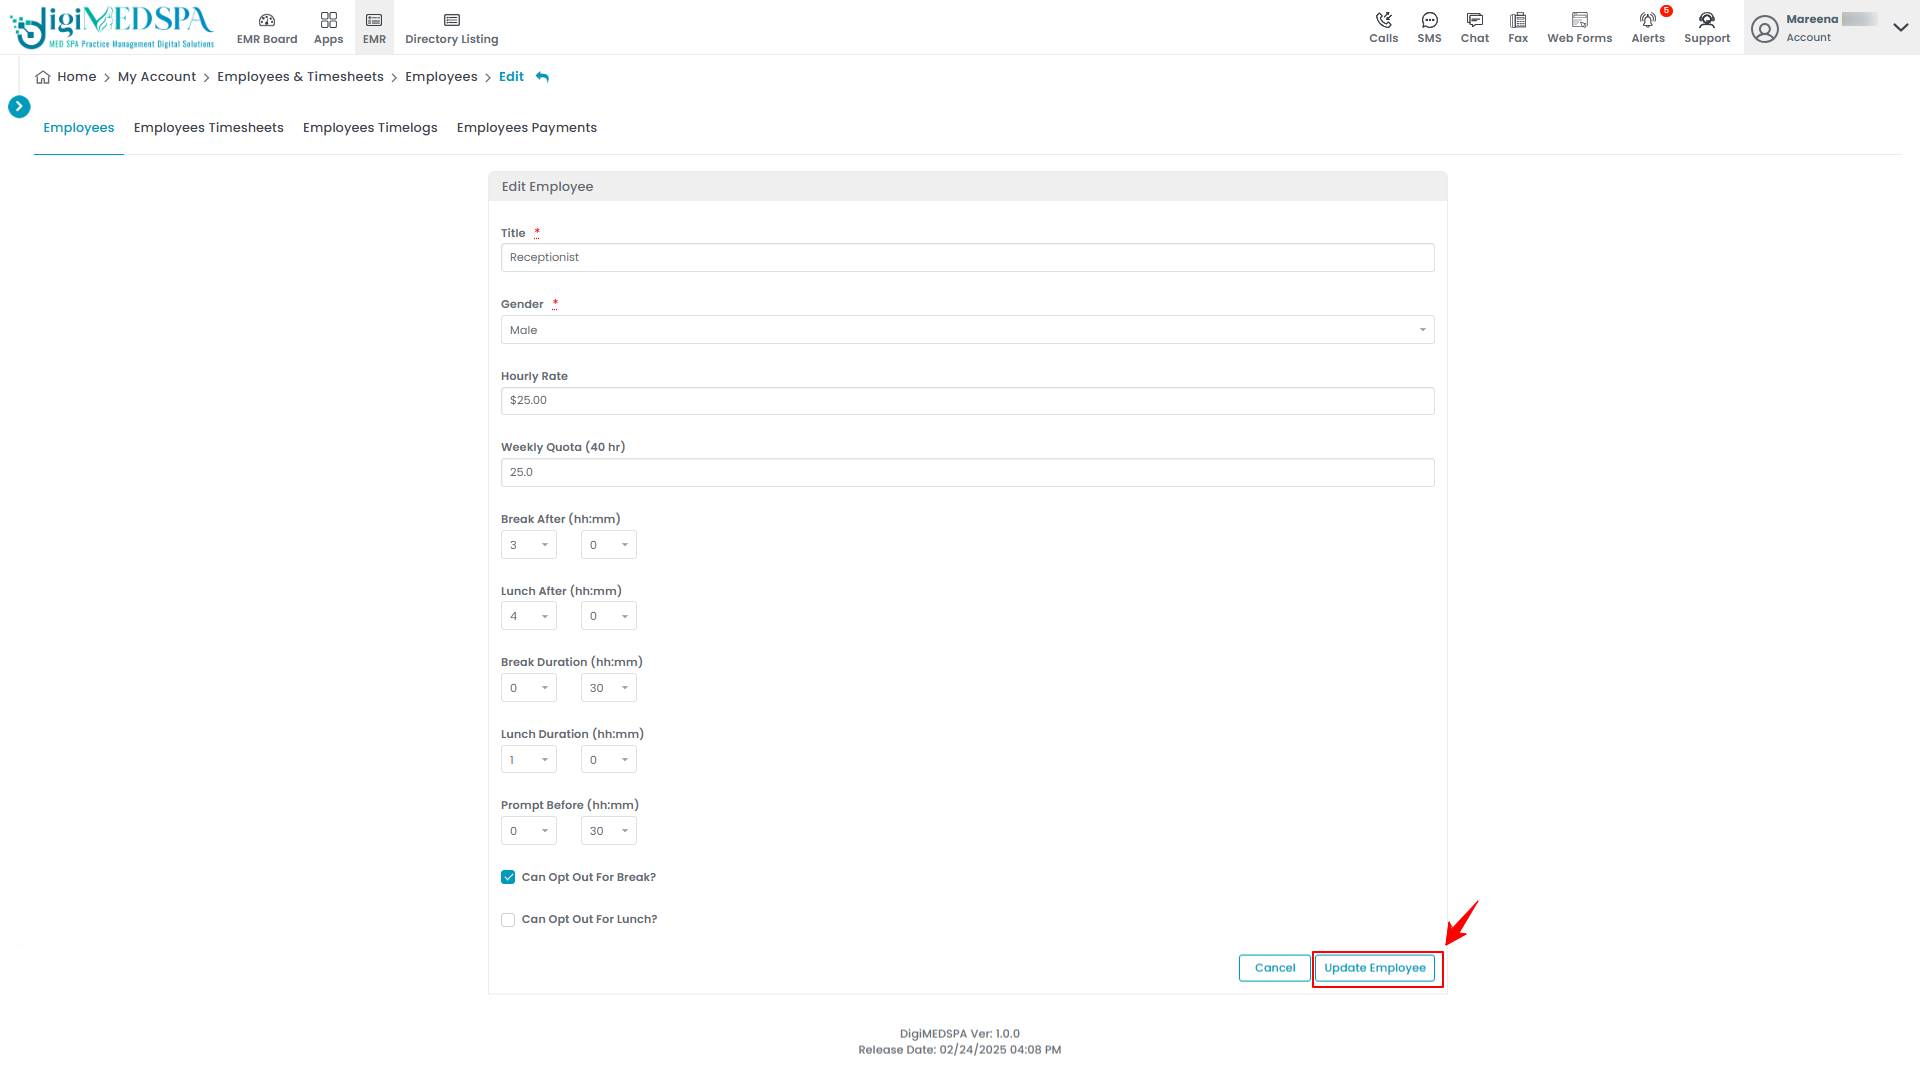
Edit the information you would like to change and click “Update Employee”
 Employee information has been edited successfully!NoteEmployee information can also be edited by clicking the "Edit Employee" button in the top right corner of the View Employee Page.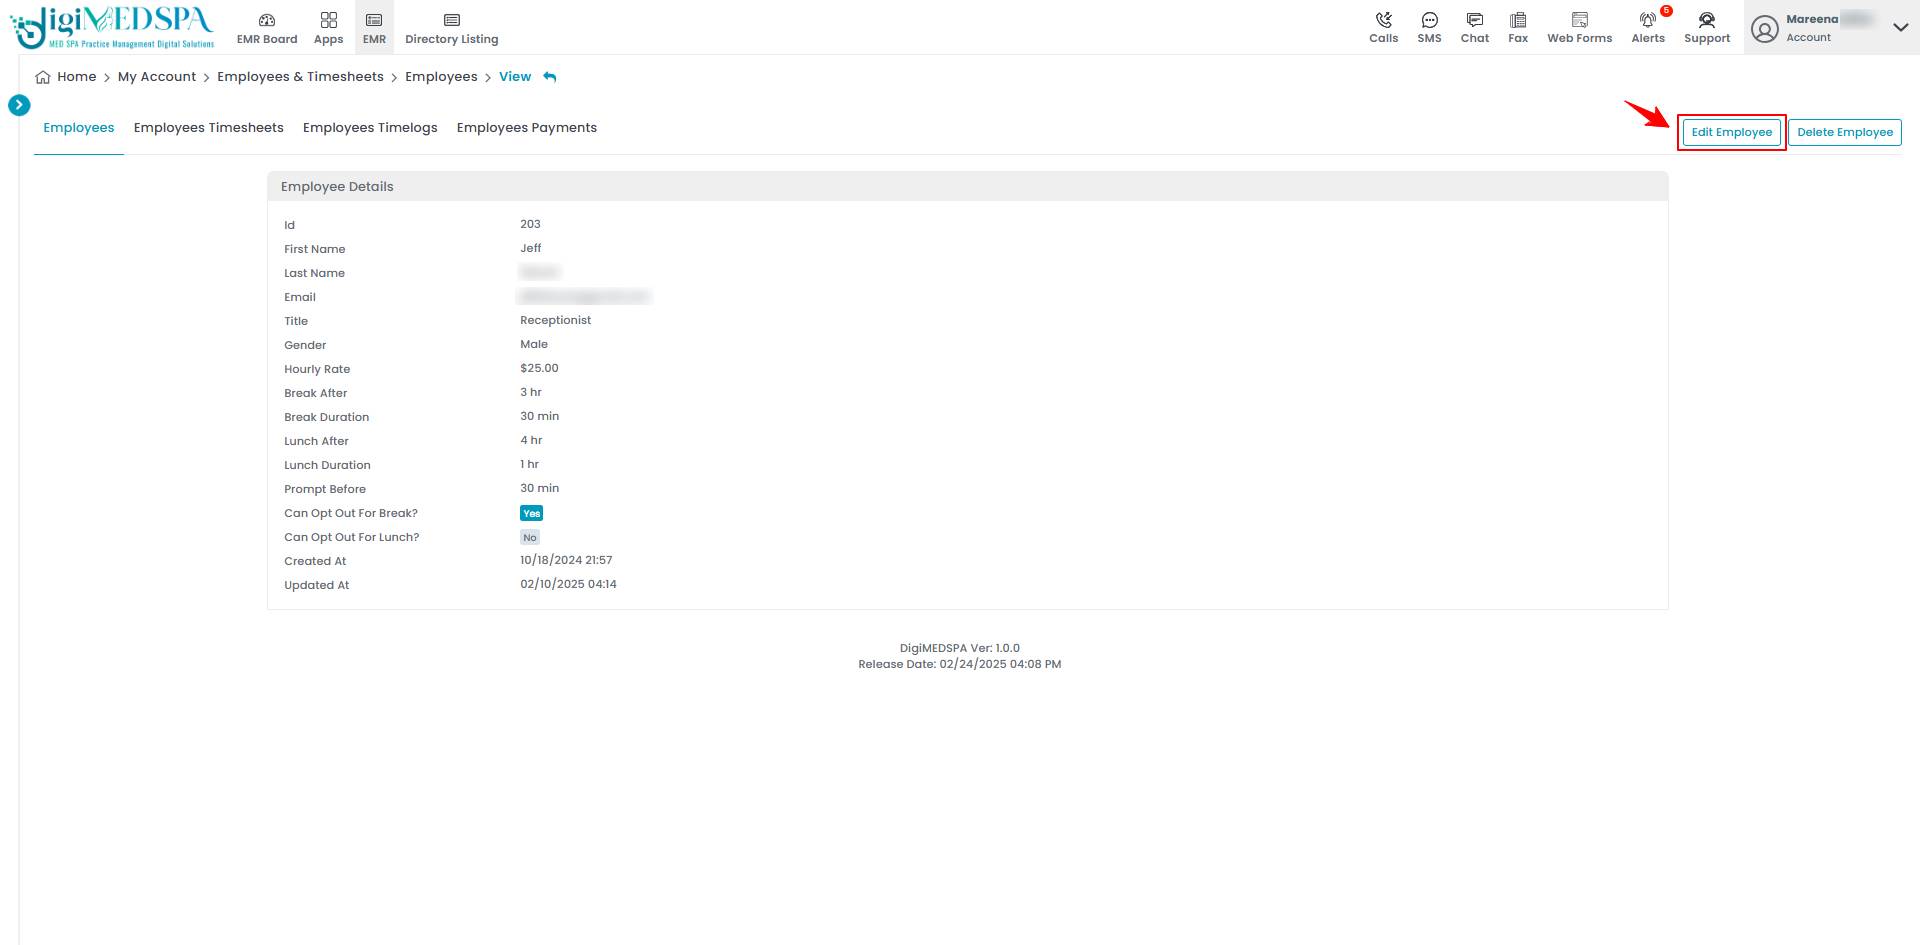
Part 5 of 5
Delete an Employee
-
From the employee list, click on three dots under the action column and select “Delete" for the specific employee.
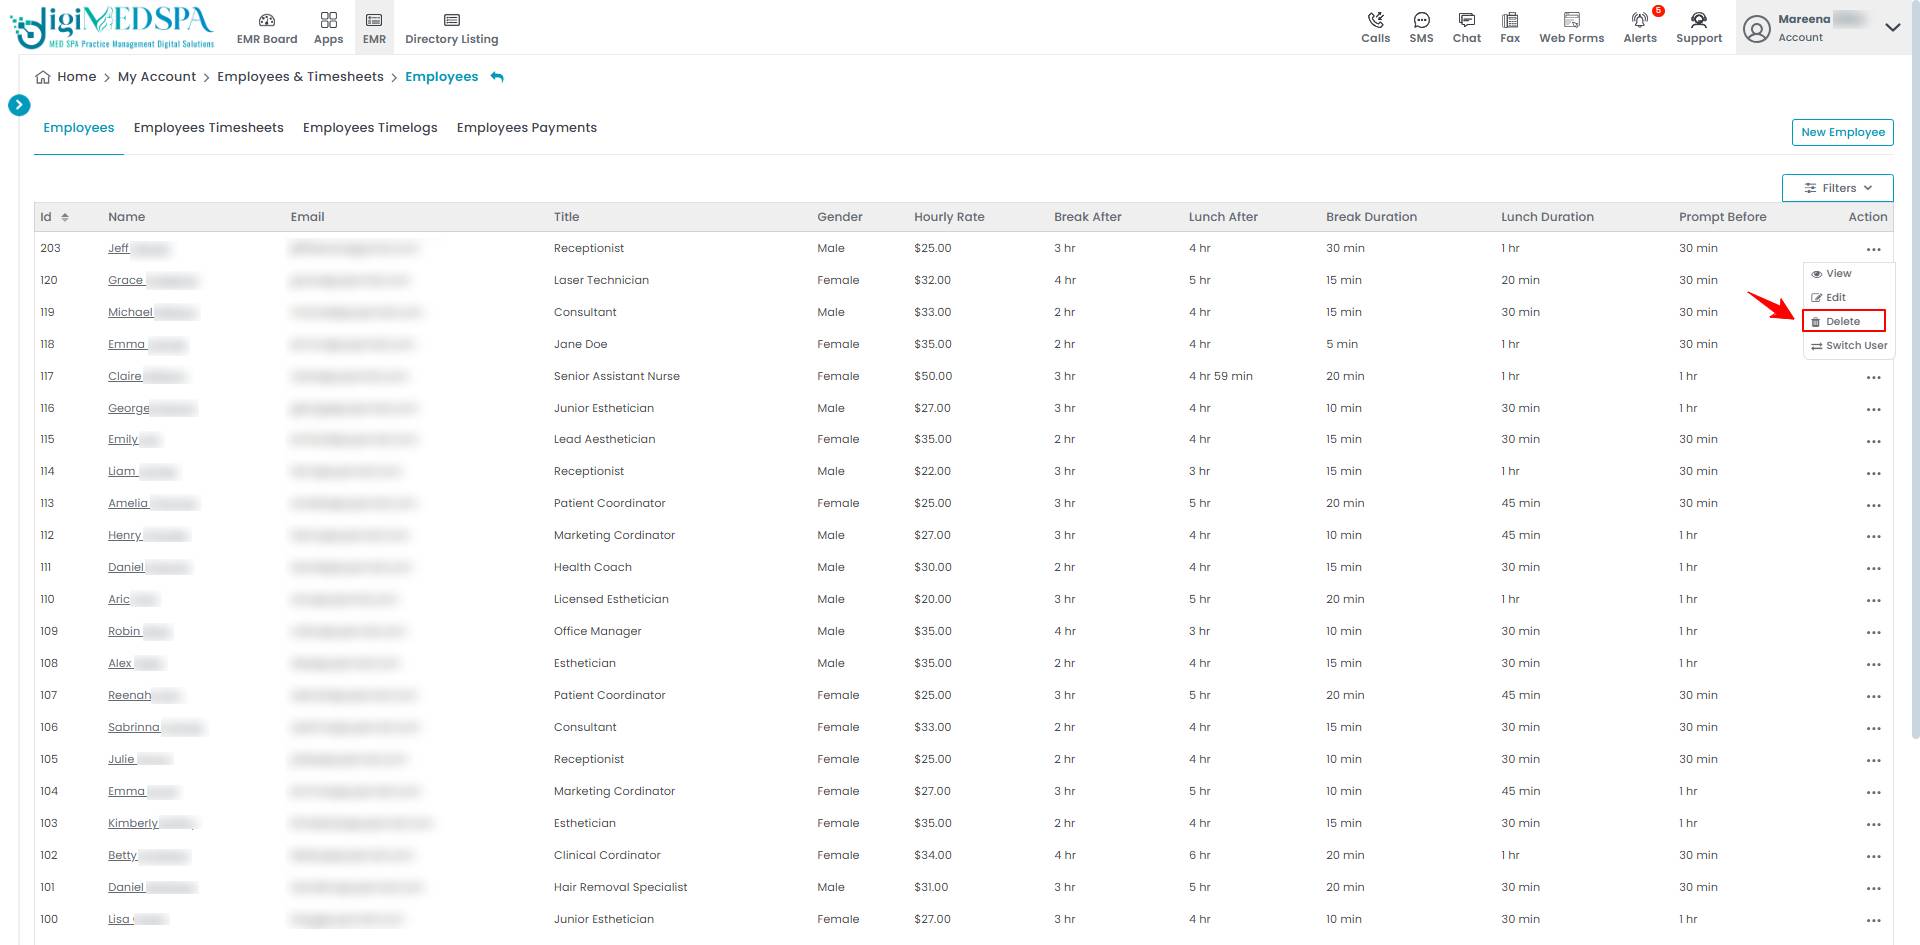 NoteEmployee profile can also be deleted by clicking the "Delete Employee" button in the top right corner of the View Employee Page.
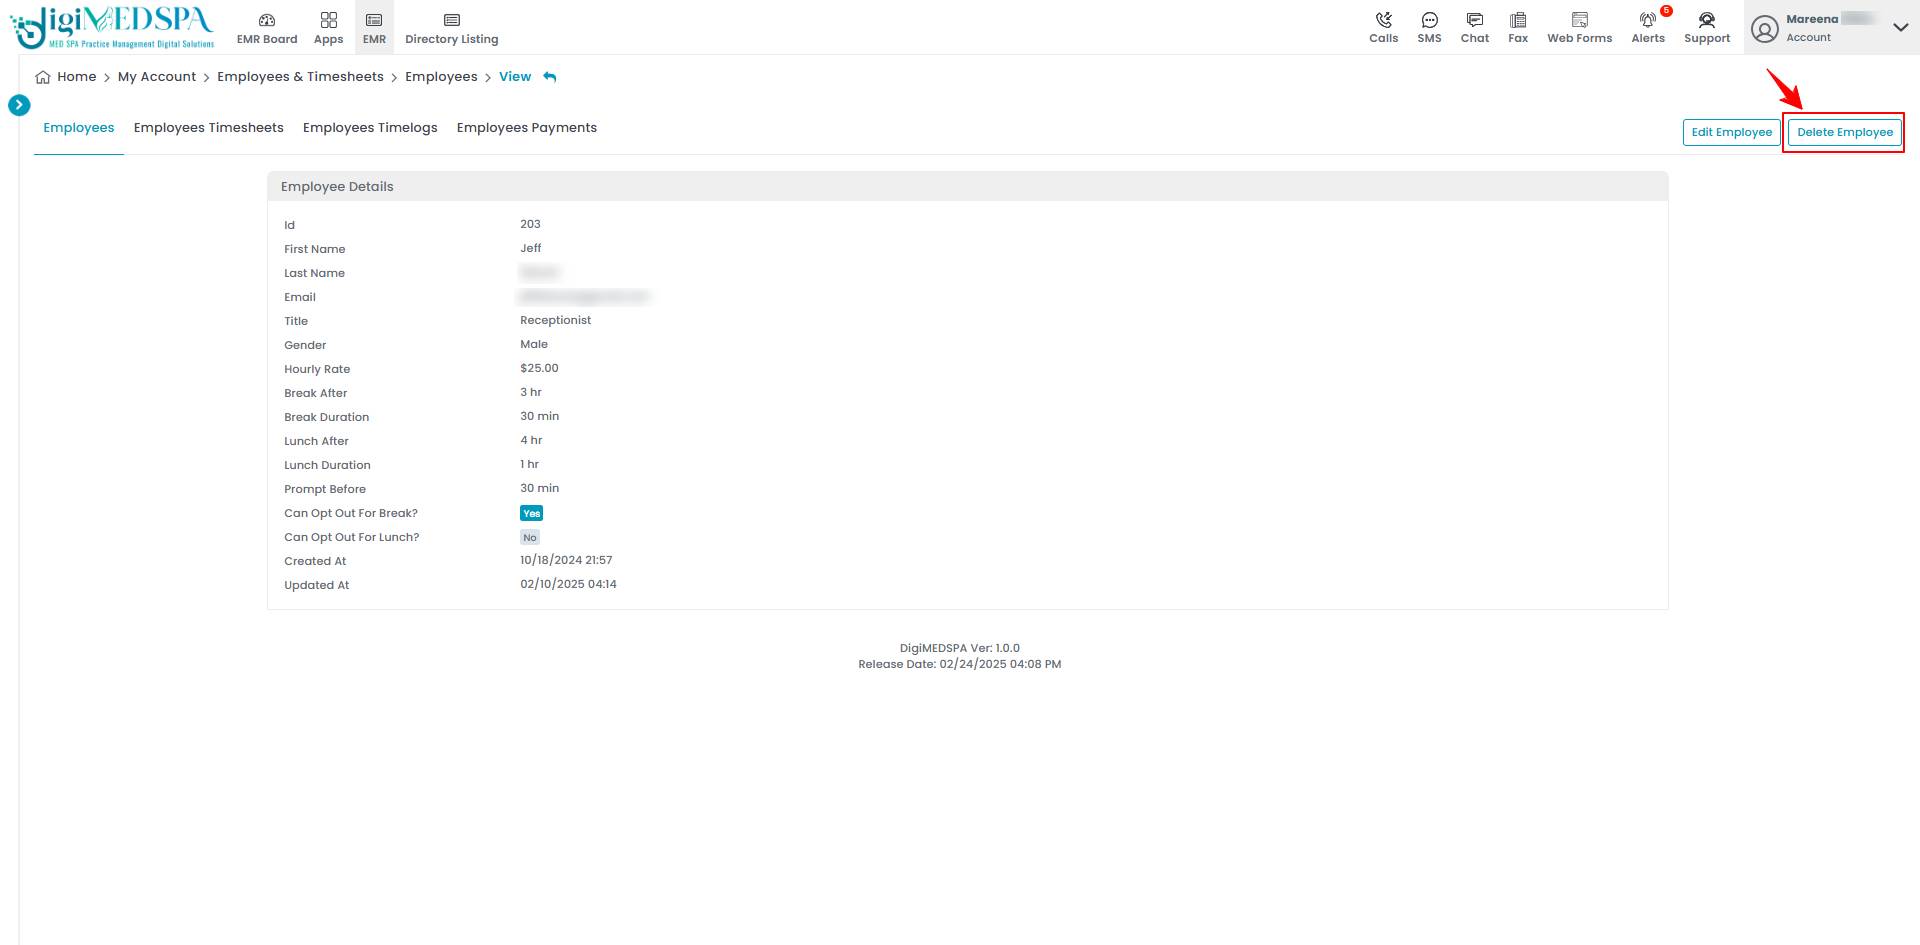 NoteDeleting an employee refers to removing the employee's profile and all associated data from the system. This action typically eliminates the employee's access to the portal and any scheduled activities, ensuring they are no longer part of the active workforce.
You’re all set
That’s every step of “Add / Edit / Delete Employee”. Up next: Add / Edit / Delete Employees Timelog.